I know, you’re probably saying “Huh? What’s a narrow pointed tube?” Well, that’s the best generic term I could think of to describe thin pointy bits on amigurumi, such as spikes, legs, horns and tails.

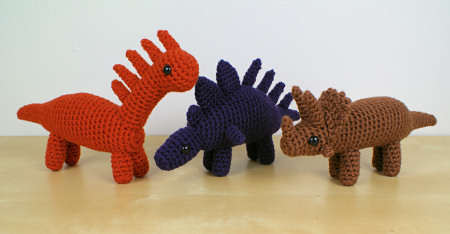
I know that the trickiest parts of my reptile and amphibian patterns (pictured above) are those really thin pieces that make the legs (and chameleon toes and tail). With many of my new dinosaur patterns (see a few examples below) featuring spikes and horns, I thought it was time to give you a demonstration of the way I crochet the tiniest thin tubes without difficulty. I hope you’ll find my tips useful!
Here’s the video tutorial (in right- and left-handed versions, of course):
Narrow Pointed Tubes for Amigurumi (right-handed)
Click to watch this video on YouTube.
Narrow Pointed Tubes for Amigurumi (left-handed)
Click to watch this video on YouTube.
Note: The videos may look a little small embedded in the blog: if so, you can fullscreen them or click through to YouTube to watch them full-sized 🙂
Written Instructions
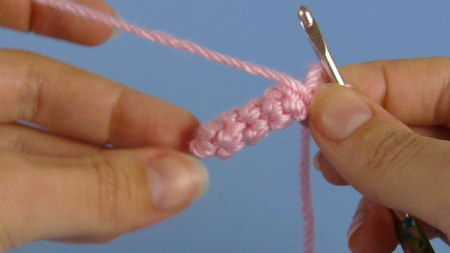
- At the end of Round 1, pull the magic ring gently closed (but not too tight, or it’ll be difficult to begin Round 2).
- At the end of Round 2, pull the magic ring tightly closed, then, before you begin Round 3, turn the piece right-side out. This is a little tricky, and it’s much easier to understand if you watch the video, but, in case you can’t do that, here’s my description from the video:
To turn a narrow piece inside out, gently peel the stitches back, starting from the last stitch you made, and working backwards around the circle. It’s a slow process, so just keep pulling back around the edges gently, and the stitches will gradually reverse, until the magic ring pops through to the front, and you can see all the ‘V’ shapes around the edge of the piece. Once you’ve got it right-side out, roll the piece between your fingers to help set the stitches the right way out.
- Now you can begin Round 3, with the piece right-side out. Continue to crochet around the tube, and you’ll find it’s all relatively easy from here, even with a tiny 4-stitch tube. Just keep rotating the work, and single crocheting into the next stitch.
If you enjoy my crochet tutorial videos, please help to spread the word about them, and/or subscribe to the PlanetJune YouTube channel. And let me know if you have any requests for crochet techniques you’d like me to explain in a future video tutorial!

Loved this tutorial? I have so many more amigurumi tips and tricks to share with you!
Boost your amigurumi skills with my latest book, The Essential Guide to Amigurumi, your comprehensive guide to amigurumi techniques and tips.
Do you find my tutorials helpful? If so, please consider making a contribution towards my time so I can continue to create clear and concise tutorials for you:
Thank you so much for your support! Now click below for loads more crochet video and photo tutorials (and do let me know what else you’d like me to cover in future tutorials…)


Aurélia said
You have such a lovely calming voice! <3
Zedgirl said
Can’t wait to watch the rest of your tutorials, this is the first one I’ve looked at and it’s already helped a lot.
Do you just poke the tail end of the yarn inside or is the piece so tight that it doesn’t matter? I’ve always wondered if the magic circle needs securing when making amigurumi pieces.
June said
My magic ring tutorial will answer those questions for you 🙂
Flavia Bencina said
I just found your site and its been very helpful! I love to crochet amigurumi, and I was having a difficult time making “thin” legs, but your video explained it very well to me. Thanks again!
Patrick said
Hi June, I’m a newbie and trying to create a simple mouse from a kid’s drawing. Straightforward except that the tail is striped in two colours. This video is very helpful for shape. Is there a way to get a clean colour change on such a narrow tube? Thanks in advance for any advice.
June said
Patrick, for the best results in a thin piece like that, I’d recommend the No-Cut Join from my Perfect Stripes for Amigurumi tutorial 🙂
Betty Stewart said
Thank you for also adding the left hand version on your videos!!
Christine said
Thanks for your video tips, they are so helpful!! Love them.
Monica Ballinger said
That is so neat! Very helpful video! This is actually how I make tubes and didn’t know if I was “correct” in doing so, I’m glad to see you recommend this as well! 😀 I feel so much better knowing you make them this way! Thanks June!!!