Lip Balm Holder crochet pattern
© June Gilbank 2011
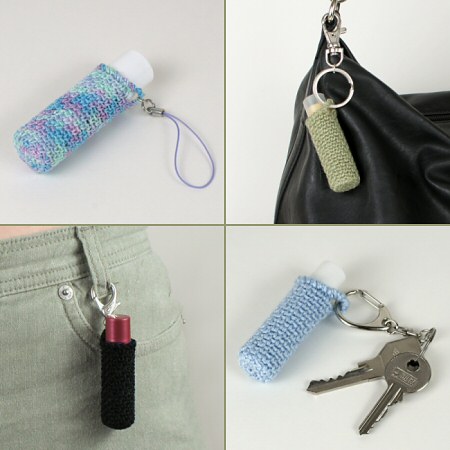
Never lose your lip balm again (or have it melt in your pocket) with this stylish holder! Clip it to your keyring, to your bag, or even to your belt loop and you’ll always have lip balm at hand when you need it. Quick and easy to crochet, just pop a lip balm inside and you have a perfect little gift!
Lip Balm Holder is part of the PlanetJune Accessories range of crochet patterns by June Gilbank.
This pattern is Donationware – the pattern is available for free, but if you like it please consider sending me a donation to show your appreciation:

Send me a donation and receive the easy-to-print PDF version of the pattern as a thank you! It includes some additional info that you’ll only find in the PDF version:
– A modification to make the holder slightly wider
– A simpler edging option
– Tips for attaching the various types of hardware that you see in my photos
Donations of any size are much appreciated. Just add the amount you wish to donate, and, once you have checked out and paid, your pattern will instantly be available to download from your PlanetJune account.
The complete pattern and instructions are available below, regardless of whether or not you choose to pay for them 🙂
This is a PlanetJune original crochet pattern. Feel free to use items made from this pattern however you wish, but I’d appreciate credit as the pattern designer. Please do not reproduce the pattern anywhere else; instead post a link to www.planetjune.com/lipbalmholder
Not ready to make it yet? Add it to your Ravelry queue:
Terminology
| ch | chain |
| ch-sp | chain space |
| rsc | reverse single crochet (reverse double crochet for UK/Aus) – aka crab stitch |
| sc | single crochet (double crochet for UK/Aus) |
| sl st | slip stitch |
| st | stitch |
You will need…
- B US/2.25mm crochet hook (or size needed to create a good fit, see Gauge, below)
- Small quantity of size 5 crochet thread (or substitute size 8 or 10 thread, or a super fine/fingering weight yarn)
- Needle to weave in ends (as small as possible, but large enough to fit your thread/yarn through the eye – an embroidery needle is a good choice)
- Optional: metal key chain or jewellery findings (as desired)
Samples
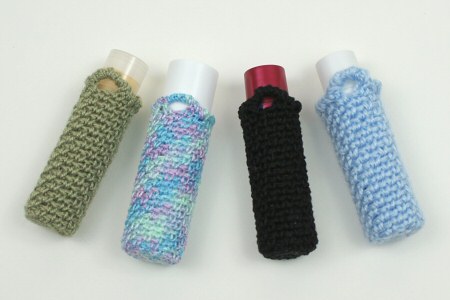
L-R: size 5 crochet thread, size 8 pearl cotton, size 10 crochet thread, fingering weight yarn (Bernat Baby).
Gauge
Although exact gauge isn’t critical for this pattern, the holder does need to fit snugly around a lip balm tube. It will depend on the exact yarn you use as well as how tightly you crochet. To test your gauge, crochet the first 6 or 7 rounds, then try fitting the base of your tube inside. It should be a fairly tight fit:
- If the holder is too loose to grip the tube: reduce your hook by 1 size and/or use a thinner yarn/thread.
- If the holder is too narrow to fit over the base: increase your hook by 1 size and/or use a thicker yarn/thread.
Note
Do not join at the end of each round; rounds are worked in continuous spirals.
Special stitches
Reverse single crochet (rsc). This technique creates a twisted cord edging and a neat finish.
Insert hook into previous stitch, yarn over and draw up a loop, yarn over and draw through both loops on hook.(1 rsc completed)
See also my rsc video tutorial (including right- and left-handed versions).
Pattern
Make a magic ring, ch 1.
Rnd 1: 6 sc in magic ring. (6 st)
Rnd 2: 2 sc in each st around. (12 st)
Rnd 3: (2 sc in next st, sc in next st) six times. (18 st)
Rnd 4: ch 1, (sc in next st, ch 1, skip next st) nine times.
Make sure the magic ring is pulled completely closed. Thread the starting yarn tail onto a needle and weave it through a few stitches around the base of the circle (Figure 1); you don’t need to be neat, as the inside of the holder won’t be seen, but make sure you weave the end through enough stitches that it’s secure. Snip off the remaining tail close to the stitches.
You don’t need to count rounds or mark the start of each round from this point, just continue to crochet the following stitch pattern:
Rnd 5: (sc in next ch-sp, ch 1, skip next st) around.
Note: Each round is automatically offset by one stitch so the pattern can continue seamlessly as you spiral around.
Complete 2 or 3 rounds of this stitch pattern, then test the lip balm holder for size (Figure 2). See Gauge, above, and follow the instructions to correct if it is too wide or narrow.
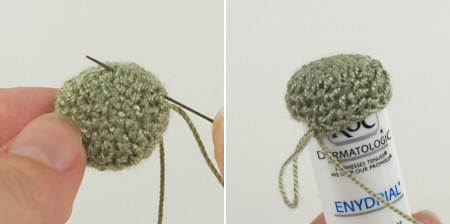
L: Figure 1 (weaving in the starting tail on the inside of the base)
R: Figure 2 (testing the width of the lip balm holder to make sure the lip balm will fit snugly inside)
Continue to work in the same stitch pattern, working in a continuous spiral, until the lip balm holder is long enough (approx 19 rounds of the stitch pattern). Test the length by sliding a lip balm tube inside the holder, then remove it to continue. Stop crocheting when the holder reaches the join between the lip balm base and cap, ending with a sc in next ch-sp.
Do not fasten off…
Note: It’s very easy to make a shorter or longer hanging loop if you’d prefer. In Rnd 6, below, instead of the ch 5 to create the loop, chain as many stitches as you’d like. When you work the rsc edging, work the same number of rsc stitches into the ch-sp as the number of chain stitches you worked, or as many as you need to work all the way around the loop.
Rnd 6: ch 5, sc in next ch-sp (Figure 3), ch 1, sl st in next ch-sp, ch 1, rsc in previous ch-sp. Working backwards around the edge, rsc in previous sc, 5 rsc in ch5-sp (Figure 4), rsc in each sc and each ch-sp around. In final stitch, still working backwards, insert yarn back into same stitch and complete a sl st. Fasten off, leaving a long yarn end.
Thread the yarn end onto a needle, and weave it in around the top of the lip balm holder, passing the needle under each rsc (Figure 5). Snip off the remaining yarn end.
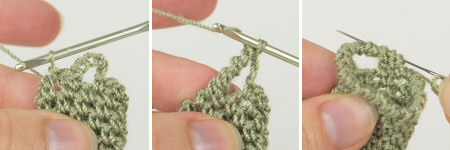
L-R: Figure 3, Figure 4, Figure 5
How to Use it
You can attach all sorts of clasps to your lip balm holder for different uses.
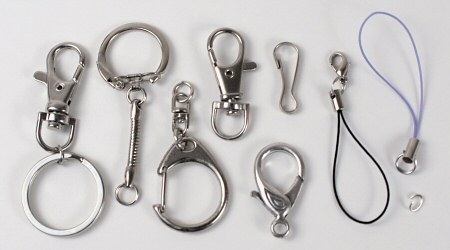
A wide selection of hardware including key chains, lobster claw clasps, clips and straps is available from general craft stores or bead stores.
For example, you can attach it to your belt loop, to your key chain, or to your purse strap, as shown in my examples:

I hope you enjoy this pattern. Please leave me a comment below if you do, and consider leaving me a donation. Thanks!


Meg said
I have made so many of these, I probably owe June another donation! For the last 4 years, I’ve made over 6 dozen as Christmas gifts for my spouse’s students all high school seniors (and all girls). The girls love them — and even mention them in emails sent back from college the next year.
The pattern is very easy and very well explained. This is definitely beginner level & yet looks elegant with the “crab stitch” trim.
Thanks again, June, for this great little gift.
Alissa Chronister said
June I have been a crocheter for almost 3 years now I taught myself and I am really glad to find your patterns for the crocheting. I am constantly losing my lip balm and this is going to help out a lot so thank you for taking the time to post the pattern because most people make you pay for the pattern first instead of letting you try it out first to see if you like it so thank you for your patterns
Alissa
Chellie said
You’re the best June ! I love your site. I literally look to you for the first source of items I wish to make ! Your instructions are so well defined and easy to understand and follow ! I can’t thank you enough ! 🙂
Lori said
Hi June, I consider myself still new to crocheting, even though I’ve learned the basic stitches. There are two phrases in this pattern I haven’t come across yet, that don’t make sense to me, and I was wondering if you could explain them or make a short video to show them. The first one is “chain space” (ch-sp); The second is “skip a chain”. I would greatly appreciate it. Thank you SO much for your great patterns and video tutorials; I can’t wait to try my hand at amigarumi too!
June said
I can help with that, Lori!
Linda said
Hi June,
Just found you a few days ago and have been taking a tour….wow, what a lovely place to spend time. You have some fabulous ideas, thank you so much for sharing. I cannot wait to tour some more and then hopefully do some crochet work again.
This idea for the chapstick is fab, my daughter is loosing hers all the time so this will really be a great idea for her. If I get time to do it I will let you know. Many thanks and keep up the good work.
Best wishes Linda x
Lidia said
que hermosos me gustaron son muy lindos ^.^ me voy animar hacer uno ?
Anna said
YES! Just in time. I just found my favorite chapstick behind the couch and the outer cover of the bottom (where it turns) is broken off! The chapstick is untouched and completely useable, and it still turns and everything, but I can’t carry it in my pocket for fear the now loose-fitting top will come off and I’ll end up with it melted all in my pocket. Thank you so much!
clara tebeau said
bummer you are the best teachin the how to’s… but thanks for the smile 🙂 , also thank you for what you post about be yourlsef and encourage others to follow our dreams and put our special touch in what we do, it lift my spirit, thanks again
clara tebeau said
June you are so silly, i underestand that, the thing is with the p5tog i am new in this and am trying to find a logical explanation i think is you purl 5 stchs together then k1p1 etc i read some instructions in the internet and confused me even more since you are very practical and clear in your instructions i thought yours will make more sense than mine, thanks Clara
June said
Oops! I assumed you were asking me because you thought it was bizarre crochet terminology. I’m not a knitter, so really not the best person to ask about knitting questions…
DOULOS said
June hi, i have a question i got this pattern ad it is like chniesse to me can not understand a word can you please help k2 *p5tog, (k1,p1,k1,p1,k1)al into next stich, repeat from * to last 2 stch, k2 thank you before hands,have a blessed ad creative week, Clara
June said
Hi Clara, that’s not Chinese, but it is a knitting pattern! k is knit, p is purl 🙂
Cindy Renckly said
Your patterns are wonderful. And you are so gracious in showing us how to do so many crochet stitches. I would like to make a donation for a few of your free patterns but do not want to use PayPal. Is there another way?
June said
I’m afraid not, Cindy – I currently live in South Africa, and the fees to deposit a cheque and convert it into local currency make it impossible for me to accept any form of payment other than PayPal. The only option I can think of is that you could send me an amazon.co.uk (not .com!) gift certificate for the amount converted from USD into GBP. If you’d like to do that, please email me and we can sort out the details.
Monica said
Amazing! You have done it again June! Simple Brilliance! I can’t wait to get the PDF, but even your instructions here as so easy to follow! This will make a Great Gift for Christmas! I’ve only made one so far but I plan on making more! Thanks so much June!