This is the first post I’ve written using my new BlackBerry (although the photos were taken back in Canada a few weeks ago)! I hope this works, as I won’t have internet access for my laptop until our furniture arrives in a couple of months and we can move out of this temporary accommodation. Here goes…
Cutting Down (aka downsizing my wardrobe)
As part of our move preparations, I sorted through all my clothes and donated any that didn’t fit or suit me any more. We gave away over 8 garbage bags full of clothing (mostly mine) and I reduced my wardrobe by about half! In case this makes me sound like a clothes junkie, I should probably clarify that most of these clothes had UK labels, which makes them at least 8 years old(!) – I really don’t like to get rid of anything that I may find a use for some day…
I do feel the occasional twinge of regret about all the stuff I’ve donated, but, on the whole, it’s liberating to have reduced my wardrobe by so much. If you have the time, I recommend you refresh your wardrobe too. This is how I did it:
How to refresh your wardrobe
- Try on every single item of clothing you own
- Look at yourself in a mirror (full-length if possible) and pretend you’re in a shop fitting room
- Ask yourself ‘Would I pay to buy this right now?’
If the answer is ‘no’, it’s time to repair/refashion/donate/toss it, and reclaim some space in your closet!
Cutting Up (aka mending and refashioning)
My plan was to pack only wearable clothes for the move, so I donated the larger ‘project’ items (like sweaters I’d had vague plans to felt and make into something at some point – i.e. I’d probably never actually do anything with), and concentrated on the simpler alterations I needed to bring everything else into wearable condition:
Exhibit A: Mending. New buttons attached, belt loop stitched back on, strap stitched back down. Quick and easy when you actually sit down and do it, and now I’ve rescued 3 pairs of pants and a top from the mending pile.
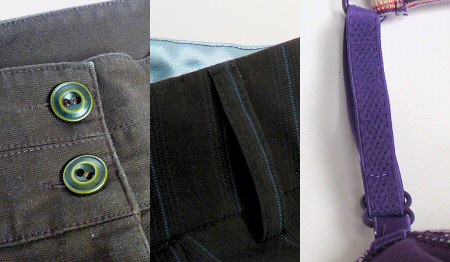
Mending: new buttons, fixed belt loop, fixed strap
Exhibit B: Extra-long pants. Oh look! I’ve been Americanised! I used to say ‘trousers’ – I wonder when that changed… It’s ridiculously easy to take up pants neatly, although I can never remember how to do it. Luckily, I wrote a really good tutorial for it in 2007 – it saves me from having to figure the method out each time! How embarrassing that I had 2 pairs I’ve never worn because they’ve been sitting, with the tags still attached, waiting for me to take up the excess length. 2 brand-new pairs of pants to add to my wardrobe – very nice.
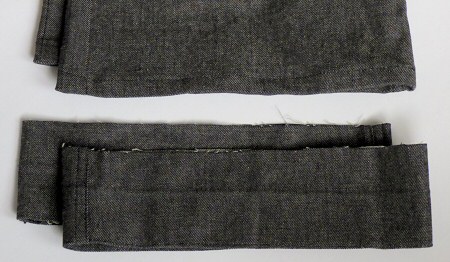
Shortening: I cut 3″ off the bottom of these pants and re-hemmed them
Exhibit C: Too-short pants. As I’m 5’2″, I’ve made the mistake of buying “short” length trousers in the past, and worn them for far too long before I realised they were that awkward ankle length. I’ve donated almost all of these faux pas pairs, but I have these linen-mix jeans that I really love (apart from the length). What to do with them? I’ve seen tutorials for adding a decorative ribbon or strip of fabric at the bottom, but that’s really not a look I’d like to wear. So, I used my handy taking up trousers tutorial again, and converted them into capris! Same method, different result.
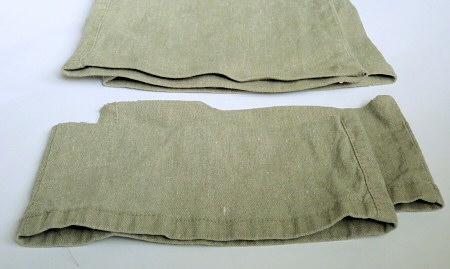
New capris: cropped pants from embarrassing ankle-length jeans
Exhibit D: Too-long skirt. I’m not going to subject you to a ‘before’ photo – let’s just say that this ankle-length skirt, circa early 90s, was not at all flattering on my short pear-shaped frame. But it fits nicely, I like the print, and you’d never guess how old it is (apart from the dated style). It’s a stretch fabric – always a challenge to work with – but I got brave with my scissors and cut it off at knee length, zig-zag stitched around the raw edge to stop it from fraying (I don’t have a serger), then turned up the bottom edge and stitched a new hem. I only folded the hem over once in this case to reduce bulk and weight. I skeptically tried the straight stretch stitch on my sewing machine for the first time – it really works! I now have a really cute knee-length skirt, and, added bonus, I have a sizeable piece of leftover fabric (which I packed with my fabric stash).
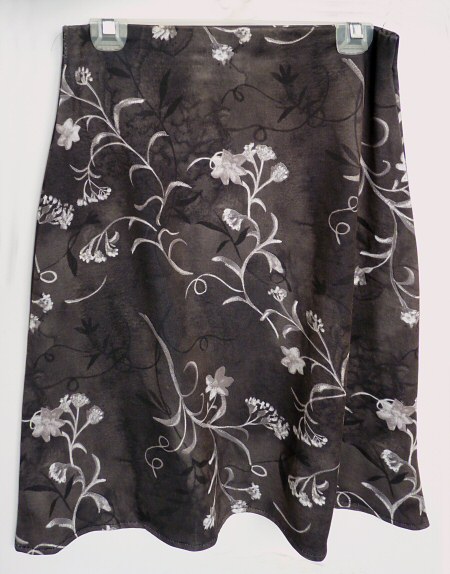
Swishy knee-length skirt from ankle-length horror (it was too cold to model it for you but, trust me, it looks good)
That’s the last I’ll see of my trusty sewing machine for a couple of months; it’s packed in our shipping container and (I hope) on its way to us! My efforts rescued 8 items of clothing – not bad for a couple of hours’ work. I’m particularly happy with Exhibits C and D: my new capri pants and knee-length skirt will be perfect for the warmer climate here in South Africa!
Mend, refashion, donate and/or toss – wouldn’t your wardrobe benefit from a little spring cleaning too?


val said
wonderful revisions, I bet that skirt is precious on!
Heather said
How great it must feel to check that off your list! Ha! I love the result of mending and refashioning. There is no cost, yet you feel as if you just went shopping and bought new clothes! I’m also 5′ 2″ and have the worst time trying to buy pants to fit my short legs! I will be checking out your tutorial. Thanks for posting. I am inspired!!
June said
Yay, that’s great to hear!
Rachel said
I agree about how much easier it is when you get rid of everything you don’t use any way, and fix everything that needs it.
Lindy said
Brilliant! Love your skirt and capri trousers. And yes, my wardrobe could do with following your advice! Thanks!