As always, I was not compensated for this review, and the following is based on my honest opinions!
I’ve known Abby through craft blogging circles for years – you may also know her from her blog, While She Naps – and I’ve been eagerly anticipating this book since the day she first announced she’d be writing it! Abby and I are kindred spirits in the sense that we’re both passionate about the techniques used to create our stuffed animal designs – in my case amigurumi, and in hers sewn toys.
You’ve probably already heard good things about this book (with everything going on here, it’s taken me far longer than I’d anticipated to prepare this review) but I don’t think you could test a book much more thoroughly than I have! And (spoiler alert) I’m so excited to show you the results of my testing process! Read on to see what I’ve been able to make, thanks to Stuffed Animals…
Overview
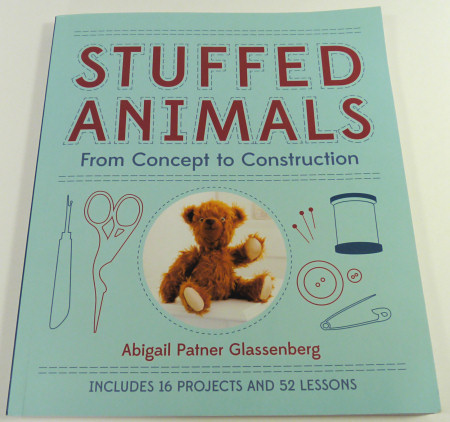
Stuffed Animals: From Concept to Construction by Abigail Patner Glassenberg is “a comprehensive reference that teaches you how to sew heirloom-quality stuffed animals, from four-legged friends that actually stand to a classic, poseable Teddy bear.”
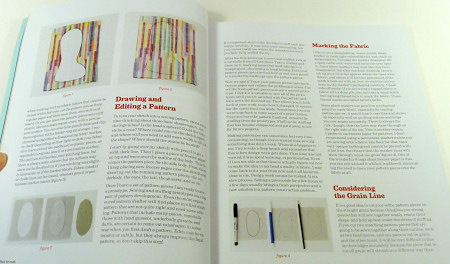
Stuffed Animals begins with a very useful introductory section, covering tools and materials, design considerations (research, pattern drafting, fabric selection, etc), and how to actually make soft toys (sewing, turning, stuffing, etc). This is a really solid basic instructional section, and, if you’re new to toymaking, I’d recommend that you read these chapters thoroughly before you do anything else.
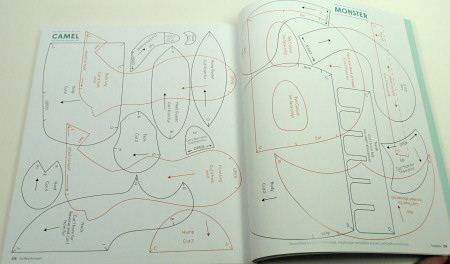
The remainder of the book takes the form of a pattern followed by 3-4 lessons on techniques that were used/demonstrated in the pattern. The patterns are child-friendly and designed to make toys that will be played with and treasured. My favourites are the cute puppy, the hilarious zipper-mouthed dinosaur, and the classic teddy bear (just to satisfy my curiosity on how these are made).

All the pattern pieces are printed at full-size (except the dinosaur, which is just too big) so you can copy them directly without resizing. But, even better than that, all the pattern pieces are also available to download from Lark Crafts. This is an excellent bonus feature – it’s so much easier to print the relevant pages directly than to try to hold the book open to scan/copy the pattern pages, and, in the PDF version, the pattern pieces aren’t overlapped (they have to be in the book, to save space), so it’s much easier to see what’s going on. Thumbs up to Lark for offering this.
The pattern instructions are detailed, and numbered points guide you through each stage of the toy assembly, together with in-progress photos of all the interim stages. (Although I didn’t try making one of the included patterns, I read through several from start to finish in preparation for my own design, and I used the step-by-step instructions to help me figure out my toy assembly – I just used my own pattern pieces instead of Abby’s – so I can verify that the instructions are clear and easy to follow.)
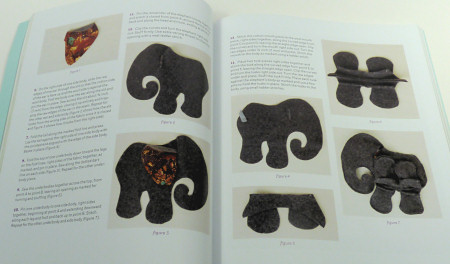
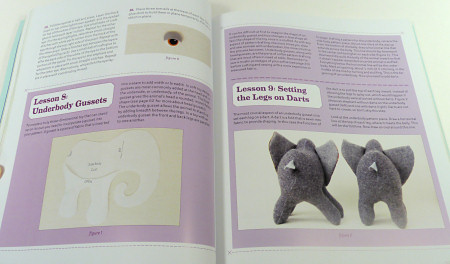
After you’ve made each pattern, Abby follows with some theory on the techniques used in the pattern that you can use when designing your own toys, and additional related tips. For example, the Elephant pattern also serves as a demonstration of very useful design features: an underbody gusset, setting legs on darts, cutting a slit to insert a detail (ears, in this case), and making eyelids. (I ended up using 3 of these techniques in my design!)
It’s a big book, both in size and number of pages, with lots of content covered (16 patterns and 52 lessons), so there’s plenty of value for money here.
My Experience
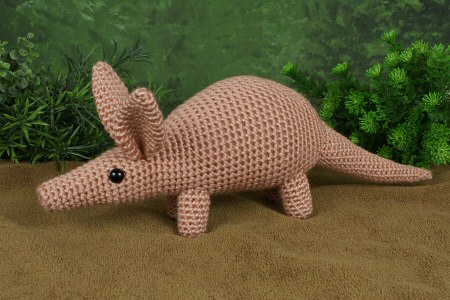
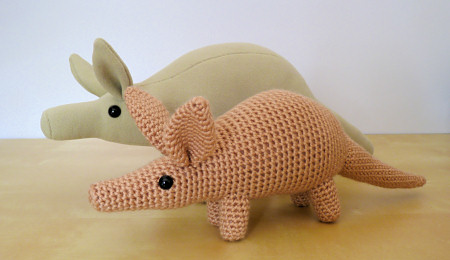
I decided to try creating a sewn version of one of my amigurumi designs, and I thought my aardvark would be a good example, with only one colour and a very distinctive shape to replicate. Plus, who’s ever seen a soft toy aardvark?! Mine could be the first ever created!
The inspiration: my amigurumi aardvark design
I have happy memories of sitting on my bed as a teenager, listening to the Friday Rock Show on the radio, and hand-sewing toys from kits. So I’m no newcomer to sewing toys, but how the strangely-shaped pattern pieces combine into a perfect animal shape always remained a magical mystery to me.
Toys I sewed from kits, over 20 years ago(!)
Designing for crochet (where you create the shape in 3D as you go) is nothing like designing for sewing (where you create the shape from multiple 2D fabric pieces) so I knew going in that this would be a huge challenge for me, and an excellent test of Abby’s teaching. You may have noticed that I like to jump in at the deep end in my crafting adventures, and this is no exception…
I read through all the lessons and skimmed all the project instructions to see each technique in action before deciding which would make good starting points for the design I wanted to create. I wrote myself a list so I could refer back to these lessons when I needed them (lessons 8, 9, 10, 12, 14, 17, 29, 39 and 50 and the elephant, dinosaur, kangaroo and hippo patterns) and then I was ready to start!
I took some measurements from my crocheted aardvark, and drafted my first pattern, building in all Abby’s advice about underbody gussets and darts so the legs wouldn’t splay. I got some scrap fabric and whipped up my first prototype on the sewing machine:
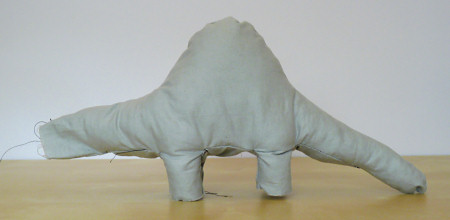
Hahaha! Oh dear – I’m embarrassed to even show you this. I didn’t have a real grasp of the way to create a fully rounded shape, so my poor aardvark v1 was skinny with a giant humpback. Note, though, that the legs are nice and straight! I went back to the drawing board (and the book) and used the information on sewing a ball to refine my design with an additional top gusset piece, to create my second pattern and prototype:
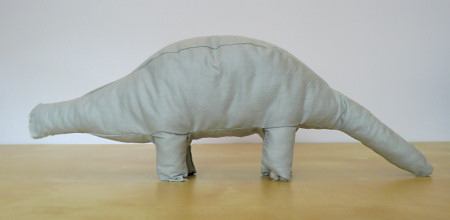
Definitely better, but still not right. I didn’t bother sewing on the footpads or snout or figuring out the ears at this stage – no point working on details if the main body still looks awful. So I went back for another round of prototyping:
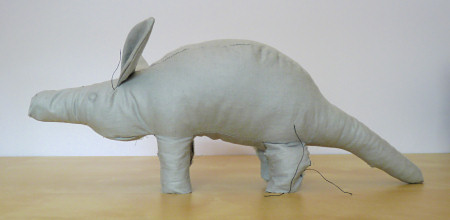
It was starting to look like an aardvark by this stage, although I have no idea what was going on in the chin area! I marked the eye position, and, using Abby’s elephant design for instruction on how to insert the ears, I also used this prototype to test 2 different ear positions, so I could get an idea of the best way to do it. (Don’t look at the legs too closely – I got a little scissor-happy when trimming these seams, so some of them came undone when I turned it! All good learning experiences…)
I could have made another prototype, but by this stage I was running out of time (I have my own book to write, you know!) and had no more scrap fabric, so I decided to be bold and make the next version, with a few final tweaks, in my real fabric, and keep my fingers crossed I’d got it right this time…
I’m what I’d call a straight-line sewist: I can whip up a basic skirt or bag on my sewing machine, but these small pieces, exact lines and tight curves are a little beyond my skill level – just the thought of stitching the tiny circles for the feet and the snout with my machine makes me shiver. To give me the best chance of success, I decided to go back to what I know, and hand-sew the final aardvark. Much, much slower, but very relaxing, and it’s much easier for me to get a smooth finish when I place each stitch individually!
When it came to inserting the safety eyes, I had a big surprise – I thought there was no way my awl (bought on Abby’s recommendation) would create a hole large enough for the shaft of the eye to slip through, but it did! Not snipping the fabric for the eyes was a revelation. This is the kind of expert tip that makes Stuffed Animals such a treasure.
Finally, finally, it was time to turn and stuff my aardvark, and see what I’d created… In my quest for the perfect aardvark, after turning and stuffing, I unstuffed and unturned and tweaked a couple of my seams by less than 1mm to subtly alter a curve here and there – it made a big difference. Then all I had to do was re-turn, re-stuff, and sew up the final seam (I came up with a little tip of my own at this stage to make my ladder stitches perfect – I’ll mention it here, in case it helps anyone else: as my fabric is stretchy, I couldn’t press a seam line as shown in Abby’s examples, so I basted a row of running stitches along each edge as a guide for my ladder stitches.)
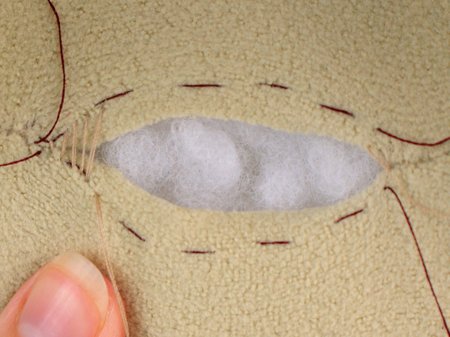
Basting lines in burgundy so I could accurately place my ladder stitches
And the end result is:

Fatty Aardvark! I love him so much, and I can’t really explain why.. I don’t think his charm really comes across in the photo: he’s big and soft and unbelievably cuddly. I love how solid and fat he is, but he’s still recognisably a PlanetJune design. And he’s irresistably huggable!
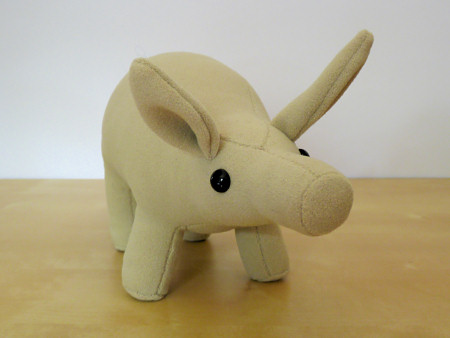
He’s most definitely an aardvark, isn’t he? And look at those perfectly straight legs: not a hint of splay there. If I were going into the soft toy pattern design business (which I’m not – at least for the forseeable future!) I’d probably do one more iteration to tweak the angles on the neck and tail a teeny bit, but Fatty Aardvark is perfect just the way he is.
I’ve learnt so much from this project; I feel like Abby has given me the skills to design lots of animal toys (if only I had the time, and could master my sewing machine so I can actually sew samples on it instead of hand-sewing!)
Ami and Fatty Aardvarks
As shaping is so important to me in my designs, now I’ve seen how much difference 1mm in your sewing line makes to the shape of the finished toy, I think I’m more comfortable sticking with designing crochet patterns; they give you much more precise control over the shape you end up with. Follow my crochet pattern stitch by stitch and you will end up with the same shape as me, even if you’re a beginner. Cut and sew my sewing pattern template and you’d probably end up with a similar, but not identical, shape – by the time you’ve eyeballed a 1/4″ seam to add to the pattern piece and then eyeballed it away again to get back to the stitching lines, it’s highly unlikely you’ll end up with exactly the same shape, even if you’re a master of your sewing machine.
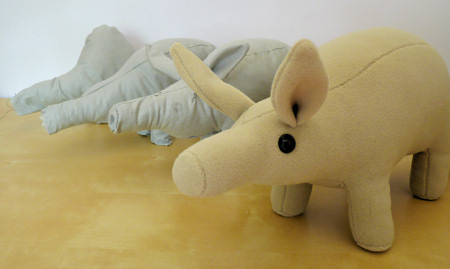
Aardvark evolution, or how I went from embarrassing ignoramus to plush designer in 4 stages – and all thanks to Stuffed Animals!
Peeves
These are all small niggles that I’m including for the sake of completeness. As I’ve used this book as a technique reference, not as a project instructional book, some of my peeves relate to that: if I’d made Abby’s projects before attempting one of my own, I’d have a better grasp of which techniques are illustrated by which project.
- A visual contents page of all the projects in the book would have been very useful; to decide which project would be the closest starting point for each element of my design (e.g. do the closest legs belong to the elephant, or the lion, or the dinosaur, or something else?) I found myself flicking through the book over and over, making lists of every technique I thought might be useful for my design.
- The index is brief and alphabetized not by subject, but by lesson title. I’ll give you a couple of examples of why this is a problem: I wanted to look up Abby’s advice on stretchy fabrics, but Stretch isn’t in the index, and neither is Fabric! The fabric selection advice is actually listed under C in the index, for Choosing Fabric – would you have thought to look there? And then I tried looking up Joints (there are 5 jointing lessons that I can see, spread over 3 projects) but there’s no mention of any of these on the index page. I’d advise you ignore the index and skim through the contents instead – it’s just as easy to find information there, and it’s far more complete.
- Abby is clearly 100% a sewing machine user – there is no mention anywhere of the fact it’s possible to sew toys completely by hand. There is a page on hand stitches, but it only shows how to make various stitches for closing and embellishing, with no mention of which stitch would be best to use for hand-sewing a toy. (I just made one up to sew my aardvark – a faster variant of backstitch – but it would be nice to have some expert advice on that topic.)
- I did spot a couple of minor text errors in my flick-through; the hippo’s underbody pattern piece is labelled ‘upperbody’, the footpads say to cut 2, not 4, and there’s no mention of attaching the hippo’s footpads to the legs. I’ve notified Abby so these can be added to the book’s errata page – unfortunately, errors are a fact of life in printed books, so I always recommend you consult the errata if something confuses you in any craft book.
Final Thoughts
This is a one-of-a-kind book and I think it really fills a gap in the marketplace. I’ve decided that this is really three books in one, and different people will use it in very different ways:
It’s a soft toy pattern book: If you’re looking for a book of toy patterns, this is a varied collection of animal patterns to suit a range of skill levels. If you want to make a toy as a gift, you’ll probably find a design to suit every child. While there’s no difficulty level indicated on the patterns, the complexity increases throughout the book as new techniques are introduced.
It’s a course on soft toy technique and construction: Abby’s background as a teacher really shows through here; this book is structured as a step-by-step course, with each project as a demonstration piece for the lessons in that chapter. If you work through every project in the book, learning the lessons as you go, you’ll have a solid grasp of soft toy design techniques that you could bring to your future projects.
It’s a soft toy design reference book: And then there are people like me, who want the book solely as a reference book and will create our own designs. The included patterns are still useful as demonstrations of the lessons, which, for me, are the real gold. The lack of an alphabetised index is a real blow here – this is the only place where the book falls down for me. Everything I need to know is here, somewhere, but I found I had to flip through the book over and over again to hunt for the gems I needed. But it was always worth it – the content in Stuffed Animals is worth digging for, and my copy has definitely earned its place on my permanent reference shelf.
Overall: highly recommended! (Well done, Abby!)


Kat said
I wondered if you had a pattern you’d be willing to share for your ardvark, I’m really struggling to find/make one.
June said
Only my Aardvark crochet pattern! As I never intended to design a sewing pattern for others’ use, I didn’t keep notes of those seams I mentioned tweaking in my final version,so the latest pattern template I made isn’t quite right. I’m afraid I don’t remember how I altered it to get to my final aardvark, so I have nothing I could share – I’m sorry.
kerryann stachiw said
Do you make to sell? I’m looking for a red aardvark for my 18 month old son, and your work is adoreable.
June said
Thank you, Kerryann! Designing my crochet patterns and running PlanetJune is already more than a full-time job, so I only have time to make occasional pieces like this hand-sewn aardvark for fun, not to sell, I’m afraid. But, you could buy the pattern for my crocheted aardvark and make one of your own with red yarn, or commission a PlanetJune seller to crochet a red aardvark for you 🙂
Judy Carlson said
I’m glad I have a crocheted earth pig of my own and am content with it. Otherwise I’d be catching a plane to SA to sneak off with your new adorable plush earth pig! 😉
justine said
great review, you really put the book through its paces. I like that you mentioned some negatives as well. Most blog reviews don’t do that. Finally, I agree with you. I prefer to knit and crochet because if you follow the pattern your piece comes out right, whereas with sewing there is a lot of skill needed before your things look good.
Alicia Brink said
I love the evolution photos. It helps perfectionist like me know that you don’t have to be perfect the 1st time.
.: petrOlly :. said
Your earth piggy looks lovely, June! 🙂
And it’s not fat, it’s fluffy 😉
Interesting review, I will recommend it to a friend who sews toys – thanks for the thorough work! 🙂