
How to Make a Seamless Join in Amigurumi
My Amigurumi Seamless Join technique allows you to create an almost invisible join in amigurumi whenever you stitch an open-ended piece to a closed piece. This is the type of join you’ll use for almost all amigurumi joining, for example: joining a muzzle and ears to a head; or joining a head, legs, and a tail to a body.
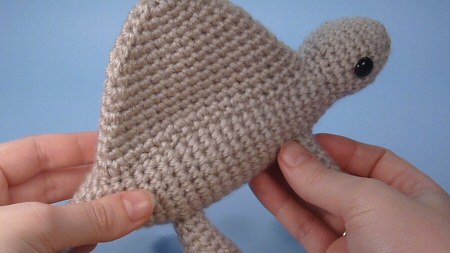
Give my Seamless Join method a try on your next amigurumi and you’ll find that your joins look smoother and neater, with much less time and effort on your part.
I recommend you watch the video to see the Seamless Join method in action, but in case you prefer text or want something visual to refer to, I’ve also made a photo tutorial version for you.
Quick finder:
- Video Tutorial (right- and left-handed)
- Step-by-Step Instructions (right-handed)
- Step-by-Step Instructions (left-handed)
- When to Use the Seamless Join
Amigurumi Seamless Join – Video (right-handed)
Click to watch this video on YouTube.
Amigurumi Seamless Join – Video (left-handed)
Click to watch this video on YouTube.
Note: The videos may look a little small embedded in the blog: if so, you can fullscreen them or click through to YouTube to watch them full-sized 🙂
Seamless Join – Step-by-Step Instructions (right-handed)
Hold the two pieces together in their final position, with the open-ended piece above the closed piece you’ll be stitching it to.
Tip: You can pin the pieces together so they won’t shift while you stitch.
1. To start, insert your needle into the gap between stitches on the closed piece that’s directly below your yarn end, bringing it back out directly below the next stitch of the open piece (below, left) and pull through, pulling the stitch tight.
2. Insert the needle through both loops of the next stitch around the open edge (below, right).
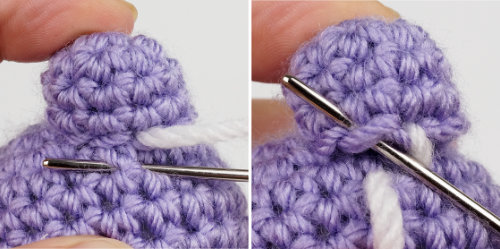
3. Reinsert the needle back into the same gap on the closed piece that you just came out of, bringing it back out at the gap directly below the next stitch of the open piece (below, left).
4. Pull the yarn very tightly to draw the open edge right down to the surface. Your stitch will practically disappear (below, right).
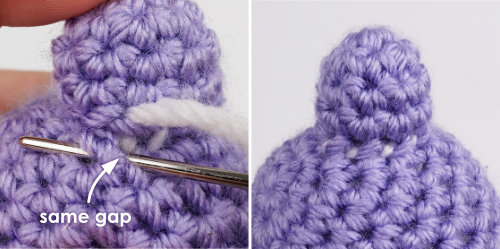
Repeat steps 2-4 for each remaining stitch around the open edge, then fasten off securely.
Seamless Join – Step-by-Step Instructions (left-handed)
Hold the two pieces together in their final position, with the open-ended piece above the closed piece you’ll be stitching it to.
Tip: You can pin the pieces together so they won’t shift while you stitch.
1. To start, insert your needle into the gap between stitches on the closed piece that’s directly below your yarn end, bringing it back out directly below the next stitch of the open piece (below, left) and pull through, pulling the stitch tight.
2. Insert the needle through both loops of the next stitch around the open edge (below, right).
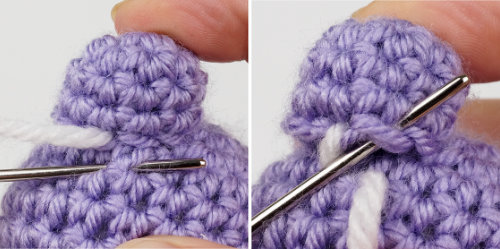
3. Reinsert the needle back into the same gap on the closed piece that you just came out of, bringing it back out at the gap directly below the next stitch of the open piece (below, left).
4. Pull the yarn very tightly to draw the open edge right down to the surface. Your stitch will practically disappear (below, right).
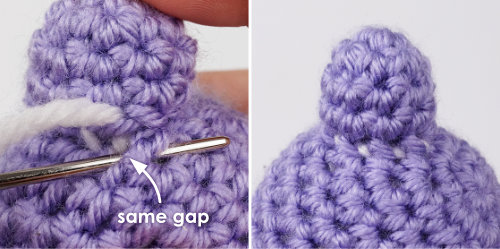
Repeat steps 2-4 for each remaining stitch around the open edge, then fasten off securely.
When to Use the Seamless Join
The Seamless Join is almost always the best choice for joining amigurumi pieces, with two exceptions:
-
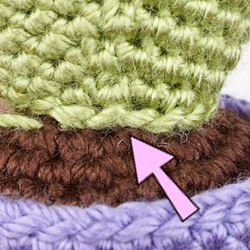
If you’re joining pieces of different colours and want a clearly defined edge between the pieces (see photo, right) instead of an invisible join, follow my Clean Edge Join tutorial.
- If a pattern calls for you to join two open pieces together, a basic whipstitch join is the best option.
But, apart from those exceptions, you can’t go wrong with the Seamless Join – it’ll give all your amigurumi a clean, polished finish!

Loved this tutorial? I have so many more amigurumi tips and tricks to share with you!
Boost your amigurumi skills with my latest book, The Essential Guide to Amigurumi, your comprehensive guide to amigurumi techniques and tips.
Do you find my tutorials helpful? If so, please consider making a contribution towards my time so I can continue to create clear and concise tutorials for you:
Thank you so much for your support! Now click below for loads more crochet video and photo tutorials (and do let me know what else you’d like me to cover in future tutorials…)
















JJ said
Thank you! Great video. Now I get it.
Judy said
Thank you! I’m just beginning to venture out into the Ami’s and your instructions on sewing together will be a great help! I’m also going to take a look at your instructions on how to do a magic circle. I’ve tried several ways and still cannot master it yet.
Ineke said
Thanks you so much for showing the details for left- handed people
Joe Majury said
I had literally just set down to join arms and legs onto a soft toy I was making, when I came across your tutorial. So I’m going to give it a go right now. Your videos are so clear and easy to understand that I’m sure my finished piece will look great. Adding the arms and legs have always been my weak point, they never turned out as well as the rest of the soft toy, so THANK YOU.
Ann said
Thanks June, this method made such a difference to the final product and has restored my confidence in joining the pieces together.
Alisa Licking said
WOW! thank you! I hated Amigurumi and avoided it until now. Thanks to you I feel like I just won the lottery!!
Olga said
THAT IS JUST BRILLIANT!!! THANK YOU SO MUCH! as it too is my worst thing to do. So glad I found you. Well thanks to the Nerdy Knitter Design too.
Olga
Cathryn said
Thanx, June! I’d given up amigirumi when my grey tabby cat turned out looking like a weasel after electric shock : / Your voice is so soothing! Cathryn
Maya said
Totally awesome tutorial. Ingenious to show with a different color, thank you it was really helpful.?
JudyB said
This was incredibly helpful. My joins have been messy until now. I really loved seeing it left handed. It has always been really fiddly for me. Do you always sew the pieces onto the main body which has been stuffed first? I was instructed to sew the parts on before stuffing but then sometimes they don’t look correct after stuffing.
June said
Oh no, you should definitely stuff before you attach any pieces! The crocheted stitches stretch when you add the stuffing, and if you’ve already sewn something onto the body, the body stitches won’t be able to stretch in that area, which may lead to a pinched or uneven result. (Exception – as there’s always an exception to every rule: if a pattern specifies you should attach a specific piece before stuffing, you should follow the pattern instructions, as there’s probably a good reason for it!)
AL said
Very detailed tutorials….THANK YOU!
goverdien said
What a very good idea to stitch the amigurumi that way. I thank you for this video
Jenny said
I am just wondering what you do to finish off the yarn once the limb is attached? Thank you.
June said
This will be the subject of my next video, Jenny! The most secure way is to tie a knot around the post of one of the stitches, then use your yarn needle to pass the end through your piece to the other side and pull, so the knot is drawn to the inside and isn’t visible. From there you can pull the yarn tight and snip off the end close to the surface, so the cut end retracts back inside the piece when you let go. I’ll demonstrate and discuss this (and other methods) further in the tutorial 😉
Timi said
Hi June, many thanks for the great tutorials 🙂 I’m just wondering whether the video is already available about how to finish off the yarn once the limb is attached ? Many thanks, Timi
June said
Not yet, Timi, but it’s on my to-do list for 2016! If you don’t follow my blog regularly (or even if you do!) you can subscribe to my monthly newsletter to make sure you don’t miss any of my helpful tutorials or new patterns 🙂
Alex Maltby said
Hi June,
Your website is my go to for arigurumi tips. It is so clear and gives the neatest finish. I have a question about joining pieces. When I finish a piece, say an arm or an ear, the V’s of the last round sit ontop. So when i look at my piece fom the side I can only see the front loop as the back loop is hidden behind it on the inside of the circle. (I hope that makes sense). So when I try to do the seemless join I struggle to put the needle through both loops as the back loop is hidden behind the front loop. At the beginning I can usually get around this by leaning the ear / limb away from me to expose both loops. However this gets harder as towards the end when it’s nearly attached. Do you have a way to prevent this ? I saw in your video that it was really easy to see both loops of the piece you were attaching to the body.
Thanks
Alex
June said
It sounds like you have your pieces inside out – that’s why the front loops are obscured. See my Which is the Right Side? tutorial for more details. I bet that if you flip your pieces so they are right side out, you’ll find it much easier to see the loops!
Melanie said
Yes!!!
Mary Smith said
Thank you so much! I’m working on my very first ami piece and was a little overwhelmed. I was really pleased with the way my individual pieces are turning out since I have only been crocheting for 3 weeks now, but wasn’t sure how to sew them together. This video is awesome. Now I can finish my beautiful doll and not be disappointed with the results! Thank you!
Meg P said
Thank you, yet again, June! This video is a great addition to any ami-maker’s tool kit. Speaking of tool kits, when will those special PlanetJune stuffing tools be available again?
June said
I didn’t think it would take this long – being sick for so long really upset my plans. I still have a few logistics to overcome once my ribs are healed and I’m fully mobile again: I need to buy a printer, find out where I can source shipping supplies, and figure out how international shipping works from here. Hopefully it won’t be too much longer though!
Katherine Perry said
great patterns, love these little dinos and thanks for the tutorial.
Sonja said
Wow, really handy!
I kind of did that, but didn’t really know what I did. So somtimes it looked good and sometimes not…Now there is a technique for it! Thanks a bunch.
Sandy said
June, this is lovely, thank you so much! You have helped me with so many of the little details I never had quite right in making my creatures! Your video and blog entry inspired me to purchase all of your lovely little dinosaurs. Hope your move is going well! Best, Sandy
Rebecca said
Excellent!! 🙂
Millasew said
Thanks for a very detailed video instruction!!! I will definitely try this technique on my next project! Many thanks!
mrs. hemenway said
This is awesome! i’m almost finished the ankylosaurus and i’m going to use this new method to sew the parts together.
Julie said
Nice video! He’s so cute! All of your dinosaurs are! 🙂
Rachel Hansen said
Brilliant! I love it. Thank you so much!
Jessi said
Awesome tutorial! Such high quality video, I never miss a beat of what you’re doing!
Thanks June 😀
Sheryl Watson said
Brilliant technique, I will try this with my next ami project. Thank you so much! :o)
Dawn Peterson-Smith said
You have such a wonderful ability to solve problems and also create excellent visual aids to educate others! You definitely deserve to win a Flamie!
Cindy G. said
I love this technique! Thanks so much for showing how to do it. My least favorite part of making amigurumi is joining all of the pieces together (I’ve got a bag full of dragon bits that have been waiting to be joined for at least 4 years), so I’m thrilled to learn a technique that makes the seam look so neat. The video is wonderful (nice and clear, too!) and I love how you used a contrasting color to show how much the stitch really does disappear.
Simone said
Thank you for sharing this! A great way to join two pieces together. The sewing part is also my least favorite part of doing Amigurumi, since I’m always afraid to mess up. With your video, the difficulty is somehow lowered! 🙂
maryanne @ mama smiles said
This is brilliant! Thank you for sharing your technique!