
Punchneedle Tutorial
See my Punchneedle info page.
The following is a modified excerpt from the left-handed version of my eBook, The Punchneedle Handbook: Miniature Punchneedle Embroidery Basics & Beyond, now available for purchase from my online shop in a new 2nd edition, which comes in both right-handed and left-handed versions, so you can buy whichever you need!
What is Punchneedle?
Punchneedle is a form of embroidery that uses a hollow needle to create loops of thread on fabric. Also known as thread painting for the complexity and texture of design that can be created with this technique, it creates a textured pile surface akin to a miniature version of a hooked rug.
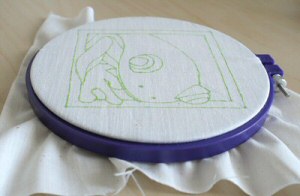
It is worked on the back of the fabric, which is why all punchneedle patterns are a mirror-image of the completed design. When you punch, you form lines of running stitches on the top of the fabric while forming the loops of the stitches on the front of the fabric (the underside as you are punching). The fabric has to be stretched as tight as a drum in an embroidery hoop.
The Basics
Punchneedles and weaver’s cloth fabric are available to buy from most craft stores (if you’re in the US, I know that JoAnn has a good selection of the fabric).
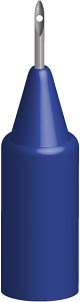
Hold the punchneedle in the same way you hold a pen, or however feels comfortable to you. The punchneedle should be held upright so it is almost perpendicular to the fabric, and with the bevelled (slanted) edge facing in the direction you are going to punch your stitches.
Note: I am left-handed, so, as you’ll see in these images, I punch from left to right. Right-handers, punch from right to left.
Begin at any point around the outline, or as instructed in your pattern.
- Push the punchneedle straight down into the fabric, until it stops:
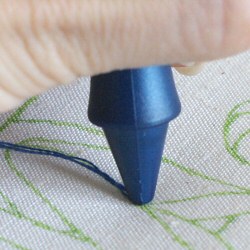
- Bring the needle back up slowly, stopping as soon as the tip is clear of the surface of the fabric:
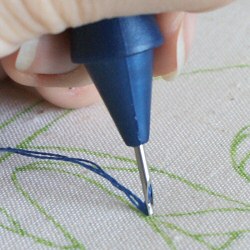
- Slide the needle tip across the fabric by approximately the width of the needle:
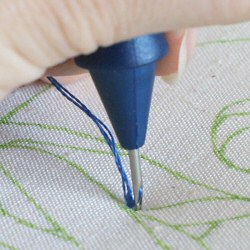
Now repeat – punch the needle into the fabric again, lift it to the surface, slide it across the surface. That’s all there is to the basic punch stitch!
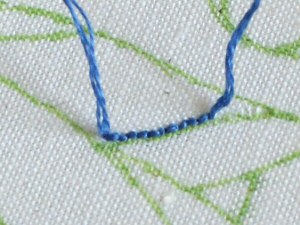
As you punch on the back of the fabric, the stitches will appear as a line of running stitches:
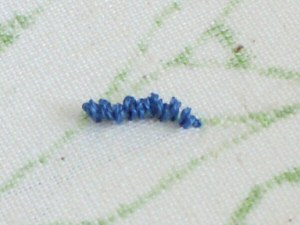
If you turn over the work to look at the front, you’ll see the loops:
If you were to look at the underside of the work as you punch, you would see the needle forming the next loop:
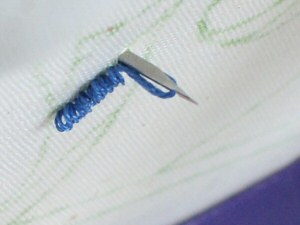
When you reach a corner, stop with the needle in the down position, rotate the hoop, and then continue to punch along the new line. This means you’ll always be punching right to left (left-handers: left to right) and the bevelled edge of the needle will always stay facing forwards.
Once the outline is complete, fill in the area by working in a spiral fashion towards the middle of the area, following the contour of the previous row. Leave about half a needle width of space between each row.
Continue working in a spiral towards the middle until the entire area has been filled in:
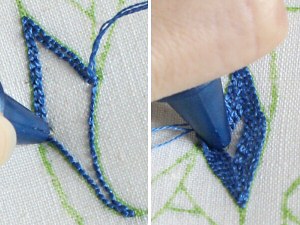
In this way, you can complete the entire design by first outlining each area and then filling it in. Punchneedle works up very quickly and gives stunning results:
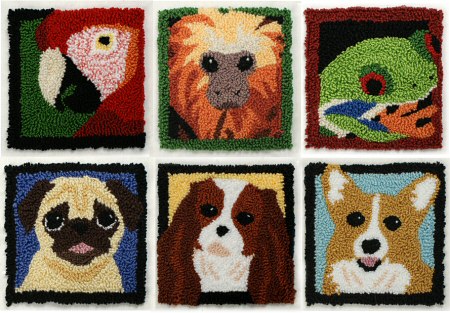
It’s a lot of fun and very simple to master. I hope this brief overview has tempted you to try punchneedle yourself!
This is a brief excerpt from my eBook The Punchneedle Handbook, which covers everything you need to know to get started in punchneedle, from equipment advice to detailed instructions on how to punch, with tips, techniques and troubleshooting solutions that will help you to create beautiful punchneedle embroideries in no time. For more details, or to buy the eBook, click through to the PlanetJune shop, where you can also find all of my punchneedle designs!
Questions?
I have answers! Although I can’t answer specific questions (unless they’re about PlanetJune patterns, in which case email me for customer support), check my Punchneedle FAQ for answers to the most common questions I receive. And if you have further questions about the punching technique, materials, finishing, etc, you’ll find all the answers in The Punchneedle Handbook 🙂
















Warner Brown said
Nice work
Kathy said
I bought your book but I can’t find the information on do I wash my weavers cloth before I punch needle it.
June said
The instructions in the handbook are complete, so if it doesn’t tell you to do something, you don’t need to do it! As I said in my reply to Holly, above, the density of stitches should keep the backing fabric from any noticeable shrinkage, even if you wash the finished piece later, so there’s no advantage to prewashing, as far as I know.
Mary Puskar said
can you tell me where I would find the pattern for the little pug’s face shown on this page? thank you very much.
Mary
June said
Hi Mary – thanks for asking! You can find all my punchneedle patterns, including the Pug, in my shop 🙂
Susan Cox said
I wish I could as half good as you June! That embroidery looks super cute. Thank you for sharing!
Tracey Fairclough said
Hi. I have a question. Can this tool be used on Aida? I’ve make a cross stitch but now need to do all the outlines, and wondered if this tool would work?
Thanks in advance
June said
I’m afraid not: punchneedle needs tightly-woven fabric to hold the stitches in place; the holes in aida fabric are far too large, so the stitches would probably pull straight out again as you punched.
margaret thomson said
Having problems with stitches being lose and coming out of fabric.
Manyou thanks
June said
Margaret, there could be several reasons for your problem (e.g. you’re holding the punchneedle facing the wrong way or you’re sliding the needle too far between stitches). It could also be that your fabric doesn’t have a sufficiently tight weave to hold your loops in place. If you’d like further assistance, my Punchneedle Handbook explains the correct punching technique with close-up photos and has a detailed troubleshooting section for when things go wrong like this. Good luck!
karina said
hi, i bought a punch needle cause my hands are very shaky and so i thought it would be easier for me but the truth is that i cant get it to work cause none of the stitches stay put. As I advance the loops start to get undone. What am I doing wrong? I feel like it should be something so simple but I cant understand.
June said
Karina, there could be several reasons for your problem (e.g. you’re holding the punchneedle facing the wrong way or you’re sliding the needle too far between stitches). If you’d like further assistance, my Punchneedle Handbook explains the correct punching technique with close-up photos and has a detailed troubleshooting section for when things go wrong like this. Good luck!
Maulden Dainty said
I am new to needle punch embroidery. I have bought a Hemline needle punch but am having problems. My stitches don’t “lock” into place and just undo if I pull the tail of thread at the beginning. I followed threading instructions and believe I have done it correctly. I have to the best of my knowledge followed the punching technique. However, it seems that something is not right. Can you help?
Regards,
Maureen
June said
That sounds right to me, Maulden! Punchneedle stitches are only secure from the front of the work – you can always pull them out from the back (the side that faces you while you punch). My Punchneedle Handbook includes information about options for finishing and securing your work 🙂
Katheryn hamilton said
If stitches are only secure on front of fabric how could you ever wash it.
June said
It would depend on the purpose of the embroidery, but I use a thin layer of washable fabric glue on the back of each piece, to permanently lock all the loops in place (see The Punchneedle Handbook for full instructions!)
Beverley said
i just cant get the punch needle concept. how do i make loops stay in fabric??? i push needle thru and pull needle up to fabric line and when i move the needle for next stitch it comes out…What am i doing wrong???
June said
Beverley, there could be several reasons for your problem (e.g. you’re holding the punchneedle facing the wrong way or you’re sliding the needle too far between stitches). If you’d like further assistance, my Punchneedle Handbook explains the correct punching technique with close-up photos and has a detailed troubleshooting section for when things go wrong like this. Good luck!
Debbie Prosser said
Ready to start a project. Making a chicken for granddaughter to frame and display, at the fair, when she shows her chickens. Do I want to use the 1 ply needle, 3 ply needle or there is a 3rd one called yarn needle? Also what loop length would you suggest I use?
Thanks!
Debbie
June said
Debbie, please see my Punchneedle tool info post for help with that 🙂
Alecia said
I would like to use this to cross stitch or use a cross stitch kit to comeplete a baby blanket. Is there a way to do this with the punch needle? I noticed an earlier comment about cross sticking and was wondering how this could be done.
June said
Alecia, please see my earlier reply to this question, here. Also, the back of a punchneedle embroidery needs to be covered, so you could only use it on a blanket if you completed the embroidery as an applique, as I show in my free Punchneedle Poinsettia pattern (minus the felt backing) and then attached the applique to the blanket.
Anne Schipper said
I would like to use punch needle to embroidery quilt blocke. Is there anything special I need to know.
Doris said
Bought your Punch Needle instruction book. Found some useful tips in there, so thank you.
I usually do projects that I draw myself or I use purchased clipart. I think of punch needle as coloring, but much more complex since I have to figure out colors/stitches myself. I have several different types of needles and I use anything that will go through them–baby yarn all the way down to sewing thread.
Doris Zielinski said
I am addicted to punch needle–so much more rewarding than playing Candy Crush :-). I use clipart and also try my own designs. I use several different brands of needles (Cameos are great, but I don’t want to limit my projects) and all kinds of threads, yarns and ribbon. I trim and sculpture as well to give a lot of texture to my pictures. I am aware of licensing limitations so I just use these items for my use or give them away as gifts to the young ones in my family.
But I will be ordering your book soon since I have problems with fine details. I hope to sell my own designed finished projects at the senior center gift shop when I retire so I have to improve my finished product.
Thank you for your site, it is helpful!
Mary Ann Schumacher said
I am working with DMC embroidery floss (3 strands) and my thread keeps breaking. What am I doing wrong? It’s very frustrating as threading the punch needle is not my favorite part of the process. I have tried using a different needle in case the eye had a sharp area that might be causing it but the same thing happened with the other needle too so I am assuming it is my technique that is causing it. I keep the open point of the needle facing the direction I am punching. Does the needle have to be exactly straight up and down?
June said
Pretty much, yes – as I said above, “The punchneedle should be held upright so it is almost perpendicular to the fabric”. If you try doing that and the thread still breaks, I’d check the troubleshooting section of my Punchneedle Handbook – if you’re accidentally trapping the thread so it can’t flow freely, that could make it break as you punch down.
Ramya said
Hi,
I have tried once this.. Still I’m facing the issues with the back loops.. when we pull it, the entire patteren came out. Could you assist me to how to prevent this. I have Seaching the technique, unable to find the solution. Please help me.
Thanks in advance.
June said
Ramya, there could be several reasons for your problem (e.g. you’re holding the punchneedle facing the wrong way or you’re sliding the needle too far between stitches). It could also be that your fabric doesn’t have a sufficiently tight weave to hold your loops in place. If you’d like further assistance, my Punchneedle Handbook explains the correct punching technique with close-up photos and has a detailed troubleshooting section for when things go wrong like this. Good luck!
Holly McG said
Hi June,
I bought the handbook and read through it. I got all of my supplies and am excited to start my first pattern. But I am wondering, should I wash my fabric before I get started, or is that not necessary? Pre-washing fabric is just a habit from sewing, and I wasn’t sure if it is also a part of punch needle. Thanks!
Barbara F said
Hi. Saw this technique at a craft fair, & it’s had me thinking for years. Finally found a tool, so I’m really glad to find this tutorial. Thank you so much. Shall have to look out for your book.
June said
You’re welcome, Barbara! My Punchneedle Handbook is an ebook, so you can only buy it from www.planetjune.com/punchneedlehandbook 🙂
Karen said
Hi June,
I’m outside of the US (South Africa) and I had to order my kit online, as it’s not available in my country. I’m also having problems locating Weavers Cloth locally, most suppliers don’t even know what I am talking about? Is there an alternative I can use? I’ve tried various fabrics that I had lying around, but they don’t seem to hold the thread properly – I am very new to this, so it could also be I am not doing it correctly, but I’m pretty sure the correct fabric should make a difference?
June said
Karen, please see my previous answer to this question, here 🙂
I also recommend the Troubleshooting section of my Punchneedle Handbook if you’re having difficulties forming the stitches.
Bluejay said
Hi, I have a question, If I have a cross stitch pattern, could I use a punch needle to embroider the outline? I wanted to know because it looks like it would be more defined and quicker.
Thank you!
June said
Bluejay, please see my previous answer as to why you can’t punch onto Aida (cross stitch) fabric.
Ann Zahorik said
I’m new to punch needle and would like all the info I can gather before proceeding. What k7nd of thread or yarn is used? Can the same needle be used for yarn and thread?
June said
Ann, please see my main Punchneedle info page for more information on punchneedle. (And my page on punchneedle tools, linked from there, gives details about the size of thread/yarn you can use with each needle size.)