which is the ‘right’ side?
Amigurumi are typically crocheted in the round, in a continuous spiral, which means that the two sides of the crocheted fabric that is produced will look completely different. You can choose which side faces out by flipping the piece inside out at any stage before closing up the piece, and then continuing to spiral around. It doesn’t really matter which side faces out, unless you want to use the invisible decrease technique, in which the ‘right side’ of the fabric has to face outward for the decreases to be invisible.
I keep getting asked which side is the ‘right side’, so I thought I’d put this side-by-side comparison together to show you the differences between the two sides.
UPDATED: See also my video tutorial (right- and left-handed versions) to see the ‘right’ and ‘wrong’ sides forming as I work, and watch how I can switch between them.
The ‘Right’ Side
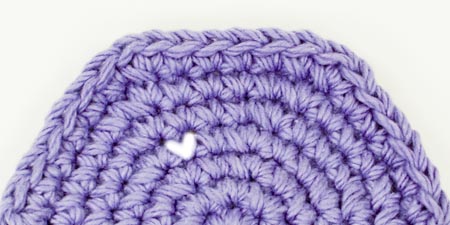
- Each stitch looks like a V shape (I’ve highlighted one in white for you).
- Note also that you can see the sideways V shapes around the edge that you will crochet into to form the next round.
The ‘Wrong’ Side
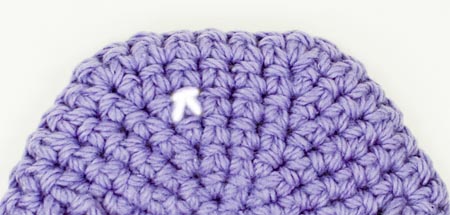
- Each stitch looks (to me, at least) like a pi symbol (π) – but maybe that’s just my geek side coming out again! Otherwise, you could say it looks like a little table – an upside down V with a bar on the top – again, I’ve highlighted one stitch in white for you. You won’t see any of those horizontal bars if you look at the right side – that’s a big clue.
- Also, the sideways V shapes around the edge of your piece will be facing to the other side, so you won’t be able to see them.
Also, if you’re working ‘inside out’, you’ll be working around the inside rim of the piece – see my Worked inside out section for an illustration of what I mean by that. You’ll probably find that when you start crocheting an amigurumi piece, this is the way the piece will naturally want to curve. You can just flip it inside out so it faces the ‘right’ way after you’ve crocheted a few rounds, and then continue to work around the outside rim after that.
I hope this has helped you to be able to tell the difference between the ‘right’ and ‘wrong’ sides – and once again I’d like to stress that I’m only calling them ‘right’ and ‘wrong’ by convention: there is nothing wrong in having the ‘wrong’ side face out if you prefer the look of the stitches that way, or it’s just what you’re used to. Just remember, if you want to use invisible decreases (which I do recommend; they’ll make your pieces look soo much neater!) you’ll have to crochet with the ‘right’ side facing out 🙂
UPDATE It just occurred to me to add this: If you’re following a pattern that includes complex colour changes (not just simple stripes), or with some stitches worked in back loops or front loops only, you should make sure you’re working the piece the same way out as the designer intended – it will make a difference to the finished appearance!
Do you find my tutorials helpful? If so, please consider making a contribution towards my time so I can continue to create clear and concise tutorials for you:
Thank you so much for your support! Now click below for loads more crochet video and photo tutorials (and do let me know what else you’d like me to cover in future tutorials…)


Helen said
Hi June,
When I am making amigurumi (in a spiral) I think I am working the right way out (the “v” stitch is the correct way up). However, when I come to close the piece, as that is generally more untidy than the top end (where I started with the MR), that becomes my bottom, if you see what I mean, so I flip it upside down essentially, making the V stiches the wrong way up. Am I doing this wrong? In all the finished pieces I see online, the V stitch is still the correct way up. Am I working upside down??
Thanks!
Helen said
PS, I should mention I have been practising with a lot of amigurumi balls, which is why I can turn the work upside down without it interfereing with the pattern! If that makes any difference…..
June said
Helen, you’re not doing anything wrong at all! The magic ring end is neater, so I almost always design my patterns so I’m working from the top down (or from the front back), so the magic ring will end up at the top (or front) of the piece.
I recommend you use my Invisible Decrease and Ultimate Finish techniques to make the end look almost as good as the start, but, unless you’re following (or designing) a pattern that has a good reason for working bottom up or back to front, I’d keep doing what you’re doing!
Helen said
Wonderful! Thanks so much for clarifying, much appreciated. Bit of a relief too :slight_smile:
I have been using those techniques but am still getting a bit of a “bump” where I am closing off. I think I have been weaving the needle inside-outside-outside-inside through each stitch instead of inside-outside each time. I’ll give it a next go on the project I am workinng on now.
Thanks again for your advice.
Amy said
Thanks for the tips, June! I’m loving your cat pattern. I Just realized today that I’ve been crocheting “backwards” all my life. I put the hook in from the back so the pi stitches end up showing on the “right side”. Oh well, as you said, it doesn’t really matter.
I do an invisible decrease in a way that I think is invisible from both sides. Assuming you crochet the “normal” way, putting the hook in the stitch from the front, you would take the front loop from the first stitch and the back loop from the second stitch. That way it’s invisible on both sides, and I find it even easier since you don’t have to pull the hook down to loop under again.
Thanks for all your tips and patterns!
Amy
Lisa Newlin said
OMG! I just started teaching myself to crochet and I’m so glad I came across your website! I’ve watched a few YouTube tutorials but your site is easy to understand and you explain things so well.
I’m so overwhelmed, although I’ve only been trying this for about 48 hours. I have a feeling I will be spending much more time on your website in the future. Thanks for making this so easy to understand. It’s quite daunting to a newbie who doesn’t have any friends to ask about this stuff!
Lisa
Rebbacca said
Why do you call the ‘right side’ the right side?
June said
Because it’s the side where the fronts of the stitches (the side you see as you crochet them) are visible on the outside of the finished piece.
Birdie said
I’ve heard that the right or wrong side mainly depends on the w ay the designer designed the pattern. Could you give me your opinion on this?
All the best,
Birdie
June said
Well, yes and no: if the pattern has stitches worked in front loops or back loops only, uses the invisible decrease, has colour changes, or uses fuzzy yarn, you’ll need to work it the same way as the designer did to make it look the same. If not, you can work it either way out and it should look pretty similar (apart from the fronts vs backs of the stitches showing on the outside).
Of course, most patterns don’t specify which side is the outside, so, if you’re following a pattern, my advice would be to work ‘right side’ out unless a pattern specifies otherwise. If it looks wrong, contact the designer to see if it should have actually been worked inside out – as there’s no crochet course you have to pass before you can publish patterns, designers don’t all work in the same way!
Jessica said
Out of habit, I’m always working from the inside when doing amigurumi. If I flip it inside out a couple rows before closing, then continue crocheting from the inside, won’t those few stitches look “wrong”?
June said
Jessica, I’m sorry it’s taken me so long to reply! Your question came just as I was in the throes of preparing to move to South Africa, and I’m only just finding the time to work back through old emails now (oops)…
To answer your question, no the stitches won’t look wrong. If you look at the inside out section of my fuzzy/brushed tutorial you can see that you’re inserting the hook from inside to outside (with the hook at the back of the opening) when the piece is flipped one way, and from outside to inside (with the hook at the front of the opening) when you flip it the other way.
The right side of the fabric is still facing you whichever way you flip it, but when it’s inside out, the ‘right side’ is the inside of the back layer of the fabric. When you flip it, the ‘right side’ is the outside of the front layer of the fabric. (I know that sounds confusing, but read it while looking at the pictures and it should be clearer.)
So you’re still crocheting the same way, and your stitches will still look the same, no matter if you flip your work right way out after about 3 rounds (as I do) or just before you stuff it.
MELISSA KROLL said
HI!
Thank you so much for clearing this up for me. I have used many different crochet pattern books and I have never been able to figure out what they are talking about when they say wrong and right side, but with the way you just explained it I now know that I will always be able to figure it from here on out. Thank you again!
MutantSuperModel said
Thank you for this! I’ve looked at four sites and it was your note about the horizontal bars that just made it CLICK for me. HA! I feel like a genius now 🙂
Nina said
How can you tell which side a designer means a piece to be worked when you’re working from a pattern?
June said
Nina, I’d assume you should use the ‘right’ side (as defined in my post above) when following a pattern, unless the designer specifically says any different. For example, my fuzzy patterns are all worked with the wrong side out, but for good reason (all the fuzz would be trapped on the inside otherwise!).
Ultimately, you hope that any designer would include all relevant information (like crocheting in a non-standard manner) in the pattern, but there’s no guarantee of that – some patterns only include very minimal information. If you’re unsure, try looking at the pictures of the finished sample and see if you can tell whether the stitches show the V or pi shapes (pictured above) – that’s a surefire way to tell whether it’s worked ‘inside out’ or not.
Lalena said
I’m having a problem getting my stitches to look right. I’ve made one of your fuzzy ferrets (I love it! I’m making more for my nephews), but my stitches still look like a pi symbol. Is this because I’m using back loop only? Does this mean that invisible decreases won’t work for back loop only?
June said
Yes, that’s right – working into the back loop only leaves the unworked front loops looking like a horizonal line. My ‘fuzzy’ patterns are NOT regular amigurumi patterns because they are designed for the challenges and appearance of fuzzy yarns, so a lot of my amigurumi tutorials will not apply to them.
My Fuzzy to Brushed Crochet tutorial explains (with pictures):
a) why my fuzzy patterns are worked in BLO
b) why those front loops are hidden: because the fuzziest side of the work is the ‘wrong side’ according to this tutorial, so pieces worked in fuzzy yarn (or regular yarn using my ‘fuzzy’ patterns) should actually be worked ‘wrong side’ out!
And yes, the invisible decrease is only for when you’re working into both loops of the regular stitches; it doesn’t give the same benefit if you’re working into back (or front) loops only. In fact, as you’re working my fuzzy patterns ‘inside out’ anyway, the invisible decrease would leave an ugly line of unworked loops (normally hidden on the inside) on the outside of the work, so it’s definitely not a good choice!
puglette said
i also think the definition between rows is easier to see on the right side…it’s easier to count rows on the right side because of the definite rings. your photos show it perfectly! i have got to play with the invisible decrease.
hugs,
puglette
:o)
Piston said
I wondered about this myself a long while ago. I just started having the Vs out because I liked that way better, it seemed more… contained? I don’t know the word.
But I’ve actually seen people, and books for that matter, use the other side too. It’s interesting to see how one person’s choice for it really adds to their style.
becky brockman said
YAY
I have been crocheting for ten years and never could figure out wich way to do it and now you have given me an answer.
Jana said
😀 I like futuregirls imagery! June, when you suggested earlier that maybe I had my piece inside out when I had the problem with the invisible decrease, you were absolutely right! I couldn’t see where it was “invisible” because each one I made had a bar! I have since started turning the piece (the best way for me to be sure I have done this is that the beginning “tail” from my magic ring is INSIDE the “cup”) my invisible decreases ARE invisible! 😀 YOU, my friend, have the BEST tutorials for things on the net, BAR LOL none! The main thing that sets you apart is your pictures! I am a visual person, as I know MOST people are! Case in point: highlighted the stitches above in WHITE! GREAT idea! Thanks so much! Oh, BTW, I got that tubing I talked about the other night from a medical supply store, NOT a pharmacy!
futuregirl said
I always think of the two parts of the sc as a body … actually a little guy doing a jumping jack. The V is the arms raised up, and the pi is the torso and legs. 🙂