Fuzzy to Brushed Crochet
Looking for my Fuzzy Yarn Tips? If not, read on:
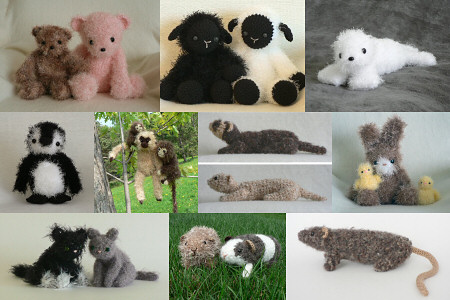
One pattern, two looks! Here’s another way to create a furry crocheted animal, without using fuzzy yarn.
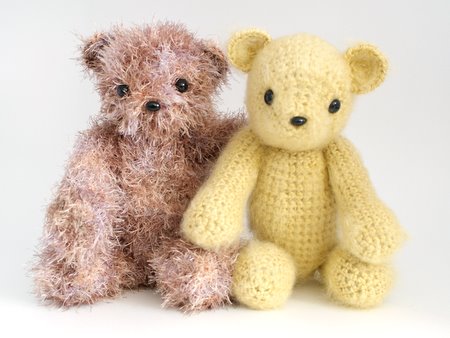
L: eyelash yarn. R: acrylic yarn, brushed. Both use my Fuzzy Bear pattern
Incidentally, when I refer to ‘fuzzy’ yarn, I’m talking about eyelash yarn, novelty yarn, textured yarn – whatever you want to call it. Any yarn that has some sort of fluff, bumps or lashes. (See my Fuzzy Yarn Tips for more on different types of fuzzy yarn and how to use them to crochet amigurumi.)
You can crochet with any regular yarn (wool and other natural fibres work very well, but acrylic and other yarns work too – see my brushed crochet experiments for proof) and then brush each piece with a wire brush after crocheting to release some of the fibres from the yarn and create fluff. The advantages of this method are that it’s much easier to crochet using a regular yarn than a fuzzy yarn, and you can use any yarn you want to, so it’s much easier to find the perfect colour for your project.
My fuzzy patterns are written slightly differently to most amigurumi patterns. They are worked in the round, in a spiral, just like regular amigurumi, but with 2 key differences:
1. Back loops only (BLO)
It can be hard to see where to insert your hook when you work with a fuzzy yarn. Working in the back loops helps to alleviate this, as the back loops stick up away from the work, whereas the front loops sit on top of the other loops that form the stitch.
You may think “well, I’m using a regular yarn so I’ll ignore the ‘back loops only’ instruction and crochet the usual way”. Please don’t – the stitches are not interchangeable! BLO crochet is more open and the stitches are taller. If you work a BLO pattern in both loops, you’ll get a misshapen result:
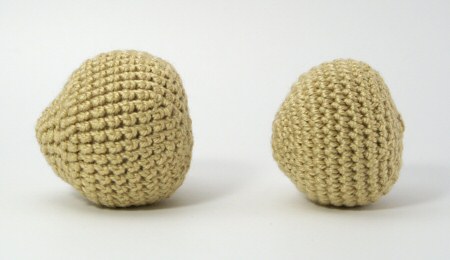
L: Fuzzy Bear head pattern worked in BLO
R: Fuzzy Bear head pattern worked in both loops
(In the pic above, both heads are facing the left.) See how the shaping of the muzzle is almost lost when it’s worked in both loops, and it looks like it’s been squashed from front to back?
2. Worked ‘inside out’
When you crochet with a fuzzy yarn, most of the fluff ends up on the back of the piece. If you crochet around the outside rim of each piece, as with most amigurumi, the result would be patchy on the outside, and very fluffy on the inside. So, you can either turn your work after crocheting most of it and before stuffing, or crochet around the inside rim of each piece, which eliminates the turning step.
Although fluff on the inside isn’t a problem with a regular yarn, there’s still a good reason to work around the inside rim, but before I explain that, I’ll clarify what I mean by the inside and outside rims:
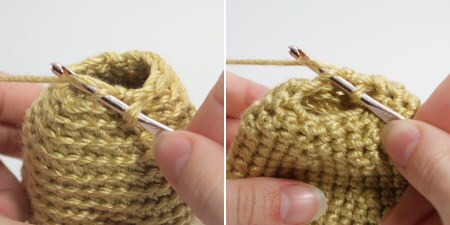
L: working around the outside rim. Hook is inserted from outside to inside of piece to begin stitch (towards the middle of the hole).
R: working around the inside rim. Hook is inserted from inside to outside of piece to begin stitch. Notice that the active stitch is at the back of the hole.
Now, why work around the inside rim? When you work in BLO, the unworked loops form a horizontal line that is visible in the finished piece. If you work around the inside rim (or turn your work after crocheting) those horizontal stripes will be hidden.
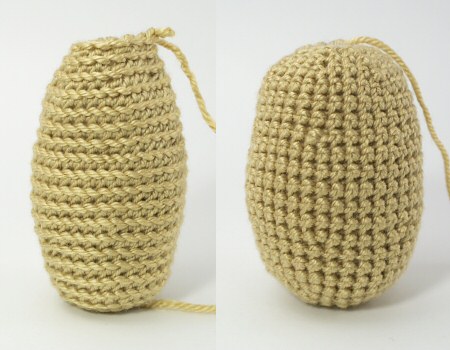
L: Visible horizonal stripes caused by working in BLO
R: Working around the inside rim (or turning the work after crocheting) eliminates those stripes
If you’re planning to brush your animal until the stitches are pretty much obscured, this may not matter to you, but I prefer to hide the stripes by crocheting around the inside rim so that the stripes form on the inside of the piece.
How to convert the pattern
- Follow the stitches as written (i.e. use back loops only where specified)
- Reduce your crochet hook size. Fuzzy yarns need a larger hook than usual; you’ll need to choose an appropriate hook size for your yarn. For worsted weight yarn, a size E (3.5mm) is a great choice for amigurumi. For a larger animal, try bulky weight yarn and a G (4 or 4.5mm) hook. Just use the same yarn and hook that you’d use for other amigurumi.
- Note that your animal will probably end up smaller than the fuzzy one, because of the smaller hook and the lack of fluff, so you’ll most likely need smaller eyes than those recommended in the pattern.
- Brush each piece with a wire brush (e.g. a pet slicker brush) after crocheting it, and before stitching the pieces together. Brush with a reasonable amount of force – if you are too gentle you won’t generate any fluff. It will probably take around 10-20 strokes over each area of the piece for the fluff to come up. Also be sure to brush the head before attaching the eyes, so they don’t get scratched by the brush. Keep brushing until the piece is as fluffy as you’d like it to be.

If you’re using an acrylic yarn, even just brushing it a bit, as below, will take away that acrylic ‘sheen’ and give a soft, fluffy appearance. It’s like a halo of fluff around the animal, and looks really sweet.
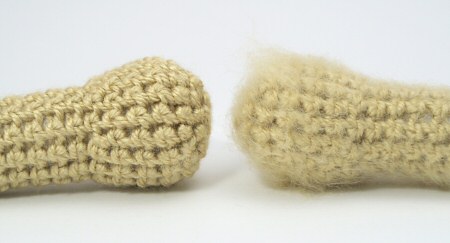
Fuzzy Bear arms, before and after brushing
Note that I purposely didn’t brush my bear too hard, because I like the antique/threadbare look above. But you could keep brushing all the pieces until your stitches are practically invisible, if you’d prefer.
Now you have the option of making all my fuzzy patterns with regular yarn! And if you have any more pattern-specific questions, you can always e-mail me for additional assistance 🙂
Hope you found this useful!

Loved this tutorial? I have so many more amigurumi tips and tricks to share with you!
Boost your amigurumi skills with my latest book, The Essential Guide to Amigurumi, your comprehensive guide to amigurumi techniques and tips.
Do you find my tutorials helpful? If so, please consider making a contribution towards my time so I can continue to create clear and concise tutorials for you:
Thank you so much for your support! Now click below for loads more crochet video and photo tutorials (and do let me know what else you’d like me to cover in future tutorials…)


Trisha Price said
Thank you so much for teaching this method of making a ‘ fuzzy ‘ animal. I just can’t get the hang of working with eyelash yarn. Love your method.
veronica brooker said
Do you know anyway to do fluffing without a pet brush
June said
Yes, you can use anything with a sharp, spiked/barbed surface, e.g. a teasel brush, a wire brush for cleaning rust from metal, or even the ‘hook’ side of a piece of Velcro! However, I do recommend that you test your brushing tool on a scrap piece of crochet (made from the same yarn) before you use it on your real piece, to make sure you’ll be happy with the results.
cizkah said
Hai june…one thing i still confuse is….if we work inside rim…which loop is called back loop? Coz if we work outside rim…the back loop is the one inside rim.
June said
The back loop is still at the back, whichever way your piece is flipped – the ‘back loop’ is always the one that’s higher up and further back. If you’re working inside out (working around the inside rim), working in the back loops will leave the unworked front loops hidden on the inside of your work; if you’re working right-side out (working around the outside rim), working in the back loops will leave the telltale ridge of unworked front loops visible on the outside of your work.
Casey S. said
Hi there! I was wondering if you had any suggestions for alternatives for pet slicker brushes.
June said
You can try any brush with fine sharp prongs or bristles that are strong enough to pull and drag the fibres of the yarn so they turn to fluff. A wire brush will likely be strongest (and hence will fluff up your work more quickly), but you could try any brush with stiff bristles.
Ann Marie said
Hello,
I have just stmbled upon your website and love it. Have been looking for a Christmas Stocking Ornament, of about 4″ long, not very big at all. This would be to hang on a Christmas Tree. I was wondering if you have a free pattern for this and if so, would you mind fowarding it to me or tell me where I can find it. I have seen several, but none of them are working for me. Thank you so much and good luck. you are a terrific crafter!!!
Ann Marie
June said
Ann Marie, you can find all my free patterns at www.planetjune.com/free – I’m afraid I don’t currently have a Christmas stocking ornament pattern though.
barb boran said
Just wanted to thank you for that info re: brushing your yarn. I wanted to make your baby penguin and i had the hardest time finding yarn and when i did it was so expensive and with my time was much easier to just buy one but now i will try it since learning this technique. Thank you!
June said
Hi Barb, if you mean the new Baby Emperor Penguin pattern, it was designed to be crocheted with a regular worsted weight yarn, and then to be brushed as in the method above, but it doesn’t use the complete method above.
The older Fuzzy Penguin (as with all my Fuzzy patterns) can be adapted to use normal yarns with the method above. All my Fuzzy patterns come with these instructions as an additional PDF file 🙂
Sarah said
I love all of your Tutorials ! They are so helpful and really well explained, especially because you show everything with pictures !
Thanks so much for sharing your skills =)
I also like your amigurumis very much, I’ll make sure to browse your shop in the near future =)
Rose said
THANK YOU!!! I’VE BEEN LOOKING FOR THIS METHOD FOR SO LONG OMG YOU SAVED ME.
Jaimico said
all the animals that you make, are on your book?
June said
Hi Jaimico! Not at all: NONE of my animal designs are in the book. The patterns for my animals are all for sale in my shop. My book includes four exclusive patterns (hamsters, mushroom & toadstool, boy and girl) but is primarily a reference/instruction book, not a pattern book – you can get a better idea by viewing my book trailer video 🙂 Hope that answers your question!
Barbara said
Your tutorial on fuzzy patterns and their conversions to worsted wt yarn was extremely enlightening! I appreciated your explanations for using BLO and working “inside out” Been crocheting for sooo many yrs and never even knew about that technique. Your patterns look great, and am ordering a few.
Look forward to your newsletter.
Thanks!
Cindy said
Of course! I have been crocheting for 40 years plus but never questioned it and did it either way. Now it all make sense. I wondered why sometimes patterns worked out just as pictured and when they didn’t. I thought it was just me. Like the God of crocheting only shined down part of the time. Crocheting was always partly cloudy. Now I work in the sun. Or is that “son”? Hmmmm
Stefanie said
June~ Thank you for the pictures, but I am needing some additional help. I just cannot get crocheting inside out right! Is there a video that you can point me to that will give me a few minutes of watching someone do this this technique? I am getting stuck after the first round, I can’t get my hook to get working from the inside out. I am also having trouble trying to get the positioning of my yarn right…the slack between the skein and the piece I am working on. Any additional help is greatly appreciated! Thank You!
June said
You’re welcome, Cherrysling 😀
Cherrysling said
What a revelation your blog is, apart from finally learning how to invisibly decrease, I just realized I have been working backwards the whole time (inside rim) and this is why instructions in patterns for BLO or FLO always seemed to be the opposite. WOW! Thank you PlanetJune
June said
Mary, the Fuzzy Bear pattern, and all the other Fuzzy Friends patterns, are available from my shop 🙂
mary said
Hello there! Can i ask how to stich the bear?
mary said
Hello! can u teach me how to do the fuzzy bear and so the others….
Thank you…!
Sarah said
This is a fabulous tutorial!
Crystal said
This is great, thank you. I’m totally going to use this * u *
linda p said
this is a great little tutorial- and makes me giggle, because when i wrote my first published pattern, it was done in the round and i worked on the inside rim b/c I liked the way it made the outside look. the tech editor told me i had worked it backwards, but i insisted that i meant to do it that way. now i have reference that shows the difference, thanks. 🙂