Soil Ball Tutorial (for ‘planting’ Crocheted Plants)
© June Gilbank 2019
To speed up your crocheted plant projects or get a different effect, you can ‘plant’ them in a decorative container instead of crocheting the pot too. With this method, you’ll make a ball of crocheted ‘soil’ and stitch your crocheted plant to the ball. You can then ‘transplant’ your crocheted plant into the container of your choice!
This tutorial is Donationware – the instructions are available for free, but if you like them please consider sending me a donation to show your appreciation:

Send me a donation and receive the easy-to-print PDF version of the tutorial as a thank you! It also includes some additional info that you’ll only find in the PDF version:
– Full crochet patterns for two pot sizes (1.5″/4cm and 2.25″/6cm diameter)
– Additional tutorial photos
Donations of any size are much appreciated. Just add the amount you wish to donate, and, once you have checked out and paid, your pattern will instantly be available to download from your PlanetJune account.
The general instructions for how to make a soil ball are available below, regardless of whether or not you choose to pay for them 🙂
This is a PlanetJune original crochet tutorial. Feel free to use items made from this tutorial however you wish, but I’d appreciate credit as the designer. Please do not reproduce these instructions anywhere else; instead post a link to www.planetjune.com/soilball
You will need…
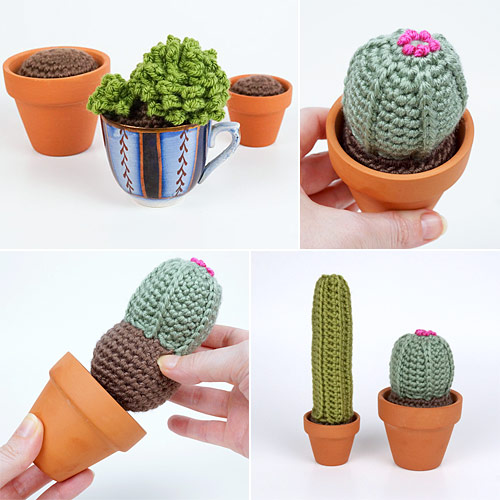
- One or more crocheted plants
Samples use cacti from the Cactus Collection 2 crochet pattern (available to purchase, together with many other potted plant patterns, from www.planetjune.com/potplants) - A clay plant pot or any other container e.g. a teacup or mug, a tin or a basket.
Samples use 1.5″/4cm and 2.25″/6cm terracotta clay pots - E US/3.5mm crochet hook
- Small quantity of worsted weight yarn
- Polyester fibrefill stuffing
- Yarn needle to weave in ends
- Stitch marker
PlanetJune Potted Plant Patterns
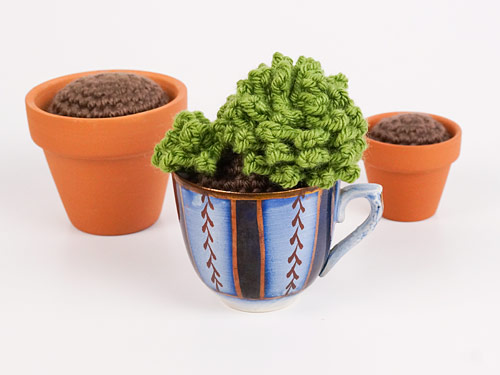
If you’d like to crochet some plants (like the cacti pictured above, and many others) to ‘plant’ in pretty containers, see www.planetjune.com/potplants for my wide range of potted plant crochet patterns!
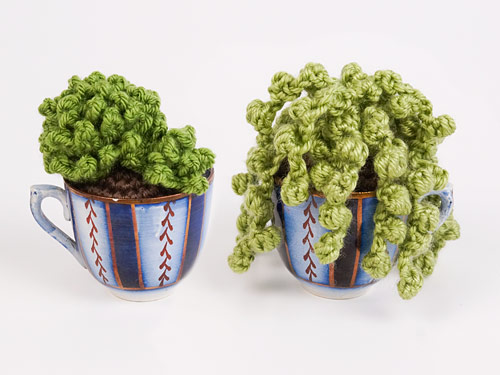
For example, these samples use succulent patterns from Succulent Collection 1 and Succulent Collection 2, ‘planted’ in decorative teacups.
General Instructions
1. Choose a Container
For this tutorial, I’m going to use miniature terracotta plant pots that I bought from the craft store, instead of the crocheted pots from my pattern. (A 2.25″/6cm clay pot is the perfect size to replace the small pot in almost any PlanetJune plant pattern.)
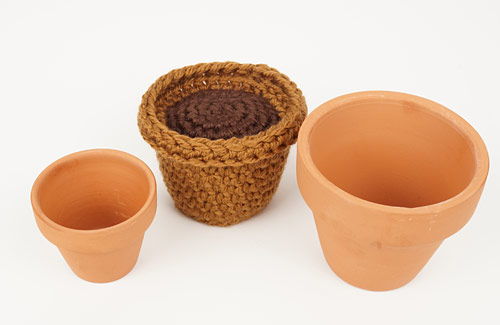
You can ‘plant’ a crocheted plant in any container, though, for example, a teacup or mug, a pretty metal tin, a little basket, etc. Unlike finding a pot for a real plant, you don’t need to worry that the pot will rust or leak water – crocheted plants are the definition of easy-care 😉
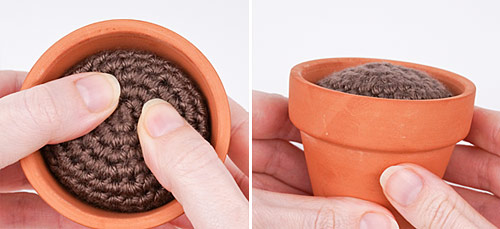
You can choose any container that’s an appropriate size for the plants you want to display. The container doesn’t even need to be round – the soil ball can squash to fit into different shapes. As long as you make a large enough ball, it’ll even squash into the corners of a square container!
The same soil ball can be squashed into various shapes to fit its container.
Container Size
If you’ve already crocheted the plant(s) for your container:
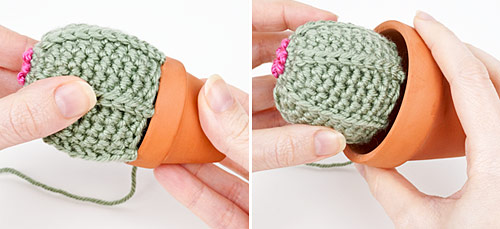
Check to make sure the container is large enough. Every part of the plant that will be stitched to the soil needs to fit inside the opening of the container, with a little room around the edge.
For example, the small pot here (below, left) is too small for this cactus – the opening at the bottom of the cactus is larger than the pot! The larger pot (below, right) is just perfect – once it’s ‘planted’, there’ll be a little crocheted soil showing all around the edges of the cactus.
If you haven’t already crocheted your plant(s):
- For a single-plant pot: Check the dimensions of the pot in the original plant pattern, and look for something similar.
- For a multi-plant arrangement: Either check the dimensions of the pot in the original plant pattern, and look for something similar, or choose any size of container, then crochet enough plants to fill it!
2. Crochet the Soil Ball

The following instructions are a general method to make a soil ball to fit any size of container. The squishiness of the soil ball means you don’t need to be too precise with fitting your container exactly – if your ball is slightly oversized, you can force it into place; and if it’s slightly undersized, you can overstuff it so it’ll hold in place.
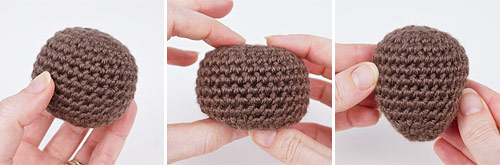
Top:
Start by crocheting a circle to fit your container.
Tip: You can use the pattern for the base of a crocheted pot as a guide if you don’t know how to make a flat circle (or just use the standard amigurumi formula of 6 equally-spaced increases per round).
The ideal size for your crocheted circle is slightly smaller than the diameter of the inner edge of the container. Crochet until there’s a narrow border (less than 1 stitch height) of space visible around the edge of the circle. If you add one more round, the circle will overlap the edges of the pot – that means you’ve gone too far! Undo the last round to get the perfect fit.
Sides:
Now you need to crochet the sides of your soil ball. Crochet straight (with no increases or decreases) for several rounds – the number will depend on the height of your container.
The soil ball doesn’t need to reach the very bottom of your container, unless you plan to glue the bottom in place. Provided that there’s enough contact between the soil ball and the sides of the pot, the ball will stay securely in place once you press it into the container.
Bottom:
Once you’ve finished the sides, you need to decrease to close up the soil ball. Invisible decreases with the standard amigurumi formula of 6 decreases per round will give you the neatest ball, but nobody will see the bottom of the ball, so don’t worry if it’s not perfect.
Pause when you have 12 stitches (or thereabouts) remaining, and stuff the soil ball. I’d recommend you use a bit less stuffing than you’d usually use to stuff an amigurumi piece – if your ball is a bit squashy, it’ll be able to conform better to the shape of the container.
Test the soil ball for size at this point by popping it into the container and checking it for width and height:
Width check:
- Press the soil ball into the pot to check for fit. If it grips the sides nicely, it’s just right. If not, add more stuffing to fill out the sides of the ball so it’ll hold in place more securely.
Height check:
- Check from the side: the edges of the soil should sit below the top edge of the pot.
- If the soil in your plant pattern has a mounded shape, make sure the middle of the ball sits at or slightly above the edge of the pot, so the leaves have room to spread over the top of the pot.
- If the ball is too tall and sticks out of the pot, you’ll have to unravel back to before the decreases and then unravel a round or two of the sides to make it shorter.
Once you’re satisfied with the amount of stuffing, continue decreasing until you have only 6 stitches remaining. Fasten off, stitch the remaining hole closed and weave in the end.
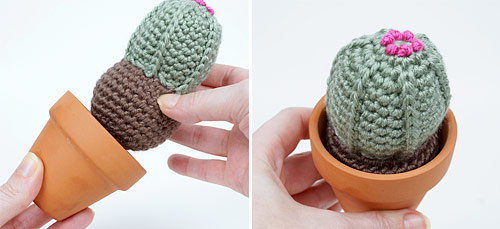
3. Attach the Plant
Using the instructions from the original pattern, stitch the plant to the top of the soil ball instead of the soil from the pattern.
4. Plant the Soil Ball
For the final step, transfer your plant to its new container by placing the soil ball back into the container. Push it in until the sides of the ball grip the sides of the container, so the plant will be stable.
Optional: If you’d like to make the arrangement permanent, remove the soil ball from the container and run a line of white craft glue or hot glue around the inside of the container, just below the top of where the soil ball gripped it. Replace the soil ball in the container and allow the glue to dry fully.
Now all you need to do is find a container like a mini plant pot or small teacup, pick up a PlanetJune plant pattern, and get crocheting!
I hope you enjoy this tutorial. Please leave me a comment below if you do, and consider leaving me a donation. Thanks!


Beverly said
You are so clever in your crocheting and how you help us us so much how you instruct us to do certain things in crocheting Not just great patterns. I Thank You so much.
Ana Carolina said
I always wanted to know how to make it, thank you very much, June!! ?
Erica said
What a perfect tutorial! You make everything so clear.
chantale perron said
I like that you gave a “recipe” that way, wew can make it with any kind or cntainer….Thank you for this free “pattern-recipe