Tulips crochet pattern
© June Gilbank 2019
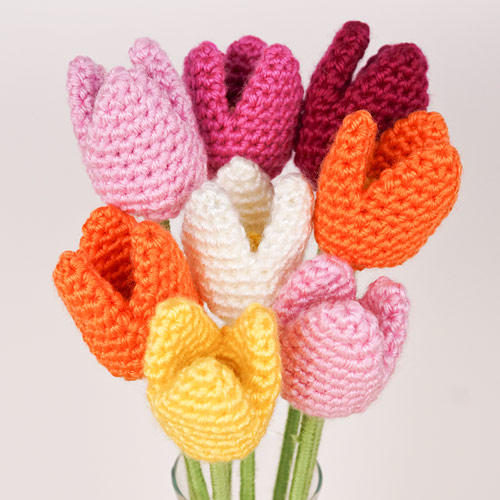
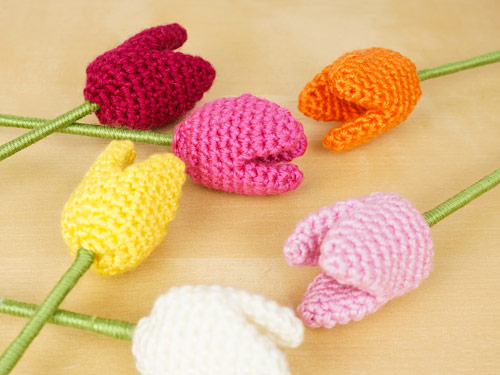
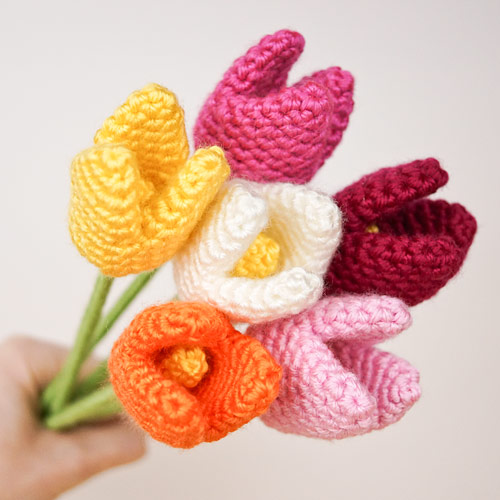
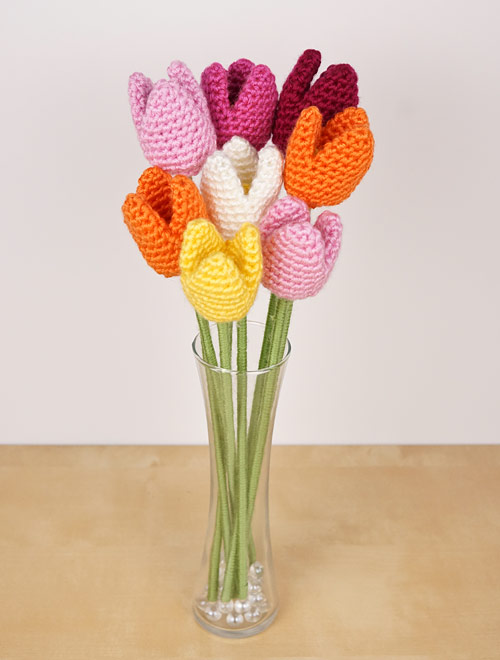
A beautiful realistic tulip flower with a clever one-piece construction – you’ll love how it comes together! Add some colour to your life with a bouquet of everlasting tulips.
Here are some ideas for use:
- Create a beautiful bouquet or vase of tulips
- Add a shorter stem to make a lovely tulip buttonhole
This Tulips pattern is Donationware – the pattern is available for free, but if you like it please consider sending me a donation to show your appreciation:
Send me a donation and receive the easy-to-print PDF version of the pattern as a thank you! It includes some additional info that you’ll only find in the PDF version:
– Additional progress photos (including left-handed photos)
– A special technique for fastening off the yarn neatly at the base of the stem
Donations of any size are much appreciated. Just add the amount you wish to donate, and, once you have checked out and paid, your pattern will instantly be available to download from your PlanetJune account.
The complete pattern and instructions are available below, regardless of whether or not you choose to pay for them 🙂
This is a PlanetJune original crochet pattern. Feel free to use items made from this pattern however you wish, but I’d appreciate credit as the pattern designer. Please do not reproduce the pattern anywhere else; instead post a link to www.planetjune.com/tulips
Not ready to make it yet? Add it to your Ravelry queue: 
Terminology
| ch | chain |
| invdec | invisible decrease Note: If you prefer, you may use a standard sc2tog decrease in place of each invdec. |
| sc | single crochet (double crochet for UK/Aus) |
| sl st | slip stitch |
| st | stitch |
You will need…
- E US/3.5mm crochet hook
- Small quantity of worsted weight yarn in a floral colour (e.g. white, pink, red, purple, yellow, orange, cream) plus yellow for the flower centre and green for the stem
- Yarn needle
- Stitch marker
- Optional: bamboo skewer, thin dowel, pipe cleaner, or floral wire for the stem
I used worsted weight yarn and a size E hook, which produced a lifelike 2.25″ (6cm) tall flower. (Your gauge and yarn choice will affect the finished size slightly.) Try using a finer yarn or crochet thread with a correspondingly smaller hook to give a more compact flower.
Crochet Instructions
Notes
- Do not join at the end of each round; rounds are worked in continuous spirals.
- Use a stitch marker to mark the beginning of each round. Move the marker up as you start each new round.
- Always change colour in the last loop of the stitch before the colour change: www.planetjune.com/colour
Colour code
A: main colour for petals
B: yellow for centre of flower
Petal Tip (make 3)
worked from top down
With A, make a magic ring, ch 1
Rnd 1: 6 sc in magic ring. (6 st)
Rnd 2: (sc in next 2 st, 2 sc in next st) twice. (8 st)
Rnd 3: (sc in next 3 st, 2 sc in next st) twice. (10 st)
Rnd 4: (sc in next 4 st, 2 sc in next st) twice. (12 st)
Rnd 5: sc in each st around. (12 st)
Tips 1 and 2 only: Fasten off, leaving a short yarn end.
Tip 3 only: Do not fasten off. Continue to Petal Joining.
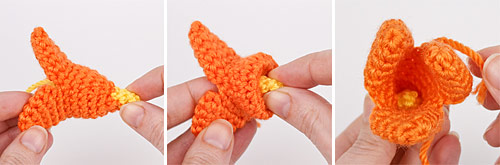
Petal Joining
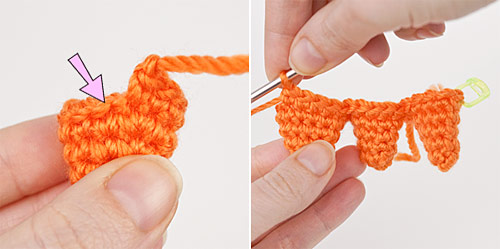
Rnd 6: sc in next 5 st (placing a stitch marker in the first stitch worked); move to the next unworked st of Tip 1 (marked by arrow in photo, below, left) and sc in that st and in next 4 st; move to the next unworked st of Tip 2 and sc in that st and in next 4 st. (15 st).
Note: The three tips are now all joined together in a line (below, right).
Rnd 7: pull the petal tips into a ring with the last round of stitches around the outside, sc in the first stitch of Rnd 6 (the marked stitch) to join the petal tips into a ring; sc in each remaining st around. (15 st)
Rnds 8-10: sc in each st around. (15 st)
Rnd 11: (invdec, sc in next 3 st) three times. (12 st)
Rnd 12: invdec six times. (6 st)
With B:
Rnds 13-14: sc in each st around. (6 st)
Pull the yarn ends from the colour change through to the inside.
Fasten off, stitch the remaining hole closed and weave in the end.
(Do not weave in the short yarn ends from Tips 1 and 2.)
Turn Inside Out
Don’t worry that your flower now looks very strange – this is correct! The previous section formed the inside of the tulip, and now you’ll turn it all inside out so you can work the remainder of the outside of the tulip flower.
Grasp the tulip by the yellow centre (below, left), and begin to push it down into the flower (below, centre), to turn the flower inside out.
Note: The yellow centre will not be turned, so you can use it as a handle to push with.
Continue to push it all the way through until the petals are at the top of the flower, and the yellow centre is inside at the bottom (below, right).
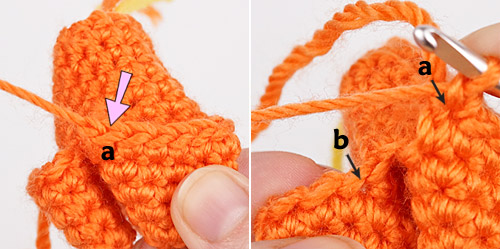
Outer Flower
- Insert hook into the specified stitch of the current piece (a), yarn over and draw up a loop.
- Insert hook into the specified stitch on the other piece (b), yarn over and draw up a loop.
- Yarn over and draw through all 3 loops on hook. (The finished sc2tog spans both pieces.)
Turn the flower upside down and locate the last stitch you worked on one of the petal tips (the stitch before one of the short yarn ends from the petal tip – we’ll call this point a, marked by arrow, below, left).
With A, fasten on into this stitch (by inserting your hook under both loops of the stitch and drawing up a loop), ch 1.
Rnd 1: jsc2tog over the same st you just worked into (a, below, right) and the first st on the next petal (b, below, right), sc in next 6 st; (jsc2tog over last st of current petal and first st of next petal, sc in next 6 st) twice. (21 st)
Rnds 2-4: sc in each st around. (21 st)
Rnd 5: (invdec, sc in next 5 st) three times. (18 st)
Tuck any remaining loose yarn ends down inside one of the petal tips to keep them out of the way.
Rnd 6: (invdec, sc in next st) six times. (12 st)
Rnd 7: invdec six times. (6 st)
Join with sl st and fasten off, leaving a long yarn end.
Optional: Make a couple of stitches around the bottom of the flower, passing through both layers, to attach the inner and outer layers together and stop the inside from being pulled out.
Weave in the remaining yarn end.
Stem
I used yarn-covered 1/8″ wooden dowel to make my tulip stems. If you prefer, you may omit the stem altogether, or wrap yarn around, or crochet over, a bamboo skewer, floral wire or pipe cleaners to make a stem (see my Basic Rose pattern for details).
For detailed instructions for making stems, see my Easy Yarn-Wrapped Stems for Crochet Flowers video tutorial, or follow the basic instructions below.
To make a yarn-wrapped stem:
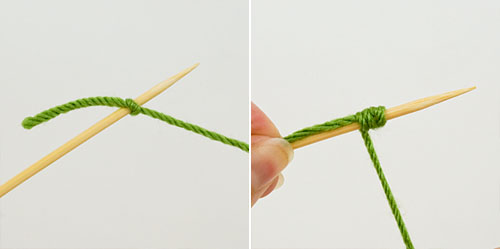
- With the end of the yarn, leave a short yarn tail and tie a single knot tightly around the stem base, about 2cm (3/4″) from the top (below, left).
- Lay the short yarn tail against the stem, pointing down, and begin to wrap the yarn around both the stem and the yarn tail (below, right).
- Continue wrapping the yarn all the way to the bottom of the stem. Once the yarn is well-anchored to the stem, and the tail is covered, you may find it faster to rotate the stem so the yarn is wrapped onto it, pausing to push the turns of yarn together if you notice any gaps between them.
- Knot the yarn around the bottom end of the stem, and secure the knot in place with glue before cutting the yarn.
Finishing and Assembly
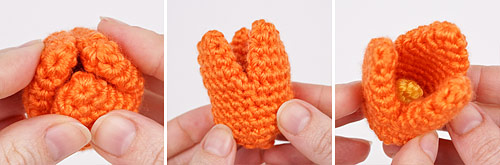
Flatten the three petal tips of the tulip, then push the tips together (below, left). Open the tips slightly so they point straight upwards (below, centre) and you can see the yellow centre if you look down from the top of the flower (below, right).
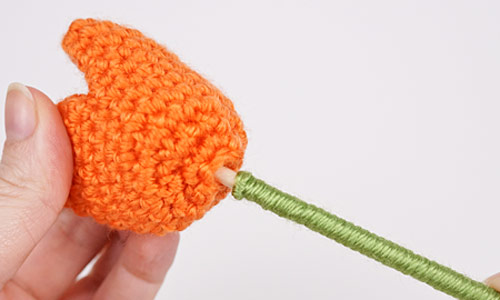
Insert the uncovered tip of the stem through the hole in the bottom of the tulip, so it goes up inside the middle of the yellow centre of the flower.
Optional: To keep the flower head from being pulled off, you can pull the stem out most of the way again, apply some white glue to the top of the stem, push it back into the flower, and hold it in place for a minute until the glue dries.
I hope you enjoy this pattern. Please leave me a comment below if you do, and consider leaving me a donation. Thanks!


Marie agnès Pezé said
Bonsoir, je viens de m’inscrire sur votre site que j’ai visité et que je trouve très intéressant, par contre je voudrais savoir si l’on peut imprimer vos modèles, ce serait pour moi plus facile, car je n’ai pas toujours accès à internet, je vous remercie et vous souhaite de bonnes fêtes de fin d’années, Cordialement
June said
Bonjour Marie, and yes! If you donate any amount by clicking one of the pink ‘make a donation’ buttons above, you can download the PDF version of any of the patterns you find on my website. They’re nicely formatted and laid out to be printed. (Or you can see them all in one place here.)
Naomi Harrison said
I agree with the previous comment that this pattern is great and easy to understand until you get to the outer flower part. I am a pretty experienced crocheter yet still found it really confusing. I managed to finish and make the flower look good but I think this is only because of my experience. It’s such a shame because the finished flowers look so pretty!
June said
Thank you for your feedback, Naomi. I’m going to add some additional clarification to the pattern – I’ll post another comment here once that’s done!
June said
Okay, the pattern is now updated with clearer explanation of the jsc2tog stitch, clearer text explaining which stitches to work into, and close-up photos showing points a and b. This is a new and different technique, so even the most advanced crocheter will have to learn it, but when you have the piece in front of you and compare it with the photos, it should become clear!
Karla said
I really enjoyed making the first tulip until the outer flower part started. From there on, it was extremely confusing and I my opinion very poorly explained. You could have attached some detailed pictures and explained in detail were exactly to put the stitches. Its not possible for me to finish the tulip, I’m very disappointed.
June said
I’d be happy to help you understand, Karla. The arrows in the photos above show you exactly where to start the outer flower and exactly where to make the first sc2tog stitch (with the first leg at point a and the second leg at point b). After that, you just sc along the edge of the petal, just like you would for any other round. Then you’ll repeat the exact same sc2tog process (as shown in the photos) to jump over to the next petal, and continue in the same way all around the flower until you’re back to the start of the round.
Please try again, and, if you’re still struggling, let me know exactly where in the instructions you’re stuck, so I can help further! That’s all part of the PlanetJune service 😊
M m lane said
Just thought I’d say thank you. Your stem for Tulip flowers was exactly what I was looking for. All the instructions were easy to follow.
Elaine Ramirez said
How does the tulip not come off the stick? I watched the video but am trying to understand that.thanks.
June said
Hi Elaine, for a decorative flower, there’s no need to do anything – it just stays in place. There are also optional instructions for gluing it in place if you prefer. (For details, look for the ‘Finishing and Assembly’ section, right at the end of the above instructions.)
Linda Frommer said
Thanks so much, June. I was looking for something unique to make for Christmas presents for my sisters, and these crocheted beautifully! I will make a bouquet for each sister in her favorite color. I sincerely appreciate the time you spent sharing this easy-to-follow, well-written pattern.
Sara said
What a nice pattern with a very smart construction, thank you!
Marcia Lewis said
Thetulip patter was easy forme to follow love it
Marcia
Kelly Almstedt said
This Tulip pattern makes no sense!!!
The pattern is explaining how to make circles, as the petals.
In the pattern pictures the pictures show the petals as cone shaped.
Can you explain to me what I am misunderstanding?
Before I started to crochet this pattern, it sounded so easy.
Thank you in advance for any advice you can give me.
June said
Kelly, you’ll flatten each piece after crocheting it to create the final petal shape – please see my Flattened Pieces tutorial for a demonstration of this 🙂
Giulia said
Eu estou meu perdida, sera que tem um video de como fazer?
Pmc said
i would like to make the tulip, but the pattern is confusing to me. do you close the first row with a slip stitch? it doesnt say too. Also, the part where you attached the 3 tips, do you crochet them closed or do you attach them on only one side and keep the middle open?
thanks
June said
Pmc, there are no slip stitches unless the pattern specifies it – rounds are always worked in continuous spirals in this pattern. And, if you follow the pattern as written, the petals will be joined only along one side each at the ‘Petal Joining’ stage. (If you jump down to the ‘Outer Flower’ section, you’ll see that those unworked stitches will be used later!)
Rita said
Your little yes/no survey went too fast. I would like to say I DO like your site. I was looking for a simple flower to crochet and yours popped up first and was exactly what I was looking for. After supper, I am sitting down to make spring flowers in the middle of a downpour of snow. Thanks for providing the free pattern. Rita
ria said
Goodmorning thank you for this loverly flowers .have a nice tuesday.Ria.