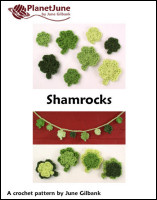
Shamrocks crochet pattern
© June Gilbank 2013
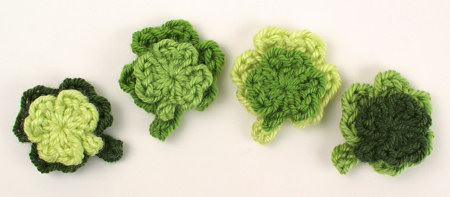
This is a clever little pattern to make sweet shamrocks with a dimensional 3D effect, in two sizes: a realistically-shaped design, and a tiny miniature version!
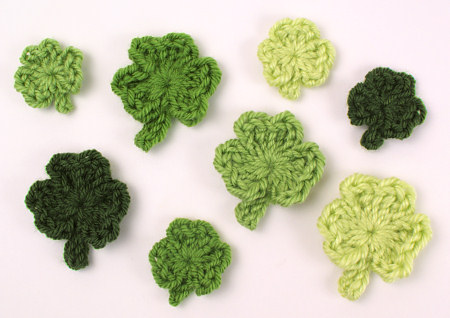
Each shamrock is crocheted in a single round, so you can make one in minutes.
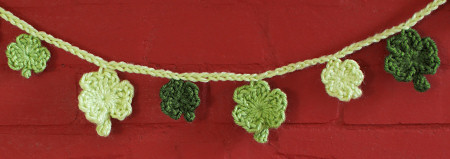
String them into a garland, attach one to a greetings card, add a pin back to make a cute brooch or lapel pin, or layer them for a novel look.
This pattern is Donationware – the pattern is available for free, but if you like it please consider sending me a donation to show your appreciation:
Send me a donation and receive the easy-to-print PDF version of the pattern as a thank you! It includes some additional info that you’ll only find in the PDF version: a crochet stitch diagram for each shamrock design, in both right- and left-handed versions.
Donations of any size are much appreciated. Just add the amount you wish to donate, and, once you have checked out and paid, your pattern will instantly be available to download from your PlanetJune account.
The complete pattern and instructions are available below, regardless of whether or not you choose to pay for them 🙂
This is a PlanetJune original crochet pattern. Feel free to use items made from this pattern however you wish, but I’d appreciate credit as the pattern designer. Please do not reproduce the pattern anywhere else; instead post a link to www.planetjune.com/shamrocks
Not ready to make it yet? Add it to your Ravelry queue: 
Terminology
| ch | chain |
| dc | double crochet (treble crochet for UK/Aus) |
| hdc | half double crochet (half treble crochet for UK/Aus) |
| sc | single crochet (double crochet for UK/Aus) |
| sl st | slip stitch |
| st | stitch |
| tr | triple (treble) crochet (double treble crochet for UK/Aus) |
You will need…
- H US/5mm crochet hook
- Small quantity of worsted weight yarn in green
- Yarn needle to weave in ends
Size
Approx 1.3 – 2″ (3.5 – 5cm) tall. (Your gauge and yarn choice will affect the finished size slightly.)
Gauge
Gauge is unimportant for this pattern. I like to crochet the shamrocks with a larger hook than I’d use for amigurumi – the looser stitches enhance the 3D effect and prevent the shamrocks from becoming too rigid. Use the recommended hook size on your yarn’s ball band as a starting point.
Notes for both shamrocks
To make these shamrocks, you must be comfortable with the magic ring technique. Instead of single crocheting into the magic ring, the entire shamrock is crocheted directly into the ring, and then the ring is pulled tight to complete the round, and the shamrock.
- As you crochet, you may need to stop and snug together the bases of the stitches you’ve already made, so that you can fit all the stitches into the magic ring.
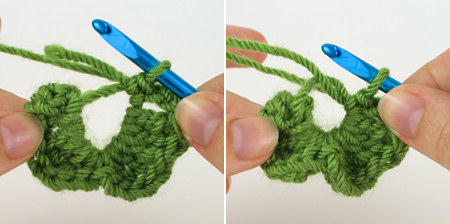
Left: Two leaves finished. Right: The same stage after pushing the bases of the stitches together. - When you reach the end of Rnd 1, make the final sl st into the remaining hole of the magic ring (it may be a tight fit!) and then fasten off.
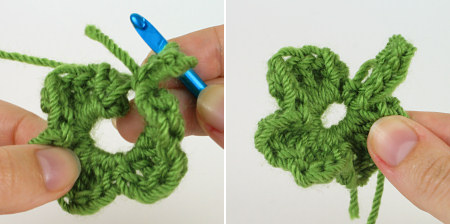
Left: Stem finished. Right: Sl st into ring and then fasten off. - To complete the shamrock, pull the magic ring tightly closed, then pull the stem back to create the 3D effect (see Finishing, below, for detailed instructions).
Note: As there are so many stitches worked into the ring, depending on your yarn choice, you may not be able to pull the ring completely closed. Don’t worry; just pull the ring as tightly closed as you can – a small hole in the middle is okay!
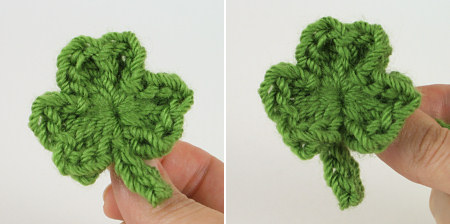
Magic ring pulled tightly closed. Right: Stem pulled back to give leaves more space.
Realistic Shamrock
Note: All stitches into chains are worked into the back bumps of the chains.
Make a magic ring, ch 2.
Rnd 1: working all stitches into the magic ring:
(2 tr, dc, 2 tr, ch 2, sc, ch 2) twice,
2 tr, dc, 2 tr, ch 2, sl st,
ch 5, sc in 2nd chain from hook, sl st in next 3 chains, sl st in magic ring.
Cut the yarn, leaving a long tail. Pull the tail through the remaining loop on the hook and pull tight to fasten off. Holding the shamrock by the base of the third leaf you crocheted, pull the magic ring tightly closed.
To complete the shamrock, see Finishing (below).
Mini Shamrock
Note: All stitches into chains are worked into the back bumps of the chains.
Make a magic ring, ch 2.
Rnd 1: working all stitches into the magic ring:
(dc, hdc, dc, ch 2, sl st, ch 2) twice,
dc, hdc, dc, ch 2, sl st,
ch 3, sl st in 2nd chain from hook, sl st in next chain, sl st in magic ring.
Cut the yarn, leaving a long tail. Pull the tail through the remaining loop on the hook and pull tight to fasten off. Holding the shamrock by the base of the third leaf you crocheted, pull the magic ring tightly closed.
To complete the shamrock, see Finishing (below).
Finishing
The front of the shamrock is the side that faced you while you were crocheting (you should be able to see the row of sideways Vs from the top of each stitch visible around the edge of the leaves). Pull the stem backwards, away from the front of the leaves. Pull the bottom end of each side leaf down and together at the front, to fill the space previously occupied by the stem. This gives the shamrock its 3D effect.
Weaving in the ends
Note: Make sure your magic ring is pulled tightly closed before you begin weaving in the ends – this is your last chance to avoid having a hole in the middle!
Both yarn ends should already be at the back of the work. If not, use a yarn needle to pass the ends through to the back. Using a yarn needle, weave each end, a few stitches at a time, underneath the backs of the stitches of Rnd 1, then snip off the remaining yarn tail.
Tip: To save time, you can thread both yarn ends onto the yarn needle and weave them in together. However, if you find the needle is too bulky to pull through your stitches with both yarn ends, you’ll have to weave in each end separately.
I hope you enjoy this pattern. Please leave me a comment below if you do, and consider leaving me a donation. Thanks!


Jean E. Roberts said
THANK YOU! THANK YOU!
Kat said
What a fantastic pattern! Thank you so much for sharing it.
Sandra said
Hello
I would like to know where can I find videos, for all your works.
I found writting explanations, but I prefer videos.
Thanks.
June said
You can find all my video tutorials at www.planetjune.com/help
Please note that my videos show you crochet techniques (that you can apply to any pattern), not specific patterns – my patterns are available in written form only.
Monica Ballinger (MagicalAmigurumi) said
Thanks for this amazing pattern! I have already made a handful and I have to say that they are simple, and fun to make! I will be donating as well! Thanks June! 🙂
muna said
Thank you, once again, June for a lovely pattern and so timely too! Already made a whole bunch to give to my friends for our st. pattys day do!
Edie said
Thank you so much for these. Will have some fun making them.