Amigurumi Acorn crochet pattern
© June Gilbank 2007
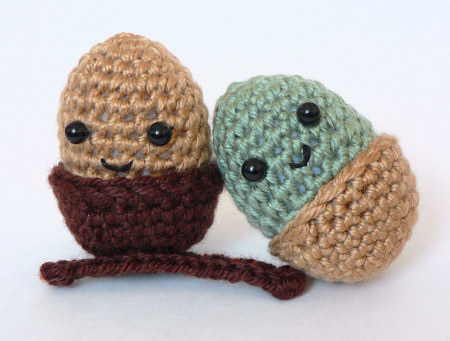
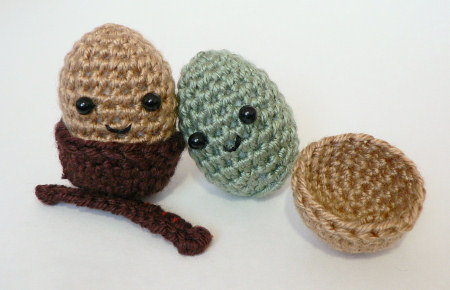
Make your own amigurumi acorn complete with removable cup! Standing at just over 2 inches tall, these little acorns are quick and easy to make.
This pattern is Donationware – the pattern is available for free, but if you like it please consider sending me a donation to show your appreciation:
Send me a donation and receive the easy-to-print PDF version of the pattern as a thank you! It includes some additional info that you’ll only find in the PDF version:
– How to invisibly stitch the acorn to the cup
– An unwired (child-safe) twig pattern
– Suggestions for use, and bonus tips
Donations of any size are much appreciated. Just add the amount you wish to donate, and, once you have checked out and paid, your pattern will instantly be available to download from your PlanetJune account.
The complete pattern and instructions are available below, regardless of whether or not you choose to pay for them 🙂
This is a free PlanetJune original crochet pattern. Feel free to use items made from this pattern however you wish, but I’d appreciate credit as the pattern designer. Please do not reproduce the pattern anywhere else; instead post a link to www.planetjune.com/acorn
Not ready to make it yet? Add it to your Ravelry queue: 
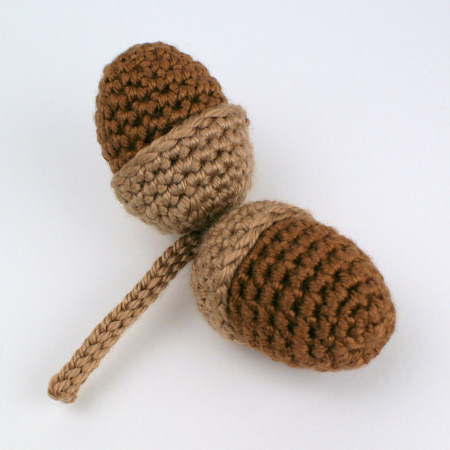
Omit the eyes to make realistic acorns!
Terminology
| ch | chain |
| invdec | invisible decrease Note: If you prefer, you may use a standard sc2tog decrease in place of each invdec. |
| sc | single crochet (double crochet for UK/Aus) |
| sl st | slip stitch |
| st | stitch |
| sc2tog | single crochet decrease (insert hook into stitch and draw up a loop, insert hook into next stitch and draw up a loop, yarn over and draw through all 3 loops on hook) |
Notes
- Do not join at the end of each round; rounds are worked in continuous spirals.
- Use a stitch marker to mark the beginning of each round. Move the marker up each time you start a new round.
You will need…
- E US/3.5mm crochet hook
- Small amount of worsted weight yarn in 2 colours (for acorn and cup)
- Polyester fibrefill stuffing
- Yarn needle to weave in ends
- Stitch marker
- Embellishments (see below for ideas)
- Pipe cleaner to make twig (optional)
Acorn Pattern
worked from top to bottom
Make a magic ring, ch 1.
Rnd 1: 6 sc in magic ring. (6 st)
Rnd 2: 2 sc in each st around. (12 st)
Rnd 3: sc in each st around. (12 st)
Rnd 4: (sc in next st, 2 sc in next st) six times. (18 st)
Rnds 5-10: sc in each st around. (18 st)
Rnd 11: (sc in next st, invdec) six times. (12 st). Stuff acorn through hole.
Rnd 12: invdec six times. Close up remaining hole, fasten off and weave in ends.
Acorn Cup Pattern
Make a magic ring, ch 1.
Rnd 1: 6 sc in magic ring. (6 st)
Rnd 2: 2 sc in each st around. (12 st)
Rnd 3: (sc in next st, 2 sc in next st) six times. (18 st)
Rnd 4: (sc in next 5 st, 2 sc in next st) three times. (21 st)
Rnds 5-6: sc in each st around. (21 st)
Rnd 7: sc in next 9 st, sc2tog, sc in next 8 st, sc2tog. (19 st).
Join with sl st to next stitch. Fasten off and weave in ends.
The acorn should fit snugly in its cup so it won’t fall out by accident.
Customizing
Unless you want to make a realistic acorn, you’ll need to add a cute face. This can be as simple as just two eyes, or you can embroider on a nose and/or mouth as well – it’s up to you!
Suggestions for the eyes (approx 6mm diameter):
- sew on small round beads or buttons
- use animal (safety) eyes
- embroider circles to make an alert acorn
- embroider ‘u’ shapes to make a sleeping acorn
- glue on googly eyes
Optional extra: make a twig for your acorn’s cup by single crocheting around a short length of pipe cleaner and then stitching it to the bottom of the cup with the same colour yarn. (NB please don’t do this if your acorn will be a toy for a small child, as the wire is not safe for children.)
UPDATED TO ADD:
For those of you with an autumn-themed Christmas tree, you could also attach the face upside down (so the cup becomes a ‘hat’ at the top), stitch the cup to the acorn so it won’t fall off, and make a hanging loop on the base of the cup so the acorns can dangle from your tree branches!
I hope you enjoy this pattern. Please leave me a comment below if you do, and consider leaving me a donation. Thanks!


Patricia said
Hello,
i have a question.
May i translate your free patterns, for my own website for (free) dutch patterns.
Ofcourse i link to your originel patterns.
Greetings Patricia
June said
I’m glad you’re enjoying my patterns, Patricia. Please see the translations policy in my FAQ for the reasons why I do not allow any translations of any of my patterns to be posted/published/shared. Thanks for checking with me, and for your understanding!
naweldoigtdore said
thank you very much for your free pattern!beautiful site .
Sara Culpepper said
Hi
just to say a massive thank you, I have been wanting to try amigurumi for ages and tried to follow a video yesterday, i had a very rubbish looking ladybird 🙁 today i have two lovely acorns, your instructions are so easy to follow, thank you for taking the time to put them up and sharing with us beginners 🙂
Bests Sara
Peter Collis said
Hello June
Wonderful acorns! Are ythey available to buy? my television debut may just depend on them.
Kind regards
Peter
Nancy said
Thank you ,thay are so cute .
Marion said
Thank you for your cute pattern. So good for children and fetes.. Marion.
choco said
thank you so much for your free pattern..
i love it…
Toni said
These are just adorable! Thanks for posting this free pattern. Amigurumi is my next step.
Debbie said
I love this pattern. I am leaving the face off for a more formal look and I’m attaching a piece of ribbon to each one with our children’s names on them. These ornaments are to hung on a diplay tree during our wedding as a symbol of the joining of our families for our family tree. Thank you so much for helping me with another great unique wedding idea!
Cindy said
I hope this is yours because the picture is definitely taken from your site. On top of that, the pattern is free here, but sold for $3.50 on ebay?!?
cgi.ebay.com/Crochet-Pattern-Amigurumi-Acorn-Doll-Dolls-Toy-9107-FUN-/290511844020?pt=US_Crocheting_Knitting_Patterns&hash=item43a3daf2b4#ht_2609wt_788
June said
How infuriating! It is my pattern – it was published in the Crochet Pattern A Day calendar a few years ago. It looks like this seller is trying to sell that one page of the calendar for $3.50 (the listing does say it’s from a calendar or magazine). I’m not sure on the legality of that – I have a feeling that books etc shouldn’t be split up and sold as individual patterns, but I’m not sure if that’s correct. Hopefully everyone will realise they can get it free from me here and not be tempted to buy the ebay version! Thanks for alerting me though 🙂
Hannah said
I checked on eBay and you can report this as a copyright infringement. Not only is this person using your image, but the pattern you created as well, which was published in another source. I am surprised that no one reported this yet.
Priscilla said
I love my finished acorn!!!! It’s so cute, my sister squished the bottom flat so that it could be a mushroom, she wants me to make her some more “Mushrooms.”
levi said
Hi my name is Levi,
I really love the acorns but my mum cant crochet. I stumbled across your cute acorns when i was researching homework. Can I buy them ready made?
from Levi (aged 8)
June said
Sorry, Levi, I don’t sell crocheted acorns. Maybe you could get a friend or relative to make one for you – or learn to crochet yourself! It’s easy to do, and makes a great hobby 🙂
ELIZABETH BOYD said
Hi – I have been crocheting for years – I really appreciate the instructions for the magic ring. I have been trying several patterns, and I completely understand the instructions with one major critical part – transitioning from the magic ring to round 1. For example,
Make a magic ring, ch 1.
Rnd 1: 4 sc in magic ring. (4 st)
I am stuck on the Rnd 1: 4 sc in magic ring (4 st)
Does this mean single crochet 4 times in the “hole” that is in the center of the magic ring? Then I am confused by the 4 st.
Any help would be appreciated. Thanks
June said
Yes, make 4 sc into the hole in the magic ring, then pull the ring tightly closed afterwards. The (4 st) in brackets at the end of each round is the stitch count – how many stitches you’ve made during that round. Hope that helps!
Ashleigh said
ok i haven’t tried the acorn yet and i have NEVER crocheted before!!!!! I was just wondering if u could add a few chain stiches at the top of the acorn to make it look like a stem on it? Just an idea 🙂 thanks because i think the acorn will b great for me and will try my best but im not sure what ” stuff the acorn out” means? little help!!
Thankz
June said
Yep, you could crochet a chain to be a stem if you want – it’d just be a floppy stem instead of the rigid pipe cleaner stem I made. As for “stuff the acorn out”, I’m not sure where you see that – if you mean “stuff acorn through hole”, there’s a hole left in the acorn at that point, and you insert the stuffing through that hole before closing up the acorn 🙂
Kay said
Finally get my internet back. And wanted to thank you for your help the other week =)
Also I kinda have another question. With this pattern if you wanted to make it bigger, would you keep increasing after 18 or would you do a few rounds of just 18 then increase? Thanks in advance!! =D
June said
You’re welcome, Kay!
If you wanted to make it bigger, do 1 or 2 rounds of 18 sts after Rnd 4 before increasing further – it’d flare out too much if you increase straightaway 🙂
Marla Jones said
I did this!!! My first amigurumi!! I made him for a swap, and sent it, but it does look like yours, except I sewed the hat(??) down on him and embroidered the eyes so that he was right side up.
I had one question tho, pertaining to the sewing portion. I had trouble embroidering the eyes, as I found it hard to get it started. I’m using to woven cloths and you’re able to start stitching by making a knot, etc. So, how do you get your sewing portion done (attaching arms, embroidering eyes, mouths, etc.)?
thanks!
June said
Embroidering onto crochet is difficult, as you’ve found! I try to avoid it, but if you use a sharp(ish) needle and pierce the fibres of the yarn instead of making your embroidered stitches between your crocheted stitches, you can make your stitches more accurately. Start by inserting your needle at a hidden spot away from where you want to embroider, and bringing it up out of your piece at the starting point. You can deal with that dangling end in the hidden spot after you’ve completed the embroidering.
Sewing on arms and other pieces is a totally different matter, and I have a tutorial that covers that: Joining Amigurumi 🙂
melissa rose said
i just made the egg part and it reminded me of a mouse so i did i made ears and left the long end at the end and thus, made a cute little white mouse 🙂
Faith Mcafee said
I made one and they are sooooooo cute!the only thing is that it ended up with 23 stiches instead of 18 so I made an extra decrease row on the acorn and started out with 8 stiches on the hat instead of 6. thankyou!
Karen Crain said
These are so cute. Who would have thought about crocheting acorns! Kids and adults will love these! 🙂 Thanks for sharing.
Wahoo! said
I cant wait to make this little guys! Birthday presents for everyone!
Also I can make mine crazy colored. I have some yarn that’s three colors in one. One kind is brown-light borwn or tan-blue. My other one is light pink-dark pink-white. I can’t wait to see how they’re going to turn out!
Anna said
I’d like to make some of these then use a photo of them as a logo for my husband’s business. If you like I’ll post a link to the photo when I’m done. And we could probably post a link back here for anyone who wants to know how it’s done!
If I actually get round to it, that is! 🙂
Reba said
Thanks for all the free patterns!
Nicola said
I wish I could make these for my French children, they are called “Acorns” and these would have been perfect….sadly I can’t crochet/knit etc.
Lisette said
Hi!! I totally love your acorn!! It’s so cute!
I hope you don’t mind I praised you at craftster and put a link to you.
If you do, please let me know.
www.craftster.org/forum/index.php?topic=292207.990;
EJ said
hello =)
umm, im sort of new at this, and i was wondering how you weave in the ends? =S
ohh, and thank you so much for your tutorial on how to make a magic ring! i had been wondering what those were ^^
Maria said
Hello!
first of all I would like to thank you for the pattern. I’m making some accorns for my x-mas tree and they’re really cute.
Second thing I wanted to ask you if you’re selling the pattern on ebay, because if you don’t somebody is doing it for you… I know it’s not my issue, but you gave it for free and I think it’s unfair somebody else is getting benefit of something yours, and trying to cheat other people.
Thank you again for the pattern and sorry if I cause you any inconvenience.
Evarie said
I am making these for my wedding. As we have hidden “kisses”(peter pan) thru out the wedding. Now I just need to find a crochet pattern for a thimble!
June said
brennakins, it’s just the way it sounds – make a regular single crochet, then instead of moving on to the next stitch, insert your hook into the SAME stitch you just crocheted into, and make another single crochet 🙂
brennakins said
How do you do two single crochets in one stitch? I’m new at this.
Helga Escobar said
Hi,
I am Helga, I am from Chile, I started to do amigurumis last month, That was a very good experence, thank for your patterns.
I will be doing more amigurumi.
Helga
Kisa said
awwwwwww! sooooooooooo cute! i soooooooooo going to make one!
Neww =] said
hi… i love these ‘lil acorn things =]
Just a thought but you could use the acorn part in easter as an egg too, adorable C=
Thanks =]
marie said
Hi June,
I’ve been practicing making these little guys this weekend and mine acorns are turning out more “stawberry” shaped than your eggy acorns (which is ok because I’m going to make strawberrys!). I think that has more to do with my beginner crochet skills than anything tho! I think I’m doing something wrong (in the step after the magic ring, I’m a beginner) and that is making my caps and acorns more “pointy”. With the caps it’s kind of cute because the top of it has a “nib” just like a real acorn! Thank you for the tutorial! These little guys are so adorable and I’m making a couple as a birthday present for my boyfriend’s 4 year old niece!
Bidouillette said
I’m so happy, juste done and on my blog tomorrow in the morning! Thank for the tuto and excuse me for my bad english! It was really so cut to do them!!!!!!
Linda said
Thanks so much for the pattern. I left off the eyes, attached the cups and put ribbon through the back to make napkin rings!
Thanks!!
June said
Angela, to join at the end of a round, you slip stitch into the first stitch of that round, then ch1 before beginning the first stitch of the next round.
To work in continuous spirals, you skip both of those steps. When you reach the last stitch of one round, your next stitch will be made directly into the first stitch of that round, so you just keep spiralling around and around the piece. I hope that makes sense!
Angela said
what does “Do not join at the end of each round; rounds are worked in continuous spirals.” mean? I think this is what I have been doing, but I see some patters say “join” and I don’t know what the difference is.
Thanks for the pattern! They’re so cute! 🙂
June said
Thank you, Mary! I have been in touch with Elisa – it was a genuine mistake on her part, and she has now kindly replaced her copy of the pattern with a link to this page 🙂
Mary said
Elisa reproduced your pattern directions and pattern photo at www.craftycrafty.tv/2007/09/more_autumn_fun_with_amigurumi.html … your pattern does say not to reproduce it anywhere else but to post a link instead. I wondered if you were aware that it was reproduced on the Crafty Crafty site?
Diane said
So cute! Have just the right colors to make several. I also have an “autumn” Christmas tree and these, along with the glass ornament acorns and walnuts will look wonderful!
Jenny said
love the acorn and thanks for sharing your pattern
Hanane said
Sharing the link to your pattern over on Stashbustin! Love it! Thanks for sharing with the world.
June said
cyen, there’s no real magic involved 🙂 It’s really just an adjustable loop that you crochet your first round into and then pull tight to close the hole.
I’ve just finished a tutorial to demonstrate the Magic Ring: www.planetjune.com/blog/magic-ring-for-amigurumi/
cyen said
Cool pattern! I’m a crochet noobie and was wondering if you could tell me what “magic ring” means? Sounds mystical 🙂
I found your link via craftzine.com/blog – congrats.
crafty carolinagirl said
Thanks so much for the pattern. I am working on another project now, but am going to try some of these when I am finished.
Else said
This is precious! Thank you! 🙂
KnitFreak said
My 5 yr. old son is crazy about acorns! Planning on making a few of these!
sarah said
thank you so much for the free acorn pattern….
purchased some fall colors in crochet thread…
these little guys will look great on the autumn themed christmas tree….