PlanetJune Craft Blog

Latest news and updates from June

Perfect Stripes for Amigurumi [video]

Link easily to this tutorial in your patterns: www.planetjune.com/perfectstripes
Note: Since writing this post, I’ve developed a new technique, Ultimate Stripes, which I believe is superior to both the techniques below. You can find the Ultimate Stripes tutorial here šŸ™‚

The No-Cut Join below is still a very good option for situations where you’d prefer to not cut the yarn between rounds. You can compare all three methods for yourself in my amigurumi stripes comparison post.)

I’ve developed two methods you can use to minimise the seam when you work in joined rounds to make stripes for amigurumi (or anything else that’s single crocheted in the round). As these joins don’t travel or require extra stitches, you can just add the join of your choice between rounds in any striped single crochet pattern (whether it was designed to be worked in continuous spirals or joined rounds). You don’t need to modify your stitch count; they just work.

perfect stripes for amigurumi by planetjune
Where’s the seam, you ask? That’s exactly the point!

Let’s jump straight to the video, and then I’ll give you a rundown of the strengths and weaknesses of each method.

Perfect Stripes for Amigurumi (right-handed)

Click to watch this video on YouTube.

Perfect Stripes for Amigurumi (left-handed)

Click to watch this video on YouTube.

Note: The videos may look a little small embedded in the blog: if so, you can fullscreen them or click through to YouTube to watch them full-sized šŸ™‚

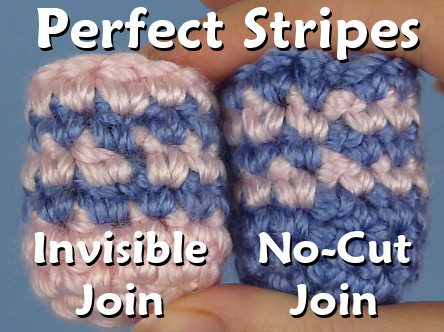
Method 1: Invisible Join

Pros: doesn’t travel, totally invisible
Cons: slower, must cut yarn between stripes, lots of yarn ends on back
Best choice for: stuffed amigurumi where the back will be hidden inside the piece

Method 2: No-Cut Join

Pros: doesn’t travel, no need to cut yarn, no yarn ends on back
Cons: not completely invisible
Best choice for: joined rounds with no colour change between rounds; hats etc where the inside of the piece will show; people in a hurry!

My Recommendation: Hybrid Method

The Invisible Join (as the name suggests) gives a slightly better finish, but the No-Cut Join is faster and less fiddly, so I recommend using a combination of the two for any pattern where you need to single crochet in joined rounds and/or make stripes. I recommend:

  • For rounds where you’re changing colour, finish the round and start the new round with the Invisible Join.
  • For rounds where you’re continuing with the same colour as the previous round, finish the round and start the new round with the No-Cut Join (there’s no point in cutting the yarn and immediately starting again with the same yarn!)
  • If you have a big chunk of one colour ā€“ lot of rounds with no colour changes ā€“ you may want to save time by spiralling around those rounds, and then changing to joined rounds at least one round before the colour change.
    (To change from a spiral to joined rounds, just use the end of round instructions from the No-Cut Join – or the Invisible Join if you prefer – at the end of your last spiral round. You’ll have a slight glitch there, but you may prefer it to making a No-Cut Join every round for e.g. 20 rounds…)

Video Quick Links

Looking for a quick video refresher on the method you want to use? Jump straight to the part you need:

Written Instructions

I do recommend you watch the above video to see the methods in action, but in case you prefer text or want something to refer to, here are written instructions for each method too.

Invisible Join Method:

START OF ROUND: Make a slip knot on your hook. Sc in first st (the duplicated stitch from the previous round) and in each st around.

END OF ROUND: Cut yarn leaving a 2″ tail. Draw up last loop to pull cut end through to the top. Now we’re going to duplicate the loops at the top of the first stitch, to close the round and hide the join:

  1. Insert hook from back to front under both loops of the 2nd stitch of the round, yarn over and draw cut yarn end through to the back.
  2. Insert hook from back to front under the back loop of the last stitch of the round, yarn over and draw cut yarn end through to the back.
  3. Optional: to keep the duplicate stitch tight, tie both ends together on the back of the work.

No-Cut Join Method:

START OF ROUND: Ch 1. Sc in first st (the same stitch you drew yarn through at end of previous rnd). Sc into each st around.

END OF ROUND: Remove hook from loop. Insert hook from back to front under both bars of first stitch of round. Put loop back onto hook and draw through to the back. Pull loop tightly to draw stitches together, then pull working yarn to draw loop back to usual size.

And, if you’re changing colour, the magic colour change point is at the very beginning of each round – you’ll change colour with the ch 1 at the start of the new round.

Use in Amigurumi Patterns

You can safely use either technique for any of my patterns that use stripes in joined rounds (e.g. African Violets pot, Ring-tailed Lemur tail); instead of fastening off between colours for the Ami Paint Set brush and paint tube, or instead of the optional joined round modification given in my other striped patterns, Easter Eggs and Christmas Baubles.

striped amigurumi by planetjune

You can also substitute one of these joins for a normal join to give you neater stripes in any other amigurumi pattern, or to add stripes to any amigurumi (it’s the stripe equivalent of substituting invdec for a sc2tog: it will work in almost every case). These joins will improve the appearance of striped hats too, or any other pieces single crocheted in the round!

***

If you enjoy my crochet tutorial videos, please help to spread the word about them, and/or subscribe to the PlanetJune YouTube channel.


Do you find my tutorials helpful? If so, please consider making a contribution towards my time so I can continue to create clear and concise tutorials for you:

Thank you so much for your support! Now click below for loads more crochet video and photo tutorials (and do let me know what else you’d like me to cover in future tutorials…)

See more helpful PlanetJune crochet tips and technique tutorials

74 Comments »

  1. Renee Romig said

    Iā€™m new to crochet and working on changing colors. My question is, did you fasten off the color you started with and then insert it in the starting chain with the new color? Or if you fastened off can you start that new color anywhere?

    • June said

      It depends on the pattern you’re following: if it has any asymmetrical shaping or colour patches, you need to keep the first stitch of the round in the same place each time, so your shaping and colours will be made in the right place! But if it’s a simple, symmetrical shape, you can fasten on anywhere to begin the next round.

  2. Sharon Ghose said

    Thank you so much for perfecting this AND making it available for us to learn for free. Having tried a number of techniques I am now sold on the no cut join you have demonstrated! Made my day

  3. hidayah said

    hi june! i prefer not to use the no cut join for seamless colour change but i have a question.

    if i still want to work in spirals and still use the invisible join method, is it possible to finish the last round using your invisible finish method? or should I still use the ending round in the invisible join video?

    I’m kind of confused because the video shows no height gap between rounds so I assume it is not in spirals. Thank you!

    • June said

      Any joined rounds are (by definition) not worked in spirals, but see the section above called “My Recommendation: Hybrid Method” that explains how you could work in spirals in rounds where you don’t need to change colour, and then switch to joined rounds when you need to. You will need to change to joined rounds to be able to make an Invisible Join, though – that’s how the method works!

  4. Carolyn said

    is there anyway you can do a short video on the no cut join?

  5. Sheena said

    Just wondering if I could use the continuous spiral method for hats in one colour then switch to the cut invisible join for a couple of stripes near the brim? would there be any issues? Your website is great and i also have your book which I use a lot šŸ™‚

  6. Donna Cantalupo said

    Thank you for showing the invisible join method. I’m a perfectionist and this method leaves me satisfied with my work. As you say it’s “fiddly” but well worth the extra time. I love making these little creatures but the jogs really ruined the look I was going for. Thanks Jume

  7. Joyce Beebee said

    Hi June, your tutorials and articles are amazingly clear and easy to follow! Thanks so much for sharing them. You’ve just solved my headache over jogs in the stripes! Yay!

    And I love your nature-inspired patterns, both adorable and realistic at the same time.

    Thank you again!

  8. Jackie Sharp said

    Thank you. You are awesome. Really appreciated the lesson

  9. SMJ said

    Merci infiniment pour ce tuto No-cut Join. C’est parfait pour faire des rayures sans d

  10. Ana Carolina said

    Hi, June!
    You are an inspiration for me, and a huge font of knowledge. Thanks for sharing it! I have a doubt: we use this techniques when working is spiral, isn’t it? When using your “invisible join” method, if I’d like to make a stripe of two rows of each color, instead of one, how can I go up to start the second row? Sorry, I’m a newbie and had no idea…
    Thank you so much!! Love your blog, patterns and book too! šŸ˜‰

    • June said

      Hi Ana! You can just use the invisible join for each round (whether or not you’re changing colour), but please see the section above called ‘My Recommendation: Hybrid Method’ which explains my recommendation when you have stripes of more than one round šŸ™‚

      • Ana Carolina said

        It’s never too late so say a huge THANK YOU!!! heheheh
        2 years later and I’m a frequent visitor of your blog!
        The crochet improved a lot, unfortunately, I can’t say the same of my English!

  11. Nina said

    Excellent tutorial… thank you. I make HDC chemo caps for kids and I frequently change colors. Will your method work with any stitch, or just SC?

    • June said

      This tutorial is designed for amigurumi, which are always worked in single crochet, so I haven’t extended the techniques for taller stitches. The invisible join will certainly work for any stitch, but I haven’t tested the no-cut join (if you’re curious, you can just try it for a couple of rounds and see how it looks!)

  12. Shai said

    Hi June! I wanted to tell you how useful this article was for me. I have only been crocheting since Christmas and while I seem to be getting the basics down pretty well, I have been frustrated by color changes in spiral amigurumi. I haven’t done any projects that require stripes per se, but I have done a few that have a row or so of a highlight color (for example, to imply a belt around a doll’s waist). The “jog” or “step” at the back of the work drives me crazy! It just doesn’t look right. In searching for ways to combat this I found your article and am trying this technique on my current project. So far it is coming out very well and I am much happier!

    Thank you for sharing your techniques with the community. I’m looking forward to exploring your website further. šŸ˜€

  13. Jenna said

    Hi June,

    You’re incredible! This tutorial is wonderful. I’m going to be writing some patterns and selling them in my Etsy shop. Can I provide a link in my pattern to this tutorial, since it’s how I joined my rounds? I don’t want to include the instructions as part of my pattern, in order to give you credit, and I wouldn’t be able to explain it as well as you anyways!

    Thank you!

  14. Pam Ammons said

    Thank you so much for the tutorial. When I need to perfect a technique I look to Planet June. I have made several of your pieces and am now working on the Christnas Baubles. These methods of joining rows when making color changes will make keep me from tearing my hair out over jogged seams. The smooth transition from stripe to stripe is much easier on the eyes because mine are always drawn to the “flawed” joins and seams. I look forward to using your methods and to creating better pieces. Again, thank you for sharing your “discoveries”.
    Pam

  15. Jackie Morgan said

    June, this tutorial just saved my life! I am crocheting zebras and was SUPER WORRIED about jogged stripes! I tried two other methods first, both of which did not give me the desired results. Your tutorial is amazing, and I will never do stripes any other way! THANK YOU!! šŸ˜€

  16. SadyzHook said

    Hi June !

    Please excuse me because my English is’nt very well !
    So, first, I would like to say you THANK YOU VERY MUCH for this wonderful tutorial !
    I have a question please (excuse me because probably stupid…) about the Not Cut Method :
    If I don’t change color during several rows, should I use this method at the end of each rows ? or do I use the classical spiral method ?
    If YES (Use the No-Cut Method at he end of each rows), should I do the chain1 to begin the next row ? And the first sc in the same stitch that chain1 ?
    THANK YOU again for your help šŸ˜‰

    Greetings from France ! šŸ˜‰

  17. Rebecca Stacks said

    Thank you for explaining that in method A the yarn is cut at the end of “each round”. It is understandable when changing colors, but I never found a tutorial that actually said this when not changing colors. I am also excited about using your 2nd Method especially for amigurumi. I am so glad I found your instructions. Thank you.
    Rebecca

  18. Sanne said

    Hi šŸ™‚

    I’m having problems with the invisible join … It’s like I’m making a decrease somewhere, cause suddenly I’m missing a stitch …

    I make my slipknot, and start in the “invisible join” I’ve made in the last round, and make a sc – does that count as my first sc?

    I have to make 24 sc all the way round.. Does that mean I have to make 23 sc including my first one with the slipknot – and then the invisble join (which then counts as a regular sc?) = 24 sc

    Thank U in advance šŸ˜‰

    • June said

      Sorry I didn’t see your question sooner, Sanne. No, the invisible join doesn’t count as an sc – if you watch the video, you’ll see it’s worked over the top of the first sc of the round, so you should be making your full 24 sc for the round and then working the invisible join over the top of the first sc. It sounds like you’re skipping the 24th stitch and then making the join – that’s why you end up with one stitch fewer at the end, as you’ve missed the final stitch of the round. I hope that makes more sense.

  19. Dorothy said

    I finally have figured out what I need to know. Thank you To all of the ladies above. You were able to word much better than I. Therefore the answers from June were what I needed. I believe I was over thinking the whole process. My colour changes are needed NOT for stripes bur changing colours between large blocks of colour. I m going to try the Hybrid method where I start and finish using the two methods as June suggested above.
    Thanks to all of you and especially you June.

  20. miri said

    Okay. Thanks. From your replies, I can take it that the answer to my original question of “Does this look like I

    • June said

      You may want to try pulling the loop more tightly (at the ‘pull the loop tight’ stage) to see if that improves the look of your seam.

      These methods use joined rounds to improve the horizontal appearance of the colour jog, and joined rounds will never be completely invisible without using the Invisible Join (hence the name)! If having any kind of visible seam bothers you, you should use one of my suggestions instead of the No-Cut Join.

  21. miri said

    Hi! Thanks so much for your helpful videos/tutorials (thanks to you, a magic ring finally makes sense). I’m trying to use your methods on my first stuffed figure. My rounds are coming out pretty even, but I’m getting an odd looking “seam” where the rows start/end. Does this look like I’m doing this anywhere near right?

    instagram.com/p/tT8RSxnK5r/?modal=true

    I’m using the no-cut method when there’s no color change and the cut methods when I switch colors.

    • June said

      Miri, as your piece has large blocks of colour instead of narrow stripes, you have two choices to improve the look of the joins at the end of each round:

      1. Use the Invisible Join for all rounds – as I say above, the No-Cut Join is not completely invisible – you’re making a trade-off when you use the No-Cut Join by sacrificing total invisibility for a gain in speed.
      2. You may be happier with the result if you work in a continuous spiral within each block of colour so there’s no seam at all, and switch to using the joins as you approach a colour change to the next block of colour (using the method I described in this previous comment).
      • miri said

        Thanks. It’s not so much the horizontal match up I’m worried about, it’s the vertical seam that looks odd to me and makes me thing I’m doing the join wrong. That part looks much better when I’m just spiraling and not doing any special join.

        • June said

          I understand, and both the suggestions I gave you are to improve the look of that vertical ‘seam’ – I suggest you try both and see which gives you the result you like best, then use that in future.

          The other option would be to just work in a continuous spiral instead, so you have no seam at all, and just make sure the resulting colour change jogs are hidden on the back or underside of your piece. There’s no right or wrong here – the choice is yours!

  22. Rita said

    Your tutorial is super simple! I really love it! Thank you so much for sharing it with us.

    But I am a little confused how to switch between this two methods when I want to work also in continued spirals. How to finish spiral round to switch to one of this method or How to start spiral yarn when finishing one of your method.

  23. Anna Dee Hinckley said

    Thanks so much for your informative videos. They are very clear and concise. This is new information to me and I have wondered what to do about the seams in hats and other items I have made. Thanks again. I am excited to have found your site and marked it in my favorites.

  24. Lynne Armstrong said

    This is brilliant June!! I’ve just found your tutorial and pinned it, to come back to when I need it. I’d never have worked this out by myself šŸ™‚ Thanks so much for sharing your technique.
    Lynne

  25. Hi June – I think this tutorial is fab! I used it to make a crochet robot and have linked to your site on my blog here: missknitnat.blogspot.co.uk/2013/08/what-should-have-been-on-my-knitting.html – so exciting that you can make completely jogless stripes!

  26. candeias lima said

    S

  27. Joan said

    Easy to understand

  28. Shay said

    Hi June! Just started crocheting again and was really a newbie before as well, your tutorials are so great! I always google search what I’m looking for and type ‘planet june’ on the end lol. Anyways, I was wondering if these methods, especially the invisible method, can be used if the first or last stitch is an increase or decrease? Like if I’m making a stripy ball basically. Thanks for your help!

    Shay

    • June said

      Yep, there’s no reason why the methods shouldn’t work – they don’t replace or alter any of the stitches; only the join itself. Follow the instructions, but instead of the ‘first sc’ or ‘last sc’ of the round, make your increase/decrease in the first/last stitch(es) as required.

  29. Jennifer Niskanen said

    Thank you so much for these techniques. They work perfectly. My only regret is that they do not appear to be in your book, which is a real shame, as I can tell this is something I will want to refer to often. These methods not only work for Amigurumi, as you mention. I just used them for Bosnian Slip Stitch with a mitten I am working on. They performed beautifully and have been very helpful. Rounds are also worked in a spiral for this kind of thing too without joins or chains.

  30. Laura Head said

    Hi June,
    Thank you so much for the videos. I am crocheting a tea cup and it needs to have two stripes in the middle.
    Please could you explain how you go back to crocheting in a normal spiral after using your no cut method?
    Many thanks
    Laura

  31. Marian said

    Thank you so very much! I appreciate you sharing your knowledge of crochet. I am a newbie to crochet and I love making hats for the local schools and shelters in my area and your tutorial on the Invisible Join and Changing Colors is so clear and produces a perfect join! I have seen others on the web but with yours… it finally clicked for me. I can’t wait to start making hats with lots of stripes! Thanks again!

  32. janellyo said

    Thank you sooo much for clearly outlining the instructions for these two methods. I have been searching for a very long time for clear instructions on joining rounds. Most of the patterns I’ve made so far didn’t require it but I recently had to use joining rounds for an oval shape I was making and the seam was unsightly! Comparing my first version to one using the no-cut join has made a huge difference.

  33. Dewi said

    Neat!

    Thanks so much for sharing! You’ve solved a problem that I’ve always been struggling with.

    Are you ambidextrous?! Since you always post videos for both righties and lefties.

    Happy holidays!

    • June said

      Haha, no, I’m a lefty – I just flip my videos both ways so everyone can understand them!

      • AMC said

        Thank you for all the time and work you’ve done to share this with us! And it’s wonderful how you’ve included info for both lefties and righties as well as the videos. I can’t imagine how much work this takes but I sure do appreciate it!

  34. Melissa said

    Dear June,

    Thank you so much for sharing this tutorial!
    These seams drove me nuts (>_<)

    There is one question left concerning the invisible method:
    How do I finish off my work before doing the slip knot and stitch in the first stitch of the round? Just leave the last stitch of the round open or pull the yarn through?

    btw: Your voice is wonderful smooth and gently :o)

    Thank you very much, greetings from germany,

    Melissa

    • June said

      Melissa, for every round you’ll end it the way I show in the video (and describe in points 1-3 of the written instructions in this post) to duplicate the first stitch – you need to watch the complete method before you start crocheting so you’ll understand it all! Each method demo shows 2 complete rounds, so if you watch the middle of the demo you’ll see me ending one round and then beginning the next – it’s using both those parts (ending one round and starting the next) that forms the invisible join šŸ™‚

      • Melissa said

        Thank you so much for your quick response!
        How stupid I was..Crocheted my pattern (a baby rattle) as usual and started your method unfortunately first when I came to the first stripe (>_<)
        Now everything is clear to me :o)
        Thanks a lot and greetings,

        Melissa

        • June said

          Oh no, you’re not being stupid at all! I spent a long time thinking about how to film the video – I knew that, no matter where I started the video demo, it would confuse people. If I showed the end of the round without showing how I started it, some people would be confused; if I showed the start without showing the end of the previous round (as I ended up doing), other people would be confused! I’m glad it makes sense to you now, anyway šŸ™‚

          • ChiWei said

            Just so I’m clear on the original question and answer… I am following a pattern that is a SC continuous spiral that has a color change in it. So if I don’t want to show the join between the two colors as a jog in the piece, then I’d have to NOT spiral my work at all, but instead always use the no-cut method for each round, then the invisible join when I switch yarn colors, is that right? Thanks!

          • June said

            ChiWei, yes, that’s the best method that will give the best result.

            If you have a big chunk of one colour – lot of rounds with no colour changes – you may want to save time by spiralling around those rounds, and then changing to joined rounds at least 1 round before the colour change. (To change from a spiral to joined rounds, just use the end of round instructions from the No-Cut Join at the end of your last spiral round. You’ll have a slight glitch there, but you may prefer it to making a No-Cut Join every round for e.g. 20 rounds…)

  35. Chrisie Merriman said

    I made a PJ Lemur and used the Invisible Join method for the tail (I cut every round)… I literally can’t see the joins at all.
    It works amazingly well, and it’s actually pretty fast once you get going.
    Love love love! I will be using this technique at every striping opportunity.

  36. Gillian McMullen said

    Thanks so much for this and for all your tutorials, June. They must take hours and hours to make, and you share them so generously with us. You are turning us all into expert amigurumiers. It’s exciting to create more and more perfect work by following your instructions!

  37. Laura said

    Thanks so much for this June ! I use your invisible method often with hats. I was pleased to share this with my blog readers on Off The Hook. I am sure they will find it as useful as I did.

  38. tiffany said

    bless you june. I wish i had known this last year.

  39. Erin Scull said

    EXCELLENT!!! I will be using this method! I’m just not sure which one. šŸ˜› Do you mind if I share a link with my followers June? Thank you so much for sharing these wonderful tutorials!!! I love learning new techniques. I just finished one of my dolls and I wasn’t happy with my strips, so this is really going to help me out!

    Thank you again!
    Erin Scull

    • June said

      You’re welcome, Erin, and you’re very welcome to link to any of my tutorials!

  40. Lissa said

    I keep telling my mother that June is a genius, and this only proves it. I enjoy making crocheted crayons (I believe the pattern belongs to The Craft Frog), which have several fiddly little stripes. The pattern is meant to be made with joined rounds, but I always do it as a continuous spiral. I then have to either not look at the jog in the stitches, or fiddle with the stitch count so the colors sort of line up.

    These two methods look like they would work perfectly for making these crayons. I would have to use both of them, as you recommend, which would also give me a chance to compare the two. Although the invisible join method looks cleaner, the no-cut join is a lot neater yarn-end-wise. I need to go find some yarn; I’m really excited right now…

  41. Amazing! I’ll have to try this! I’ve been using your invisible increase and decrease. With invisible joins, soon, all of my crochet will be invisible!

  42. Carmen said

    Hi June,

    this is so amazing! I am really impressed by your meticulous description and visualization of the different techniques and the final comparison of the ‘winners’. This definitely convinces me to use both of these techniques, since the end result of them is fabulous. So far, I was always a bit frustrated with the end result of my color changes, because whenever I did some amigurumi as a gift, I also wanted it to be as perfect as possible.

    Having seen your written and video tutorial and followed your previous Twitter posts about how much time it takes to prepare the video, I want to thank you very much for having shared this with us :)! It also helps a lot that you gave a video as well as a written instruction on how to do the two methods. I am sure that for the next CAL you will these methods in use :)!

    Best regards

    Carmen

  43. Yarnitect said

    Another great tutorial! Love it. I’m sold on the no cut join. Will definitely give that a try. I’m headed off to put this tutorial on my Pinterest “How to Crochet” board! And I’ll link to it on facebook. Can’t keep this technique to myself!

  44. Ana said

    Great results! A bit of work but beautiful stripes!

  45. Lindy said

    Brilliant video, and the instructions are so clear! Thank you.
    Love, Lindy xx

  46. Margo said

    I knew about the first method you demonstrated. The second method
    is similar to the way you might join two tunisian crochet panels. I never thought of using it for stripes in the round that is a GREAT idea.

  47. Karen said

    Very interesting. The first one might be too tedious for me, but they’re both definitely worth investigating.

  48. Charlotte said

    Wow, this is fantastic! Thank you for sharing this!
    What patience you have to try and try until you find the perfect fit. And then without hesitation sharing your secrets šŸ˜‰

    Thanks!

RSS feed for comments on this post

Leave a Reply to June Cancel reply

Thank you so much for taking the time to leave a comment here! I read and appreciate every comment. I only respond to questions here on the blog, so please return to this page to see my reply, or check the box below to subscribe to new comments by email.

Please note that I can only answer questions related to PlanetJune patterns and tutorials (see details), and I can only respond to questions or comments written in English. Thank you :) - June

Your email address will not be published. Required fields are marked *

  • Quick Links: Crochet

    navigation: arrow

    buy crochet patterns and accessories from my online store

    'Everyday Crochet' and 'The Essential Guide to Amigurumi' crochet books by June Gilbank

    Crochet video tutorials and step-by-step photo tutorials

    Free PlanetJune crochet patterns

    Frequently Asked Questions

    Quick Links: Crafts

    navigation: arrow

    Punchneedle Embroidery information, ebook & patterns

    Papercraft ebook & tutorials

    Free PlanetJune craft projects & tutorials

  • Blog Post Categories

  • Blog Archives

  • Welcome to PlanetJune!

    June Gilbank

    Hi, I'm June. Welcome to my world of nature-inspired crochet and crafting. I hope you enjoy your visit!

    If you'd like to get in touch, you can contact me here.
    crocheted Canadian flag by PlanetJune
  • A fanned-out pile of the books Everyday Crochet and The Essential Guide to Amigurumi, with text 'The answers to all your crochet questions at your fingertips - find out more'
  • Support PlanetJune!

    Want to say thanks? You can send me money in seconds at paypal.me/planetjune (over $20) or paypal.me/planetjune2 (under $20) or send me a donation through my shop.

    Or simply click through from my links before you shop at Amazon, Etsy, KnitPicks, LoveCrafts or Crochet.com, and I'll make a small commission on your purchase, at no cost to you! Start here:

    ♥ Support PlanetJune ♥

    Tip: This link is also in the footer of every page!

    Thank you so much for your support!