How to Crochet a Magic Ring
The question I get asked most often is how to make a magic ring (sometimes also called a magic circle) to begin an amigurumi.
What is a Magic Ring?
A magic ring is a way to begin crocheting in the round by crocheting over an adjustable loop and then pulling the loop tight. Unlike the traditional chain start, it leaves no hole in the centre of your starting round, which is ideal for amigurumi.
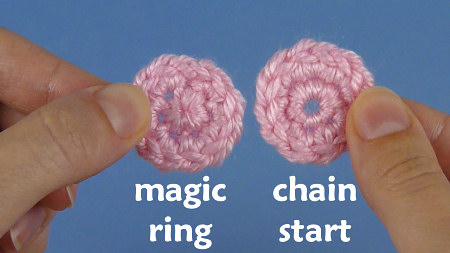
With a chain start (below, left), you can clearly see the hole in the centre, which isn’t ideal for amigurumi, as the stuffing can show through. By using a magic ring (below, right) instead, you can completely close that gap, leaving no hole at all:
L: ch 2, 6 sc in 2nd ch from hook, 2 sc in each st around.
R: magic ring, ch 1, 6 sc in magic ring, 2 sc in each st around.
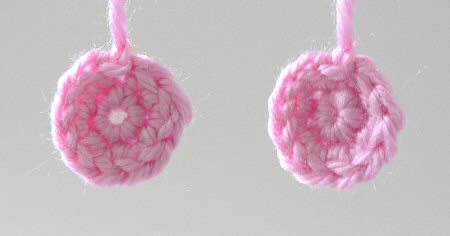
It can take a few attempts to master the magic ring technique, but once you’ve got the hang of it, you’ll never go back to your old method again, I promise!
I recommend you watch the video to see the method in action, but in case you prefer text or want something visual to refer to, I’ve also made a photo tutorial version for you.
Quick finder:
- Video Tutorial (right- and left-handed)
- Magic Ring Tips
- Step-by-Step Instructions (right-handed)
- Step-by-Step Instructions (left-handed)
How to Crochet a Magic Ring – Video (right-handed)
Click to watch this video on YouTube.
How to Crochet a Magic Ring – Video (left-handed)
Click to watch this video on YouTube.
Note: The videos may look a little small embedded in the blog: if so, you can fullscreen them or click through to YouTube to watch them full-sized 🙂
Magic Ring Tips
- Remember that the magic ring is just the loop of yarn – it doesn’t include any crocheted stitches. If you’re following a pattern, you’ll work all the stitches of Rnd 1 into the magic ring, and pull the ring tightly closed at the end of Rnd 1.
- You can use magic ring in any amigurumi pattern – if it starts with a chain, just replace the starting ‘Ch 2, X sc in 2nd chain from hook’ with ‘Make a magic ring, ch 1, X sc in magic ring’.
- To work in joined rounds instead of the spiral I demonstrate, simply sl st into the first st at the end of Rnd 1, then ch 1 to begin the next round.
- Magic ring is also pretty handy for other crochet patterns worked in the round, too. For taller stitches, instead of the ch 1, you would ch 2 (for hdc), 3 (for dc), or more for even taller stitches, then work Rnd 1 of your stitches into the magic ring.
Note that, with taller stitches, the turning (or non-turning, if you’re working without turning) chain typically does count as a stitch, so where I say to ignore the ch 1 in the video, you’d instead count that chain as the first stitch of Rnd 1, and sl st into the top of the chain before beginning Rnd 2. - If your ring needs extra strength or security, you may prefer a double ring instead of a standard magic ring. See my Amigurumi Double Ring tutorial to learn when and how to use this more secure option.
Is it ‘Magic Ring’ or ‘Magic Circle’?
While you’ll sometimes see the magic ring called the ‘magic circle’ or ‘magic loop’ online, I use magic ring, because it’s more precise. Magic loop and magic circle have different meanings, unrelated to crochet:
- Magic ring: starting crochet in the round
- Magic loop: a narrow circular knitting technique
- Magic circle: a society of magicians
Terminology matters! 😀 But whenever you see a crochet pattern that tells you to make a magic circle or a magic loop, you’re safe to assume it means a magic ring.
How to Crochet a Magic Ring – Step-by-Step Instructions (right-handed)
This demonstration shows a piece made using the following pattern:
Make a magic ring, ch 1.
Rnd 1: 6 sc in magic ring. ( 6 st)
Rnd 2: 2 sc in each st around. (12 st)If you’re following a different pattern, you’d complete steps 1-2 of this tutorial exactly as shown below, then work the chain and the stitches of Rnds 1 and 2 as specified in your pattern.
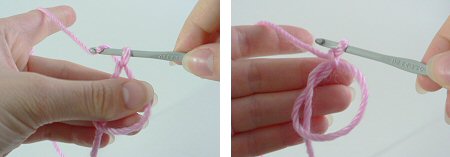
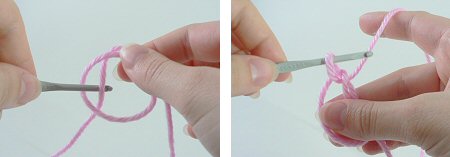
Please note: in the following photos, the starting yarn tail is always on the left and hanging down. The working yarn begins on the right and is then picked up over my left forefinger in Step 2.
- Make a loop a few inches from the end of your yarn. Grasp the join of the loop (where the 2 strands of yarn overlap) between your left thumb and forefinger:
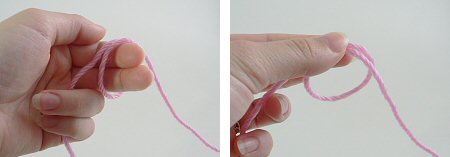
- Insert hook into the loop from front to back. Draw up a loop:
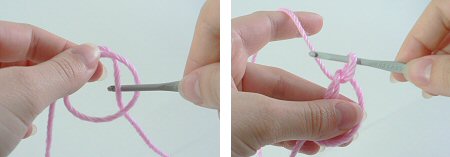
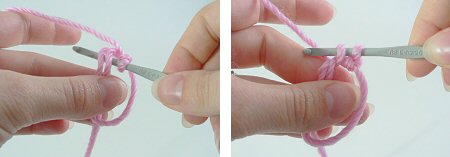
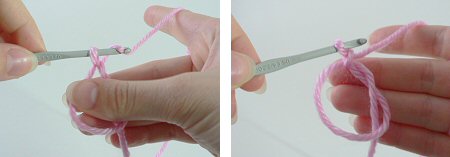
- Ch 1 (or as many as stated in your pattern). Note: this does NOT count as a stitch:
- Insert hook into the loop, so you are crocheting over the loop and the yarn tail. Draw up a loop to begin your first sc of Rnd 1:
- Complete the sc. Continue to crochet over the loop and the yarn tail until you have the required number of sc for your first round (6 sc shown here):
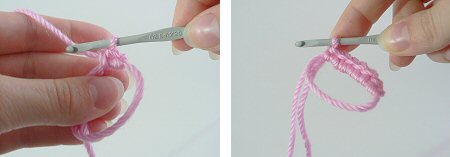
- Grab the yarn tail and pull to draw the centre of the ring tightly closed:
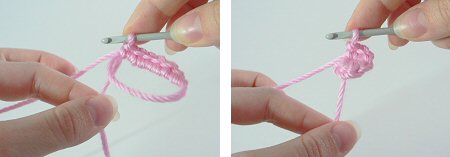
- Begin your second round by crocheting into the first stitch of the first round (below, left). At the end of round 2 your work will look like this (below, right):

How to Crochet a Magic Ring – Step-by-Step Instructions (left-handed)
This demonstration shows a piece made using the following pattern:
Make a magic ring, ch 1.
Rnd 1: 6 sc in magic ring. ( 6 st)
Rnd 2: 2 sc in each st around. (12 st)If you’re following a different pattern, you’d complete steps 1-2 of this tutorial exactly as shown below, then work the chain and the stitches of Rnds 1 and 2 as specified in your pattern.
Please note: in the following photos, the starting yarn tail is always on the right and hanging down. The working yarn begins on the left and is then picked up over my right forefinger in Step 2.
- Make a loop a few inches from the end of your yarn. Grasp the join of the loop (where the 2 strands of yarn overlap) between your right thumb and forefinger:

- Insert hook into the loop from front to back. Draw up a loop:
- Ch 1 (or as many as stated in your pattern). Note: this does NOT count as a stitch:
- Insert hook into the loop, so you are crocheting over the loop and the yarn tail. Draw up a loop to begin your first sc of Rnd 1:

- Complete the sc. Continue to crochet over the loop and the yarn tail until you have the required number of sc for your first round (6 sc shown here):

- Grab the yarn tail and pull to draw the centre of the ring tightly closed:

- Begin your second round by crocheting into the first stitch of the first round (below, left). At the end of round 2 your work will look like this (below, right):


Loved this tutorial? I have so many more amigurumi tips and tricks to share with you!
Boost your amigurumi skills with my latest book, The Essential Guide to Amigurumi, your comprehensive guide to amigurumi techniques and tips.
Do you find my tutorials helpful? If so, please consider making a contribution towards my time so I can continue to create clear and concise tutorials for you:
Thank you so much for your support! Now click below for loads more crochet video and photo tutorials (and do let me know what else you’d like me to cover in future tutorials…)


Pat Stauffer said
Oh my gosh!!! This is fantastic!!! Never heard of this, but will use it from now on. Thank you so much for posting this!!
Jenna said
My pattern starts with: magic ring, ch 3 dc10, pull ring tight, join to top of ch 3. I don’t understand if if that is supposed to be after the magic ring? How many stitches do I do on my ring? I am new to this and your site is really helpful so far.
June said
Jenna, all stitches before the ‘pull ring tight’ are worked into the ring. Please note that if you have other questions about specific patterns like this, your best bet is to contact the pattern designer directly and ask them for help – I can’t offer support for other people’s patterns 🙂
Shelly Lewis said
June
Thank you for the easy to understand instructions. I have been looking for a way to close off the circle instead of leaving a hole so thanks again. I will definently be keeping an eye out for new ways to do things by visiting PlanetJune
Sheila Rishworth said
Thank you so much for this tutorial in left handed. Brilliant!
Cindy Outland said
Thank you June for the instructions on the magic ring. It took a couple of hours practicing, but I was able to do this.
Sincerely,
Cindy Outland
Anita said
This is cool…but what do you do with the yarn end after you pull it tight? Cut it off? Tie it off? Weave it in?
Thanks!
June said
Don’t cut it off, or your work will unravel! It’s the same as any other yarn end – if it won’t show (e.g. inside an amigurumi) you can leave it hanging; if it will be visible (e.g a coaster or hat) you’ll want to weave it in so it doesn’t look messy.
BeeZeeDee said
Hi June –
You can’t imagine how many other videos and tutorials I looked at before I found yours – I wanted to try making tiny things for my soon-to-be granddaughter, and I was so frustrated! Your clear step-by-step pictures, with accompanying explanations, did the trick!
One of the things that was most helpful was the identification of which yarn was which (starting yarn and working yarn) in the note at the start of the instructions. Maybe because I am so new at this, the distinction wasn’t clear to me in the pics, but with your ‘aviso’ up front, I figured it out.
Whoopee, and thanks!
Stacey said
Thanks for the “lefty” instructions. I have been crotcheting for years and always have issues trying to do stuff backwards. It is nice too see someone take us into consideration. 🙂
Jill said
Ive been making hats for a while with no pattern but my own imagination, but I always start from the bottom and go up just decreasing as I go. It seems to work for me but sometimes it’s difficult to get my large starting round perfect. Super excited to try the magic circle with a “real” pattern for a baby beanie.
Lucy said
this will take me some practicing, as I am fully right handed and I don’t do well with my left hand, thanx again Lucy.
June said
I’d recommend you use the right-handed version of my tutorial, in that case, Lucy! (The link is at the top of this page.)
Jess Copland-gemmell said
Thanks so much for this. I found all other demos of this really hard to use.
lindsay said
Do you have a video for this?
June said
Yes! There’s a link to my video tutorial at the top of this page 🙂
Dee001 said
Thank you so much for showing the magic circle. I have tried doing it before but your explanation answered it all. Love it!!! Thanks much for sharing.
Keep it up.
Hoda said
Oh my good, it ‘s unbelievably easy. Thank you so much for sharing .
Rosemary Foley said
Hello… thank you so much for the video, I have always hated the hole in the crochet project I am working on, so I am going to try this. I watched the video, and will watch it again, as I am hearing impaired and tried using the captioning, but it really wasn’t matching what you were saying.. so when I have a minute, I will practice.. this is such a great idea and from other comments it will be easy to learn. thank you again, I am hoping to learn to make some coasters or perhaps hot hats for my children’s homes !!! and mine of course.. thank you again very much..
Rosemary.. are you on facebook ???
June said
Rosemary, as an additional guide, you could also try following my step-by-step Magic Ring photo tutorial (linked at the top of this page) for my written explanation. And, yes! www.facebook.com/planetjune 🙂
toni said
Now I get it, thanks.
neyah said
awww tanks now i can make my teacher miss foote a babby hat .
./
Kristina Hathaway said
Now I know how lefties feel. I am right handed and it took me a minuet to realize that the instructions were for lefties. It is hard to translate. It was a very good tutorial and I was able to make it work for me.
June said
Kristina, all my tutorials are available for both right- and left-handers! There’s a link to the righty version at the top of this page 🙂
ola said
Thank you that was helpful for a beginner
Stay well
Ola
Judith Stover said
This is the most amazing technique I’ve found in a long time! I’ve been crocheting for over 21 years and wish I had known this years ago. I make stuffed animals and characters for my kids and now grand kids. Many of the patterns start in a round and I often have to sew together the tell tale hole so stuffing won’t get pulled out by curious little fingers. I will begin using this immediately! Thank you!!!
Robin said
Wow! I love this technique. It reminds me of being a kid and learning macrame for the forst time. …but now I can incorporate into crochet. BRILIANT!
Carolyn Nicely Bradley said
Found your instructions on making the magic circle most helpful , esp with pics….. I found the pattern for making a flower using the magic circle, then I clicked on the link for the instructions ….. glad I found you ! Thanks
mtliz50 said
Thank you so much, I am a lefty and self taught so this was GREAT!!!!! will be back often =)
Corinne said
Just completed my first magic loop! Thank you so much for sharing, I’m never going back now! 🙂
Ariadne said
Hi June, I love your website and thanks particularly for the video tutorials, which are incredibly clear and very useful – especially love the one on invisible decreasing! Excuse my crochet ignorance, but can you tell me if I am correct in thinking that a pattern that starts like this:
Round 1: ch 4, sl st in the 1st ch to form ring.
Round 2: ch 1, dc 8 in the ring, sl st in the 1st dc st of row (8 sts).
can be substituted with this below to avoid a hole?:
Round 1: make magic circle, dc 4 in the circle, pull yarn to tighten circle and sl st in the 1st dc.
Round 2: 2 dc in each stitch (8 sts).
??? Does this give the same effect, but without the hole??
Thank you!
June said
Ariadne, not quite: Round 1 in the original pattern is just forming a circle to crochet into – the equivalent of making a magic ring. So you’d jump straight to Round 2 and crochet 8 dc directly into your magic ring.
Ariadne said
D’oh, I see, thanks! I was making it far too complicated for myself! Thanks for clarifying that. It’s surprising how many amigurumi patterns don’t instruct you to use the magic ring.
Thank you for taking the trouble to answer me, I appreciate that : )
Ari xx
Carol Newman said
Oh my goodness, I finally learned how to make the magic ring from your instructions. I have made so many patterns that reference the magic ring without instructions I could figure out. I am a lefthand crafter in a righthand world lol.
Thank you for simplifying it to my level lol.
Carol
June said
I’m glad I could help, Carol, but I hope you realise that I have left-handed versions of all my crochet tutorials for people like us (yep, I’m a lefty too)! You can find them all at www.planetjune.com/help 🙂
Shawn George said
Thank you June for making such a clear video that even I could understand it and sucessfuly make a majic ring!
Janet Reid said
THANK you soooo much!!
stephanie darrow said
Finally easy to understand left handed instructions and pictures. thankyou so much, is so hard to find instrucktions fro left handed people. :O)
Margie Echevarria said
Do you have a video for the Frothy Flower? I just can’t seem to grasp how to do Row 4 (going to the back of the flower)
June said
Margie, I’m afraid I can’t provide support for other people’s patterns – I suggest you contact the designer of that pattern for assistance 🙂
Lisa said
Thank you so much for posting this. 🙂 I am new to crocheting and my boyfriend’s mother taught me rounds but I had no idea that you could make it without a hole this easily!! I have had more practice with double crochets than singles, but I found this easy to do with doubles as well.
Paula_ said
Thank you for realizing lefties might get it “right” if we were ever shown by a lefty. I have spent my entire life trying to do things (sewing instructions, scissors, etc.) in a right handed world. I don’t know why I didn’t think to look on the internet until today when I thought I would try to give crocheting another try.
So thank you. Maybe this time, I’ll get it right.
Kathleen said
Thank you so very much!!! To say that I am a novice crocheter is a vast over-exaggeration of my skill!!! With no guidance whatsoever I progressed from being able to make a single chain as long as a skein of yarn to creating a sort of dense pot holder looking thing….then I bought beginner’s crochet guide only to find out that the world of crochet stich nomenclature was WAY beyond my ability to understand! My holy grail at the moment is to make a simple cap…I found instructions elsewhere on how to increase and decrease a circle in crochet and created something that kept my head warm on a recent trip to NY…but there was a hole at the top that I had to cover with a pathetic looking pom-pom…Today I sat down with your instructions and have created a successful (if a little wonky) magic circle!!! I am feeling there is a slightly less odd looking cap in my near future!!! I love your beautiful site and your clear and simple instructions!!!
Beth Nieto said
That’s great! Thanks for sharing! As a beginner I’m still trying, but maybe one time I’ll learn! LOL
Suzanne said
Great video! I can finally do the magic ring thanks to you! I really appreciate all of your tutorials and videos. They are great aids for beginner crocheters!
natasha said
Thanks for this tutorial. I have made hundreds of hats but they always had a little hole in the top. I can’t wait to try the “magic circle” it seems so simple but at the same time a great idea! Thanks again 🙂
Robin said
Thank you SO MUCH for making this tutorial!!!
I refer to it every time I start a hat. I’m sure as my crochet skills grow I will have to use it for other projects too. I wouldn’t have been able to learn it without your steps and pics.
Monika L. said
Thank you so much for the photos. With video tutorials I have to pause all the time to figure out what I’m doing. I’ve been making a lot of amigurumi toys for my niece and nephews and some Caps for Cancer and this is the perfect way to start those projects.
Lee Ann said
YAY! I finally get it!! I’ve looked everywhere to find how to make a magic ring, and I’ve never figured it out. Even with your photo tutorial, I just couldn’t quite get it. One time watching the video, and I’ve got it! I had to see every little step since I was missing some in the photos. Thank you! Not sure this lefty would have been able to figure it out watching the righty video. Thank you!!!!!!
MaryMargaret said
YOU are a GENIUS! Thanks for sharing!
Joan said
Thank you so much June for these lovely video tutorials. I’ve often wondered how to make a magic ring, and now I know, thanks to you. Brilliant!
Love Joan xx
Linda Greer said
Have been crocheting for lots of years and love seeing this. Feel clumsy doing it and isn’t as neat so I know I need more practice. Thank you for sharing.
Joann said
Hello again, ok I am a little slow this morning. (day after Thanksgiving) I just saw the instructions for Lefties! Horray! this will be my project today and then I will crochet the wine bottle cozies. Thank you again for Leftie help. 🙂
Joann said
Hello June ~ gosh I have been crocheting for years and never thougt of this or have ever seen it before. I can’t wait to try it, my only problem, I am LEFT Handed. I can usually figure it out, I may have to try this today. I will let you know how the “leftie” did. 🙂
June said
Hi Joann, I’m actually a lefty too! All my tutorials come in right- and left-handed versions – look for the link to the lefty version (and the video version, in both-handed versions) at the top of this page 🙂
sharon swander said
Thanks for making this easier for me. But I still can’t pull the tail tight enough to close the hole. I know it’s just me but any suggestions will help
June said
Sharon, take a look at my magic ring video to see exactly how I do it – I find you can pull it much tighter if you tug really hard at the end of Rnd 2.
If that doesn’t help, it could be the yarn you’re using. Some yarns just aren’t compressible enough to fit all those loops into such a tiny circle that no hole at all remains. Other yarns aren’t strong enough, and when you tug hard enough to close the hole, they snap! So maybe try a different yarn and see if that works better.
MJo said
I was looking for directions that were not a video so I could print them out and have them on hand.. thank you!!
Ollie Ruzgal said
its really a great help for a beginners like me.. i often use a ring w/ a hole and using a button to hide it.. i’ll use a magic ring this time. well, thanks a lot! ^_^
Dianne said
What a trick! I’ll be using this often. Thanks so much.
BB said
Hello, I purchased a few of your patterns and I am really having a hard time with the legs. I am working on the Stegosaurus leg to be exact. . Same thing with attaching the head to the body, just not working out for me. Please let me know if you have any tips or tricks.
Thanks you!
June said
BB, I tried to email you about this, but you gave me a fake email address…
Assuming you’re just having difficulty attaching the pieces neatly, I recommend my Seamless Join tutorial.
(I show it on a much larger piece, but the principle is the same for any sized piece). You can also look at my older tutorial, Joining Amigurumi, which also works well and is demonstrated on similarly-sized parts to the steg legs and head.
If you need more help, please give me a real email address so I can get in touch with you!
Alasia said
I won’t go back! So awesome! I always wondered how people were able to do this without a hole! SOOOO excited!!! L!