How to Crochet a Magic Ring
The question I get asked most often is how to make a magic ring (sometimes also called a magic circle) to begin an amigurumi.
What is a Magic Ring?
A magic ring is a way to begin crocheting in the round by crocheting over an adjustable loop and then pulling the loop tight. Unlike the traditional chain start, it leaves no hole in the centre of your starting round, which is ideal for amigurumi.
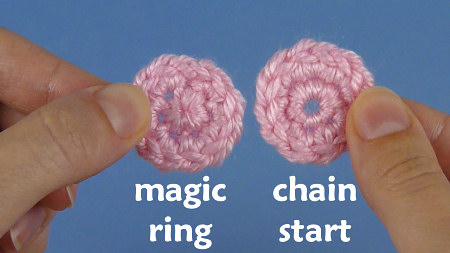
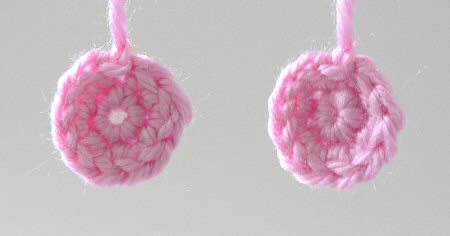
With a chain start (below, left), you can clearly see the hole in the centre, which isn’t ideal for amigurumi, as the stuffing can show through. By using a magic ring (below, right) instead, you can completely close that gap, leaving no hole at all:
L: ch 2, 6 sc in 2nd ch from hook, 2 sc in each st around.
R: magic ring, ch 1, 6 sc in magic ring, 2 sc in each st around.
It can take a few attempts to master the magic ring technique, but once you’ve got the hang of it, you’ll never go back to your old method again, I promise!
I recommend you watch the video to see the method in action, but in case you prefer text or want something visual to refer to, I’ve also made a photo tutorial version for you.
Quick finder:
- Video Tutorial (right- and left-handed)
- Magic Ring Tips
- Step-by-Step Instructions (right-handed)
- Step-by-Step Instructions (left-handed)
How to Crochet a Magic Ring – Video (right-handed)
Click to watch this video on YouTube.
How to Crochet a Magic Ring – Video (left-handed)
Click to watch this video on YouTube.
Note: The videos may look a little small embedded in the blog: if so, you can fullscreen them or click through to YouTube to watch them full-sized 🙂
Magic Ring Tips
- Remember that the magic ring is just the loop of yarn – it doesn’t include any crocheted stitches. If you’re following a pattern, you’ll work all the stitches of Rnd 1 into the magic ring, and pull the ring tightly closed at the end of Rnd 1.
- You can use magic ring in any amigurumi pattern – if it starts with a chain, just replace the starting ‘Ch 2, X sc in 2nd chain from hook’ with ‘Make a magic ring, ch 1, X sc in magic ring’.
- To work in joined rounds instead of the spiral I demonstrate, simply sl st into the first st at the end of Rnd 1, then ch 1 to begin the next round.
- Magic ring is also pretty handy for other crochet patterns worked in the round, too. For taller stitches, instead of the ch 1, you would ch 2 (for hdc), 3 (for dc), or more for even taller stitches, then work Rnd 1 of your stitches into the magic ring.
Note that, with taller stitches, the turning (or non-turning, if you’re working without turning) chain typically does count as a stitch, so where I say to ignore the ch 1 in the video, you’d instead count that chain as the first stitch of Rnd 1, and sl st into the top of the chain before beginning Rnd 2. - If your ring needs extra strength or security, you may prefer a double ring instead of a standard magic ring. See my Amigurumi Double Ring tutorial to learn when and how to use this more secure option.
Is it ‘Magic Ring’ or ‘Magic Circle’?
While you’ll sometimes see the magic ring called the ‘magic circle’ or ‘magic loop’ online, I use magic ring, because it’s more precise. Magic loop and magic circle have different meanings, unrelated to crochet:
- Magic ring: starting crochet in the round
- Magic loop: a narrow circular knitting technique
- Magic circle: a society of magicians
Terminology matters! 😀 But whenever you see a crochet pattern that tells you to make a magic circle or a magic loop, you’re safe to assume it means a magic ring.
How to Crochet a Magic Ring – Step-by-Step Instructions (right-handed)
This demonstration shows a piece made using the following pattern:
Make a magic ring, ch 1.
Rnd 1: 6 sc in magic ring. ( 6 st)
Rnd 2: 2 sc in each st around. (12 st)If you’re following a different pattern, you’d complete steps 1-2 of this tutorial exactly as shown below, then work the chain and the stitches of Rnds 1 and 2 as specified in your pattern.
Please note: in the following photos, the starting yarn tail is always on the left and hanging down. The working yarn begins on the right and is then picked up over my left forefinger in Step 2.
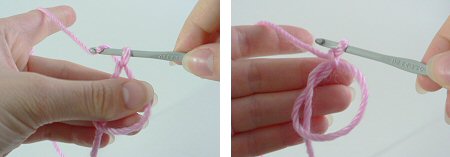
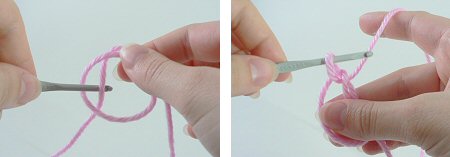
- Make a loop a few inches from the end of your yarn. Grasp the join of the loop (where the 2 strands of yarn overlap) between your left thumb and forefinger:
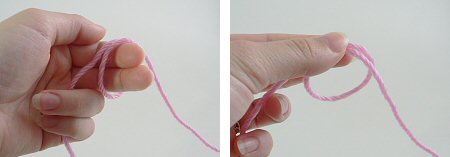
- Insert hook into the loop from front to back. Draw up a loop:
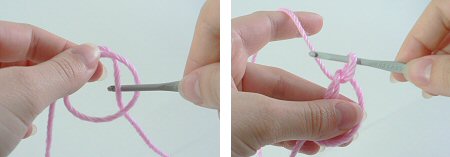
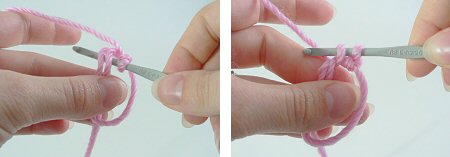
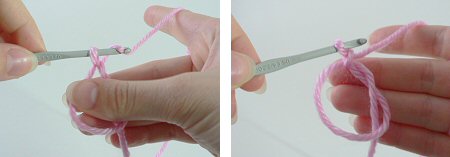
- Ch 1 (or as many as stated in your pattern). Note: this does NOT count as a stitch:
- Insert hook into the loop, so you are crocheting over the loop and the yarn tail. Draw up a loop to begin your first sc of Rnd 1:
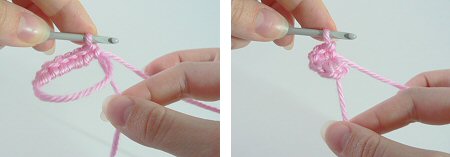
- Complete the sc. Continue to crochet over the loop and the yarn tail until you have the required number of sc for your first round (6 sc shown here):
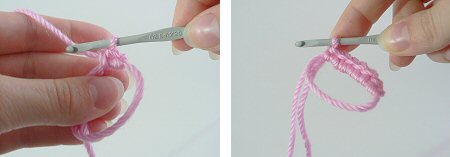
- Grab the yarn tail and pull to draw the centre of the ring tightly closed:
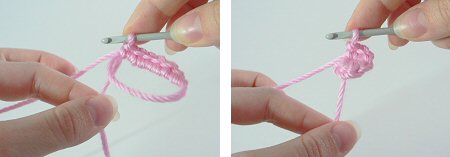
- Begin your second round by crocheting into the first stitch of the first round (below, left). At the end of round 2 your work will look like this (below, right):

How to Crochet a Magic Ring – Step-by-Step Instructions (left-handed)
This demonstration shows a piece made using the following pattern:
Make a magic ring, ch 1.
Rnd 1: 6 sc in magic ring. ( 6 st)
Rnd 2: 2 sc in each st around. (12 st)If you’re following a different pattern, you’d complete steps 1-2 of this tutorial exactly as shown below, then work the chain and the stitches of Rnds 1 and 2 as specified in your pattern.
Please note: in the following photos, the starting yarn tail is always on the right and hanging down. The working yarn begins on the left and is then picked up over my right forefinger in Step 2.
- Make a loop a few inches from the end of your yarn. Grasp the join of the loop (where the 2 strands of yarn overlap) between your right thumb and forefinger:

- Insert hook into the loop from front to back. Draw up a loop:
- Ch 1 (or as many as stated in your pattern). Note: this does NOT count as a stitch:
- Insert hook into the loop, so you are crocheting over the loop and the yarn tail. Draw up a loop to begin your first sc of Rnd 1:

- Complete the sc. Continue to crochet over the loop and the yarn tail until you have the required number of sc for your first round (6 sc shown here):

- Grab the yarn tail and pull to draw the centre of the ring tightly closed:
- Begin your second round by crocheting into the first stitch of the first round (below, left). At the end of round 2 your work will look like this (below, right):


Loved this tutorial? I have so many more amigurumi tips and tricks to share with you!
Boost your amigurumi skills with my latest book, The Essential Guide to Amigurumi, your comprehensive guide to amigurumi techniques and tips.
Do you find my tutorials helpful? If so, please consider making a contribution towards my time so I can continue to create clear and concise tutorials for you:
Thank you so much for your support! Now click below for loads more crochet video and photo tutorials (and do let me know what else you’d like me to cover in future tutorials…)


Sarina Eckhardt said
Thank you! I always wondered how this was done. Your directions were easy to understand too. =)
Louetta Lee said
Thank You June!!! For the first time, now I really understand! I have been crocheting for many years and have never used this trick. Thanks for all the effort and trouble you took to make it so clear. Your directions are great and are much appreciated! I will now use this technique forever!
Blessings and Best Wishes
Louetta Lee
Etha said
hehe, I just looked it up because it was mentioned in the patterns that I bought. I know no other way of starting a crochet ring, so I guess I’m good 🙂
Sandra said
Great tutorial. I had to try it three or fout times before I got it right, but now I have it down. No more holes!
Suzanne said
Hello, thanks for the pictorial. Will try it tomorrow. I have tried 50 times to make basic amigurumi. I think I am losing track of stitches. I am getting holes and stuffing showing through. Using right yarn and hook( I think) could it be tension. It looks good until I stuff and them looms Lacey. Help! My little girls are waiting so patiently!
June said
Hi Suzanne! There are a few reasons why you could be getting holes:
Crochet in both loops (if you crochet in back loops only the stitches will stretch when you stuff them)
Use a hook 1-2 sizes smaller than recommended for the yarn you’re using, e.g. for worsted weight yarn I typically use an E (3.5mm) hook
Tension is important – make sure you’re wrapping the yarn through the fingers of your non-hook hand so that your hook only pulls through just enough yarn to form each stitch
Don’t overstuff – if the stitches start to stretch open, stop adding stuffing at that point!
Hope that helps!
Holly said
Fab tutorial! I only learned to crochet yesterday and I still found this straightforward and easy to follow. Thanks so much for posting it 🙂
Tori said
Im sorry but I really dont understand this. Im sorta mentally challenged (not really, its just hard for me to understand instructions). If you had a video maybe that would be better? Just a tip
June said
Hi Tori, I know some people have problems with text-and-pictures instructions – making a magic ring video is already on my to-do list! Check back here soon 🙂
Tori said
Thank you =) Btw, great job with the website- One of my top crochet sites x)
Aubrianna said
Hello but I like your crochet planetjune!!!??????
Charles said
Would you please share where you learned this? I enjoy chasing references to find wonderful things.
(Of course, if you learned it from someone instead of from a book, then I’ll just … sigh.)
June said
Charles, I don’t remember if I first heard of the technique through Crochet Me or somewhere else, but quoting my original Magic Ring blog post from 2007:
Hope that answers your question!
Line said
Thank you – I’ve been reading patterns and they all start with a magic ring -now I know what that is 🙂
hannah said
*mind blown*! thanx for the help
Shanti said
Hi June!!
I just wanted to let you know that I linked your wonderful Magic ring tutorial, to a pattern in my blog… hope you don’t mind!
Thank you for your clear tutorial!
wiresandyarns.blogspot.com/2010/05/siena-dress.html
June said
I don’t mind at all – I’m glad you like my tutorial 🙂 Your dress pattern is very cute, btw!
Kati said
Hi June, maybe you could update your instructions and writing the “loose end being left” next to the pictures, I tried and tried and tried and tried and threw everything away thinking i´m stupid… and after all i read the comments and got it 🙂
Thanks for this great tutorial, when you got the trick its really easy!
Kati
June said
Thanks Kati, I’ll do that right now 🙂
Jess said
Thank you so much for this! I can’t tell you how helpful it is. I spent two hours trying to learn this and finally found your instructions. The other sites had good pictures but you just couldn’t see what was going on. Thanks to your pictures and instructions I finally realize what I was doing wrong and I made my first magic ring 🙂
sue said
Thanks for the clear explanation. I’m left handed, but right-handed instructions are really no problem — the secret is to sit with your back to the screen!
June said
You’re welcome, Sue, but I do have a left-handed version too! 🙂
Emily said
I just love your pieces! I see your stuff on etsy and you’re just wonderful! Thanks for the patterns!
Freya said
Thanks for the tutorial! Way more helpful than the book I’ve been trying to decipher!
andrea mu said
hello . i want to know if is possible that you send to me the model of yoshi in amigurumi.
thanks so much i´ll be possible send it to me in spanish, to my e – mail
thank you very much
Blaize said
Thank you for the clarifications. I will try again.
Blaize said
I find this confusing, because in the second photo, the yarn that goes off to the right is in FRONT of the loop, and in the third photo, the yarn is suddenly magically behind the loop, with no explanation as to how it got there. Then it says “draw up a loop.” Draw which yarn up?
I know I’m a beginner, but I don’t think of myself as a totally stupid person, yet I cannot understand this explanation, or, really ,any other tutorial I have seen for the “magic” loop. It’s frustrating, and I’m just going to have to have someone show me In Real Life.
June said
Blaize, the yarn is only held in the loop by my left thumb and forefinger. I’m sorry if I’ve confused you.
You’re actually right that to accomplish the third picture, the long yarn end (the one that goes to the ball of yarn, not the short starting end) will be pulled to *behind* the loop so that you can grab it with the hook, but there’s no knot there; it’s only my fingers holding the loop together, so that’s easily done – I actually just hold it at the point where they cross, so there is no obvious ‘in front’ or ‘behind’. All that matters is that you:
a) Hold the loop together with your thumb and forefinger
b) Insert the hook from front to back and use it to grab the yarn that goes to the ball before bringing the hook back up through the loop to the front
The loop won’t hold together by itself until you do the ch 1, so don’t release it from your thumb and forefinger until you’ve completed step 3.
Tessel said
This was very helpful, thanks a lot!
Tony said
A quick question what do you do with the tail after you tighten it? do you weave it in immediately? or do you leave it hang for a bit ? I can’t see where it went after you’ve finished round 2.
June said
Tony, if you’re making something like an amigurumi, you can just leave the tail hanging on the wrong side (the inside in the case of an amigurumi) – there’s no need to weave it in at all! For other projects where both sides of the work will be visible, you can just leave it dangling on the wrong side of the work until you’ve worked a few more rounds (or until you’ve finished the piece), and then weave it in.
In my example, the end is on the reverse side, but I snipped it short so that it wouldn’t show in the pic and confuse people by hanging down. I hope that clears things up for you!
%$#*&!!! said
I’m so frustrated. I can’t do this stupid magic loop. I’m an inexperienced crocheter and the photos don’t show which end is the loose end and which end goes to the yarn. It doesn’t say which end is pulled up to make a loop or anything. I hate it when I can’t figure out something that looks so simple. 🙁
June said
I’m sorry this isn’t clear to you – as I said in an earlier comment, the starting yarn tail is always on the left and hanging down in all the photos.
You should be able to see the overlap by looking at the first two photos
Kaylesha Blackheart said
Thanks a million for making left handed instructions. I am very frustrated with pictures in articles always showing RIGHT handed crochet techniques.
Sometimes it makes it annoying to do the ‘mirror flip’ as they always recommend.
June said
You’re all very welcome! I’m a lefty too, so I know how frustrating living in a right-handed world can be! I try to give both options wherever possible 🙂
willow said
Great tutorial. Thankyou!
Nancy J said
Thanks! Yay. It works so well.
jane said
Thanks for this. I’d tried other tutorials on the magic ring, but always been confused by what to do after pulling that first loop through. At last!! I now understand and have bookmarked your instructions for the future. My chickens will no longer have holes in their heads!
Jane
x
June said
Janetta: there is another type of magic ring called the double ring. I suspect you must have been using that. The double ring is more difficult to tighten – you have to do it in stages:
1.Pull the end a little, to figure out which of the 2 rings is drawn tighter when you do
2. Grab the OTHER ring and pull that tight
3. When it’s fully closed, grab the end again and use it to close the second ring
This is why I prefer the single loop magic ring shown in my tutorial – it’s much easier!
Shell Russell said
Hello! Thank you for the lefty instructions. I, too, am a lefty, & it IS hard to figure out sometimes. I’ve tried scanning the pics in books & reversing them, kind of works, but I’ve actually sat down & went through pattern books with a pencil & re wrote the places I needed. This is SOOOO much nicer…thanks again!
Lynda A said
Thank you so much for the pictures and the wonderful instructions! I went to all sorts of websites and saw magic circle lessons on youtube, but I just cannot get the circle to work until I found your website! Your step-by-step instructions are very good and useful. Thank you very much!
Janetta said
when i tried multiple different types of magic rings, when I pull
the tail it doesn’t tighten. Theres another loopy thing that prevents it from tightningwhy is that???
Jan said
Thanks so much for this technique. It’s the first time I’ve tried it and it’s really nice to not have the hole! 🙂
Debbie said
THANK YOU!!! for the left handed instructions I get soooo frustrated reading everything for the right handed person and can never figure it out…LEFT HANDERS MATTER TOO….and thanks for helping us all out just looking at the photo I know I am going to be ablr to do this..you are wonderful…
Jennifer said
Thank you, thank you, THANK YOU! I’ve been trying over and over to make this magic ring. I watched videos, followed the instructions in my book (all right-handed of course), but I could never get it to close cleanly. It worked out on my first try using your instructions and has worked perfectly every time since!
Amy said
Wow….this is seriously a phenomenal trick! Thanks for sharing. =)
Bonnie said
Thanks so much for the magic circle technique-am crocheting your Alpaca pattern and this is working out great- I have been crocheting for about 49 years -I started when I was 6 with my Mum and don’t know how I got by without this fabulous starting stitch. Thanks also for the great pattern- my grandkids are anxiously awaiting their toy Alpacas.
Kira said
Lol thank you for replying June! But I believe I have it now! Still stuck on the cone pattern…
Melissa said
Thank you so much for this! I’ve tried half a dozen different tutorials on the internet and this is the one that I finally got!!! You win!
evie said
thanks for the lefty instruction!!!!! XD love it!
The Crafty Librarian said
Left handed instructions! Hallelujah! I will be giving these a go, because there has been so many cute things I wanted to make :o) Thank you!
Judy said
June I was getting SO confused w/right hand directions, I felt like a little trying to learn how to tie my shoes. Thanks for showing us lefties that the magic circle is so awesome with the right teacher, pics, & directions. Thank you for caring about us!
Britin said
I find the magic ring to be next to impossible and prefer working in a continuous spiral but your pictures and explanations are much more useful then the ones found in the Creepy Cute Crochet book. Hopefully I’ll be able to finish my friends wedding present now.
Thank you!
Kirsten said
I just began learning to crochet a few days ago, so naturally I had no idea what to do when I tried to follow my first pattern and saw “SC 6 into magic ring”. This tutorial, when paired with another one that made it a little easier to see how to keep a grip on both the loop and the crochet, was IMMENSELY helpful. It took me a couple of tries, but I eventually figured it out. My first ring was rather sloppy, but it worked!
skrunkycat said
Wow I actually found a tutorial where the pictures matched the instructions clearly and everything was pointed out, not assuming you already know what they mean!
Thanks a bunch I am happy!
Cina said
So good tip ! I Love it !! thanks
KristaS said
Thank you so much 🙂 This is very comprehensive, SO much nicer than how I was doing it 🙂 Thanks again!!!
DianaG said
thank you, it’s been bothering me that there is always a hole in the middle of my amigurumi things… I hope I can grasp this and use it 😉 gonna give it a try soon
kathy carraher said
BLESS YOU ! For the left-handed instructions.I love crochet but some patterns are hard to figure out when you are going in the opposite direction.
Ella Runciter said
Thank you so much for these clear, easy-to-follow instructions with photos! They were very helpful and much appreciated.
Grace Norcott said
Thank you so much for the left-handed tutorial. I tried using a right-handed version and couldn’t figure it out. I will have to try this. I am used to translating directions from right to left but sometimes I just can’t do it so I miss out. I’m sure I speak for other lefties in saying how great it is to have left specific directions. Bravo!
Liz said
thank you for the lefty instructions. is there a slip stitch to close the round before you start each round? or is that left out of ami-crochet?
June said
Liz: there are two ways to crochet in the round:
1) join with a sl st at the end of each rnd and then ch 1 to being the next round
2) crochet around and around in a continuous spiral
Amigurumi typically uses the second method, although you could also use the join with sl st, ch 1 method with the magic ring if you prefer!