Spoiler alert: in doing this colour changing investigation, I’ve come up with recommendations for how best to manage your yarns when you make multiple-colour amigurumi.
If you’re not interested in my experiments and how I reached my conclusions, you can skip the rest of this post, and jump straight to the Changing Colour: Managing the Yarns tutorial 🙂
I’m often asked how to deal with the other yarn when changing colour in my amigurumi patterns. If there’s a specific technique I recommend for a specific pattern – one that makes the colour changes much neater or faster than any alternative – I give you that information in the pattern itself.
But, in general, I don’t give specific details within a pattern for every colour change, because a) there’s no one ‘right’ way to deal with yarn ends and carrying colours, and b) it’s up to you which method(s) you find to be the best combination of fast, easy, and with a good end result.
In fact, I tend to intuitively use a combination of several options, but how do you know what to use when? Time for another crochet experiment, so we can see the the advantages and disadvantages of each technique, and I can give you a better recommendation…
Note: Not interested in the investigation and just want my recommendations for how to deal with the other yarn when you’re changing colours? Go straight to my page Changing Colour: Managing the Yarns!
Method
I crocheted the same amigurumi-style sample piece 4 times, using the same pattern each time but changing the method for dealing with the other yarn in each sample, as a basis for comparison.
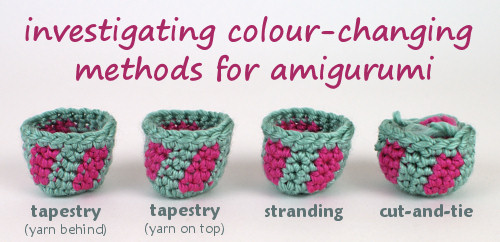
The pattern was a two-colour cylinder worked in a continuous spiral in the round, changing colour every five stitches on one side and every two stitches on the other side, so we can see any differences between short and long blocks of stitches between colour changes.
The techniques I used were:
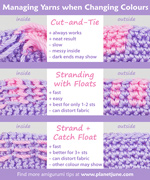
- 1. Cut-and-tie: Cut the yarn at every colour change and tie each resulting pair of ends together.
- 2. Stranding: Carry a float of yarn behind the work, and pick it back up when you resume crocheting with that colour.
- 3. Tapestry crochet (yarn on top): Lay the unused yarn across the top of the stitches, and crochet around it with every stitch.
- 4. Tapestry crochet (yarn behind): I don’t think there’s a real name for this technique: crocheting around the other yarn with each stitch, but holding it behind the back loop, instead of across the top, of the stitch below. (But does that really make a difference? Let’s find out…)
Results
The overview picture below shows the results of the four different methods.
L-R for each method:
- Wide blocks of colour, right side
- Wide blocks of colour, wrong side
- Narrow blocks of colour, right side
- Narrow blocks of colour, wrong side

(You may be wondering why I’m looking at the wrong sides too, when the inside will never be seen in an amigurumi piece. It’s important for the experiment to see what’s going on behind the scenes as well as comparing the look of the finished outside.)
By comparing each of these samples, I could see the advantages and disadvantages of each method, which will let me figure out which is best to use when, and why…
Cut-and-tie vs Stranding
Stranding is much faster than stopping to cut the yarn and tie knots at every colour change, but the quality of the stranded result depends on the width of the yarn that’s floated on the back of the piece:
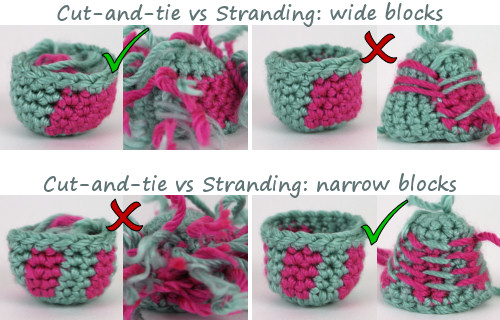
For long stretches between colour changes, the floated yarn on the back of the piece can distort the shape of your work (if too tight), or cause the stitch before and after to work loose (if too loose). Cut-and-tie leaves yarn ends, but gives a consistent result.
However, for frequent colour changes of only a stitch or two, cut-and-tie is fiddly and leaves a big mess of ends on the inside of the piece. Stranding works very well for these shorter colour changes, provided you tension the stranded yarn so it sits snugly along the inside of the piece.
Conclusion: Stranding the yarn behind your stitches saves time and yarn vs cutting and tying at each colour change, but it works best when you’re only carrying the yarn for a short length before swapping back.
Tapestry crochet vs Normal crochet (cut or stranded)
There’s a big problem with using tapestry crochet for amigurumi – unless, of course, the pattern was designed to be worked this way! Let’s compare the stitches formed with standard crochet vs those with tapestry crochet:
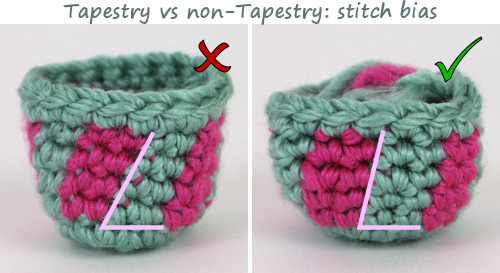
Working in the round without turning always introduces a bias to your stitches – a stacked colour change will travel by approximately 1 stitch per 5 rounds (above, right). But with tapestry crochet (above, left), that bias is intensified, so a stacked colour changed will travel by approximately 1 stitch per 2 rounds. So, if you use the tapestry technique where it’s not intended (or, use non-tapestry for a pattern designed for tapestry), the colour pattern will become skewed.
The tapestry stitches are also slightly taller than standard stitches, but I’m not sure there’s enough of a difference there to skew the overall shaping significantly on the scale of an amigurumi piece. The colour shifting is a much more obvious problem, and a good enough reason to abandon this method for amigurumi colour changes without further investigation.
Conclusion: Don’t use tapestry crochet (working over the carried yarn with every stitch) for amigurumi with colour changes, unless the pattern specifies it.
Tapestry crochet (yarn on top vs yarn behind)
The modified tapestry crochet technique, where you carry the yarn just behind the back loop of the stitch instead of across the top, does make a difference: looking at the green stitches in the samples below, you can see that the carried (pink) yarn is less visible on the front of the piece, and more visible on the back (where it doesn’t matter for amigurumi).
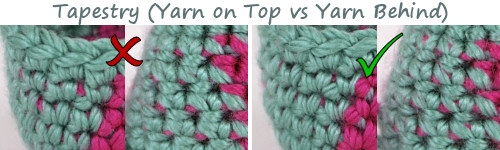
Conclusion: If you’re going to work over yarn (to carry a yarn, to catch a floated yarn, or to work over a yarn end), for amigurumi it’s better to hold the yarn behind the back loop of your stitch instead of across the top of the stitch.
(This modification doesn’t help with the bias effect, so I still wouldn’t use it for amigurumi colourwork, unless the pattern was designed to be worked in tapestry crochet. But I have incorporated this technique into my recommendations in a specific scenario, as you’ll see…)
Verdict & Recommendations
Putting it all together, we can see which techniques may be most effective when a pattern has frequent/infrequent colour changes that span few/many stitches, and I now have solid reasons for recommending different yarn-wrangling methods in different situations.
You always have a choice of how to deal with the other yarn(s) when you change colour, but I’ll give you my recommendations – together with some case studies so you can see how these methods work in practice for amigurumi – in my tutorial page:


Jan said
Thanks for the thorough analysis. I tried a hybrid – stranding with floats, but using tapestry crochet in the back of the stitch every 4th stitch or so to keep the strands short. Seems to work for amigurumi color changes without adding height. I was previously cutting and finishing all the ends with color changes. The new method reduced time substantially.
June said
Yes! That’s one of the three methods I recommended (I called it “Strand + Catch Floats”) in my conclusions from this investigation (the article is linked in the post above, but here’s the link again: Changing Colours: Managing the Yarns).
Florencia said
Thank you for doing and sharing. This is awesome. I have been dealing with this question for a while 🙂
Fenneiu said
Hi June,
Thank you so much for this investigation on using colours! I like your scientifical and at-the-same-time practical approach to crohcet! I was wondering if stranding when crocheting wide blocks could be turned into-cut and-tie technique simply by cutting the strands after crocheting ?Will the fabric be distorted anyway? I would think that the tension would be more even if the yarn were cut afterwards. What about intarsia?
June said
You can definitely do that, provided you leave long enough lengths to tie at both ends after cutting, and you keep the right tension on the ends when you tie them later. I do this myself sometimes, but I find it’s easier to keep the tension on the knots even when you tie as you go. The problem is that inserting your hook into the loop that leads straight to the loose strand can pull that loop too long as there’s nothing tensioning it, so you have to make sure to tighten it appropriately (and not too much!) when you tie the knots later.
As for intarsia (dropping the yarn to the back and picking it up again when you work back around to it), it has limited uses in amigurumi, because you’re working in a spiral, not back and forth in rows. It’s definitely usable but only in specific situations – if you’re making a block of colour B against a different coloured background A, when you get to the start of the B section on the next round, your B yarn will still be at the end of the block. See my case study #5 in the follow-up to this investigation (Changing Colour: Managing the Yarns) for an example of where I do use it.
Pamela said
Wow what a wealth of info! Thanks for doing all the dirty work so we don’t have to. I will definitely be using these tips in my future projects!
June said
You’re welcome, Pamela! I always want to make sure I’m recommending the best techniques, and not just the first one I happened to try – I hope you find the results useful 🙂