Gingerbread Tree & Christmas Tree Ornaments crochet pattern
© June Gilbank 2025
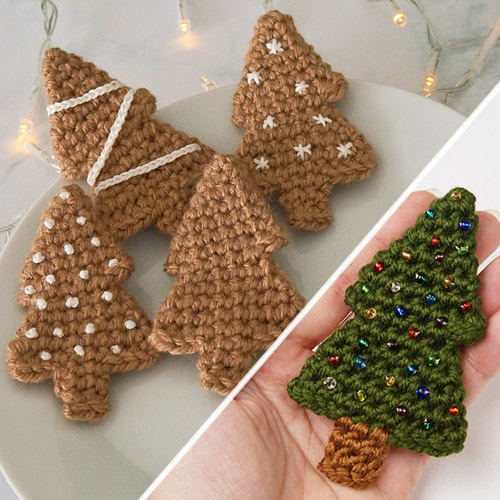
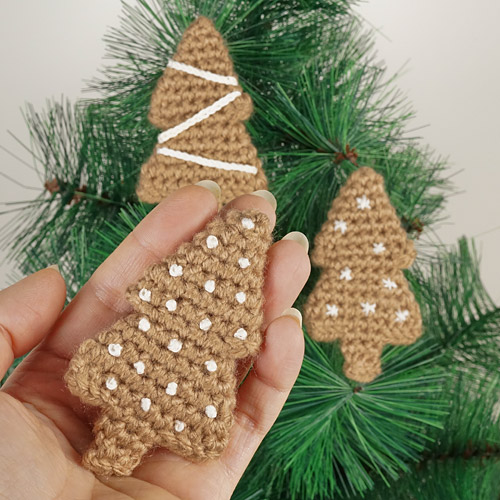
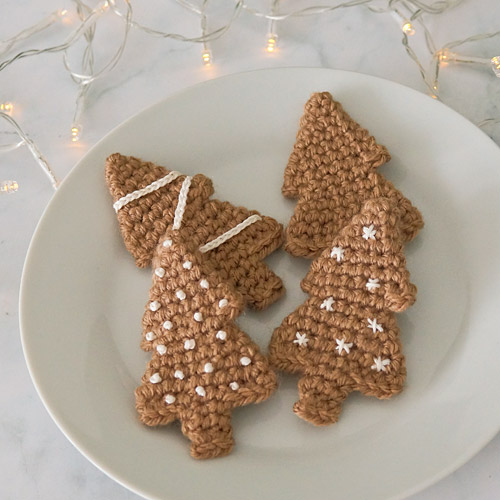
Chunky and flat, just like the edible cookie version, the Gingerbread Tree ornament is a perfect blank canvas for decorating with beads, embroidery, or whatever crafty ‘icing’ you like. Or make the Christmas Tree version in green or white with a brown trunk.
Both versions are crocheted amigurumi-style (in a continuous spiral) from only 10 yds of yarn with no sewing, so the pattern works up quickly with minimal finishing!
This ornament pattern is Donationware – the pattern is available for free, but if you like it please consider sending me a donation to show your appreciation:

Send me a donation and receive the easy-to-print PDF version of the pattern as a thank you! It includes some additional info that you’ll only find in the PDF version:
– A 2-page guide to the embroidery and embellishments used on the sample trees
– Additional info and left-handed photos
Donations of any size are much appreciated. Just add the amount you wish to donate, and, once you have checked out and paid, your pattern will instantly be available to download from your PlanetJune account.
The complete pattern and instructions are available below, regardless of whether or not you choose to pay for them 🙂
This is a PlanetJune original crochet pattern. Feel free to use items made from this pattern however you wish, but I’d appreciate credit as the pattern designer. Please do not reproduce the pattern anywhere else; instead post a link to www.planetjune.com/gingerbreadtree
Not ready to make it yet? Add it to your Ravelry queue: 
Terminology
| ch | chain |
| sc | single crochet (double crochet for UK/Aus) |
| sl st | slip stitch |
| st | stitch |
You will need…
- E US/3.5mm crochet hook
- Small quantity of worsted weight yarn in a gingerbread shade, or green (or white) and brown
- Yarn needle to weave in ends
- Stitch marker
Approx 3.5″ (9cm) tall. (Your gauge and yarn choice will affect the finished size slightly.)
Crochet Instructions
Notes
- Do not join at the end of each round; rounds are worked in continuous spirals.
- Use a stitch marker to mark the beginning of each round. Move the marker up as you start each new round.
Overview & Colours
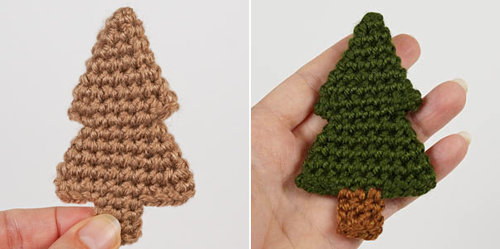
This no-sew tree is worked in three sections (Upper, Lower and Trunk), with one simple colour change that allows you to make two different ornament styles:
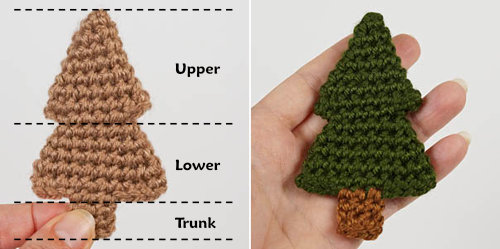
- Gingerbread cookie tree: Work all three sections in brown.
- Christmas tree: Work the Upper and Lower sections in green (or white) and the Trunk section in dark brown.
Upper Section
Make a magic ring, ch 1.
Rnd 1: 4 sc in magic ring. (4 st)
Rnd 2: (sc in next st, 2 sc in next st) twice. (6 st)
Rnd 3: (sc in next 2 st, 2 sc in next st) twice. (8 st)
Rnd 4: (sc in next 3 st, 2 sc in next st) twice. (10 st)
Rnd 5: (sc in next 4 st, 2 sc in next st) twice. (12 st)
Rnd 6: (sc in next 5 st, 2 sc in next st) twice. (14 st)
Rnd 7: (sc in next 6 st, 2 sc in next st) twice. (16 st)
Edge row:
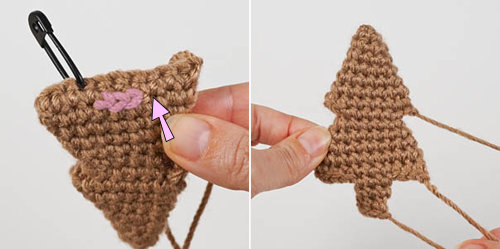
- Flatten your work so the last stitch you worked is at one edge (below, left);
- skipping that edge stitch (marked by arrow, below, right), sc through both layers of next stitch then mark the stitch you just
completed;

- sc in the front layer only (below, left) of the next 5 stitches;
- skipping the next 5 stitches of the back layer (highlighted stitches, below, right), sc through both layers of next st, sl st in front loop of last st (the edge st).

Fasten off, and pull on the remaining loop on the hook until the cut end is drawn through to the top.
Lower Section
Turn your work so you’re looking at the back of the edge row. Look at your work and you’ll see the 5 skipped stitches along the front layer (highlighted stitches, below, left). Identify the stitch before the first of these stitches (arrow, below, left) – this is where you made the stitch that joined both layers together.
Tip: Right-handers: this stitch will be to the right of the row of 5 stitches.
Left-handers: this stitch will be to the left of the row of 5 stitches.
Fasten on by drawing up a loop in that stitch. Do not ch 1.
Tips: Work over the starting tail for the first couple of stitches of Rnd 1. Then, if the first loop you drew up looks too large, pull on the starting tail to draw the V down to the normal size. Mark this V if you need to – this will be the first stitch you work into in the next round.
Rnd 1: sc in next 4 st, 2 sc in next st, turn your work so you can work into the other layer;
starting from the stitch after the marked stitch (arrow, below, right), sc in next 4 st, 2 sc in next st. (12 st)

Note: From now you’ll be working in a spiral again, starting by working into the first stitch of Rnd 1.
Rnd 2: (sc in next 5 st, 2 sc in next st) twice. (14 st)
Rnd 3: (sc in next 6 st, 2 sc in next st) twice. (16 st)
Rnd 4: (sc in next 7 st, 2 sc in next st) twice. (18 st)
Rnd 5: (sc in next 7 st, 2 sc in next st, sc in next st) twice. (20 st)
Rnd 6: sc in next 8 st. (8 st, plus 12 unworked). Continue to Edge Row (below).
Edge row:
- The last stitch you worked should be at one edge so you can work the edge row in the same way as you did for the Upper Section. If your hook isn’t at the edge of your flattened tree, sc an extra stitch (or unravel one stitch as needed) to bring your hook to the edge;
- skipping that edge stitch, sc through both layers of next 3 stitches then mark the stitch you just completed;
- sc in the front layer only of the next 3 stitches;
- skipping the next 3 stitches of the back layer, sc through both layers of next 3 st, sl st in front loop of last st (the edge st).
Fasten off, and pull on the remaining loop on the hook until the cut end is drawn through to the top.
Trunk Section
Note: For a gingerbread tree, continue with the same colour of yarn. For a Christmas tree, change to brown for this section.
Turn your work so you’re looking at the back of the edge row and can see the 3 skipped stitches along the front layer (highlighted, below, left). Identify the stitch before the first of these stitches (arrow, below, left).
Fasten on by drawing up a loop in that stitch. Do not ch 1.
Rnd 1: sc in next 3 st, turn so you can work into the other layer;
starting from the stitch after the marked stitch, sc in next 3 st. (6 st)
Rnd 2: sc in next 6 st. (6 st)
Rnd 3: sc in next 3 st. (3 st, plus 3 unworked). Continue to Edge Row (below).
Edge row:
- Flatten your work so the last stitch you worked is at one edge;
- skipping that edge stitch, sc through both layers of next 2 stitches, sl st in front loop of last st.
Fasten off, and pull on the remaining loop on the hook until the cut end is drawn through to the top.
Finishing
Weave in all three yarn ends (above, right). For each end, make sure not to pull the yarn through too tightly, which will pull in the point of the tree outline so it loses the pointed shaping. If you have accidentally pulled the yarn too tight, you can pull back on the squashed corner to pull it back out into shape.
Embellishments
Now you have a ‘blank canvas’ gingerbread tree, ready to decorate however you wish, just as you would with an edible gingerbread cookie!
You can leave your trees plain, keep your embellishments simple, or use your imagination to create all sorts of designs. Keep the embellishments in classic white, or match the colours to your seasonal décor. You can use the embellishment options shown in my samples as inspiration (and you’ll find full instructions in the PDF version of this pattern), or come up with your own designs!
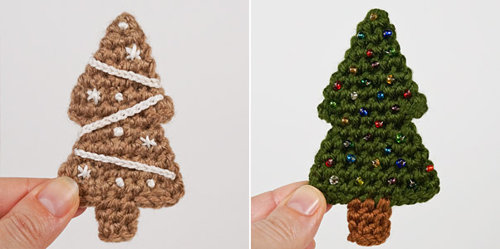
L: embroidery and chains crocheted with embroidery floss
R: stitched-on seed beads
Here are some crafty ideas for embellishments to get you started:
- Crochet embellishments using a small hook and fine yarn or embroidery floss
- Add chunky embroidery using yarn and a yarn needle
- Add finer embroidery using embroidery floss and a tapestry needle
- Cut felt to shape and sew or glue it into place
- Sew on buttons, beads and/or sequins
- Use fabric paint
- Make polymer clay embellishments

I hope you enjoy this pattern, and I can’t wait to see how you’ll decorate your trees! Please leave me a comment below, and consider leaving me a donation. Thanks so much for your support ♥


Leave a Reply