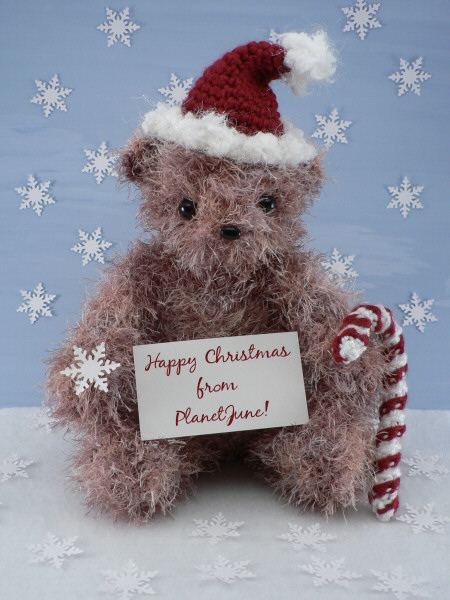
PlanetJune Craft Blog

Latest news and updates from June

Archive for December, 2008

happy christmas!

happy christmas from planetjune

Comments (5)

AmiDogs Miniature Pinscher pattern

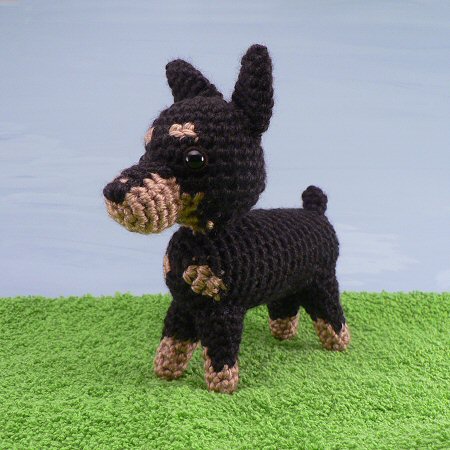
For my last design in 2008, I wanted one more small dog to complete my ‘mini’ set; a breed with a distinctive look to complete my trio…

amidogs miniature pinscher pattern by planetjune

The Miniature Pinscher is adorably also known as the ‘Min Pin’ – how cute is that?! My Min Pin is just over 6″ long and worked in worsted weight yarn and an E (3.5mm) hook. You could also make a one-colour Min Pin by just omitting the colour changes.

And here’s the complete AmiDogs Set 4 (Chihuahua, Miniature Pinscher, and Pug):

amidogs set 4 patterns by planetjune

The Set 4 patterns are available individually for $4.50 each, or $11.25 for the set of 3 – all available from the store right now!

Comments (6)

my crafty Christmas tradition

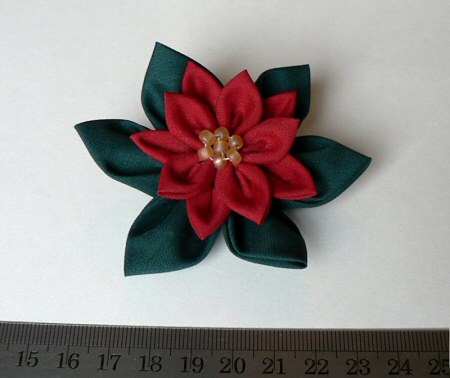
I just realised that, quite by accident, I seem to have developed a Christmas crafting tradition of making poinsettias.

In 2006, I made a kanzashi poinsettia:

tsumami kanzashi poinsettia

In 2007, I designed the famous crocheted poinsettia:

Who am I to break with tradition, even if it’s one I invented myself? So allow me to present the 2008 PlanetJune Poinsettia. This year I’ve gone for a polymer clay (FIMO) variety! It’s just over 2″ (5cm) in diameter, and would make a lovely pin or fridge magnet, or just a pretty decoration.

polymer clay poinsettia by planetjune

If you’d like to try making one, I’ve put together a tutorial for you so you can give it a go. The good news is that it’s much easier than it looks! There’s no precision involved; in fact, the leaves actually look better if they aren’t all exactly the same size and shape. As the instructions are quite long (I’ve included lots of pictures to make it easy to follow), I’ve given the tutorial a page of its own: Polymer Clay Poinsettia Tutorial.

This is my first polymer clay tutorial, so I hope it’ll all be clear. Please leave me a comment if you like it! And would you like to see more PC tutorials in future? Let me know in the comments!

Comments (7)

sizing up (and down)

This old post has been revised and rewritten – please see my Resizing Amigurumi article for my best advice on this topic!

I’ve had a couple of requests lately from people who like my patterns, but want to make a larger version. So, the question is, is it easily possible to ‘size up’ amigurumi designs?

There are a few of ways I can think of to adjust a pattern, so here are my thoughts on this…

METHOD 1: Double everything. By this I mean, every time the pattern calls for 1 stitch, you make 2 (so e.g. if Rnd 1 is 6 sc, you will do 12 sc) AND double the number of Rnds (so you would repeat your new Rnd 1 with a second Rnd of 12 sc). Note: this is not my recommended method! It would be hard to keep track of your rounds and stitch counts, when you are turning each stitch into four stitches.

If you do want to attempt it, it should work fairly well, as sc is a square stitch (same height and width) so by doubling the length and width you are essentially making each stitch into a 2×2 square of stitches, but it’s not perfect – if I was designing a double sized animal I would even up the rounds – e.g. this method will give you stitch counts like this at the end of the rounds: 12 st, 12 st, 24 st, 24 st, 36 st, 36 st… If I was designing it I would even it up to something like 6 st, 12 st, 18 st, 24 st, 30 st, 36 st so the increases are made evenly and not stepped every 2 rounds.

METHOD 2: Use thicker yarn and a larger hook. If you compare the blue and grey elephants below, the greys are made with worsted weight yarn and an E hook and the blue is made with bulky weight yarn and a G7 hook. You can see this has made the blue elephant quite a bit larger.

AfricAmi Elephants by planetjune

METHOD 3: Double your yarn (use 2 strands held together) and use a larger hook. You can see the effect of this here:

AquaAmi Sea Turtles by planetjune

The two turtles use the same pattern, but one uses doubled yarn and a correspondingly larger hook (L instead of G7). The result is a turtle that’s about 1.5 times the size.

Now you could combine methods 2 and 3 to make an ami that’s about double the size of the original, by using 2 strands of a bulkier weight yarn (than the pattern calls for) held together, and a much larger hook. This would be much quicker to make and easier to calculate than method 1, as you would follow the pattern stitches exactly as written.

The downside of using methods 2+3 is that, because each stitch is much larger, the space between the stitches is more noticeable because it’s correspondingly larger. The stitches are also more chunky, so it doesn’t give as smooth a finish as using the finer yarn and smaller hook.

You could also apply Method 2 in reverse to size down a pattern, by using a finer yarn than the pattern calls for, and a correspondingly smaller hook. You can go right down to crochet thread and a steel hook, as shown by bettika67, who turned my life sized guinea pigs:

Fuzzy Guinea Pigs by planetjune

into the most adorable 1-inch piggies, just by using very fine thread and a tiny hook:

meerschweinis by bettika67

So there you go, 3 ways you could increase the size of a pattern, plus one easy method for reducing the size. This advice isn’t limited to amigurumi (although Method 1 is limited to patterns worked in single crochet). For example, you could turn a pattern for something like a baby hat into a child-sized or even adult-sized hat, or reduce a full-size pattern down to child-sized, by using some of these methods. Hopefully this will give some of you more confidence to attempt some resizing of your own!

Comments (15)

aloha!

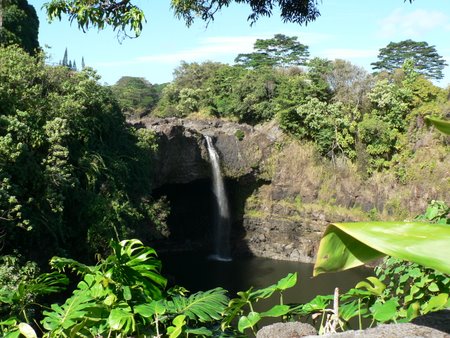
Sorry for the blog silence; Dave and I have just got back from our vacation in Hawaii! It was long overdue, and it was wonderful. It was a bit of a shock when we got back home though; going from this:

Hawaii

to this:

looks like winter

Winter really hit while we were away. And our snowblower is refusing to start up… 🙁

Nothing much craft-related to report; I crocheted half a sock on the flights to Hawaii, but was too exhausted on the way back to finish it. We didn’t really do much shopping there either, but I did manage to pick up some locally-crafted jewellery from a Farmers’ Market, some fabric and a book on how to make crocheted leis.

Hawaii
Those polymer clay flowers are just begging me to try to replicate them!

Really, we went to see the local nature and wildlife, and we saw plenty of that – stunning scenery, beautiful exotic plants and all sorts of interesting birds and animals. I won’t go into long-winded details here, but my holiday journal and photos of all the amazing things we saw will all be online if you’d like to live it vicariously through me. I’m still working on the write-ups for the last couple of days – check back there soon if you want to see the rest of the trip…

Now I’m refreshed and inspired and now I can’t wait to get back into making stuff, once I’ve finished sorting through the rest of the holiday pics. We had a wonderful time, but it’s good to be back home. Aloha!

Comments (6)

  • Quick Links: Crochet

    navigation: arrow

    buy crochet patterns and accessories from my online store

    'Everyday Crochet' and 'The Essential Guide to Amigurumi' crochet books by June Gilbank

    Crochet video tutorials and step-by-step photo tutorials

    Free PlanetJune crochet patterns

    Frequently Asked Questions

    Quick Links: Crafts

    navigation: arrow

    Punchneedle Embroidery information, ebook & patterns

    Papercraft ebook & tutorials

    Free PlanetJune craft projects & tutorials

  • Blog Post Categories

  • Blog Archives

  • Welcome to PlanetJune!

    June Gilbank

    Hi, I'm June. Welcome to my world of nature-inspired crochet and crafting. I hope you enjoy your visit!

    If you'd like to get in touch, you can contact me here.
    crocheted Canadian flag by PlanetJune
  • A fanned-out pile of the books Everyday Crochet and The Essential Guide to Amigurumi, with text 'The answers to all your crochet questions at your fingertips - find out more'
  • Support PlanetJune!

    Want to say thanks? You can send me money in seconds at paypal.me/planetjune (over $20) or paypal.me/planetjune2 (under $20) or send me a donation through my shop.

    Or simply click through from my links before you shop at Amazon, Etsy, KnitPicks, LoveCrafts or Crochet.com, and I'll make a small commission on your purchase, at no cost to you! Start here:

    ♥ Support PlanetJune ♥

    Tip: This link is also in the footer of every page!

    Thank you so much for your support!