Magic Ring (left-handed)
Looking for the right-handed instructions? Or the video tutorial? If not, read on…
What is this ‘Magic Ring’, anyway?
A magic ring is a way to begin crocheting in the round by crocheting over an adjustable loop and then pulling the loop tight. The advantage of the magic ring method (below, right) is that, unlike the regular “chain 2, x single crochet in 2nd chain from hook” method (below, left), there is no hole left in the middle of your starting round.

L: ch2, 6 sc in 2nd ch from hook, 2 sc in each st around.
R: magic ring, ch 1, 6 sc in magic ring, 2 sc in each st around.
How do I make a Magic Ring?
This demonstration shows a piece made using the following pattern:
Make a magic ring, ch 1.
Rnd 1: 6 sc in magic ring. ( 6 st)
Rnd 2: 2 sc in each st around. (12 st)If you’re following a different pattern, you’d complete steps 1-2 of this tutorial exactly as shown below, then work the chain and the stitches of Rnds 1 and 2 as specified in your pattern.
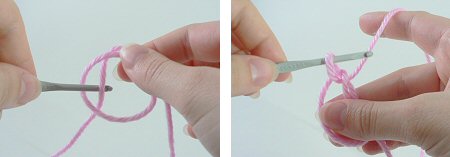
Please note: in the following photos, the starting yarn tail is always on the right and hanging down. The working yarn begins on the left and is then picked up over my right forefinger in Step 2.
- Make a loop a few inches from the end of your yarn. Grasp the join of the loop (where the 2 strands of yarn overlap) between your right thumb and forefinger:

- Insert hook into the loop from front to back. Draw up a loop:
- Ch 1 (or as many as stated in your pattern). Note: this does NOT count as a stitch:
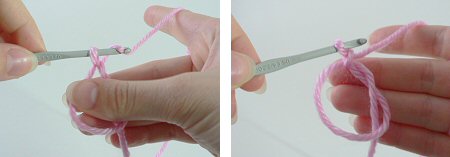
- Insert hook into the loop, so you are crocheting over the loop and the yarn tail. Draw up a loop to begin your first sc of Rnd 1:

- Complete the sc. Continue to crochet over the loop and the yarn tail until you have the required number of sc for your first round (6 sc shown here):

- Grab the yarn tail and pull to draw the centre of the ring tightly closed:

- Begin your second round by crocheting into the first stitch of the first round (below, left). At the end of round 2 your work will look like this (below, right):

You’ll never go back to your old method again, I promise!

Loved this tutorial? I have so many more amigurumi tips and tricks to share with you!
Boost your amigurumi skills with my latest book, The Essential Guide to Amigurumi, your comprehensive guide to amigurumi techniques and tips.
Do you find my tutorials helpful? If so, please consider making a contribution towards my time so I can continue to create clear and concise tutorials for you:
Thank you so much for your support! Now click below for loads more crochet video and photo tutorials (and do let me know what else you’d like me to cover in future tutorials…)


Jan said
THANK YOU!!!!! I have not been able to figure the magic ring out because I am left-handed (I can usually reverse the instructions, but not on this). I followed your directions ONCE and it worked!! Finally!
Oh, and thank you for the picture version of instructions. I am not much for watching videos for instruction.
THANK YOU! THANK YOU! THANK YOU!
Shannon said
Thanks for the clear instructions! I normally have no problems transposing right-handed instructions to left-handed execution, but the magic ring has ALWAYS been such a pain, full of hit-or-miss frustration. Normally I’m working with throws and I happen to like the center hole, so I never bother, but at the moment I’ve been struggling with a very small doll’s dress made with equally small granny squares in which a center hole just cannot exist. Thank you so very much for this step towards consistency!
Patty said
I am late to this information, but wow!! VERY helpful. It helps me to know how to hold the yarn.
I’m wondering about a pattern I want to make which has Double Crochets in the Magic Ring. . . Can you help?
June said
Patty, you should use exactly the same technique for working any number of any stitch into the magic ring – your pattern will tell you how many chains to make at the beginning (it’s ch 1 for sc, as I show here) and how many of which stitch to work into the ring (I used 6 sc here). You’ll follow your pattern and work all the stitches of Rnd 1 into the ring, then pull the ring closed – that part is always the same, no matter the pattern!
Barbara Guzman said
Thank you so much to showing how todo this left handed. Please show more , because it is so hard to try and follow anything right handed.
June said
You’re welcome, Barbara! All my tutorials are available in left-handed versions: you can find them all at www.planetjune.com/help
Karen L Day said
We have in my family one lefty every generation and I happened to have been the
Laurie said
Great Pattern! Thanks!
Nancy Davidson said
Thanks so much, lefties of the world unite! I love the Magic Circle technique
Elizabeth said
Fantastic explanation! I’ve always wanted to crochet, but everyone I know is a righty. Thank you for the wonderful tutorial.
Judy said
Incredible! R U a lefty? I’ve been trying & trying to figure out this method & every time I started to work my first sc, the entire ring fell apart like a small child trying to learn to tie his shoes. I’ve been crocheting over 45 yrs. too. I will never go back to the old method.
June said
I am a lefty, Judy, but all my tutorials are available in right- and left-handed versions 🙂 I’m glad my instructions helped you!
Maya said
So hard to understand… Please Help!
June said
Maya, try my video tutorial for another perspective – the link is at the top of this page! (Also, I assume you are actually left-handed, but, if not, the link to the right-handed version is also at the top of this page..)
Zo said
Thank you so much for these lefty instructions! I’m making a hat for my 2 month old son (we live in Alberta, Canada) and now I can get off to a good start.
Zo
Stacey said
Thanks for the “lefty” instructions. I have been crotcheting for years and always have issues trying to do stuff backwards. It is nice too see someone take us into consideration. 🙂
Lucy said
this will take me some practicing, as I am fully right handed and I don’t do well with my left hand, thanx again Lucy.
June said
I’d recommend you use the right-handed version of my tutorial, in that case, Lucy! (The link is at the top of this page.)
toni said
Now I get it, thanks.
Kristina Hathaway said
Now I know how lefties feel. I am right handed and it took me a minuet to realize that the instructions were for lefties. It is hard to translate. It was a very good tutorial and I was able to make it work for me.
June said
Kristina, all my tutorials are available for both right- and left-handers! There’s a link to the righty version at the top of this page 🙂
mtliz50 said
Thank you so much, I am a lefty and self taught so this was GREAT!!!!! will be back often =)
Janet Reid said
THANK you soooo much!!
stephanie darrow said
Finally easy to understand left handed instructions and pictures. thankyou so much, is so hard to find instrucktions fro left handed people. :O)
Paula_ said
Thank you for realizing lefties might get it “right” if we were ever shown by a lefty. I have spent my entire life trying to do things (sewing instructions, scissors, etc.) in a right handed world. I don’t know why I didn’t think to look on the internet until today when I thought I would try to give crocheting another try.
So thank you. Maybe this time, I’ll get it right.
Joann said
Hello again, ok I am a little slow this morning. (day after Thanksgiving) I just saw the instructions for Lefties! Horray! this will be my project today and then I will crochet the wine bottle cozies. Thank you again for Leftie help. 🙂
Barbara said
Great tutorial! I learned it within 5 minutes of following your visual directions 🙂 And you’re right – I will never go back to my old method! Thank you!
allie said
hello. i’m a 15 girl who like to crochet. i just got this box on how to do amirugimi(i think i spelled that wrong) and the patterns are super cute but i can’t seem to get it. in the book its said use your right had but i’m a lefty 🙁 and then it said do a magic ring and whatnot and i tried and tried but i failed every time. then i saw your website and how to do the magic ring and stuff but i failed at that,too. so i was wondering if you have a videos i can watch? because i’m the kind of person who watches how to do something and then do it myself.
June said
Allie, yep, take a look at my video tutorials page 🙂
Joan said
June, thank you for your lefty instructions and the video. I’ve watched the video over and over, still not quite getting the hang of it. I had to keep pausing all the time. I finally decided to try the pics to see if they’d be easier for me. I’m like Gina who started crocheting 40 plus years ago. But mine was with the help of a righty friend, working like the mirror image. It took me a while back then, but I continued crocheting simple items and practicing, until I finally felt comfortable enough to crochet dresses for my one-year old daughter, and subsequently, two one-year old nieces. At some point I put aside crocheting for many years, until last year when I reached the ‘young’ age of 72. Yes, I’m trying again with a much less than sharp brain. I kept reading about the magic ring or circle but everyone else’s videos and instructions were done by righties…ugh! Thank you for the easiest instructions for lefties. I’ll keep practicing so my samples look like yours. : ) I’m saving your site for further news for lefties and projects. Perhaps now when I see an amigurami pattern in the round, I’ll be able to understand how to crochet those cute little creatures.
Gina said
June, thanks for the leftie instructions! I’m a lefty who taught myself to crochet 40-some years ago, when the only instructions available were right-handed. Quite the accomplishment, I thought. Anyway, now in my late fifties, the brain isn’t quite as sharp, so I really appreciated not trying to make mirror images in my mind to learn this technique. The photos were perfect!
Desiree said
Left handed people kick ass!
Halle said
Hello June i am a beginner( I’m only 12) and I don’t exactly understand can you maybe post a video or a link? Yours looks nice and all and this probably be easy for me but its not, I keep getting stuck on step #4. Please help!!
Thanks Halle!=)
June said
Hi Halle, thanks for your message! Don’t be discouraged – the magic ring is a bit tricky until you get the hang of it. I’m actually planning a magic ring video now – and there’ll be a left-handed version of it too. I’ll try to get it finished as soon as I can 🙂
Rebekah said
Thank you for remembering us left-handers.
It makes things a whole lot easier to see the instructions this way, especially with pictures!
Amanda said
Hi, just wondering what you do with the tail. Does it need to be stitched in to the amigurumi or can it be left without the hole opening up.,
Emily said
Thank you, thank you, thank you for easy to follow, left-handed directions!!! I could not figure out the magic ring with right-handed directions, and yours make perfect sense!
Kathy said
Thank you, thank you, thank you. I have been looking online for instructions, and your post was so helpful-better than any lefty video I have found. Have taught myself how to crochet a few months ago, and am busy crocheting some amigurumi, but the books weren’t helping me learn this technique.
Joly said
OMG thank you so much. As a lefty I was starting to think I’d never get the hang of this. This is an amazing help. ^_^
Kaylesha Blackheart said
Thanks a million for making left handed instructions. I am very frustrated with pictures in articles always showing RIGHT handed crochet techniques.
Sometimes it makes it annoying to do the ‘mirror flip’ as they always recommend.
June said
You’re all very welcome! I’m a lefty too, so I know how frustrating living in a right-handed world can be! I try to give both options wherever possible 🙂
Shell Russell said
Hello! Thank you for the lefty instructions. I, too, am a lefty, & it IS hard to figure out sometimes. I’ve tried scanning the pics in books & reversing them, kind of works, but I’ve actually sat down & went through pattern books with a pencil & re wrote the places I needed. This is SOOOO much nicer…thanks again!
Debbie said
THANK YOU!!! for the left handed instructions I get soooo frustrated reading everything for the right handed person and can never figure it out…LEFT HANDERS MATTER TOO….and thanks for helping us all out just looking at the photo I know I am going to be ablr to do this..you are wonderful…
Jennifer said
Thank you, thank you, THANK YOU! I’ve been trying over and over to make this magic ring. I watched videos, followed the instructions in my book (all right-handed of course), but I could never get it to close cleanly. It worked out on my first try using your instructions and has worked perfectly every time since!
evie said
thanks for the lefty instruction!!!!! XD love it!
The Crafty Librarian said
Left handed instructions! Hallelujah! I will be giving these a go, because there has been so many cute things I wanted to make :o) Thank you!
Judy said
June I was getting SO confused w/right hand directions, I felt like a little trying to learn how to tie my shoes. Thanks for showing us lefties that the magic circle is so awesome with the right teacher, pics, & directions. Thank you for caring about us!
kathy carraher said
BLESS YOU ! For the left-handed instructions.I love crochet but some patterns are hard to figure out when you are going in the opposite direction.
Grace Norcott said
Thank you so much for the left-handed tutorial. I tried using a right-handed version and couldn’t figure it out. I will have to try this. I am used to translating directions from right to left but sometimes I just can’t do it so I miss out. I’m sure I speak for other lefties in saying how great it is to have left specific directions. Bravo!
Liz said
thank you for the lefty instructions. is there a slip stitch to close the round before you start each round? or is that left out of ami-crochet?
June said
Liz: there are two ways to crochet in the round:
1) join with a sl st at the end of each rnd and then ch 1 to being the next round
2) crochet around and around in a continuous spiral
Amigurumi typically uses the second method, although you could also use the join with sl st, ch 1 method with the magic ring if you prefer!
Judit said
Hooray! It’s MAGICAL! I just completed the ring by following your clear photos! Thanks a million! Another Desperate Lefty.
Maria said
Thank you SO MUCH for the lefty instructions!!! I was trying to adapt this from a righty set of instructions given in a pattern and I was SO confused! Your instructions and photos are clear as a bell, thanks so much!
Susan said
Thanks so much! Awesome technique. Really easy to master with the left-handed insructions and photos. You are right, I will never go back to chaining to begin projects in the round!
Mya said
Thanks for the visual instructions! I have a book but it was all words and no pictures and I am a visual person (and a lefty). Maybe now I’ll have the courage to make a hat.
Thanks again!!!
Judy said
Mya, one lefty to another: don’t ever give up. I happen to be able to look at written instructions & see if the pattern says go right, I need to go left. Yes,I get confused sometimes & then I remember I’m left handed.
Andre said
Thanks for this info.
I’ve started crochet yesterday and my book explanation wasn’t really helpfull (and they’re all RIGHTY).
Your photo really help me !
I want more lefty instruction 🙂
Angela Marconi said
Thanks so much for the info and especially for posting lefty instructions!!! 🙂