How to Crochet a Magic Ring
The question I get asked most often is how to make a magic ring (sometimes also called a magic circle) to begin an amigurumi.
What is a Magic Ring?
A magic ring is a way to begin crocheting in the round by crocheting over an adjustable loop and then pulling the loop tight. Unlike the traditional chain start, it leaves no hole in the centre of your starting round, which is ideal for amigurumi.
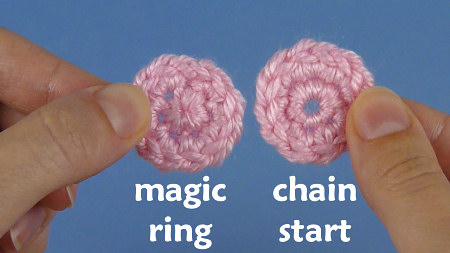
With a chain start (below, left), you can clearly see the hole in the centre, which isn’t ideal for amigurumi, as the stuffing can show through. By using a magic ring (below, right) instead, you can completely close that gap, leaving no hole at all:
L: ch 2, 6 sc in 2nd ch from hook, 2 sc in each st around.
R: magic ring, ch 1, 6 sc in magic ring, 2 sc in each st around.
It can take a few attempts to master the magic ring technique, but once you’ve got the hang of it, you’ll never go back to your old method again, I promise!
I recommend you watch the video to see the method in action, but in case you prefer text or want something visual to refer to, I’ve also made a photo tutorial version for you.
Quick finder:
- Video Tutorial (right- and left-handed)
- Magic Ring Tips
- Step-by-Step Instructions (right-handed)
- Step-by-Step Instructions (left-handed)
How to Crochet a Magic Ring – Video (right-handed)
Click to watch this video on YouTube.
How to Crochet a Magic Ring – Video (left-handed)
Click to watch this video on YouTube.
Note: The videos may look a little small embedded in the blog: if so, you can fullscreen them or click through to YouTube to watch them full-sized 🙂
Magic Ring Tips
- Remember that the magic ring is just the loop of yarn – it doesn’t include any crocheted stitches. If you’re following a pattern, you’ll work all the stitches of Rnd 1 into the magic ring, and pull the ring tightly closed at the end of Rnd 1.
- You can use magic ring in any amigurumi pattern – if it starts with a chain, just replace the starting ‘Ch 2, X sc in 2nd chain from hook’ with ‘Make a magic ring, ch 1, X sc in magic ring’.
- To work in joined rounds instead of the spiral I demonstrate, simply sl st into the first st at the end of Rnd 1, then ch 1 to begin the next round.
- Magic ring is also pretty handy for other crochet patterns worked in the round, too. For taller stitches, instead of the ch 1, you would ch 2 (for hdc), 3 (for dc), or more for even taller stitches, then work Rnd 1 of your stitches into the magic ring.
Note that, with taller stitches, the turning (or non-turning, if you’re working without turning) chain typically does count as a stitch, so where I say to ignore the ch 1 in the video, you’d instead count that chain as the first stitch of Rnd 1, and sl st into the top of the chain before beginning Rnd 2. - If your ring needs extra strength or security, you may prefer a double ring instead of a standard magic ring. See my Amigurumi Double Ring tutorial to learn when and how to use this more secure option.
Is it ‘Magic Ring’ or ‘Magic Circle’?
While you’ll sometimes see the magic ring called the ‘magic circle’ or ‘magic loop’ online, I use magic ring, because it’s more precise. Magic loop and magic circle have different meanings, unrelated to crochet:
- Magic ring: starting crochet in the round
- Magic loop: a narrow circular knitting technique
- Magic circle: a society of magicians
Terminology matters! 😀 But whenever you see a crochet pattern that tells you to make a magic circle or a magic loop, you’re safe to assume it means a magic ring.
How to Crochet a Magic Ring – Step-by-Step Instructions (right-handed)
This demonstration shows a piece made using the following pattern:
Make a magic ring, ch 1.
Rnd 1: 6 sc in magic ring. ( 6 st)
Rnd 2: 2 sc in each st around. (12 st)If you’re following a different pattern, you’d complete steps 1-2 of this tutorial exactly as shown below, then work the chain and the stitches of Rnds 1 and 2 as specified in your pattern.
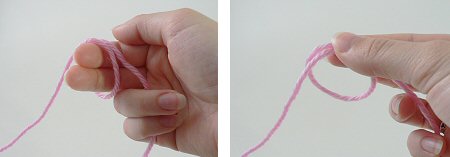
Please note: in the following photos, the starting yarn tail is always on the left and hanging down. The working yarn begins on the right and is then picked up over my left forefinger in Step 2.
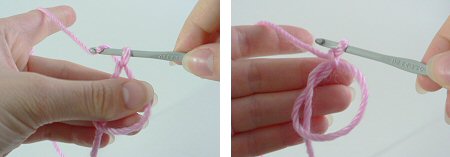
- Make a loop a few inches from the end of your yarn. Grasp the join of the loop (where the 2 strands of yarn overlap) between your left thumb and forefinger:
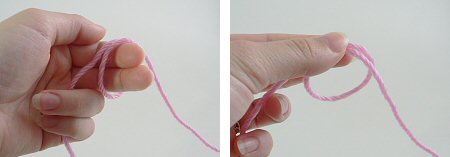
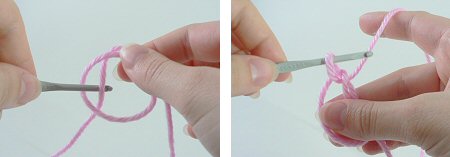
- Insert hook into the loop from front to back. Draw up a loop:
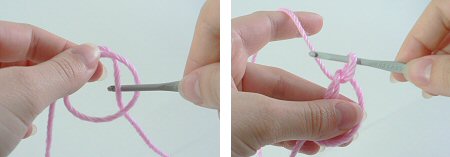
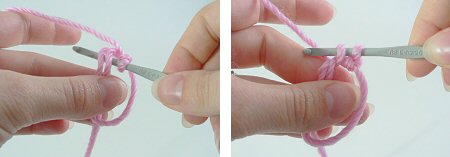
- Ch 1 (or as many as stated in your pattern). Note: this does NOT count as a stitch:
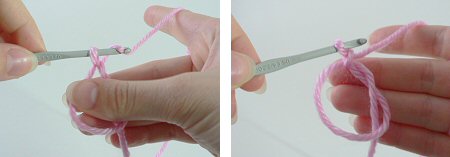
- Insert hook into the loop, so you are crocheting over the loop and the yarn tail. Draw up a loop to begin your first sc of Rnd 1:
- Complete the sc. Continue to crochet over the loop and the yarn tail until you have the required number of sc for your first round (6 sc shown here):
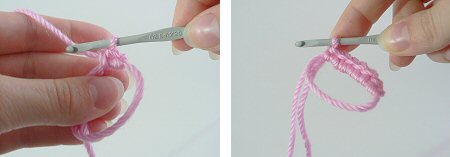
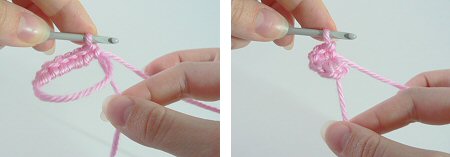
- Grab the yarn tail and pull to draw the centre of the ring tightly closed:
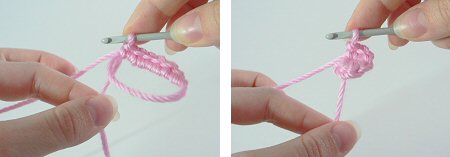
- Begin your second round by crocheting into the first stitch of the first round (below, left). At the end of round 2 your work will look like this (below, right):

How to Crochet a Magic Ring – Step-by-Step Instructions (left-handed)
This demonstration shows a piece made using the following pattern:
Make a magic ring, ch 1.
Rnd 1: 6 sc in magic ring. ( 6 st)
Rnd 2: 2 sc in each st around. (12 st)If you’re following a different pattern, you’d complete steps 1-2 of this tutorial exactly as shown below, then work the chain and the stitches of Rnds 1 and 2 as specified in your pattern.
Please note: in the following photos, the starting yarn tail is always on the right and hanging down. The working yarn begins on the left and is then picked up over my right forefinger in Step 2.
- Make a loop a few inches from the end of your yarn. Grasp the join of the loop (where the 2 strands of yarn overlap) between your right thumb and forefinger:
- Insert hook into the loop from front to back. Draw up a loop:
- Ch 1 (or as many as stated in your pattern). Note: this does NOT count as a stitch:
- Insert hook into the loop, so you are crocheting over the loop and the yarn tail. Draw up a loop to begin your first sc of Rnd 1:

- Complete the sc. Continue to crochet over the loop and the yarn tail until you have the required number of sc for your first round (6 sc shown here):

- Grab the yarn tail and pull to draw the centre of the ring tightly closed:
- Begin your second round by crocheting into the first stitch of the first round (below, left). At the end of round 2 your work will look like this (below, right):


Loved this tutorial? I have so many more amigurumi tips and tricks to share with you!
Boost your amigurumi skills with my latest book, The Essential Guide to Amigurumi, your comprehensive guide to amigurumi techniques and tips.
Do you find my tutorials helpful? If so, please consider making a contribution towards my time so I can continue to create clear and concise tutorials for you:
Thank you so much for your support! Now click below for loads more crochet video and photo tutorials (and do let me know what else you’d like me to cover in future tutorials…)


linda sencenbaugh said
I what to the search but nothe come up it side not found sorry but no matched your criteria
June said
You must be misspelling the word poinsettia if nothing comes up, Linda! Try this instead: you can find links to all my other poinsettias here www.planetjune.com/blog/tutorials
linda sencenbaugh said
I love your poinsettia i wish your would send me the patti for all the poinsettia you have please help me love linda
June said
Hi Linda, I’m not quite sure what you’re asking for, but if it’s my crocheted poinsettia pattern, you can find it here: www.planetjune.com/poinsettia
If you’re looking for any of my other poinsettia designs, try using the search box near the top right corner of this page – type in poinsettia and hit search, and all the related posts will come up 🙂
Betsye Rose said
Simply genius! Thank you a million times!
linda sencenbaugh said
Thank You so much I love your work
Wai Sam said
Hi June thanks for the tutorial. I have made my own Magic adjustable ring tutorial too! It took me one full day to take and edit the pictures. Kudos to you for making the tutorial. XoXo
Barbara said
Great tutorial! I learned it within 5 minutes of following your visual directions 🙂 And you’re right – I will never go back to my old method! Thank you!
Mary said
Love this! Is there a printable version available? I need to carry with me in case I get stuck when I am at appointments & waiting. Like to carry small projects with me to keep busy 🙂 Thanks so much!!!!
Mary said
Love the tutorial with the pictures! I really would love to share this with an older friend that doesn’t have internent. Is there any way to print this so I can share with her? Tried to highlight & print, but that doesn’t give but one picture. Thanks so much!
Ashley Carlson said
Hello! I am a new to crochet but quickly came across this tutorial and the video. Unfortunately after the 5th or 6th beanie, this is still SO very difficult for me!! I am not sure if I am doing this correctly and the tops of my beanies just seem to be a big circle of thrown together yarn!! They sort of make sense around row 3-4. How many sc do I do into the ring before I pull tight? Is it always the same or does it depend on the pattern?
Thank you!
Ashley
June said
Ashley, the stitches you make into the ring are the stitches of Rnd 1 of your pattern, so yes, the number does vary. If you’re still having difficulties, I suggest you watch my video tutorial too, to make sure you’re doing it right!
allie said
hello. i’m a 15 girl who like to crochet. i just got this box on how to do amirugimi(i think i spelled that wrong) and the patterns are super cute but i can’t seem to get it. in the book its said use your right had but i’m a lefty 🙁 and then it said do a magic ring and whatnot and i tried and tried but i failed every time. then i saw your website and how to do the magic ring and stuff but i failed at that,too. so i was wondering if you have a videos i can watch? because i’m the kind of person who watches how to do something and then do it myself.
June said
Allie, yep, take a look at my video tutorials page 🙂
Julia said
I don’t understand how you got your loop to stay and still have your circle. following your directions, it did NOT work for me.
June said
Julia, I suggest you view my magic ring video tutorial for further assistance.
RoseOniel said
wow…. that is confusing lol…. But i will try… I just started doing crochet.. i know how to stitch but making loops and rounds is still a little hard for me but your pictures and distributions help :).
Joan said
June, thank you for your lefty instructions and the video. I’ve watched the video over and over, still not quite getting the hang of it. I had to keep pausing all the time. I finally decided to try the pics to see if they’d be easier for me. I’m like Gina who started crocheting 40 plus years ago. But mine was with the help of a righty friend, working like the mirror image. It took me a while back then, but I continued crocheting simple items and practicing, until I finally felt comfortable enough to crochet dresses for my one-year old daughter, and subsequently, two one-year old nieces. At some point I put aside crocheting for many years, until last year when I reached the ‘young’ age of 72. Yes, I’m trying again with a much less than sharp brain. I kept reading about the magic ring or circle but everyone else’s videos and instructions were done by righties…ugh! Thank you for the easiest instructions for lefties. I’ll keep practicing so my samples look like yours. : ) I’m saving your site for further news for lefties and projects. Perhaps now when I see an amigurami pattern in the round, I’ll be able to understand how to crochet those cute little creatures.
Amy said
Hello and thank you for your tutorial. I have achieved the magic ring, however I was wondering how to secure it? If I just pull closed, then it opens back up ever so slightly as I am crocheting other rows, so my question is this, do I need to tie a knot to secure once pulled close? If so when, a couple rows in or when the project (a hat for now) is done? I would greatly appreciate your help, and thank you!
June said
That probably means you haven’t pulled it tightly enough, Amy. See my Magic Ring video for exactly how I do it. If you can’t pull it that tightly, there’s no harm in making a knot. You can tie the knot at any point after pulling it tight.
sandra bolser said
thank you so much for showing how to make the magic ring!
Anna said
I was looking to make, by crotchet, some tiny, tiny five petal flowerettes to salvage my daughter’s expensive, moth eaten, fine woollen jacket but couldn’t make the first ring tidy enough for the quality of the item.
I have tried your ‘magic ring’ method with great success. Using a very fine cotton sheen, like sewing thread, and the finest crotchet hook I could find in my rummage box. I am so very pleased with the finish and I’m sure the eccentric placement of the moth larvae holes (only on the two front panels) will add to the quality look of the garment.
Many thank for posting these clear and easy to follow instructions with pictures. I like pictures!
Birdie said
How nice! ;D I am sure it is a lovely sweater now! :):)
dotb said
Thank you! Will try it soon!
Jennifer in MamaLand said
Thanks! Very simple directions… just what I was looking for!
Ada said
Hi June
This is my first time on your site, I just saw your video on how to do a loop stitch (crochet), and I found it very helpful. I have this project that reguires a double loop stitch (crochet) and double-loop-st2tog and I can’t find a video on it any where, I was hoping you could help.
June said
Hi Ada! I create my videos to support my own patterns. Each one takes me several hours to film and edit, and nobody pays me to make them – I just create them as a service to help my customers. I’m afraid I only have time to make videos that demonstrate the techniques I use in my designs – I’m very sorry I can’t help you.
Wendy Hampton said
Oh my! This is such an amazingly simple to understand procedure and totally solves my problem with that annoying hole. I got here through Pinterest and am thankful I found you. Wonderful video!
pam said
Thank you 1,000 times! I did finally figure it our using the written tutorial but if i don’t make a magic ring for a month or so most likely i will need the refresher and this will be wonderful to have.
I totally love your magic ring – can’t remember if it was Alice or Diane that pointed me in your direction, but however i got here, I am so glad I did!
Lisa said
Thank you so much for this tutorial and video. It has changed the way I crochet…I love to make hats etc and always despaired of getting the ring small enough. Thank you again!
Jana said
So glad to have a good video of this! I do one thing slightly different that has really worked well for me. I pull the first chain one really tight so it is kind of a knot. This helps two ways. 1 it tightens the ring up so it’s easier to put down if I need to as it keeps the ring in place, and 2 and most important, I never mistake it for a stitch and the “bump” is not at all noticible. 🙂
June said
You can see in the video that my ch 1 is quite small too – you’d have to battle to try to work into it! (It just happens naturally when you have your yarn under tension – that’s why you have to chain loosely if you plan to work back into those chains, e.g making a starting chain when you’re working in rows.)
I find that if you pull the ch 1 closed into a knot, it makes it much more difficult to insert your hook into the first stitch of Rnd 1 (when you begin Rnd 2), so it actually works better if you leave a little give in the chain stitch – but of course, whatever works for you is the method you should use 🙂
Monica said
Thank so much for making it a video!!! Your pictures and instructions in your patterns are amazing but this video is greatly appreciated! It’s nice to know that when you do it the same way as the designer your projects will hold up 😀 Thanks!!!
Sarah-Jane Corrado said
GENIUS! I feel like my whole crochet world has changed now. That annoying hole is gone from my projects! Thank you so much for your help! You rock!!!
concretemoomin said
Great video. I’d already learnt how to do this by using books on crochet but this video is very clear and easy to follow. I also didn’t realise that it’s better to tighten the closed centre hole after completing the second round of stitches, or that there’s a risk of it loosening again unless you pull really tight. Thanks for this, it’s really helpful :).
June said
Thanks, concretemoomin. That part is my own innovation – I realised it works better that way after many years of practice!
Gina said
June, thanks for the leftie instructions! I’m a lefty who taught myself to crochet 40-some years ago, when the only instructions available were right-handed. Quite the accomplishment, I thought. Anyway, now in my late fifties, the brain isn’t quite as sharp, so I really appreciated not trying to make mirror images in my mind to learn this technique. The photos were perfect!
misty hernandez said
Glad i ran across this site very helpful. Thanks
Liz said
Is the first single crochet tougher to find than the others, or am I doing something wrong?
June said
Liz, the first stitch of Rnd 2 is always hard to work back into, but especially so if you’ve pulled the ring very tightly closed already. I like to pull it almost but not tightly closed at the end of Rnd 1, then really yank it hard to fully close it when I reach the end of Rnd 2 – it makes it easier to start Rnd 2 that way 🙂
Valerie Lever said
Thank you so much for your “magic ring” instructions….I have enjoyed everything I’ve seen so far on your site….I was introduced to it by my niece when she croqueted the “butterfly baby hat”….It is adorable….I’m still going over your patterns…I croquet hat and scarf sets (I also can up with my own pattern to make the hat and scarf together so that you don’t misplace one or the other). I donate these to Cancer patients…..we’ve had many family members over the past two years diagnosed with cancer…a couple have lost the battle…so my heart goes out to these brave people…..thanks to your patterns they will now have a wider variety…..thanks again….
Valerie
Desiree said
Left handed people kick ass!
Trystan said
hi June!
i love your rose pattern, so i thought i’d try one of your other patterns – the hearts, plumeria, and daffodils. so i tried the magic circle, and i have a few questions.
it feels like i’m doing something wrong in step to draw up the loop, and my yarn doesn’t look like the second picture in step three.
when i finally do get stitches crocheted around the loop and the yarn tail, it doesn’t pull like it’s supposed to – like there’s a knot back on stitch 1.
also in step 5, you say to crochet until you have the “required number of sc for your first rnd.” this “required number of sc” is the number you have in Rnd 1 of your patterns, correct? like the plumeria, you have “rnd 1: 4 sc in magic ring” – so that “required number of sc” would be 4, yes?
Trystan said
please ignore most of this…. i was able to find a video on another site for “adjustable rings”… and i got it!
however, i’m still cuious about my question on step 5. thanks. =)
June said
That’s right, your first round is Rnd 1 of the pattern, so however many stitches are specified in Rnd 1 of the pattern is the number you make into the ring (4 in the case of my Plumeria). You draw the ring closed at the end of Rnd 1 (for some reason, the convention is to not specifically mention that in patterns).
Trystan said
thanks so much for your answer. =)
Danielle said
thank you for the instructions. I am left-handed and your clear pictures and description made it easy for me to figure out! thank you!
Fiona said
I’m with everyone else…thank you for the very clear instructions and illustrations! I tried looking at Youtube and couldn’t get it. This is by far the simplest and most effective description!
Thanks again!
Fiona
Miranda said
Freakin genius! LOVE IT!
Jen said
I linked to your post here in a free pattern tutorial on my blog
Sara said
Hi! I just wanted to say thank you soo much for explaining this so well! I have been trying to grasp this concept for a few days now and could not get it. I tried to understand this from another site I was looking at and ended up very frustrated and confused. I just took a six week beginner crochet class near my house and am now obsessed with anything and everything crochet! Love your website! Thanks for the help 🙂 Have a nice holiday!
amanda said
After I make the ring for the cluster hat im having trouble understanding the directions. I am new to crocheting, this will be my first project! I just can’t figure out how to chain 3 inside the ring because there is no loop to start the chain as far as I can tell 🙂 if you could help I would greatly appreciate it! Thank you! Amanda
June said
Amanda, follow my instructions exactly up to Step 3. Make the ch 1 I show in Step 3, then make 2 more chains, and there you go: ch 3 made 🙂
Then work your dc stitches into the ring instead of the sc stitches I show from Step 4 (so you’ll yarn over before you insert your hook into the ring to begin each dc).
Carol lozinski said
If the hat is a double crochet pattern or a half double should you do those stitches into the circle instead of a single crochet? Or is the magic circle always done with single crochets?
June said
Carol, you can do your hdc or dcs into the ring instead of scs – the magic ring method will work for any stitch worked in the round; I was just demonstrating it from the point of view of amigurumi, which are always worked in single crochet!
To use a taller stitch
Donna D said
As a Newbie to the world of crochet I am so glad that I came across this article, thank you for writing it very clearly and with pictures! 🙂
Halle said
Hello June i am a beginner( I’m only 12) and I don’t exactly understand can you maybe post a video or a link? Yours looks nice and all and this probably be easy for me but its not, I keep getting stuck on step #4. Please help!!
Thanks Halle!=)
June said
Hi Halle, thanks for your message! Don’t be discouraged – the magic ring is a bit tricky until you get the hang of it. I’m actually planning a magic ring video now – and there’ll be a left-handed version of it too. I’ll try to get it finished as soon as I can 🙂
Carole Denson said
Hi,
I have been trying to find someone who can help me make koala bear fingers and toes from a magic circle. The pattern I have is not much help to me as I have never made them before. All help appreciated.
June said
Carole, without seeing the pattern I’m afraid I can’t help. I’d suggest you try contacting the designer of your pattern first, and if you don’t have any luck from them, email me with the details of what’s confusing you and I’ll see if I can help!
donna rios said
TY TY TY for the “magic ring” pics– I have tried and tried- and so far yours is thee easiest– Do U have free patterns? such as for hats and scarves i can make for the kids at schools or babies in hospitals?
ty ty
donn rios
Rebekah said
Thank you for remembering us left-handers.
It makes things a whole lot easier to see the instructions this way, especially with pictures!
Rebekah said
Thank you so much for this post!
I am a beginner with crocheting and I was able to understand and follow your instructions very well. It was so neat how it all came together to form circle in the end. Thanks again!
make handmade said
Great tutorial. Thanks for sharing
Karen said
Thank you so much for the clear pictures explaining how to do a magic circle! I just started crocheting again after many many years and I’m thrilled with the instructions that can be found on the internet. Your time and effort is appreciated!
Jill said
Thank you, thank you, thank you!!! I have looked at SO many tutorials for this technique, and yours actually makes sense! Thanks again for sharing this with such a clear description.
Jill
Hemapriya said
Thank you so much Planet June! You make a very ideal instructor
Di P said
Thank you so much for being the only one on the web whose magic ring instructions I can actually understand. You rock!
Rachel C said
Thank you very, very much for clearing that up!
Rachel C said
Hello, and thanx so much for your magic adjustable ring tutorial. It’s really great but I was just wondering how to interpret it into a pattern. The pattern says, like shown, ch 2 then 6 sc into 2nd ch from hook. But when I think about it, I do a slip knot, and then ch 2, which would equal 3 loops. Now does this mean as I am interpreting it into the magic adjustable ring, that the string circle I make that holds all the stitches and adjusts acts as the slip knot? Cuz then step 2 would act as the 1st chain and step 3 would act as the second chain, afterwards working onto the 6 sc for the beginning of my project. Please tell me if I am correct or correct me! Thank you SOOO much! I can’t wait to continue my amigurumi projects!
June said
I think you’re overthinking this, Rachel! It’s just a straight substitution:
“Ch 2, 6 sc in 2nd chain from hook” becomes “make a magic ring, ch 1, 6 sc in magic ring”.
(To answer your specific question, the magic ring is equivalent to the 2nd chain from the hook that you work all the stitches into, and the “ch 1” is equivalent to the 1st chain from the hook that you don’t work into in either case. But you really don’t need to think this hard about it.)
In general, “X sc in 2nd chain from hook” becomes “X sc in magic ring”. The goal is to end up with the same number of stitches (X) at the end of Rnd 1, whichever method you use. I hope that clears things up for you 🙂