How to Crochet a Magic Ring
The question I get asked most often is how to make a magic ring (sometimes also called a magic circle) to begin an amigurumi.
What is a Magic Ring?
A magic ring is a way to begin crocheting in the round by crocheting over an adjustable loop and then pulling the loop tight. Unlike the traditional chain start, it leaves no hole in the centre of your starting round, which is ideal for amigurumi.
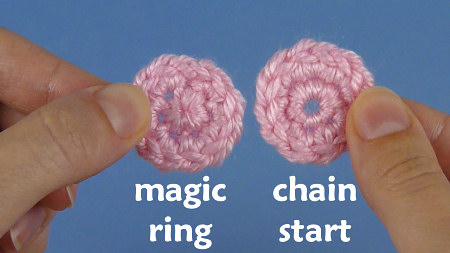
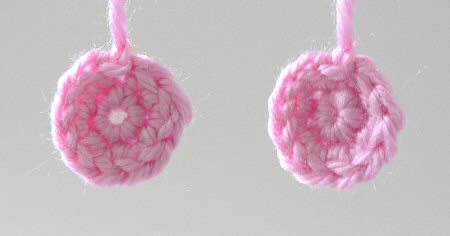
With a chain start (below, left), you can clearly see the hole in the centre, which isn’t ideal for amigurumi, as the stuffing can show through. By using a magic ring (below, right) instead, you can completely close that gap, leaving no hole at all:
L: ch 2, 6 sc in 2nd ch from hook, 2 sc in each st around.
R: magic ring, ch 1, 6 sc in magic ring, 2 sc in each st around.
It can take a few attempts to master the magic ring technique, but once you’ve got the hang of it, you’ll never go back to your old method again, I promise!
I recommend you watch the video to see the method in action, but in case you prefer text or want something visual to refer to, I’ve also made a photo tutorial version for you.
Quick finder:
- Video Tutorial (right- and left-handed)
- Magic Ring Tips
- Step-by-Step Instructions (right-handed)
- Step-by-Step Instructions (left-handed)
How to Crochet a Magic Ring – Video (right-handed)
Click to watch this video on YouTube.
How to Crochet a Magic Ring – Video (left-handed)
Click to watch this video on YouTube.
Note: The videos may look a little small embedded in the blog: if so, you can fullscreen them or click through to YouTube to watch them full-sized 🙂
Magic Ring Tips
- Remember that the magic ring is just the loop of yarn – it doesn’t include any crocheted stitches. If you’re following a pattern, you’ll work all the stitches of Rnd 1 into the magic ring, and pull the ring tightly closed at the end of Rnd 1.
- You can use magic ring in any amigurumi pattern – if it starts with a chain, just replace the starting ‘Ch 2, X sc in 2nd chain from hook’ with ‘Make a magic ring, ch 1, X sc in magic ring’.
- To work in joined rounds instead of the spiral I demonstrate, simply sl st into the first st at the end of Rnd 1, then ch 1 to begin the next round.
- Magic ring is also pretty handy for other crochet patterns worked in the round, too. For taller stitches, instead of the ch 1, you would ch 2 (for hdc), 3 (for dc), or more for even taller stitches, then work Rnd 1 of your stitches into the magic ring.
Note that, with taller stitches, the turning (or non-turning, if you’re working without turning) chain typically does count as a stitch, so where I say to ignore the ch 1 in the video, you’d instead count that chain as the first stitch of Rnd 1, and sl st into the top of the chain before beginning Rnd 2. - If your ring needs extra strength or security, you may prefer a double ring instead of a standard magic ring. See my Amigurumi Double Ring tutorial to learn when and how to use this more secure option.
Is it ‘Magic Ring’ or ‘Magic Circle’?
While you’ll sometimes see the magic ring called the ‘magic circle’ or ‘magic loop’ online, I use magic ring, because it’s more precise. Magic loop and magic circle have different meanings, unrelated to crochet:
- Magic ring: starting crochet in the round
- Magic loop: a narrow circular knitting technique
- Magic circle: a society of magicians
Terminology matters! 😀 But whenever you see a crochet pattern that tells you to make a magic circle or a magic loop, you’re safe to assume it means a magic ring.
How to Crochet a Magic Ring – Step-by-Step Instructions (right-handed)
This demonstration shows a piece made using the following pattern:
Make a magic ring, ch 1.
Rnd 1: 6 sc in magic ring. ( 6 st)
Rnd 2: 2 sc in each st around. (12 st)If you’re following a different pattern, you’d complete steps 1-2 of this tutorial exactly as shown below, then work the chain and the stitches of Rnds 1 and 2 as specified in your pattern.
Please note: in the following photos, the starting yarn tail is always on the left and hanging down. The working yarn begins on the right and is then picked up over my left forefinger in Step 2.
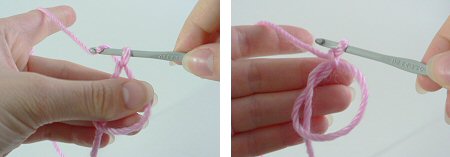
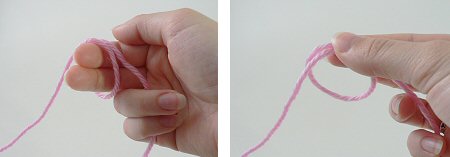
- Make a loop a few inches from the end of your yarn. Grasp the join of the loop (where the 2 strands of yarn overlap) between your left thumb and forefinger:
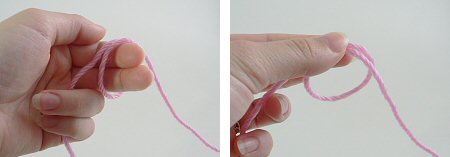
- Insert hook into the loop from front to back. Draw up a loop:
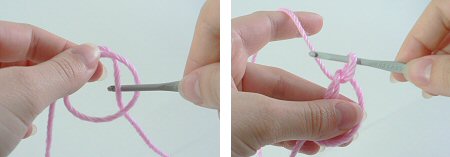
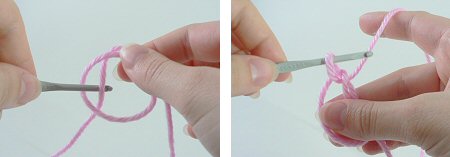
- Ch 1 (or as many as stated in your pattern). Note: this does NOT count as a stitch:
- Insert hook into the loop, so you are crocheting over the loop and the yarn tail. Draw up a loop to begin your first sc of Rnd 1:
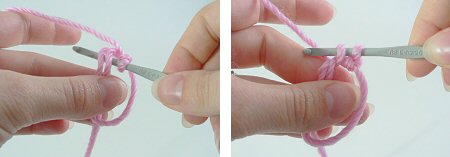
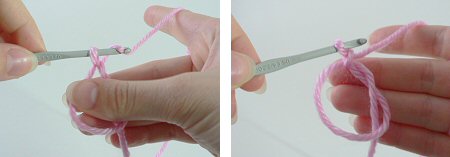
- Complete the sc. Continue to crochet over the loop and the yarn tail until you have the required number of sc for your first round (6 sc shown here):
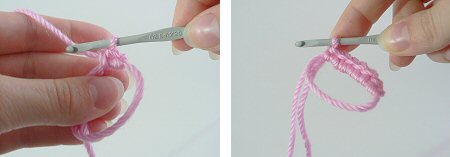
- Grab the yarn tail and pull to draw the centre of the ring tightly closed:
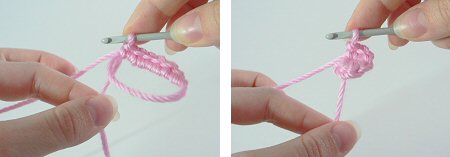
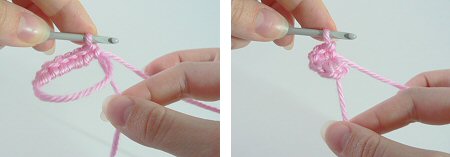
- Begin your second round by crocheting into the first stitch of the first round (below, left). At the end of round 2 your work will look like this (below, right):

How to Crochet a Magic Ring – Step-by-Step Instructions (left-handed)
This demonstration shows a piece made using the following pattern:
Make a magic ring, ch 1.
Rnd 1: 6 sc in magic ring. ( 6 st)
Rnd 2: 2 sc in each st around. (12 st)If you’re following a different pattern, you’d complete steps 1-2 of this tutorial exactly as shown below, then work the chain and the stitches of Rnds 1 and 2 as specified in your pattern.
Please note: in the following photos, the starting yarn tail is always on the right and hanging down. The working yarn begins on the left and is then picked up over my right forefinger in Step 2.
- Make a loop a few inches from the end of your yarn. Grasp the join of the loop (where the 2 strands of yarn overlap) between your right thumb and forefinger:
- Insert hook into the loop from front to back. Draw up a loop:
- Ch 1 (or as many as stated in your pattern). Note: this does NOT count as a stitch:
- Insert hook into the loop, so you are crocheting over the loop and the yarn tail. Draw up a loop to begin your first sc of Rnd 1:

- Complete the sc. Continue to crochet over the loop and the yarn tail until you have the required number of sc for your first round (6 sc shown here):

- Grab the yarn tail and pull to draw the centre of the ring tightly closed:
- Begin your second round by crocheting into the first stitch of the first round (below, left). At the end of round 2 your work will look like this (below, right):


Loved this tutorial? I have so many more amigurumi tips and tricks to share with you!
Boost your amigurumi skills with my latest book, The Essential Guide to Amigurumi, your comprehensive guide to amigurumi techniques and tips.
Do you find my tutorials helpful? If so, please consider making a contribution towards my time so I can continue to create clear and concise tutorials for you:
Thank you so much for your support! Now click below for loads more crochet video and photo tutorials (and do let me know what else you’d like me to cover in future tutorials…)


Debbie said
I’m working on the gecko pattern and am ready to assemble the feet and legs. What do you do with the extra yarn on the feet that you pull tight to close the magic ring? Is it something we have to weave in? Thread through the leg? I’m a little nervous that it will come undone (cue granny square conundrums).
Thanks!
June said
Oh no, don’t bother trying to weave it into the foot – it’s not worth it! The yarn ends from the foot are used to attach the foot to the leg – you can use either one or both, as needed. Once you’ve finished, you’ll lose any remaining tails inside the leg, as you’d do with any other piece in an amigurumi. Unlike with a granny square, there’s always somewhere to hide your yarn ends inside your amigurumi (and if there wasn’t, I’d tell you what to do instead!)
Elin Duke said
I am so left-handed. Like another poster said, I can usually “translate” to left-handed from right-handed. But this magic ring thingy has eluded me for years. Even today with step-by-step pics and detailed instructions, my brain was going Nope Just Ain’t Getting this. Noper-oonies. Then I watched the video. and had this AHA moment so amazing that I was talking to my walls, asking them if they saw it too. There’s a finger switch-up move that no one ever mentions but is super important to the completion of the ringy thingy. Thank you, June!!! Blessings!!!
Jan said
THANK YOU!!!!! I have not been able to figure the magic ring out because I am left-handed (I can usually reverse the instructions, but not on this). I followed your directions ONCE and it worked!! Finally!
Oh, and thank you for the picture version of instructions. I am not much for watching videos for instruction.
THANK YOU! THANK YOU! THANK YOU!
deb said
Hi June,
If my pattern calls for a chain join, but I would prefer to use a magic circle, how would I convert it?
Thanks,
Deb
June said
Do you mean a loop of chains joined into a ring with a sl st? If so, you’d replace “ch X, join with sl st into a loop” with “make a magic ring”, so the “ch 1” that locks the magic ring together will be the first chain in your pattern after the sl st. To make it clearer, I’ll just make up an example for you.
Original pattern: Ch 4, join with sl st into a loop. Ch 3, 11 dc in chain loop. Join with sl st.
Converted pattern: Make a magic ring, ch 3. 11 dc into the ring. Join with sl st. (Use yarn tail to pull ring closed.)
Sandra Stewart said
This is the very first magic circle i was able to make thanks to your pictures and instructions. I will always go to your sight from now on. THANK YOU Sandra Stewart
Shannon said
Thanks for the clear instructions! I normally have no problems transposing right-handed instructions to left-handed execution, but the magic ring has ALWAYS been such a pain, full of hit-or-miss frustration. Normally I’m working with throws and I happen to like the center hole, so I never bother, but at the moment I’ve been struggling with a very small doll’s dress made with equally small granny squares in which a center hole just cannot exist. Thank you so very much for this step towards consistency!
Deb said
I cant figure out magic circle…oh well. Thats why I can only crochet afghans.
Diane said
Deb, Did you watch the video tutorial? That is the only way I was able to figure it out. The written instructions just didn’t do it for me. It’s worth the effort, love the magic ring!
Nana K said
Thank you so much for this wonderful tutorial. It was so easy to follow.
A very grateful fellow Canadian.
Debbie said
Thank you helps much. I finished two projects already but still did not know
How to make the proper manic ring. Your video for left handers was perfect. I think I will finally have it down.
MiMilla said
Thank you for the tutorials. It’s nice to avoid the round holes at the start. My magic circle doesn’t look as neat as yours. There are kind of bumps in the first row. It’s better than holes, but is there anything I can do to make my magic circle start better?
Just now I’m making meat balls and pasta so thats’s not a big problem. I’m planning to crochet a cat after the meat balls. I’d love to make the head perfect with perfect symmetry, without bumps.
Yvette said
Just make sure you are not twisting the chain.
Verna M. Smith said
Thank you so much for your tutorial. I am left handed but I was taught around ages 8 or 9 but a righty. She sat me on the floor in front of her, and I could follow her “backwards” motions and they made better sense.
Kristina said
Thank you for putting both left and right-handed instructions. Though I am left-handed, I find myself working upside-down like I am using right-handed instructions with my left hand. I can’t seem to get fully left or fully right down but because you have both, I feel hopeful that I can find a way that can work for me.
Katria said
Thank you so much for sharing your talent and knowledge!
Katria Jakee
Patty said
I am late to this information, but wow!! VERY helpful. It helps me to know how to hold the yarn.
I’m wondering about a pattern I want to make which has Double Crochets in the Magic Ring. . . Can you help?
June said
Patty, you should use exactly the same technique for working any number of any stitch into the magic ring – your pattern will tell you how many chains to make at the beginning (it’s ch 1 for sc, as I show here) and how many of which stitch to work into the ring (I used 6 sc here). You’ll follow your pattern and work all the stitches of Rnd 1 into the ring, then pull the ring closed – that part is always the same, no matter the pattern!
Tami Bloom said
Do you have instructions for left handed?
June said
Yes – all my crochet tutorials have right- and left-handed versions! They’re linked from the top of this page, or, for convenience, you can also find my left-handed magic ring tutorial here 🙂
Den Hunter said
Hi June, is it possible to use the magic ring for a blanket? Many thanks!
June said
Yes, Den, you can use this for any piece worked in the round (unless a hole in the middle is part of the design!) The only difference is that, if you’re making an amigurumi, you can leave the yarn tail dangling inside the piece, whereas for any other crochet (garments, accessories, home decor, etc) you’ll weave in the yarn tail on the back of the work to secure it, as you do with all your other yarn ends.
Kathryn Pless said
This is one of the best tutorials I’ve found on the magic ring. I really like the nice big and clear pictures you’ve included. They make it very easy to learn how to do this technique.
Tel said
Yay finally a tutorial for a magic ring that has madeit easy for me to do this, never used one before,but now i’ve got the hang of it, I will be using this in future. Thanks June 🙂
Gloria Wagstaff said
Thanks to you, I understand the magic ring. But I’m a bit confused because my pattern says after Round 1 to “Chain two into magic ring”. I know all the basic stitches, but how do I chain INTO the magic ring? Am I being thick? Thanks for your help.
June said
Gloria, I think it’s just a badly-phrased pattern! Of course you can’t make chains into anything – that wouldn’t make any sense. I assume your pattern should have said “Make a magic ring, ch 2” – in the same way as, in my tutorial, I have “Make a magic ring, ch 1”. So follow my tutorial, but make an extra chain before you work the first stitch of Round 1 into the ring 🙂
Ellen said
Is it possible to show this for left handed people?
June said
Absolutely, Ellen! The links to the left-handed version of this tutorial, and the video tutorial (which has right- and left-handed versions) are at the top of this page 🙂
Mel said
I just want to say thank you very much for this tutorial! Like so many others have noted, yours is the only one I’ve found that is absolutely clear in the images and explanations. I also appreciate that you show Round 2, because I wasn’t sure how to continue haha. Thank you so much again, your blog is very lovely 🙂
Anna F said
This is, by far, the best and easiest description I have found of how to do a magic ring. Thank you so much!
Barbara Guzman said
Thank you so much to showing how todo this left handed. Please show more , because it is so hard to try and follow anything right handed.
June said
You’re welcome, Barbara! All my tutorials are available in left-handed versions: you can find them all at www.planetjune.com/help
Angelica Dominguez said
Hello first let me start with a big thank u!! I’m not longed confused lol…..except for one thing and I can’t find the answer anywhere..do u make a knot after u pull the magic circle closed? I’m afraid it’ll come loose if I dont….help..thanks very much ahead of time
June said
You shouldn’t need to (I don’t!), but if you have a particularly slippery yarn and/or feel worried, you can either tie a knot or weave the tail through the backs of some of your stitches to secure it further.
Hermione impettt said
I have been knitting for over 30 years but could never crochet. I decided it was time I learnt and have made 2 very uneven granny squares. I then made a rose, which actually looked ok. Your detailed explanation of a magic ring is brilliant, even I can’t mess that up haha. Thank you so much for sharing this tutorial, it makes it so much easier
All the best
Hermione
Georgi said
Thank you so much for these instructions – the best ever for a magic ring. Will have to investigate the rest of your website.