Changing Colour: Managing the Yarns
(or www.planetjune.com/managingcolors if you prefer!)
I’m often asked how to deal with the other yarn when changing colour in my patterns. If there’s a specific technique I recommend for a specific pattern – one that makes the colour changes much neater or faster than any alternative – I give you that information in the pattern itself.
But, in general, I don’t give specific details within a pattern for every colour change, because a) there’s no one ‘right’ way to deal with yarn ends and carrying colours, and b) it’s up to you which method(s) you find to be the best combination of fast, easy, and with a good end result.
In fact, I tend to intuitively use a combination of several options, but how do you know what to use when? I’ll give you my tips below, and then some case studies so you can see my recommendations in action.
(If you’d like to see more about how I reached these conclusions, see my Colour Changing Investigation, where I analysed all the options to discover which work best in various scenarios.)
My Recommendations
I can’t prescribe the ‘best’ method – that’s always up to you, and I recommend you use whichever method(s) you like best that give you a result you’re happy with. But I will tell you what I do – you can choose to follow my advice if you prefer more guidance, or make your own choices.
Here’s a summary of each of my recommended techniques, with their advantages and disadvantages:

I tend to use a combination of all these methods, sometimes even within the same amigurumi, so let’s look at each in a little more detail:
Cut-and-Tie
My go-to solution is cutting and tying, to make sure I get a clean result. If I’m not happy with the results of one of my shortcut techniques, I’ll rip back and redo it with cut-and-tie. (The advantages of trying a shortcut first are that they are faster to work, and, as they don’t involve cutting the yarn, you can easily undo your stitches if necessary and reuse the same yarn.)
Cut-and-tie can be a bit time-consuming, but if you tie each pair of ends together after you’ve crocheted a couple of stitches past the colour change, it’s not too much trouble. Do tie the knots as you go – it can be difficult to reach them once you’ve crocheted a few more rounds.
Tip: the knot is simply to prevent your stitches from working loose, so don’t pull the ends too tightly when knotting them together; the goal is to maintain the tension in the yarn so the stitches stay even.
Dealing with Yarn Ends After Cutting
Cut-and-tie will always work well, provided you can hide the yarn ends so they don’t show through from the outside. When you stuff the piece, take care to push all the yarn ends so they’re hidden behind the darker colour stitches and aren’t trapped against the insides of the lighter stitches, where they may show through from the outside.
If that’s impossible and you want the best result, you can weave the dark ends into the backs of your dark stitches before you stuff the piece, then trim them off.
Stranding
For one or two stitches I often strand the other yarn behind my stitches, to save time. To strand the yarn, all you need to do is drop the yarn to the back (inside) of the work and pick it up again when it’s needed.
Note: It’s important to leave the right amount of yarn so the float (the loose length) will lie smoothly against the inner surface of the piece when it’s been stuffed (judging this becomes easier with practice!). If you pull the float too tightly, it’ll buckle your work, but if you leave it too loose, the stitches on either side of the float can work loose and look untidy.
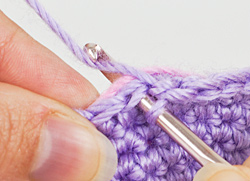
Catching the Float
If I want a longer span, to help maintain the tension on the float (to avoid puckering or loosening), I may catch the float behind a single stitch, every few stitches (as shown in the photo here).
Doing this only once every few stitches keeps the floats from getting too long, while minimizing the tapestry crochet bias/lengthening effect.
Note: I don’t recommend stranding a dark colour of yarn behind a light colour, as the dark yarn will show through between the lighter stitches. See Case Study #5 (below) for an example!
Tapestry Crochet
A word of warning! Although tapestry crochet – working over the unused yarn(s) with every stitch – is a great crochet technique in general, I don’t recommend you work an amigurumi pattern in tapestry crochet (unless your pattern was specifically designed to be worked that way).
As I showed in my colour-changing investigation, using tapestry crochet will skew the colours so you’ll end up with misshapen markings. This technique also makes it more likely that the carried colour will show through between your stitches (particularly if you stuff your work firmly, which can stretch the stitches open slightly), and the final shape of your piece may be affected, as the technique adds bulk and height to each stitch.
Case Studies
Let’s look at some examples of the yarn-wrangling techniques I use in specific circumstances, so you can see the options in action:
1. Small Spots (1-2 sts)
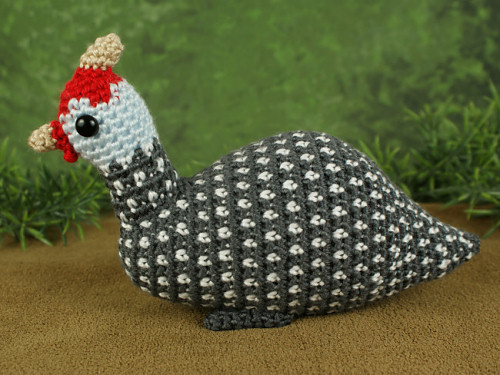
For my Guinea Fowl‘s spots, you change colour with every stitch. In this case, stranding the other yarn behind the stitch and picking it up again for the next stitch is the most sensible choice.
2. Wide Bands
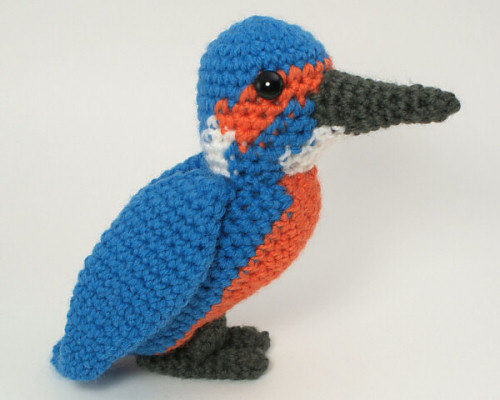
For my Kingfisher‘s body, half of each round is orange (for the breast) and the other half is blue (across the back). In this case, the only sensible option is to cut and tie at every colour change – stranding the yarns across such a wide space would distort the work, stranding plus catching the float occasionally would probably leave a ghost of blue showing between the orange stitches and vice versa, and using tapestry crochet to crochet over the other yarn would skew the colour pattern so the orange breast wouldn’t look symmetrical (see my colour-changing investigation for proof).
3. Full Stripes
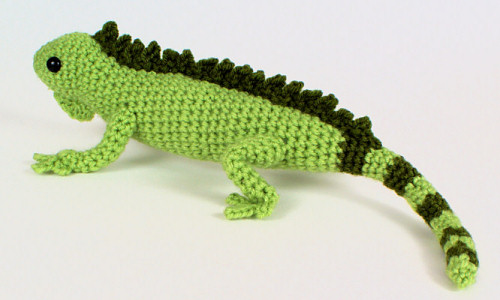
For a simple stripe like my Iguana‘s tail, where the colour always changes at the end of each round, I drop the unused yarn to the inside, and pick it up again when I’ve crocheted around back to it.
(I also recommend using one of my Perfect Stripes techniques to improve the look of the ‘jog’ at the point where you change colour.)
4. Partial Stripes

For a partial single-row stripe of one colour against a base of another colour, like the black stripes on the sides of my Flame Angelfish, I cut the black yarn for each stripe, but instead of cutting the main (red) yarn too, I may choose to carry a float of red with the stranding technique, and catch the float at the back of the work for a single stitch, every few stitches.
Whether I choose to do that depends on the length and width of the stripe. For 3-8 stitches in a single row I’d probably strand the yarn (and catch the float once or twice, as necessary), but for anything much longer, or a thicker stripe, I usually cut and tie both yarns at both ends of the stripe, to give a clean result. Neither option is wrong in this situation, so you can do whichever you prefer.
5. Everything Else
For the ‘in-between’ situations, which usually involve switching after a few stitches of each colour, the best answer isn’t so obvious – you can use your judgement in each case. There’s a balance between getting a good result on the outside of the finished piece, not wasting more time than you need in cutting and tying the yarn, and not having the yarn ends show through from the inside.

For example, for my Giant Panda‘s eye patches, you have two small black patches separated by a small white patch in the middle. Carrying the yarn on the inside with the stranding technique (and catching it at the back of the work for a single stitch every few stitches) would usually be a good technique in this situation. In this case, however, you don’t want to carry a dark colour across light/white areas, as that stranded black yarn (pink arrow, top right photo) would show between the white stitches of the panda’s face.
You can plan around this by carrying both colours across the dark areas only (bottom right photo). Here, I used one length of black yarn to crochet each eye patch and carried each one back across the eye patch to re-use the same yarn in the next round. I stranded the white yarn across each eye patch too, and continued to use the same white yarn for the whole head without any cutting.
I hope this tutorial has helped you see that there’s no definitive answer for how to deal with the other colour(s) of yarn for multiple-coloured amigurumi, and given you some options you can try, to see which you like best in various situations.
If in doubt, check your work as you go: push some stuffing against the stitches and see if the result looks satisfactory from the outside, and try a different method if you don’t like what you see! With practice, you’ll get a feel for where you can get away with using a faster method, and where only cut-and-tie will do.

Loved this tutorial? I have so many more amigurumi tips and tricks to share with you!
Boost your amigurumi skills with my latest book, The Essential Guide to Amigurumi, your comprehensive guide to amigurumi techniques and tips.
Do you find my tutorials helpful? If so, please consider making a contribution towards my time so I can continue to create clear and concise tutorials for you:
Thank you so much for your support! Now click below for loads more crochet video and photo tutorials (and do let me know what else you’d like me to cover in future tutorials…)


Paulina Smith said
Thank you so much, this was really helpful 🙂
Camila said
thank you!!! this is just what I needed
Peter said
Great explanation!
Especially the case studies, very helpful in deciding when to try each method.
Christine Bacon said
Thank you so much for this it’s amazing. After crocheting a heart on a giraffe over Christmas and not knowing “how to carry over yarn” I came across your tutorial purely by accident. Wow so well explained. You are my hero. Xx
Patricia said
Thanks very much for the article! Very, very usefull! I already used some, making the little panda.
Jennifer said
Thank you so much for taking the time to explore techniques, find improvements, and clearly write up and/or video the methods and results. You have developed some great improved techniques over the years, which I use not only on amigurumi but also on many other projects! Their use always makes the end result so much better! Thanks again!
TAM said
Such a great article again! Thank you, June!