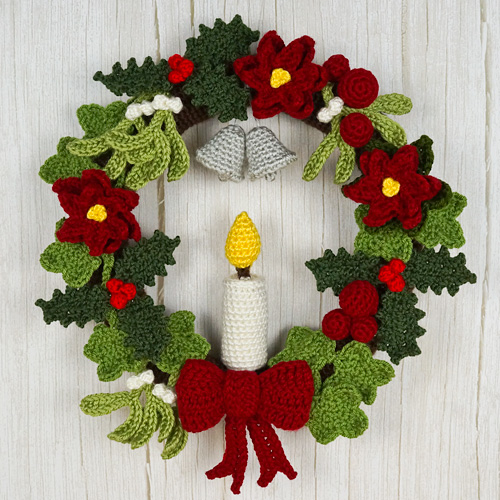
Craft Blog Crochet Pattern Store Mailing List

Archive for Tutorials

healthy muffins

Mmmm, muffins. What’s not to love about a muffin? Delicious, convenient, and… did I mention delicious?

Of course, a regular muffin usually contains between 10 and 25g of fat, which takes the edge off the pleasure of eating it. Low fat muffin recipes are a lot healthier (e.g. my Quaker Low Fat Banana Muffin Mix contains 1.5g fat per muffin) but tend to be a bit light and unsatisfying, and lack the moist, heavy goodness of a regular muffin.

I have a solution to make a healthy muffin that really does taste good! Mix your low fat muffin ingredients as directed in your recipe or mix packet, then add some magic ingredients (quantities below are for 12 muffins; if you are making a different number, adjust these amounts accordingly):

1/2 cup apple sauce
1/3 cup wheat bran
1/2 cup fruit or chocolate chips (e.g. I like to use raisins or fresh blueberries)

Add these to your mix, then spoon it into your muffin pans and bake as directed. (You may need to add 1-2 mins to the regular cooking time.)

Et voila…

low fat muffins
Mmmmm, fresh banana raisin muffins… Are you hungry yet?

Comments (2)

magic ring for amigurumi

The question I get asked most often these days is how to make a magic ring to begin an amigurumi. The Crochet Me tutorial I normally point people to is great, but uses double crochet instead of single crochet, so I thought there may be some value in making a new photo tutorial that specifically deals with making a magic ring for amigurumi.

What is this ‘Magic Ring’, anyway?

A magic ring is a way to begin crocheting in the round by crocheting over an adjustable loop and then pulling the loop tight. The advantage of the magic ring method (below, right) is that, unlike the regular “chain 2, x single crochet in 2nd chain from hook” method (below, left), there is no hole left in the middle of your starting round.

magic ring vs traditional method
L: ch2, 6 sc in 2nd ch from hook, 2 sc in each st around.
R: magic ring, 6 sc in magic ring, 2 sc in each st around.

How do I make a Magic Ring?

As this is a photo tutorial, I’ve saved the photos for left-handers and right-handers. If you notice any backwards writing on my crochet hook, that’s why!

Continue to:

Comments (14)

free pattern: amigurumi acorn

I’m pleased to announce that I am Co-Editor of the new Crochet Along group blog. The first crochetalong theme is amigurumi, so if you’re interested in crochet or amigurumi, why not head over there to find resources on how to get started and a great list of free patterns you can try!

Crochet Along

To whet your appetite, here’s a little free pattern that I’ve designed for you: a PlanetJune original crochet pattern for an amigurumi acorn with a removable cup!

amigurumi acorns by planetjune
Amigurumi Acorns – looks like the one on the right was picked before he was ripe!

amigurumi acorns by planetjune
The cup on both acorns is removable

>> Continue to the Amigurumi Acorn free pattern instructions >>

Why not join the Crochet Along and make some acorns of your own? Or you can make any other amigurumi you want – we have lots of free pattern links to get you started!

Comments (10)

offset square wrist pincushion tutorial

I designed my pig wrist pincushion last summer, and it’s been so useful – I wear it whenever I use my sewing machine. This month’s Whiplash challenge theme is Zakka so I thought a tutorial for my pincushion might fit into that category. I have named this pincushion the Offset Square Wrist Pincushion because it’s made from two squares of fabric, offset before sewing, which results in an interesting shape in the finished pincushion:

wrist pincushions
Click for the full size picture

wrist pincushion materials

You will need:

2 squares of fabric, each 3.5″
3/4″ width twill tape, approx 10-12″ (depending on the size of your wrist)
3/4″ width Velcro, 1.5″
A small bead or button
Sewing thread in colours to match fabric and Velcro
A small quantity of polyester fibrefill stuffing

Instructions

  1. Measure the circumference of your wrist and add 3.5″. Cut a length of twill tape to this measurement.
  2. Lay the twill tape down on a flat surface, and fold up 1 inch at one end of the tape. Position the ‘hook’ piece of the Velcro at the same end so it covers the raw edge of the folded tape. Pin in place if required, then sew all around the edge of the Velcro.
    sew velcro to twill tape
  3. Turn the twill tape over so the Velcro is face down. Fold up 1 inch at the other end of the tape and position the ‘loop’ piece of the Velcro over this end so it covers the raw edge of the folded tape. Pin in place if required, then sew all around the edge of the Velcro.
  4. Cut two 3.5″ squares of fabric using scissors or a rotary cutter. Using a fast-fade fabric pen or tailor’s chalk, mark one square (square A) 3/8″ from the edge around all four edges, then mark the centre of each edge. Mark the second square (square B) with registration points 3/8″ down from the top, at each side.
    mark fabric squares
  5. Position A face up and lay the twill tape along a diagonal of the fabric with the loop side of the Velcro facing up, so that an equal amount of the tape extends over each corner of the fabric. Pin the tape to the fabric.
    pin strap to fabric
  6. Sew the tape to the fabric with a 1.5″ long rectangle in the middle of the fabric and tape (turned over in photo below so you can see the stitching).
    sew strap to fabric
  7. pin strap neatlyPlace B face up with the registration marks at the top edge. Close the wrist strap and pin to itself to keep it out of the way while you sew up the pincushion (see right), then place A face down on top of B. Now offset A by moving it upward until A’s centre marks are aligned with B’s registration marks. Pin the squares together along the right hand side.

    Now, to sew the squares together. You will be stitching 7 lines, each half the length of one side of the square, and then rotating either the upper or lower fabric square before stitching the next line. The fabric you have already sewn will get bunched up while you are sewing, but it will all work out in the end!

    diagram showing starting position for sewing

  8. Starting at the centre of the right edge of A (point a), sew the squares together from a to b. Make sure the sewing machine needle is down, then lift the presser foot. Rotate A so that the next side of A is aligned with the remainder of the first side of B and point c is directly over point d. Pin in place if desired (as the piece is so small, I find it easier to just hold the two pieces together and feed them through the machine), then lower the presser foot.
    rotate fabric to sew next side
  9. Sew along this edge until you reach point d. Make sure the sewing machine needle is down before raising the presser foot. Rotate B so the next side is aligned with the remainder of the side of A. Pin if desired, lower the presser foot, then sew along the next edge.
    hold both squares together while sewing
  10. Continue in this way, repeating 8 and 9, until you reach the final side. Leave this side open to turn the pincushion through. Finish off securely.
    before and after turning
  11. Clip the excess fabric from all the corners of the pincushion, then turn it right side out through the open side. It will be a tight fit so be patient with it. You can use a pen or your finger to push out the corners.
  12. Fill the pincushion with fibrefill until it is fairly solid, then fold the seam allowances inside the cushion and hand-stitch the gap closed.
    stuff and hand-sew closed
  13. Thread a needle with both ends of a length of strong sewing thread, leaving the loop of the thread longer than the two ends. Push the needle through the centre of the pincushion from the middle of the cushion top through to the middle of the tape. Do not pull the thread all the way through – leave the loop extending from the top. Insert the needle close to where it came out and stitch back up through the pincushion and through the loop. Pull tight to dimple the centre of the cushion.
    dimple centre of pincushion
  14. Add a small button or bead to cover your stitch and then go back through the pincushion, make one more small stitch on the back and come back through to the top. Unthread one of the two ends from your needle, go through the button or bead once more with the other end. Tie the two ends together and then lose them inside the pincushion.
  15. Attach the pincushion to your wrist, add some pins, and you’re ready to go!
    finished wrist pincushion


whipup

Comments (42)

how to join amigurumi

To whet your appetite for my upcoming AmiDogs crochet patterns, I’ve just published the latest in my occasion series of crochet tutorials (Missed the earlier one? See my Fuzzy Yarn Tips).

To find out how to make a smooth neat join between pieces when finishing your amigurumi, take a look at my new tutorial: Joining Amigurumi.

how to join amigurumi

Comments (3)

free pattern: fuzzballs!

Fuzzballs are the ultimate in easy and cute crochet, and a perfect way to use up any scraps of fun fur, eyelash or any other fuzzy yarn you may have on hand. These tiny amigurumi are crocheted in fuzzy yarn and come in two sizes: Fuzzball and Fuzzball Mini. Let your imagination run wild as you embellish these little cuties!

fuzzballs by planetjune

Don’t be afraid of the fuzzy yarn – I have Fuzzy Yarn Tips to help you out:
• Not sure which yarns to use? Try my Fuzzy Yarn General Tips
• New to fuzzy amigurumi? Try my introduction for right-handers or left-handers

>> Continue to the pattern instructions >>

Comments (16)

how to take up trousers

A note before I begin: British trousers = American pants. I may use the terms interchangably in this tutorial after living in Canada for the past 4 years :)

As I am all of 5′ 2″ tall, it’s very rare that I find trousers that aren’t too long, and yet the petite ranges are typically just slightly too short for me. So, as I have to shorten my pants every time I buy a pair, I thought you might like to see how I do it.

The ‘regular’ way of taking up trousers involves ‘invisible’ stitching (i.e. only catching a couple of threads of the outside fabric). This is tricky, time-consuming, and if you’re not very careful, you can still see the stitches on the outside.

My method leaves a visible hem on the outside, but I don’t see anything wrong with one neat line of stitching, and for everyday or casual trousers, it can even leave a nicer finish than the hidden method. Maybe you won’t want to use this method for your best interview suit, but I use it for everything else!

You will need:

  • sewing machine
  • thread that matches the colour of your trousers
  • seam gauge (if you don’t have one, a measuring tape or ruler will do)
  • scissors
  • straight pins
  • sewing needle
  • marking pen/pencil
  • iron

Method:

  1. Try on your trousers so you can see how long they need to be. Note: remember to wear shoes while you do this, or your trousers will look too short when you wear them with shoes!
     
  2. Fold up the trousers to the length you want them to be (it helps if you have a mirror so you can see where they will fall when you are standing up straight). Adjust until you’re happy that they don’t scrape the floor but aren’t going to be too short either. Remember different heel heights will affect the apparent length, so keep that in mind.
     
  3. Pin the turn-up to the back of each trouser leg (just one pin) to stop the turn-up from falling down when you take off the trousers. This is just to give you the required length, so don’t worry about being neat. Have a final length check after pinning. Looks good? Okay, now you can get changed into something more comfortable (and don’t prick yourself on those pins!).
    taking up trousers
    Pinned to length at the back
     
  4. Measure the length of the turn-up on each leg. They should be the same, but if they aren’t, pick a measurement midway between the two.
    taking up trousers
    Comparing the turn-up lengths

    If they are very different, you should probably try the pants on again and check which one is right! Make a note of your measurement (for these trousers, mine is 9cm).

  5. Remove the pins and turn the trousers inside out.
     
  6. Fold up the bottom of each leg, to the length you measured above, and pin in place.
    taking up trousers
    Pinned 9cm turn-up
     
  7. Iron the fold so it is pressed into a crease.
     
  8. Mark 1 inch above the fold, all the way around both legs, then remove the pins.
    taking up trousers
    1 inch marked in white pencil
     
  9. Be brave – this is the scary part! Cut the turn-up around the lines you have just drawn, but be careful not to cut through both layers of fabric – just the turned up part – otherwise you’ll end up with capris!
    taking up trousers
    Starting to cut
    taking up trousers
    Partially cut
    taking up trousers
    After cutting

    Handy hint: you can even use the cut-offs to make hairbands.

  10. With your remaining 1-inch turn-up, begin to fold the raw edge inside, so you end up with a 1/2 inch turn-up with no raw edges visible. Pin in place as you go.
    taking up trousers
    Starting to fold in the raw edge and pin

    Continue folding and pinning all around the bottoms of both legs. You can iron this fold in place before sewing (I like to; it makes the sewing part easier) or just sew it at this point.

  11. Set up your sewing machine with a thread colour that matches the main colour in your fabric, for both the top and bobbin threads. Set it to a medium length straight stitch.
    taking up trousers
    Winding a matching bobbin
     
  12. Using the 1cm guide on your sewing machine (or whichever guide is just less than 1/2 an inch) sew around the bottom of each leg.
    taking up trousers
    Ready to start sewing
    When you get back to the start, sew over your first couple of stitches and then finish off.
     
  13. Pull the loose threads to the wrong side of the fabric. You can knot them together for added security, if desired, then thread them through a sewing needle. Push the needle into the turned up fabric, and out a couple of inches further along.
    taking up trousers
    Hiding the thread ends
    Pull the thread ends to make fabric scrunch up slightly, then snip off the threads flush with the fabric, so they disappear inside the fabric when you pull it flat.
    taking up trousers
    Snipping the ends
     
  14. Turn the trousers right side out and admire your handiwork!
    taking up trousers
    The finished seam as it appears on the outside of the trouser legs – crisp and neat.
    taking up trousers
    Perfect!

Comments (20)

fuzzy amigurumi tips

It seems to be a commonly held belief that it’s difficult/impossible to crochet with fuzzy/eyelash/fun fur yarn. As you may have noticed, I’ve been working with fuzzy yarns a lot recently, so I thought I should share some advice on how to crochet fuzzy amigurumi toys.

fuzzy yarn

I’ve created a main page – Fuzzy Yarn Tips – which is linked in the sidebar on the right. I have 2 pages of info in there right now – General Tips, and Starting Amigurumi with Eyelash Yarn. I’m hoping to add more pages as I have time and think of more tips!

Please let me know if you find this useful, or if you have any questions or suggestions for tutorials :)

Comments (2)

haramaki (tummy warmer) tutorial

I saw this post on Craftzine yesterday about the new Japanese fashion of wearing colourful haramaki aka ‘belly warmers’. I think this is the best idea I’ve seen in a long time! Ever since the advent of low-rise jeans, women have been stuck with a little cold gap between the bottom of our shirts and the top of our jeans. This is a cool way to cover that gap, and why import one from Japan when we can all make our own?

I whipped this one up this morning as a prototype, so I left it plain, but just imagine how amazing it could look if you freezer paper stencilled a funky design on the fabric before sewing it…

haramaki

When it was finished, I tried it on and was surprised by how warm I felt – it really does work, even when it’s just made from 2 layers of t-shirt fabric.

To make your own haramaki:

You can use any fabric with some stretch, so you can pull your haramaki on and off. I used a knit jersey (i.e. t-shirt fabric).

You will also need a sewing machine with a stretch stitch (pictured below).
haramaki

  1. Work out the dimensions you need. The height is up to you – I decided to go for an 8″ tall haramaki but you could make it longer if you want. The length of the haramaki depends on the size of your tummy..! Of course it would be easier to estimate for a skinny straight up-and-down Japanese model than for a regular curvy lady. I decided to make mine 30″ around (without giving too much away, that’s halfway between the measurements for my waist and my hips). If you want to wear it high up, make it a bit shorter than your halfway measurement, and if you want it to cover your hips, you may need to make it a little longer, depending on how stretchy your fabric is.

    To get the fabric dimensions, the length is 1″ over the length you decided (mine is 30″ + 1″ = 31″) and the width is double the height plus 1″ (mine is 2×8″ + 1″ = 17″). Cut your fabric to these dimensions and lay out as shown (right side up):
    haramaki

  2. Fold your fabric in half so the top meets the bottom, as shown below:
    haramaki
  3. Pin the 2 long sides together, all the way along. It’s better to space the pins more closely than you normally would, as the stretch fabric can get out of alignment more easily than a regular fabric:
    haramaki
  4. Sew along the line you’ve pinned. You have 1/2″ seam allowance, but that 1/2″ includes the full width of the zig-zag stitch, so you may need to practice on scrap fabric first to see which guide line to follow on your sewing machine. Trim the extra seam allowance after sewing:
    haramaki
  5. You have just made a long tube. Stick your arm through the tube and grab onto the far edge of the tube:
    haramaki
  6. Pull your arm back out of the tube, bringing that far edge of the tube back through the middle of the tube. Stop when the raw edges meet up, and align the edges:
    haramaki
  7. Pin the inner and outer layers together, all around the raw edge:
    haramaki
  8. To clarify, you should now have a tube that is half as long as before, made from 2 thicknesses of fabric. The pins should not close off the end of the tube:
    haramaki
  9. Sew around the pinned edge (again, 1/2″ seam allowance), leaving a gap of about 3″. Turn the harimaki right side out through this gap:
    haramaki
  10. Fold the edges of the gap under, and hand-sew the opening shut. That’s it! All finished!
    haramaki

I’ve been wearing mine all day and it’s warm and comfy and like having a hug all day long :)
Please leave me a comment if you like this idea or if you make one!


whipup

Comments (46)

detail sander (ex-toothbrush)

I made a polymer clay egg out of leftover clay of various colours marbled together, and needed a way to sand it smooth after baking. Previously, I hand-sanded the ballon in my pig ornament but it took sooo long and I didn’t really want to repeat the process for my scrap clay egg. I heard that you can make an electric sander from an electric toothbrush, so I thought I’d give it a go. Here are the instructions:

  1. I started with a cheap battery-powered toothbrush (reduced to $1 at WalMart).
  2. Use pliers to remove all the bristles from the brush head. Grab a section of bristles firmly with the pliers and wiggle them from side to side until they pull out.
  3. Repeat until the brush head is bristle-free.
  4. Cut a small square of sandpaper just large enough to cover the face of the brush head.Tips for cutting the sandpaper to size:
    • I wasn’t sure what sandpaper would do to my scissors, so I folded the sandpaper back and forward along the line I wanted to cut, and then it tore easily along that line.
    • Make sure you label the back of every little piece of sandpaper you cut, or you will get into a muddle!

  5. Stick a square of double sided tape to the back of the sandpaper square and attach it to the brush head.
  6. Turn on the toothbrush and get sanding!
  7. If your brush comes with extra heads (mine came with 2 heads), you can attach a different grade of sandpaper to each head. If you do this, remember to mark up each head differently, so you know which is which! Otherwise, you can just pull off each square when you’ve finished with it, and tape a finer grit in its place. I’ve been doing this and it works very well. I have sandpaper in 220, 320, 400 and 600 grits.
  8. When your piece is sanded nicely, you can also make buffing heads by attaching a square of sturdy fabric to the brush head in the same way. I used a piece of thick corduroy.

Here’s my finished egg. It’s really smooth and softly shiny, although I couldn’t capture that well in my photo.

polymer clay egg

Comments (19)

Next entries » · « Previous entries