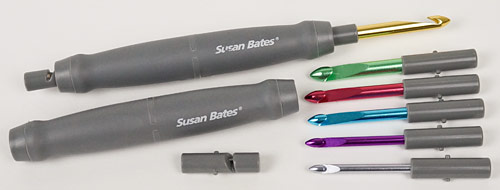
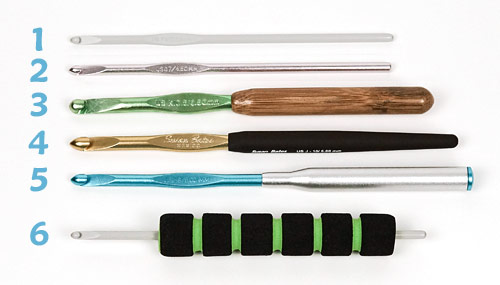
PlanetJune Craft Blog

Latest news and updates from June

Archive for Reviews

review: Susan Bates Twist + Lock crochet hook set

Have you heard of the new Twist + Lock crochet hook sets from Susan Bates?

Susan Bates Twist + Lock crochet hooks

Yarnspirations (the company behind the Susan Bates brand) say:

Crocheting just became easier with the Susan Bates Twist + Lock interchangeable crochet hook tool. Select the desired hook size and insert into the opening of the oversized soft touch handle. With a simple Twist and Lock, your crochet hook will fit snugly in place whether in action or in storage. Purchase additional sizes to build your custom crochet hook set.

But is this a helpful addition to our crochet toolset, or just a solution looking for a problem? Coats & Clark kindly sent me a set to test out and see what I think…

About the Set

The Twist + Lock kits are available in various configurations:

  • 1 handle and 2 hook heads
  • 1 handle, 1 hook head and a cutter
  • 2 hooks and a cutter
  • the Deluxe Set that includes 2 handles, 2 cutters, and all 6 hook heads (sizes F, G, H, I, J, K – that’s 3.75-6.5mm).

So you can choose your preferred hook sizes and add on additional pieces later, or jump straight in with the complete set.

First Impressions

The hook heads are standard Susan Bates in-line hooks (my favourites). A hook head or cutter can be inserted into each end of the spring-loaded handle, and twisted to lock it in place:

Susan Bates Twist + Lock crochet hooks

As there’s no thumbrest on the hooks (where the hook size is usually embossed), the size is printed on the back of each hook:

Susan Bates Twist + Lock crochet hooks

With a hook at each end, the handle becomes quite long:

Susan Bates Twist + Lock crochet hooks

You can also reverse any of the heads and insert them facing into the handle, for portability:

Susan Bates Twist + Lock crochet hooks

My Testing Process

For my test, I’ve been crocheting my Cozy Cables Earwarmer using Bernat Satin yarn and a J US/6mm hook. I crocheted a full 4-row repeat of the stitch pattern with my usual Susan Bates bamboo-handled hook and then another repeat with the Twist + Lock hook, so I could really feel the difference the hook makes to the process.

Susan Bates Twist + Lock crochet hooks

I also tested the cutter out. The blade is so well protected inside the plastic casing that I couldn’t get it to work at all at first, but once I figured out you have to loop the yarn over the cutter and then pull back fairly hard, it worked well enough:

Susan Bates Twist + Lock crochet hooks

The Importance of Honest Reviews

I’m a big fan of Susan Bates hooks and I really wanted to love this concept, but it didn’t really work for me. I’m uncomfortable writing this, a less-than-positive review, but I think it’s important for people to hear both good and bad points to help inform their purchases. That’s why I’m not an ‘influencer’ – I never accept payment for reviews; you’ll always hear what I truly think.

All the other reviews I’ve seen of this set have said nothing but positive things, and I don’t know if that’s because the reviewers didn’t actually use the hooks before they reviewed them, or whether they truly love them, and it’s just me that doesn’t! Either way, it’s important for me to tell you the truth as I see it, so here goes…

Pros

Let’s start out with the reasons I do like this set!

  • It’s nicely made – the heads push and nicely into the spring-loaded body and twist securely closed.
  • I really like the idea of always having a cutter to hand!
  • You can store your hook head and cutter inside the handle, making it easy to throw into your project bag without worrying about snagging your yarn. Just push and twist and the head pops out, ready to re-attach facing outwards and start crocheting. This would be very convenient for travel.
  • The handle is reversible so you can have a hook at either end, or a hook at one end and a cutter on the other, and just flip the handle around when you want to use the other end.
  • As with all Susan Bates hooks, these hooks have the inline head shape I love. This shape head makes it far easier to form perfectly regular stitches.
  • The soft touch handle is substantial and comfortable to hold in the palm of your hand, and I think it’d be especially useful for those with larger hands or who have grip difficulty.

Cons

Now for the downsides… I have two main problems with this hook that ruin the crocheting experience for me. To make a fair comparison, I got out all my Susan Bates J hooks so you can see what I’m talking about.

Susan Bates Twist + Lock crochet hooks
Susan Bates J hooks, top to bottom: Twist & Lock, bamboo-handled, Soft Touch, Quicksilver.

Firstly, the grip position. As with all interchangeable hooks I’ve seen (from any brand), there’s no thumbrest on these hooks, and because of the shape of the handle, you have to hold it below the section where the head is inserted.

Susan Bates Twist + Lock crochet hooks
The standard thumbrest position is between the dotted lines; the Twist + Lock hold is below the bulge in the handle, below the lower dotted line.

This is about an inch below my usual position, and it feels like I have less control of the hook as a result. If you have difficulties forming a tight grip and prefer to grip a larger comfort handle instead of a thin thumbrest, this may be a benefit to you, but personally I much prefer the control of holding the hook closer to the head.

Susan Bates Twist + Lock crochet hooks
Top: my usual hand position; bottom: my hand is much further away from the hook head.

Secondly, the weight. It was immediately noticeable to me how heavy this hook was in use. I tried taking the cutter out from the base of the handle and that helped slightly, but it still felt much heavier. In case I was biased, I weighed all my Susan Bates J hooks to compare:

Hook (all Susan Bates size J) Weight/g
Twist + Lock plus cutter 32.9
Twist + Lock plus 2nd hook 37.3
Twist + Lock, empty end 31.0
Bamboo-handled 11.5
Soft Touch 10.4
Quicksilver 10.1

It wasn’t my imagination – all my other J hooks weigh between 10 and 12g, and the Twist + Lock weighs 31-37g, depending on what you have installed in the other end. That’s around three times the weight of a standard hook, and if you do a lot of crocheting, you’ll definitely start to feel that difference!

Verdict

Susan Bates hooks are my all-time favourites, because of the head shape, and that’s the same with this new set as much as all their other hooks. But, while I love the concept of the ‘portable toolkit’, carrying your toolkit in the handle of your hook maybe isn’t the best thought-out idea…

There are some plus points: the handle material is comfortable, and the wide grip in the palm of your hand is an advantage for knife-grip crocheters, especially for those with larger hands. Being able to flip the head inside the handle for easy and safe transportation in your project bag is genius, and the idea of always having a safe cutter to hand is very appealing!

If you travel a lot with a crochet project at your side, or have large hands, or your top priority is a wide comfortable grip, and/or you don’t mind the added weight, the Twist + Lock set may be a good fit for you. But, for me, the hugely increased weight and the lack of a good thumbrest position for controlling the hook make this a miss.

If you’re looking for crochet hooks, I’d recommend instead any of the other Susan Bates aluminum hooks:

  • The bamboo-handled hooks (if you can still find them), are my favourites.
  • The Soft Touch handled hooks are also very nice – the grip isn’t as wide as the bamboo handle, but the material is very comfortable to hold, and the new-style pointier tip is growing on me too.
  • The classic Silvalume hooks are just one-piece anodized aluminum, but you can always add a comfort grip if you need a wider handle.

All of these also have the same aluminium hook with the in-line head style as the Twist + Lock, and I’d guess that smaller-handed people like me would probably have a better crocheting experience with any of these than the Twist + Lock set.

(And I’ve reviewed all the other Susan Bates hooks here, if you’d like to know more about those options!)


What do you think? If you tend to like heavier hooks and larger handles with no thumbrest, or you’ve tried a Twist + Lock hook, I’d love to hear about your experience – especially if you disagree with me! Am I missing something here?!

Comments (8)

review: Contoured Face Mask sewing pattern

I’ve been experimenting with various mask sewing patterns since April. With the possibility of a second wave of COVID-19 imminent as schools start up again, I decided to spend part of my Labour Day long weekend making a batch of masks I’ll really enjoy wearing, now I’ve settled on my favourite design.

contoured face mask made by planetjune

This is the Contoured 3D Face Mask pattern from the Japanese Sewing Books blog and I love it because the structured shape keeps it away from your nose and mouth (so I find it much easier to breathe), while also fitting closely all around the edges (so it’s more effective) and going right up to my eyes (so it doesn’t steam up my glasses).

I also love it because of the clever design – it’s like fabric origami! There’s only one piece of each fabric (outer and lining), and the shape and structure is all formed from folding and seaming.

3d Contoured Face Mask tutorial from Japanese Sewing Books blog
image courtesy of Japanese Sewing Books blog

The video instructions are incredibly clear and I’d encourage you to watch it even if you don’t plan to make one of these masks – it’s so satisfying watching it come together! I do wish there were also text instructions with diagrams, but once you’ve made a couple of masks you won’t need the instructions anyway; just the printable template.

Tip: This pattern comes in 6 sizes to cover all head sizes from children to men, which is great, but I think the sizes run a little small. I used the ‘ladies’ size (L), but I’m quite petite and this size is only just large enough for me, so you may well need to size up.

contoured face mask made by planetjune

I’ve only made one change to the mask design, and it doesn’t change the sewing instructions at all: I like to use one long tie instead of elastic. I thread a 48″ length of cotton tape onto a yarn needle and pass it down through one side casing and then up through the other. The loop goes around your neck, then you pass the ends above your ears and tie them together at the back of your head to get a secure fit without the discomfort of elastic behind the ears.

contoured face mask made by planetjune

My other innovation is in folding the mask so I can keep one in my bag or pocket. Instead of just folding it in half, I tuck the lower third up under the upper third and fold in the sides so it lies flat. Then I fold the resulting rectangle in half and wrap the ties around it to secure it in a compact square shape – it’s so small and convenient!

contoured face masks made by planetjune

Until I find something like the gorgeous Japanese Hello Kitty fabric used in the tutorial video, I’m using my favourite sakura fabric to make all my masks. I bought it as a remnant many years ago and the need to make masks has finally given me a reason good enough to use it – and a way to make wearing masks at least somewhat enjoyable.


Isn’t this a great mask design? I highly recommend it. I hope you’ll try making one, or at least enjoy watching the video to see how it works!

Do you have a favourite mask pattern? Please share a link and why you like it in the comments – I’d love to see your recommendations too.

Comments (9)

Incyanity yarn review

I’d like to introduce you to a new Canadian indie yarn hand-dyer, Cheyenne Brammah of Incyanity!

Cheyenne is a long-term customer of mine and she sent me some test skeins of her hand-dyed yarn for my feedback before she launched her shop. But, as always, the following is based on my honest opinions, and I’ve been waiting for the launch so I could tell you how much I enjoyed these yarns!

Cheyenne has a great eye for colour, and choosing her palettes from her own nature photography is inspired – each shade tells a colour story, illustrated by the beautiful photos. Just look at these stunning yarn/photo combos in the lush launch colourways:

Incyanity yarns (photos by Cheyenne Brammah)

I always appreciate bringing inspiration from the natural world into my designs, and looking at these yarns together with their inspiration photos makes my heart happy.

My Experience

Incyanity yarns

Incyanity yarns come in 100g hanks, and are dyed onto high quality bases (currently merino/silk, merino/nylon and merino/bamboo are available). I chose a merino/nylon (teal) and a merino/silk (purple) to test, both in fingering weight – the perfect weight for crocheted shawls!

My yarn was securely packaged and arrived in perfect condition. They looked lovely in the hanks, and even more stunning once I’d wound them into cakes. This is some seriously pretty yarn…

Incyanity yarn

The tonal teal is a lovely shade. It’s just varied enough to provide some fun tonal changes while you crochet, but not so busy to distract from a beautiful stitch pattern in the finished piece.

Note: This shade is a preview of an upcoming colourway. It’s bluer than the Canyon Cascade colourway, but otherwise similar in the tonal variation.

Incyanity yarn

The variegated Amethyst Sky is gorgeous in the skein and absolutely stunning after being wound. Just look at those rich purples tempered with icy blue – this colour scheme could have been designed just for me!

Note: The yarn base felt very nice to me, but Cheyenne wasn’t satisfied with the softness or sheen, and she has since found a vastly superior base for her Incyanity silk blend yarns. You can see how much more pronounced the sheen is now by comparing the same yarn in the shop with the photos of my test skein 🙂

Incyanity yarn in Amethyst Sky colourway

It can be a challenge to find the right stitch pattern for a very variegated yarn in crochet, so I tested it out with this linen stitch swatch to see how the colours would play together. Very pretty! I can definitely see this as a lovely hat or cowl. But, in the end, I chose an unfussy lace stitch pattern for this skein (see my shawl below!), and I think the result is beautiful like this too.

Verdict

I really enjoyed working with both yarns. They felt soft and bouncy, they didn’t split at all while crocheting, the yarn colours didn’t fade at all after soaking (a very important test!), and both blocked out beautifully.

And I think the results speak for themselves – the two shawls I made from my yarn are just gorgeous in these rich colours:

Diamond Lace Wrap crochet pattern by PlanetJuneSweetheart Lace Shawl crochet pattern by PlanetJune

Left: Diamond Lace Wrap; Right: Sweetheart Lace Shawl

If you’re looking for a high-quality, stunningly-coloured, nature-inspired hand-dyed yarn to elevate your next crochet or knit project, I recommend you check out Incyanity 🙂

Comments (5)

review: Susan Bates crochet hooks

Did you know there are now two new additions to the Susan Bates hook line? I had to investigate, and got out all my SB hooks to compare the new styles with my classics:

susan bates aluminum crochet hooks: review

Susan Bates crochet hooks have always been my favourites, because I find their in-line shape makes it much easier to make perfectly uniform stitches.

What’s an ‘in-line’ hook?

See my Crochet Hook Styles article to understand why the head shape can make such a difference to your stitches. It comes down to personal choice – if you prefer a tapered hook, you probably won’t enjoy any of the hooks in my review below (and that’s okay too, there are plenty of other crochet hook brands out there!)

Now, I prefer aluminium/aluminum (I’ll say aluminum from now on, as the hooks are American!) hooks to bamboo or plastic, as they’re strong, smooth, and rigid. But clearly, even recommending you try a ‘Susan Bates aluminum hook’ in your preferred size doesn’t narrow you down to a single option, so I thought I’d put together a quick roundup of all the currently-available SB metal hooks, so you can make a more informed choice.


Susan Bates aluminum hooks – the contenders:

Here are all the options I’ll be looking at today:

susan bates aluminum crochet hooks: review

  1. Quicksilver
  2. Silvalume
  3. Bamboo Handle/Silvalume Head
  4. Silvalume Soft Ergonomic
  5. Silvalume Super Lightweight
  6. Crochet Hook Cushion Grip

And now onto the reviews…

1. Quicksilver

susan bates aluminum crochet hooks: review

The Quicksilver line is the old-school classic Bates hook, but they are still available today. All sizes are the same matte grey colour and very smooth. These are the first hooks I bought in all the sizes when I started crocheting seriously, and mine are still in perfect condition.

The biggest downside is that, if you crochet with a knife grip like me (i.e. you hold the hook gripped in the palm of your hand), the narrow handle, especially with the smaller sizes, makes it less comfortable to hold and and it’s more likely that your hands will cramp up.

2. Silvalume

susan bates aluminum crochet hooks: reviewI gradually upgraded to a set of basic Silvalumes, starting with the starter set (sizes F-K US, 3.75-6.5mm), and then adding all the other sizes individually. These anodised aluminum hooks are helpfully colour-coded by size, so it’s easy to tell the difference between your H hook (blue) and I hook (pink).

In a side-by-side comparison, they don’t feel as smooth as the Quicksilvers, but they’re still very smooth, and I prefer them to the Quicksilvers (although possibly just for the convenience of the colours…) Again, the handle is narrow, so not ideal if you crochet with a knife grip.

The newer Susan Bates hook styles below are all based on a Silvalume head, with a built-up handle that you may find more comfortable if you crochet with a knife grip. If you crochet with a pencil grip (with the handle of the hook resting on top of your hand), the handles are unlikely to provide you with much benefit.

3. Bamboo Handle/Silvalume Head

susan bates aluminum crochet hooks: review

My all-time favourite hook! The bamboo-handled hooks have all the advantages of the Silvalume head with a smooth, warm bamboo handle that I find very comfortable to hold.

I really do swear by these hooks – I have two complete sets, plus another six spares in my most-used size (E US/3.5mm, for my amigurumi)!

4. Silvalume Soft Ergonomic

susan bates aluminum crochet hooks: review

Soft Ergonomic is one of the new SB hooks, with a soft-touch plastic handle. The handle is a little longer than all the above hooks, so may work better for you if you have a larger hand. I find it pleasant to the touch and a definite improvement in comfort to the all-metal hooks, although I personally prefer the wider grip of the bamboo handles.

If you crochet with a pencil grip, you may find the soft-touch handle more comfortable resting on your hand because it’s warmer than an all-metal hook and not too bulky.

5. Silvalume Super Lightweight

susan bates aluminum crochet hooks: review

Super Lightweight is the other new hook style, and I must admit this one has me baffled. Aluminum hooks are always lightweight, and, weighing the same size of each of the above hooks, the Super Lightweight hook was actually slightly heavier than any of the others! The handle is made of a brushed aluminum and it is much lighter than it looks from its size – maybe that’s where the ‘super lightweight’ part comes in..?

susan bates aluminum crochet hooks: review
L: Bamboo Handle Silvalume; R: Silvalume Super Lightweight

Like the Soft Ergonomic hook, this one also has a longer handle, which you may find more comfortable if you have larger hands. However, with my small hands and the way I hold my hook, the wide part of the handle only benefits my little finger, so it’s definitely not well-suited to small-handed knife-grip crocheters! And, personally, I prefer the warm feel of the bamboo or soft-touch plastic to this cold aluminum handle.

(For amigurumists, I should mention that the smallest size this hook is currently available in is an F US/3.75mm, so it may be larger than you’d prefer for your amigurumi.)

6. Crochet Hook Cushion Grips

susan bates aluminum crochet hooks: review

If you already have the older Quicksilver or original Silvalume hooks and don’t feel like the expense of buying a whole new set of hooks but would like a comfort upgrade, cushion grips could be the answer.

These Susan Bates cushion grips come in a set of two, and the packaging says they fit sizes F-J. I found that the green grip has a smaller hole than the blue, and, in my tests, the green works well for sizes E-G7 (3.5-4.5mm) and the blue for sizes H-J (5-6mm).

These grips are squishy and comfortable, and may be the best answer if you have arthritis or find gripping a narrow hook problematic – by pulling the grip up over the thumbrest, you can get the benefit of the foam padding and wider grip for your thumb and forefinger, as well as for your other fingers.

Hook Head Shapes

For completeness, I should also mention that all Susan Bates hooks are not the same – the head shape has changed more than once over the years, and depending on where/when your hook was manufactured, you may find your hook has a pointier or more rounded head, and a deeper or shallower throat cut-out.

My Susan Bates hooks have a mixture of the two, and I can say that I usually prefer to use one with a more rounded head, as it’s less likely to split the yarn, but the pointier ones have their advantages too – for example they come in handy when you need to poke the hook into a tighter stitch (e.g. for my Better Back Loops Only technique!)

Which head shape you prefer is a personal preference, and probably not one you’ll have any control over if you buy a new Susan Bates hook, anyway. But I will say that it doesn’t change my opinion: all Susan Bates hooks have the same in-line shape, and that’s the most important factor to me when I choose a hook.

susan bates aluminum crochet hooks: review


We’re lucky to have so many hook choices these days, but it can be very confusing, especially if you add all the other brands of hook to the list of choices!

If you’ve been wondering which Susan Bates hook to try, or what the differences are between all the options, I hope this post will help you choose the one you’ll enjoy most.

What’s your favourite hook? Are you a Bates fan too, or do you prefer Boye, Clover, Tulip, or another brand? Please share your recommendations in the comments below 🙂

Notes: Red Heart kindly provided me with samples of the new hooks for my review, but all opinions are my own. The affiliate links above point to amazon.com. If you live outside North America, see my tips for buying in-line hooks internationally.

Comments (19)

book review: Making Pipe Cleaner Pets

As always, I was not compensated for this review, and the following is based on my honest opinions!

Overview

Making Pipe Cleaner Pets by Takashi Morito was originally published in Japanese, and has now been translated into English.

book review: Making Pipe Cleaner Pets

I’ve previously reviewed another translated-from-Japanese craft book (Crafting with Cat Hair) and, like that book, this is another book of adorable crafts you’d probably never think of making until you see the book!

book review: Making Pipe Cleaner Pets

Throughout, this book has a very Japanese aesthetic. On the photo pages, the dogs are posed in cute tableaus with a variety of unrelated props – books, craft supplies, crackers – and a haiku-esque poem to introduce each dog, for example:

The morning air feels good
Now, we’ll all play ball
And bathe in the morning sun

The overall effect is charming in that bizarre Japanese craft book kind of way.

(I should mention that ‘Making Pipe Cleaner Pets‘ is a bit of a misnomer if you’re looking for a variety of pets – this is a book of dogs. It has designs for 23 different dog breeds, plus puppy-sized miniature versions of several of the breeds.)

book review: Making Pipe Cleaner Pets
A few more of the included dog breeds.

After the cute photo gallery of all the dogs, we get to the tutorials for how to make them. The first three dogs (Toy Poodle, Pug, Boston Terrier) have detailed step-by-step instructions, including both a diagram of each step and a photo of the result.

book review: Making Pipe Cleaner Pets

Those three designs teach you the basic techniques you’ll need to make all the dogs. The other 20 dog breeds have text and diagrams only, but the basic idea is the same for all the dogs, so you’ll rarely need to look back once you’ve tackled a couple of the easier dogs.

book review: Making Pipe Cleaner Pets

My Experience

I found the perfect pack of pipe cleaner colours (two browns, grey, white and black) and got started! I planned to make 2 or 3 dogs, to give myself a chance to get the hang of the technique.

First up, I tried the Toy Poodle, the first and apparently easiest dog in the book:

book review: Making Pipe Cleaner Pets

My completed effort definitely looked like a dog, but nothing like a poodle! The legs were too short, so I decided to embrace that: I shortened them further by folding over the ends, and reshaped the face a bit (by squashing it around), and now it’s a dachshund puppy. 🙂

For my next attempt, I thought I’d try the actual Dachshund model:

book review: Making Pipe Cleaner Pets

I felt like the proportions in the instructions weren’t quite right, so I lengthened the body and shortened the legs as I made my initial bends in the pipe cleaner, and I think it looks pretty good!

Okay, I’m getting the hang of this now; time to step it up a notch with a multi-colored dog. I tried the Jack Russell Terrier:

book review: Making Pipe Cleaner Pets

I like the result – the head colours are good – but I somehow made it all a bit skinny (my fault, not the book’s). I think mine has a bit of greyhound in him 😉

And then the Pug:

book review: Making Pipe Cleaner Pets

I learnt from my mistakes and used the basic method from the book, but tweaked all the proportions to be more suited to how I think a pug should look. I ended up with lots of the dark brown showing on the back of the head, so I wove a bit more of the light-coloured pipe cleaner over to hide that. What a cute pug face!

After making a few dogs, you get a feel for what you’re doing, as the basic concept is very similar for all the dogs. I decided to make some modifications for my last two dogs…

book review: Making Pipe Cleaner Pets

The Miniature Schnauzer model seemed like a bit of a cheat to me – the white beard and eyebrows were formed separately and glued into place! Instead, I used what I’d learned from the Pug and built the beard into the face.

book review: Making Pipe Cleaner Pets

And finally, the Corgi. I used the book for the face colours, but built the body myself, plumping it up and omitting the tail completely.

The advantage of this book is that, as all the dogs are constructed along the same principles, once you’ve made a few, you should be able to get a bit more creative and extend the same principles to different animals. I thought I’d test my theory by trying – what else – a grey cat!

book review: Making Pipe Cleaner Pets

I basically made another dog, but tweaked all the proportions as I went (shorter muzzle and ears, wider face, longer neck, etc) to make it more feline. The great thing about pipe cleaner models is they are completely poseable, so it’s easy to adjust the leg positions, add a curve to the back, or reposition the tail, if you decide it doesn’t look quite right.

The book suggests some finishing touches – glued-on plastic eyes and noses, trimming some of the pipe cleaner fuzz to make e.g. pointier ears, and an occasional glued-on mouth or tongue. Even my smallest (4.5mm) animal eyes are too large for my dogs, so I decided to keep my dogs (and cat) as pure pipe cleaners. I’m sure they’d look even cuter with faces, but I like them as they are, and I like that there aren’t any glued-on parts this way – they are simply twisted pipe cleaners and nothing more.

Top Tips

  • The first stumbling block is that all the designs in this book use 1m (40 inch) long pipe cleaners, which may be common in Japan, but I’ve never seen in all my years and countries of craft shopping! The book instructs that you can instead twist multiple regular-length pipe cleaners together to make a long one, but I’d recommend you use one at a time, and twist on a new one as you reach the end of the old one – it’s a lot more manageable that way. I used 3 or 4 pipe cleaners for the main colour of each dog (and 1 or 2 of any secondary colour).
  • All the dogs’ muzzles are made by coiling the pipe cleaner and then feeding the remaining end through the middle of the coil. I found this to be impossibly difficult to do neatly, until I coiled the pipe cleaner around a narrow tube (I used a small knitting needle), which gave perfectly round coils, and a nice space in the middle for feeding the end through.

Verdict

I found the concept of pipe cleaner dog models to be fun, but it was more challenging than I’d expected. Although it looks like a kid’s craft, I definitely wouldn’t recommend it for young children – it’s not easy to make a dog that looks like the photos! Teens with good dexterity and patience may enjoy making dogs, and it’s great for crafty adults like me.

The dogs are very cute and fun to pose, but there’s a bit of a learning curve, and every dog will end up with its own personality, no matter how closely you follow the directions. But that variation is part of the enjoyment of making things by hand: I feel it adds to the charm – just like a litter of real puppies, you never know exactly how each one will look until you see it!

If you persevere through a couple of practice runs, you’ll be able to make cute pipe cleaner pups too, and, once you’ve made a few dogs, you’ll see how the general idea works, and be able to try designing your own animals, if you want.

book review: Making Pipe Cleaner Pets

If you’re looking for an unusual craft to try, I can recommend Making Pipe Cleaner Pets as a fun diversion, and a great introduction to sculpting pipe cleaner animals!

Comments (13)

review: Dutch Label Shop custom labels

Dutch Label Shop thought I might be interested in trying their custom woven labels, and they were right! What better way to brand my crochet art and knitwear than with unique PlanetJune labels?

Dutch Label Shop provided me with store credit so I could test out their labels, but, as always, I was not compensated for this review, and the following is based on my honest opinions!

examples of labels from Dutch Label Shop

Dutch Label Shop offer a wide variety of labels for creative artisans to brand their handmade goods. They offer care and size labels for garments, as well as custom brand labels, with low minimum quantities. All the labels are woven (not embroidered), washable, and available in iron-on or sew-on versions.

I decided to try designing two completely different PlanetJune labels, so I could test many of the different label options: a long black label with end folds that I can sew into my handmade knitwear, and a square white double-sided (folded) label that I can stitch to handmade toys and crochet art pieces.

Here’s a sneak peek of my labels:

PlanetJune custom woven labels from Dutch Label Shop
Don’t they look good?!

My Experience

Note: If you don’t have your own custom logo, it’s easy to create a Basic Label by typing in your text, choosing a font you like, (and, optionally, adding one of their built-in symbols, e.g. I’d have used one of their cute yarn balls if I didn’t have my PlanetJune yarn planet). The colour choices and sizes are more limited, and they don’t offer folded labels, but the prices are much lower for smaller quantities than for the Logo Label, so I’d recommend you look at this option if you don’t have a brand logo. The rest of my review applies to just the Logo labels, as those are what I tested.

The pricing for Logo labels starts high, at several dollars per label, but quickly drops to very reasonable prices when you buy in bulk. As I wanted to test multiple options, I didn’t take advantage of the best bulk buy pricing. I ordered 50 of my black labels and 16 of my white labels for just under $100. (If I was selling my handiwork I’d probably have bought 300 or more labels of each type, to bring the price down to under 1/3 of my cost per label – they’ll last forever, so it’s a good investment.)

As these labels are completely woven, you can choose any colour for the background and one or more colours for your design. If you’d like to match your logo shade, the listed colours give their Pantone codes after the name. You can use an online converter (like this one) to find the closest match to your brand colours.

You can set up your label to be any size and shape you want. One thing that isn’t immediately clear from the setup page is that the label size you select is the complete size of the label that they create, before any folds. (The size of the end folds isn’t mentioned anywhere, from what I can see, but you can get your questions answered quickly using their Live Chat box – as I found out, you need to allow 1/4″ per end fold, if you choose a label with those.)

I created the graphics for my labels based on my logo, and uploaded them as PDF files:

PlanetJune custom woven labels from Dutch Label Shop

Then I submitted my order and waited. With a Logo label, their designers make sure the label is going to look good before they print it, and they contact you if you’ve done anything wrong. (You can also pay extra to have a photo proof of a finished label emailed to you for approval before they create the entire batch. I didn’t choose that option, but it’s a good idea, especially if you wanted to lower the label cost by ordering in bulk – you don’t want to end up with 300 wrong labels!)

I was surprised when my labels arrived – I thought I’d have been contacted by their designer before the labels were printed, but apparently I provided all the information they needed without querying me on anything (yay, me!)

I was impressed to see that I was sent a few labels more than I ordered, presumably to insure against the possibility of a couple of them being flawed. (As they are individually woven, there is a little more variability between labels than you may expect.)

My PlanetJune Labels

PlanetJune custom woven labels from Dutch Label Shop

I think these black labels will make my handmade clothing look so professional! My yarn planet is slightly squashed due to the limitations of the weaving process at such a small scale, but overall I’m very happy with the label.

(The predominantly red side is the back, in case you haven’t seen woven labels before! The unused colour is carried on the back while the other is being woven on the front.)

One thing I hadn’t realised is that, no matter which colours you choose for background and foreground, there are white warp threads running throughout the label. You can just see them as a slight amount of grey speckling in the black around my yarn planet. As my logo is so detailed, if I need to order more of these labels, I’ll choose a white background instead of black, to avoid that speckling, and make the label a bit taller, so I could make my yarn planet slightly larger.

PlanetJune custom woven labels from Dutch Label Shop

As you can see, with the white background and a slightly larger size, my yarn planet looks really good! I think these little square labels are adorable, and perfect for stitching onto crocheted toys.

I chose the ‘double white’ option for a small additional fee, which helps the colours to not show through the white background – as you can see from the back of my label (back right in the above photo), all the white areas are covered with red on the back, but that doesn’t show through at all from the front, so I’m very happy I chose this option.

For the label at the front right of my photo, I’ve folded in the label ends, and finger-pressed them to make a crease. This is how I plan to attach these labels neatly to amigurumi, by sewing the crease lines down to the ami. For sewn pieces, I could leave the ends unfolded and trap them in a seam as I stitch it.

Specifications

For reference, if you like the look of my labels and want to make similarly-sized ones, I made Logo Labels with the following options:

  • My black labels are 2.55″ by 0.5″ end fold labels
  • My white labels are 2″ by 0.75″ center fold labels with double white

Labels in Action!

And now for the moment of truth – how do they look and function in use?

It only took a couple of hidden stitches on each side to stitch labels into my handknit sweaters, and they look so good:

PlanetJune custom woven labels from Dutch Label Shop

I conducted an important test by wearing one of these sweaters after I’d stitched the label in. It wasn’t at all itchy or irritating next to my skin, which was a potential concern for me – I couldn’t even feel that the label was there, so it passed my test with flying colours.

And do you see what Mega Bun is now sporting near her tail?

PlanetJune custom woven labels from Dutch Label Shop

No? Look more closely:

PlanetJune custom woven labels from Dutch Label Shop

How cool is that?! A perfect way to brand a one-of-a-kind creation.

Verdict

I’m very happy with my order from Dutch Label Shop. Woven labels look so professional compared with printed labels. They make a great finishing touch to handmade pieces, and I’ll be sewing mine into all my handknits and crochet art pieces from now on, to prove they are PlanetJune originals. 😉

Although I found the wealth of options available when designing my labels a bit overwhelming, the online Live Chat service was very helpful for answering all my questions. And, when my labels arrived and I found a problem with some of my long labels (the weave had somehow been stretched and my logo was almost falling off the end of the label), Dutch Label Shop’s customer support was excellent and they re-sent the incorrectly woven labels with no problems, so I’m happy to recommend them for both their products and service!

Based on my experience, I have a few recommendations to give you the best chance of being delighted with your labels:

  1. Choose a white background if you have a very detailed logo, to avoid tiny dots of white showing in the areas with the finest detail.
  2. For the most versatile option, choose a label shape without end folds, but choose a long enough label size to add folds yourself beyond the edges of your design – you can fold and iron or finger-press them yourself to make sure your logo ends up centred on the finished label.
  3. If you want to reduce the cost, unless you have a graphical logo or want to order hundreds of labels, you could use their Basic option and design a text label with a nice font (and a generic icon from their selection, if you want) to make high quality woven labels at a lower price.

UPDATE: Dutch Label Shop have kindly offered PlanetJune readers a 15% discount for the next 60 days! To order, go to Dutch Label Shop and enter the code planetjune15 at checkout.

Comments (6)

book review: Mandalas to Embroider

Let’s get this out of the way first: I received a copy of this book to review. But I’m not being compensated for this review in any other way, and the following is based on my honest opinions!

Carina and I have been friends since we first met (online) in our early days of craft blogging, over a decade ago! She’s well-known for her distinctive cheerful and colourful embroidery designs and has authored 3 books as well as a shopful of self-published designs (you can find them all at Polka & Bloom).

Ever since Carina mentioned that she was designing a book of mandalas, I’ve been waiting to see what she came up with, and I wasn’t disappointed! Embroidery, like other slow crafts, can be a calm relaxing hobby, and combining that with repeating mandala patterns sounds like a perfect recipe for slowing down and enjoying some crafting time.

Read on for my review, and to see the gorgeous embroidery I’ve made from one of the book patterns…

Overview

Mandalas to Embroider by Carina Envoldsen-Harris

Mandalas to Embroider: Kaleidoscope Stitching in a Hoop by Carina Envoldsen-Harris is a book of circular embroidery patterns. As Carina says in her introduction:

Mandala is the Sanskrit word for ‘circle’. These days, it is often used as a generic term for a particular motif, especially in arts and crafts, usually with a concentric design or one which radiates from the centre.

Mandalas to Embroider includes 12 large and 12 small delicate repeating patterns. Nature-based, geometric, or more abstract, the designs are all bold, happy, and – of course! – colourful. The circular nature of the patterns means they fit perfectly in an embroidery hoop, making the finished pieces easy to display.

Mandalas to Embroider by Carina Envoldsen-Harris
Such pretty and colourful designs!

The book is split into two halves: the first half includes clearly-illustrated stitch tutorials, instructions for preparing and finishing your work, and all the patterns, with colour palettes and stitching suggestions.

The pages of the second half are actually iron-on transfers for each of the patterns. Each page is perforated so it can be removed neatly, and there’s a handy pocket inside the back cover to store any transfers you’ve already used. I thought this was a really nice touch, as each transfer can be used up to ten times, so you’ll be able to keep the transfer pages together with the book, so they’re ready for the next time you want to use them.

Mandalas to Embroider by Carina Envoldsen-Harris
Left: stitch tutorials; Right: iron-on transfer

This book is beautifully styled and photographed, and I couldn’t stop paging through again and again to admire the variety of mandala-inspired patterns.

Mandalas to Embroider by Carina Envoldsen-Harris
A couple of the lovely photos

My Experience

Although Mandalas to Embroider includes 12 mini designs, I decided to jump right into one of the 12 full-sized designs. Sakura Clusters was an obvious choice for me, as I love cherry blossoms (I even designed a cherry blossom garland for my first book, Paper Chains and Garlands!) and this design was the first that really caught my eye as I flipped through the book:

Mandalas to Embroider by Carina Envoldsen-Harris

I decided to see how the design would look in a colour scheme inspired by real-life cherry blossom instead of Carina’s cheerful bright palette. That’s one of the advantages of embroidery (or crochet!) patterns – it’s so easy to make them your own by simply changing the colours. I shopped for floss colours using the pinks, reds and blue from this beautiful reference photo:

photo of cherry blossoms
I was unable to find anyone to credit this stunning photo to – if you’re the photographer, let me know!

I raided my fabric stash and the only off-white fabric I could find looked a bit thin, so I used two layers to stop the threads on the back of the piece from showing through on the front. (I wasn’t sure if that was going to work, but my stitches didn’t show through the fabric, so I suppose it did!)

sakura mandala emboidery

I wanted to make my embroidery a little smaller than the original, so I copied and reduced the pattern page, then traced the design onto my fabric with a pencil. If you use the iron-on transfers, you can skip all that and be ready to start embroidering right away!

I must admit to being a little nervous about starting stitching; although I’ve been cross-stitching for decades, and of course enjoy my punchneedle embroidery, I haven’t actually done any regular embroidery since I learnt the basic stitches in primary school.

sakura mandala emboidery

I needn’t have worried – the patterns in this book all use fairly simple stitches, which are clearly explained at the start of the book. Although I started slowly, I quickly picked up speed. By the end of the project, I felt very confident with the stitches used in this pattern, and I’m ready to learn some of the other stitches for my next embroidery project!

Look, even the back of the embroidery is quite pretty…

sakura mandala emboidery

And now for the big reveal:

sakura mandala emboidery

Isn’t it lovely? In my colour palette, the pattern takes on a more serene look, but Carina’s pretty design still shines through. I’m thrilled with my embroidery, and I’ll be very happy to display this finished piece on the wall of my craft room.

Final Thoughts

Carina’s designs always have a hand-drawn quality to them, and I was impressed to see that she’s managed to maintain that even with the repeating patterns in Mandalas to Embroider. There’s still a free, natural quality to the designs. I noticed while I was stitching the flowers that the petals of each flower aren’t perfectly identical. This is a good thing – the relaxed nature of the design felt like permission to be relaxed in the execution – there’s no need to make every stitch exactly even and perfect to get a beautiful result.

Mandalas to Embroider by Carina Envoldsen-Harris

If you’ve never tried embroidery, I’d definitely encourage you to give it a try – I found it very relaxing and satisfying to watch the design come together. And I think Mandalas to Embroider is a perfect introduction to embroidery, as you can build your confidence by practicing your stitching on the smaller patterns, or do as I did and jump right into a large one!

Comments (2)

a new Chunky Moebius Cowl

Trendgarne kindly sent me some of their ONline Linie 346 Arona yarn, and I decided to try it out with my free Chunky Moebius Cowl pattern. Isn’t it lovely?

PlanetJune Chunky Moebius Cowl

Arona is a 100% cotton ribbon yarn that comes in a 100g ball, which provides a generous 230m of (roughly) worsted weight yarn.

Linie 346 Arona yarn

As you can see, it comes in a beautiful range of variegated shades with slowly-changing colours. I really love all these colourways – aren’t they gorgeous?

Linie 346 Arona yarn

This yarn has an unusual flat ribbon construction, and there’s no recommended crochet hook size given on the ball band, but the recommended knitting needle size is 5-5.5mm. (A good rule of thumb in these cases is to go up a couple of hook sizes from the recommended needle size, as crochet tends to need a larger size so the piece drapes nicely and isn’t too stiff.)

Linie 346 Arona yarn

I swatched with a few different hooks and decided I like the fabric I got with a K (6.5mm) hook. As this yarn is finer than my pattern calls for, I started with a 76 stitch foundation to make a 22″ circumference cowl.

The moebius construction means that the cowl is worked outwards from the middle, and I enjoyed watching the colours change as my cowl grew, from the blue-purple foundation, through light purple and then on to pink and beyond…

Linie 346 Arona yarn

The yarn is easy to work with and the stitch definition is amazing. Even a simple stitch pattern like this stands out clearly and looks so good with the colour-changing yarn.

I worked 10 rows of my pattern until my cowl was 5″ tall. It was finished in no time, and took less than half a ball of yarn (making it a real bargain!)

Planetune Chunky Moebius Cowl

The finished cowl is smooth and cool in the cotton yarn. It feels lovely against my skin and would be perfect for the first chill of breezy autumn days.

As you can see from my selfie at the top of the page, my new worsted weight yarn cowl looks just as good as the chunkier versions, and it sits beautifully against my neck under a light jacket without excess bulk while still keeping my neck warm (useful now I have such short hair…)


chunky moebius cowl crochet pattern by planetjune

If you’d like to make a Chunky Moebius Cowl too, my pattern is free here – it’s a fast and fun stashbusting pattern, and a great choice if you’re making a start on your Christmas gifts!

As this is a donationware pattern, if you donate a dollar or more you can get the PDF version, which includes bonus content, including a fully illustrated explanation of how the Moebius construction works, standard measurements for man, woman, and child, and additional step by step photos.


I’m looking forward to coming up with the perfect pattern to use my other balls of the Arona yarn! I really enjoyed its smoothness, stitch definition, and, of course, the wonderful colourways. If you’d like to try this yarn too, here’s the Arona Ravelry listing (it includes some links to online stockists, in case you can’t find it locally).

Comments (1)

« Previous entries
  • Quick Links: Crochet

    navigation: arrow

    buy crochet patterns and accessories from my online store

    'Everyday Crochet' and 'The Essential Guide to Amigurumi' crochet books by June Gilbank

    Crochet video tutorials and step-by-step photo tutorials

    Free PlanetJune crochet patterns

    Frequently Asked Questions

    Quick Links: Crafts

    navigation: arrow

    Punchneedle Embroidery information, ebook & patterns

    Papercraft ebook & tutorials

    Free PlanetJune craft projects & tutorials

  • Blog Post Categories

  • Blog Archives

  • Welcome to PlanetJune!

    June Gilbank

    Hi, I'm June. Welcome to my world of nature-inspired crochet and crafting. I hope you enjoy your visit!

    If you'd like to get in touch, you can contact me here.
    crocheted Canadian flag by PlanetJune
  • A fanned-out pile of the books Everyday Crochet and The Essential Guide to Amigurumi, with text 'The answers to all your crochet questions at your fingertips - find out more'
  • Support PlanetJune!

    Want to say thanks? You can send me money in seconds at paypal.me/planetjune (over $20) or paypal.me/planetjune2 (under $20) or send me a donation through my shop.

    Or simply click through from my links before you shop at Amazon, Etsy, KnitPicks, LoveCrafts or Crochet.com, and I'll make a small commission on your purchase, at no cost to you! Start here:

    ♥ Support PlanetJune ♥

    Tip: This link is also in the footer of every page!

    Thank you so much for your support!