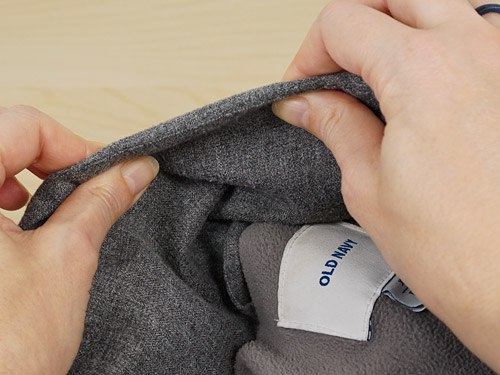
Craft Blog Shop Mailing List

Archive for Sewing

refashioning an unflattering top

I bought a cute summer top last week. It was very inexpensive, the colour was lovely, the fabric had a nice texture, and it looked like it would be a cool, pretty, summer top.

And then I tried it on. Um…

the original baggy top
Please excuse the bathroom fixtures in these photos – it’s the only place I have to take photos of myself in the mirror!

I don’t know which body types the ‘potato sack’ look would flatter, but it’s certainly not mine. Is it a maternity top? No it’s not – I did check after seeing the fit, or lack thereof! Do I need a smaller size? No – it’s a size XS. Ridiculous.

I thought of returning the top, but then I decided to try a little refashioning instead to see if I could improve it. The fabric doesn’t stretch, so I had to take care not to make it too fitted – I need to be able to get it on and off!

Step 1: Measure for new side seams. I turned the top inside out, tried it on, and pinned new seamlines down each side. I took in about an inch and a half on each side, tapering out a bit at the bottom because I didn’t want it to get too tight around my hips. (Turning the top inside out first lets you pin the new shape while you wear the top, and means that you can stitch directly along your pin lines once you take it off.)

Step 2: Sew new side seams and cut off excess fabric. I stitched along my pinned lines with a straight stitch, and then cut off the excess fabric 1/4″ outside my new seams. A serger would be helpful here, but I don’t have one, so I used a zig zag stitch to overcast the new raw edges so they wouldn’t unravel after cutting the fabric.

taking in the side seams
L: pinning the new seams; R: the top after sewing the new seams

Already a little improvement, but I think we can do more…

Step 3: Add an elastic empire waist at the front. I tried on the top and pinned an empire waistline under the bust, from one side seam to the other. Next, I measured myself along that line and cut a piece of 1/4″ elastic to the same length. I pinned the ends of the elastic to the side seams at the front along the empire waistline. To keep the resulting gathers in the fabric even, I stretched the elastic so that the fabric was flat, and pinned the two together at several points along the elastic.

elastic pinned in place

Step 4: Stitch elastic in place. I picked a pretty stretch stitch that happened to match the texture of my fabric, and stitched the elastic to the front of the top, stretching the elastic as I went so that the fabric lay flat as I sewed.

right side of empire waist

Now the front looked good, but the back was still bulging with excess fabric.

Step 5: Make ribbon ties. I salvaged the strips of fabric I had cut from each side and unpicked the original seams so I had 2 strips of fabric from each side of the top. I ironed them flat and trimmed each pieces into a 1″ wide strip. Then I stitched each pair together to make two longer strips, and ironed the long edges into the middle (using my 1/2″ bias tape maker to keep the strips straight). I couldn’t hide the raw edges because I didn’t have enough fabric width to fold the strip in half again, so I just zigzag stitched down the middle of each strip, catching both raw edges as I went. I ended up with two 24″ ribbons to tie together at the back of the top.

ribbon tie

Step 6: Attach ribbon ties. I unpicked enough of each side seam just underneath the elastic to insert the unfinished end of the tie to the inside. I then turned the top inside out and re-stitched the side seams, trapping each tie in place as I sewed.

Turn it back the right way out and… Ta-da!

refashioned top

Still loose and floaty, but it has enough shape to not make me look horribly dumpy – which, as I’m only 5’2″ tall, is a prime consideration for me! Potato sack into cute summer top in 6 easy steps :)

  • Share/Bookmark

Comments (27)

cute plush hamster

It just occurred to me that I haven’t really shown you this hamster yet. You may have spotted him (in progress) in the demo video for my Detail Stuffing Tool:

I wanted to make a stitched project to use in the demo video, to show people that my tool has uses beyond stuffing amigurumi. Coincidentally, only a couple of days earlier, I’d saved the link to an adorable hamster pattern at Nuno Life, even though I had no plans at the time to make one. And then the perfect excuse came along: a cute hamster toy and the prop I needed for my video, all in one!

plush hamster by planetjune

When I was clearing out my old bedroom at my parents’ house last year, I brought back all my old craft supplies from when I was a kid: rubber stamps, spirograph, cross stitch supplies, and a small stash of fur fabric and felt from my pre-teen toymaking endeavours. It seems strange that I’ve had these materials for around 20 years (let’s not think about how old that makes me sound!) – is that old enough to call them ‘vintage’ craft supplies? Ha!

I found that I had the perfect golden hamster-coloured fur fabric and pink felt in my rediscovered treasures. I’ve always hoarded supplies, to the extent that I used to not use anything in fear of making a mistake and ‘wasting’ it, so it’s especially satisfying to finally be able to use some of my precious, carefully guarded materials.

The pattern was easy to follow (just remember that, as with most Japanese sewing patterns, the pattern shapes don’t include a seam allowance, so cut outside the lines to add your seam allowance) and the minimal instruction was enough to piece it all together. I snipped two tiny eyeholes in the fur before stuffing so that I could use safety eyes with backs. The nose (made by the pattern seams) seemed too low to me, so I cut a tiny piece of felt and made a higher nose. Finally, I trimmed the fur around the eyes so they weren’t obscured.

plush hamster by planetjune

It was a small and satisfying hand sewing project, and look how cute my hamster is – especially those little ears!

plush hamster by planetjune

If you’d like to make one too, check out Runo’s free hamster pattern :)

  • Share/Bookmark

Comments (8)

Detail Stuffing Tool reviews

A little ‘newsy’ post today. The Detail Stuffing Tools are back in stock, and I aim to keep them in stock permanently from now on. Thanks to everyone who ordered one already; I mailed out all the backorders yesterday (unless you also ordered out of stock eyes in which case they’ll be on their way tomorrow; I just didn’t anticipate getting so many orders over the past couple of weeks!) This is what my poor Post Office lady had to deal with yesterday:


Eek! If only I could print postage online, I’d save hours waiting at the Post Office and writing out customs labels, but Canada Post in their infinite wisdom have decided that the ‘Light Packet’ rate can only be obtained in person at the Post Office…

Detail Stuffing Tool by planetjune

And the reviews of the stuffing tool have started to come in! I know my tool is now indispensible to me – I keep one with every in-progress crochet project – but it’s great to hear that other people like it too. Firstly, a review by Jessica (aka Plushroom Soup), a plush artist and one of the first people to snap up my new tool on launch day. She says:

This little number may not look like much, but boy is it handy! I’ve used everything in the book trying to more efficiently stuff tiny plush parts (tiny fingers and toes are the worst!)—chopsticks, knitting needles, wooden dowels, doll stuffing forks, the Stuff It tool, etc. But nothing had good enough grip for the stuffing; the tools would just slide right through. Wooden dowels were the closest to providing what I needed, but I still struggled. Especially because tiny dowels have a tendency to snap in half while I’m stuffing.

Enter the Detail Stuffing Tool! This neat tool makes quick work of stuffing tiny parts. It’s extremely easy to use and has excellent grip for the stuffing. No more slipping, and stuffing right where I need it.

You can read the rest of her Detail Stuffing Tool review at Plushroom Soup!

And secondly, did you know that March is National Crochet Month? It’s nice to see crochet getting more recognition, although I’d like to see an International Crochet Month next time… Silverlotus, a cross-stitcher and knitter, and novice crocheter (although you wouldn’t guess that from her work!) has written a lovely post about a certain crochet designer for National Crochet Month, including this little snippet about my Stuffing Tool:

Just this month June introduced her new detail stuffing tool, which helps make stuffing little amigurumi creations so much easier. And, my dear cross stitching readers, I know it would make stuffing biscornus and ornaments much, much easier too. I recommend it highly.

See her full review of me (*blush*) on her blog, Reflections in the Pond.

Yay, thanks so much, ladies! If you’ve bought my Detail Stuffing Tool, I’d love to know what you think of it too!

And if you’re still saying “huh? stuffing tool?” here’s my demo video so you can see what all the fuss is about:

  • Share/Bookmark

Comments (3)

Detail Stuffing Tool

I’m so excited to launch my new product today! The Detail Stuffing Tool came about because it’s really difficult to stuff tiny things, or to get that last bit of stuffing in before you close up a hole. After making a million AmiDogs legs (that’s what it feels like, anyway!) and other tiny pieces that have to be stuffed firmly, I realised I needed a better way of doing it…

Dollmakers have a special forked metal stuffing tool, and that’s where I got the inspiration for my tool. The dollmaker’s tool costs around $15, and I wanted to produce something more affordable – if you’re anything like me, you lose tools far more often than you break them, so an inexpensive plastic tool is much more appealing!

Detail Stuffing Tool for amigurumi and plush by planetjune

Whether you crochet, knit, or sew stuffed toys or amigurumi, you need a Detail Stuffing Tool! Not convinced? I’ve made a short video to demonstrate the benefits of the tool, and techniques for using it:

More Details:

Get a grip on your stuffing: Fiberfill (especially the better quality ones) can be quite slippery, and if you try to use the end of your crochet hook or a chopstick to stuff, you’ll find that the fibres just slide around the edge of the stick, and you end up poking a hole in the stuffing instead of pushing the stuffing into the hole! The Detail Stuffing Tool has two prongs that catch the fibres of the stuffing so it can’t slip away as easily, and twisting the tool as you insert it spins the stuffing fibres into the piece with ease.

Stuff the tiniest pieces: The head of the Detail Stuffing Tool is small enough to fit inside the tiniest amigurumi part. The added bonus is that you can use it to add an extra bit of stuffing to a closed shape after you’ve finished crocheting (when you only have a 6 sc hole remaining to stitch closed) so you can stuff as firmly as you want without having to struggle to avoid catching the stuffing fibres while you crochet that last round.

Stuff right into the corners: The Detail Stuffing Tool also works really well to stuff tiny pieces for sewn plush toys. It can be really difficult to position the stuffing exactly where you want it to fill a tiny finger or arm or nose. By twirling the stuffing around the tool to make a firm blob of stuffing at the head of the tool, you can place the tool inside the tip of the piece, and then grip the stuffing from the outside as you withdraw the tool, so that the stuffing stays in place.

I’ve been using my prototype tool for a couple of months, and I couldn’t be without it now! It makes the pesky task of stuffing small pieces so much less frustrating, and I love that I can easily stuff all my pieces more firmly by adding additional stuffing into the tiny hole that remains after finishing the crocheting.

Detail Stuffing Tool for amigurumi and plush by planetjune

I hope you like my Detail Stuffing Tool – now available to purchase from the PlanetJune shop! I really think it’s a tool that’s been missing from the world of stuffed toymaking until now :)

  • Share/Bookmark

Comments (14)

making cat toys

Today is my furbaby Maui’s 6th birthday. (Well, we adopted him when he was a year old, so we don’t know his actual birthday, but we settled on this date for him so it wouldn’t be too close to Christmas.) If you don’t know my lovely boy, here he is:

Maui
Awww, handsome cat!

The actual subject of this post is making toys for your cat, and whether it’s worth the effort. I’d like to demonstrate with a couple of toys that I made for Maui three years ago (please excuse the photos - my photographic skills have clearly improved since 2007!)…

__(‘Read the rest of this entry »’)

  • Share/Bookmark

Comments (15)

« Previous entries