Update: The Scarf Sweater instructions, together with my Eyelet Ripple stitch pattern, are now available as a printable Donationware pattern. They are still available for free, but if you like them please consider sending me a donation to show your appreciation:
Send me a donation and receive the easy-to-print PDF version of the instructions and stitch pattern (with bonus assembly photos and instructions on how to wear it) as a thank you!
Donations of any size are much appreciated. Just add the amount you wish to donate, and, once you have checked out and paid, your pattern will instantly be available to download from your PlanetJune account.
The complete pattern and instructions are available below, regardless of whether or not you choose to pay for them 🙂
This is a PlanetJune original crochet pattern. Feel free to use items made from this pattern however you wish, but I’d appreciate credit as the pattern designer. Please do not reproduce the pattern anywhere else; instead post a link to www.planetjune.com/scarfsweater
Not ready to make it yet? Add it to your Ravelry queue: 
***
I saw an intriguing knitwear idea on Pinterest a few weeks ago, and had one of those ‘I could make that’ moments. Here are some examples I found on Etsy (the first picture is the one I first found – uncredited – on Pinterest, and used my Google Search by Image trick to track down):
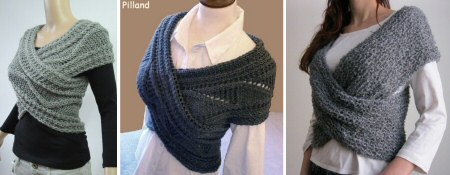
Photo (and inspiration) credit L-R: Max & Melody, Pilland, Rumina
I just wanted to test the basic concept to see how it worked – it’s essentially just a scarf turned into a sweater by wrapping and stitching it together. It’s very simple, so while I won’t be creating a full pattern, I’ll share the basic method (below), in case you’d like to make one too! I crocheted mine, but you could easily knit one if you prefer.
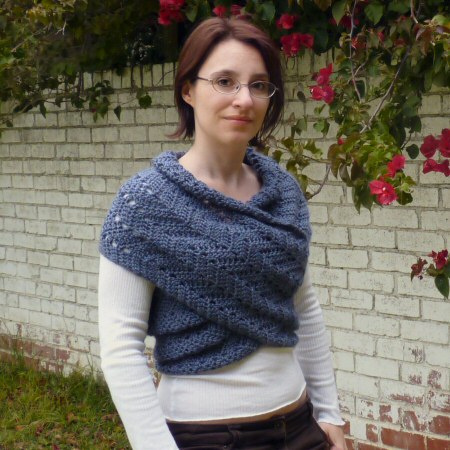
My version is very simple – I just crocheted a long rectangle like a scarf, wrapped it around myself, seamed the two short edges, and seamed across the back. I used worsted weight yarn for speed and crocheted a basic eyelet ripple to add a subtle chevron pattern. I also made it a bit wider than knitted ones, as an experiment to see if that would make it more snuggly.
Update: I’ve published free instructions for my eyelet ripple stitch pattern, in case you’d like to use it to make your own Scarf Sweater, or to make a scarf or ripple blanket 🙂

I think it’s pretty cute, although a little chunky on my short figure. The nature of the design makes it a bit of a challenge to get into, and the shoulders are a bit constrictive – I won’t be raising my arms above my head while wearing this! But the best thing about it is that wearing it feels like a warm, soft hug; despite having no sleeves, it’s really warm and cosy.
If I planned to take this further, I’d refine the concept to make a more elegant, less bulky version. But I think this is the end of the line for my experiment – it was fun, it worked, my curiosity is satisfied, and I have a new handmade garment to keep me warm.
If you want to try making one of your own, here’s a mini tutorial to get you started. You can knit or crochet this, in any stitch pattern you like – all you’re doing is making a long narrow rectangle, just like a scarf:
Basic Scarf Sweater Instructions
- Measure your back from where you want the bottom of the sweater to sit, up to your neckline (add an inch or two if you want to make a little fold-over collar like mine has or keep it shorter to be more fitted). Divide by two to get your width measurement.
- Pick a stitch pattern and start crocheting (or knitting) a rectangle with the width you determined in Step 1.
- You’ll be making a very long rectangular scarf, but the length depends very much on your figure! The easiest way to figure out how long you need it is to wrap it around yourself: it should go across the back of your shoulders, cross over down your front, around your back above the waist, and cross over again up your front to meet the starting edge. It’d be easiest to get someone else to arrange it on you and make sure the two wraps meet across the middle of your back, or you can do it yourself in front of a mirror and expect to wriggle a lot to get it into position (guess which I did!)
- When it’s long enough, pin the two short ends together while it’s on your body, then seam together (or make a double twist and then seam the two short ends together).
- Arrange it nicely with the seam in an inconspicuous place – mine lies on the lower wrap so it’s hidden. Ask your helper to pin the top and bottom wraps together across your back (or figure out where to stitch by yourself – it’s possible; I managed!), then seam them across the back, stopping just before each underarm.
Update: It just occurred to me that although you can use any yarn (and a suitably sized hook), it may be helpful for you to know the details of what I used for mine, as a starting point for yours: I used an H (5mm) hook and worsted weight yarn (Bernat Satin, in Denim Mist Heather). I used 2.7 skeins and I wear a size XS-S top.
This is probably the simplest ‘pattern’ there could be for making a sort of sweater, don’t you think?
I hope you enjoy this pattern. Please leave me a comment below if you do, and consider leaving me a donation. Thanks!


Erica Van Der Heyden said
Hi June, thank you for sharing this beautiful shrug. I have just come across this pattern, so very pretty & versatile for early Autumm/spring. I would like to donate for a PDF version. Kindly inform me of an approximate donation.
Many thanks & much appreciated. Eager to get started.
Kind regards
Erica (Australia)
June said
Thank you, Erica! You’re welcome to donate however much the pattern is worth to you. The average donation amount is around $3-$5, but I appreciate your support at any level 🙂
Mary said
Maybe it can be worn with the seam on the side, under the arm?
June said
Yes, you can arrange it however you want once you’ve seamed the short ends together (Step 5, above)! I found that having the seam at the front, on the lower wrap, means it’s completely hidden, but you can decide what looks best before you stitch the cross-back seam.
Summer said
I’d like to try this with one more wrap to go across the belly, covering that wedge opening. Thoughts?
June said
I don’t know if/how that would work – although I’m sure you could make it, I’m not sure you’d be able to get it on and off once it’s stitched together! My suggestion would be to safety pin a couple of wide scarves together, end to end, and wrap them around yourself loosely to see if you can find a configuration that does what you want it to. Pin it into place and then see if you can remove it without undoing the safety pins…
Summer said
Great idea! I’ve been looking for a novel sweater idea, something cozy and a little quirky. This may just be the one!
Ally said
What a great idea! Thanks for sharing this. I’m going to try this on my knitting board while I give my crochet-tired hands a rest.
Holly said
This is a fabulous pattern! I have finished the sweater itself but was wondering about the collar. I have looked but didn’t see the part to explain the collar. Can you provide some information about this? Thank you so much!
June said
There is no separate collar, Holly – if you’ve made the sweater deep enough (so it’s wider than the height between your underarm and neck), the excess fabric in the top half will naturally curl back when you put it on to form a collar.
Liz Witcher said
Can I buy one already made? I don’t knit or crochet but this scarf sweater would be perfect to go over a dress I want to wear on a trip to Australia I’m taking in novemver
June said
I’m afraid not, Liz – I’m just a designer, I don’t have the time to make and sell crocheted pieces. Sorry I can’t help!
Barbara said
This is awesome but being someone that is not allowed to purchase or donate money for a pattern it was sad to see that I couldn’t receive the whole pattern.
June said
I think you’ve misunderstood, Barbara – the stitch pattern (link at top of post) and instructions (printed in the post above) are still available for free, whether or not you choose to donate 🙂
Carollyn said
Hello,
Actually this is a very very old design.
You will see it worn by women in Amana, Dunkerd, and some Amish communities today. It was worn by early American pioneer women around cooking fires- they tied their shawl ends behind their backs to keep from setting themselves on fire. Also to be able to keep nursing their tucked-in babies while doing their other chores.
Not to be negative in ANY way toward your fabulous design, but these attractive and useful ideas keep repeating themselves throughout history. It keeps you warm, stays out of the way,acts like a pocket or purse and looks lovely. What more can you ask?
Ickle Trixter said
I am halfway through making mine. I’m new to crocheting but find your blog so incredibly useful and informative. You have literally taught me how to crochet 😉
Thank you so much and keep up the great work xx
Carol said
Hi you say to measure from where you want the bottom to sit to your neckline but surely that will make it too wide to wrap around and the photos only appear to be up to under your arms , I measured from my waist to my neck which is approx 45 cm but it looks too wide compared to the pictures, any help would be gratefully received :0))
June said
Keep reading, Carol! “Divide by two to get your width measurement.” – that should solve your problem 🙂
K said
What an amazing idea! I am definitely making this for my sister.. and we’re the same size so no guessing if it will fit or not!! Thanks a bunch!! 🙂
aisha said
perfct!!!!!!!!!!!!
Lynne said
I forgot to check to be notified of follow up comments via email. If you do respond, would you do so thru this comment? Thanks
Lynne said
Wow! Great idea. Thanks for sharing it. I was making a shrug. It was slow going and I was concerned with how it would look on me. Your idea will definitely look better.
Kelly said
I also saw that one in the middle on pinterest and fell in love – but since I don’t know how to knit, and didn’t get the construction I didn’t persue it. Your explanation is so simple! Had kind of a “duh” moment. Plus I CAN crochet, so you gave me inspiration! Thank you so much!
Sharon said
It appears that there is a donation required in order to receive this pattern. It is advertised as a Free Pattern. Please let me know if there are further download directions required.
June said
Sharon, you can see the Basic Scarf Sweater Instructions (the numbered list) in the post above, and the Eyelet Ripple stitch pattern in the following post. The printable PDF is available as a thank you for your donation (it includes both of these in an easy-to-print format, plus bonus assembly photos and instructions on how to wear it), but there’s no obligation to donate – as with all my donationware patterns, the basic instructions are free on the blog.
Yasmin Langley said
This is so lovely!!! I’ve been wondering for ages what to make out of some Sirdar Snowflake that i had!! Currently half way through this jumper for my 3yr old daughter, although not doing the ripple stitch as it probably wouldn’t show through the snowflake!! Hoping this turns out good when i’m done, and may even attempt to add some sleeves too!!
Cheers for the pattern and ideas!!!
June said
Ooh, please show me when you’ve made one, especially if you try the sleeves idea! I think you’d need to make the tops of the sleeves a funny shape to fit, or crochet some triangles separately to fill the gaps, but it should be possible…
Jeanland said
I’d love to know if you ever made this with sleeves. I am making this now and thinking of adding sleeves.
June said
I haven’t tried it, but there’s no reason why you shouldn’t!
Melissa said
Is there a mathematical equation to figure how long to make the “scarf”, like compared to bust size? Is it double? It just seems like it would be too difficult to measure by wrapping.
June said
Melissa, the length depends on many factors, not just bust size: your shoulder width and ribcage size also play a big part in the length you’ll need. A length that fits a 36″ bust on a woman with a small frame may only fit a 32″ bust on a woman with a larger frame.
There are other factors too: the width of the scarf you make, the vertical stretch of the stitch pattern you use, and the amount of ease you’d like, all play a part. So even if there was a formula, it would only be a very rough starting point, and I’d still recommend you check the length by wrapping it around yourself before seaming it together!
My PDF version includes specific details about the size of the one I made, to give you a baseline to work from.
CARMEN TRONCOSO SANCHEZ said
me encantaron tus diseños ojala y sigas compartiendolos saludos
Casey said
thanks for posting how to do this! I’ve been eyeing up a knit one like this but just don’t feel like I could spend $80+ on it, now I’m going to attempt to make myself one 🙂
Angel said
I am so making a crocheted hug.
This gives me an excuse to buy more yarn, and we all know crocheters always need an excuse to buy more yarn. 😉
Thanks for the idea!
June said
I think you’re wrong there, Angel: in my experience crocheters need no excuse to buy more yarn 😉
…or is that just me?!
Natasja said
This is genius! Thanks for sharing!
Carol Wolf said
I just love this! You are so clever! I recently bought some Caron Spa yarn and instead of making the vest I had planned, I think I’ll try your idea. Thanks for posting it!
arbitrarily said
That looks like a great easy project. And it looks like it would make a great jumper to use when breastfeeding. I might give it a go, but try and remember how to knit rather than crochet (I haven’t tried since I was a teenager) to try to make something with more stretch. Also, perhaps reducing the amount it is sewn together across the back (like in the Rumina pictures on Etsy) would make it a bit more comfortable and less tight across the shoulders.
June said
Ah, maybe I was a little misleading in my description: it’s very comfortable and not tight across the shoulders at all. You can see from the front picture how much slack there is – it’s not pulled tightly.
The only reason I won’t raise my arms above my head while wearing it is that it wouldn’t fall back down into place afterwards – the ‘shoulders’ would stay around my neck (like a cowl) and I’d have to rearrange it back into the sweater shape. I think that would apply to any version of this sweater – whether knitted instead, or sewn less across the back, but I’d be happy to be proved wrong if you make one!
Marie/Underground Crafter said
Looks fun and fast – a perfect holiday gift, perhaps?
June said
A good gift, if you can figure out the appropriate size for the recipient: I think it’s very dependent on the amount of stretch in your stitch pattern (a knitted one, or one worked lengthwise instead of widthwise, would have a lot more stretch and is probably more forgiving if you’re not exactly precise with the size) so I don’t think this would make a good surprise gift as you’d probably be safest trying it on the recipient as you go, to get the length right.
MichelleinWI said
SO Pretty!! I jsut saw a knit one in a magazine but since I only crochet I put it on my todo when I learn to knit list. Can you give me a brief idea of the stitch pattern? I checked eyelet ripple on ravelry but didn’t find anything that looked like it would work.
June said
I may have invented the name eyelet ripple – sorry if that confused you! I just meant a ripple with holes as opposed to a solid one. Stitch pattern tutorial to follow 🙂
A Gamer's Wife said
How cool! I don’t think it looks bulky on you at all. Very unusual and eye-catching.
Dee said
I love this idea! It looks so cozy and warm! If the back is left unsewn, then couldn’t it be a wrap-around the shoulders sweater hug OR a scarf, just wrap it around the neck again? Might be a bit bulky, but better to be bulky than cold!!
arbitrarily said
Good idea. Perhaps some buttons across the back would help to stop it being draughty when in jumper/sweater mode, and still allow it to be converted to a scarf. Although perhaps they would be too hard to do up at the back?
June said
@Dee: I found that the stitching across the back is necessary, otherwise the top wrap rides up to the tops of your shoulders when you move your arms around and you end up with a big gap across your back, which isn’t great for keeping you warm.
You can wear it as a cowl, even with the stitching across the back, although mine is far too bulky (for my taste) to wear like that 🙂
@arbitrarily: The buttons are a good idea, actually – I think you’d just have to button it before you try to put it on!
Dot Folwell said
Lovely, June! Yet another success!
Lindy said
Your scarf sweater looks really cosy and very attractive!
Hugs, Lindy xx
Beth @ Remarkably Domestic said
This looks amazing! A great idea for an alternative to a cardigan. And I love that it’s easy; I’m still a newbie when it comes to clothing.
alycia said
wow that is beautiful! i love it! certainly looks snuggly 🙂