Yesterday on Twitter I let slip that I had just turned in the manuscript for my new book! I’m so excited – I’ve been wanting to write this book for a long time and I’ve finally had the chance. I’ll share details of the book itself closer to publication – there’s still a long process of editing and printing to go through before it’ll hit the shelves.
This is the big secret project I’ve been alluding to for months, and the reason why I haven’t been blogging as much as I’d like to for a long time – so now I have some catching up to do! I’ve been making lists of things I’d like to do ‘when I finish the book’ – new patterns, new products for the shop, and a lot of improvements I’d like to make to the website. And my craft room/office is in serious need of organisation…
As I’m the photographer as well as the author of my book, I had to develop some novel methods for taking print-quality photos with only two hands at my disposal! I thought I’d share the method I came up with for taking step-by-step photos that include my hands – you’ll see the benefit of this when I next make a tutorial, as the pictures should be much improved with this new setup.
(By the way, in case you’re wondering how I took this shot of myself at work, I used a 2nd camera on a 2nd tripod with a 10-second self-timer!)
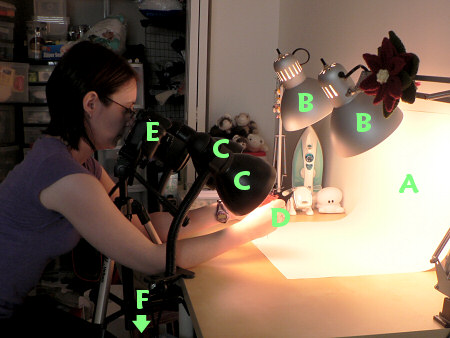
A: White bristol board used as a seamless backdrop
B: 2 very bright lamps aimed at the backdrop to make it as white as possible in the photos
C: 2 less bright lamps aimed at my hands (one on each side of the camera) to light them without shadows
D: This is where the camera is pointing – at my hands
E: My DSLR camera on a tripod, angled so that I can comfortably look through the viewfinder as I sit
F: (Out of shot) Remote detonator control for my camera so that I can operate it with my toe when I have the perfect shot set up
I bought the remote control on eBay and it’s literally changed my photo-taking life. I’ve always had to take my tutorial photos by setting up the shot, moving my right hand to press the shutter release while keeping my left hand hand still, then scrambling to get my right hand back into position before the 10-second timer ran down and the picture was taken… Now I can just press the remote button with my toe (minimal dexterity required) at the appropriate time and I don’t need to use the camera’s timer at all. Huge, huge improvement.
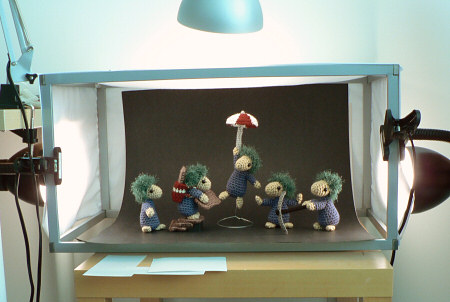
Of course, this isn’t the only way, or even the best way, to light for this kind of photography, but it works for me and only cost me 2 cheap IKEA work lamps, 2 clip-on spotlights, and a sheet of bristol board, all of which I already had from my light box (shown below, click through if you’d like details of that too):
So, when you see the clear and helpful pictures in my new book, you’ll know exactly how I managed to take them – I hope this hasn’t ruined the magic! But seriously, if you make tutorials, I hope this little glimpse into my lighting setup has been helpful 🙂


Marianne said
Hi, I was just wondering what lens you are using? – So that you can get enough of the scene in without feeling you are too close and have to stretch your arms away. I do a similar thing with a 60mm macro and I struggle a bit with my hands being too close!
Thanks very much,
Marianne
June said
Back then I would have been using the 18-70mm stock lens that came with my camera, which worked, but wasn’t ideal. These days I usually use a 30mm macro lens (caveat: I’m not a camera expert and don’t know if this is the best option out there, but it works well for me).
Lauren said
Hi! I just wanted to say thank you for sharing this, I have just recently started a blog, and part of what i do is dyeing fabrics, so stopping to snap photos is not always easy. This has given me a few ideas of how I could make dyeing tutorials easier.
Happysuz said
Thank you, thank you for posting this! I am a newish blogger and have been having a hard time getting good shots of my tutorial steps. This helps a lot!
Myko said
This was very helpful! Thank you so much for sharing it! Your little frogs are super cute and adorable!:)
Jennifer said
Wow! Thanks for sharing. I’ve never seen a small personal personal studio like that before. No wonder your photos are amazing.
Donna said
You are not only creative with crafts, but even photography too?! Wow, its like what don’t you know?!?! What am amazing woman!
Anna said
Thanks for this post! I would never have thought using my toe for the remote. *L* Mind you, the remote on my camera only works from directly in front. My husband’s newer camera has a cable trigger I could probably operate with my feet. hmmm. I wonder if he’d mind? *L*
I need to invest in good lighting. And white balance is my photographic nemesis. *L*
Susan being Snippy said
thanks for this discussion! I like to put a few nice pics on my blog now and then and the other day a simple picture of a pop bottle ended with an all day argument with the ?better? – half! Hoping that some of these hints will at least eliminate the grumpys for the rest of the day!
Jana said
Awesome, as usual! What is the set up for the bottom picture? I didn’t see all that stuff in the top one.
June said
Jana: sorry for any confusion – the bottom pic shows my same lights set up differently to make my light box (I’ll add the link to the post too 🙂 )
Kelly said
Excellent! Love the toe remote. I am struggling to find the right bulbs for my lamps. What are you using? ~Kelly
June said
Kelly: I’ve found that the most important thing with lighting is to use the same bulbs in all your lights. That way, you can use any bulbs and, once you’ve set the white balance, the photos will look naturally lighted. Okay, the most important thing is to set your white balance – I just use a piece of white card propped in front of the thing I’m trying to photograph.
Specifically, I use GE Reveal ‘daylight’ bulbs; 60W in the foreground lights and 100W in the background lights. I still need to set the white balance on the camera though – the photos come out looking orange otherwise. The ‘natural’ lightbulbs look white to the eye, but not to the camera!
Miriam said
Congratulations on the book!
Re photography: if it works, that’s really what’s important, and your pictures always come out well, so …
Lindy said
What a great photo studio! Brilliant! I look forward to seeing more photos.
becky brockman said
Oh wow, that makes me want to take awesome pictures… that is quite a set up there.