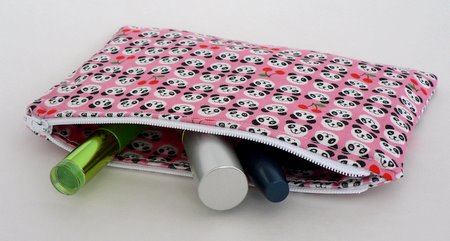
While I was in the UK, my sister handed me a piece of fabric (a gift from Jodi) and asked me to make it into something for her. We decided a makeup bag would be a good choice for the cute fabric, and I had the brainwave of adding a layer of clear vinyl over the lining, to protect the lining fabric from getting makeup smudges all over it.
I used splityarn’s zippered wristlet tutorial because it’s worked out for me before, but I skipped the wrist strap and layered a piece of thin clear vinyl over the right side of each lining piece before assembling the bag.
It was… not easy. The vinyl wanted to stick to the base plate of the sewing machine, and kept moving with respect to the lining fabric. It was really tricky to keep all the layers in position to sew the bag together. About halfway through, I realised that sewing the vinyl to each lining piece (around the edges within the seam allowance) before I started would have kept the pieces together – isn’t hindsight great?!
But I struggled on, and eventually finished the panda bag. And now I see that the vinyl lining, because it is clear, doesn’t show up at all on any of my photos! But trust me, it is there, and the panda faces on the inside will be protected 🙂
And then – the very same day – I saw Jessica’s post about iron-on vinyl. It would have been perfect for my project, had I only known it existed a day earlier… So, if you decide to make a clear vinyl-lined bag, I recommend you try the iron-on vinyl, if you can find it, and make your life easier!
Dawn: hope this is what you had in mind! I’ll send it to you soon xx


Candice said
I took a little bit of my machine oil and put a little on my finger and ran it on the vinyl where I was going to sew it works great while oiling the machine lol.
Alison Campbell said
Hi June!
What a beautiful Blog!
I really like your arts and crafts!
Please take care!
Alison
val said
very cute. I also read to use tissue under the plastic to keep it from sticking….never tried it….just read about it on a tutorial for covered coasters.
Jodi said
Yay! I knew you’d do a much better job making something with it than I could 😉
msnotty said
It looks cute! The panda design makes it nice!
caro said
That fabric is all kinds of awesome.
Another trick for sewing with vinyl is to put painters tape on the bottom of the sewing foot and anywhere else that the vinyl sticks. Works like a charm and doesn’t leave any residue behind.
Rebekah said
I just found your blog! Love it! You are so creative! Cant wait to catch up on reading your blog! Keep up the good work!
futuregirl said
Too cute! I made a vinyl dress back in the day and to keep the vinyl from sticking to the face plate, I covered the face plate with a piece of tape. It totally worked and it comes off easily when you’re done. 🙂
Josefin said
It looks really nice!
I have a tip if you are going to sew on more vinyl, that arent the iron-on. Use some freezer tape. And tape the pieces that are going to have seams (just where the seams are gonna be are fine), then it will be more friendly and move along when you sew. 🙂
Jana said
Nice! I will have to look for that iron on vinyl when I go home in August! Surely they would have it in Atlanta, GA! 🙂 I wonder if you could iron it directly onto a crochet piece? That would be a great and easy way to line a crocheted purse!
I just finished the head and body of my fuzzy rat! I think I told you that I got Paton’s Divine for it? Anyway, I thought I would go crazy working with it at first! I COULDN’T for the life of me find the BACK loops! So I ended up going through BOTH loops for the first 6 rows or so, and then MIRACLE I managed to SEE the back loops and stuck with them from there! Amazing! I couldn’t believe I was actually crocheting with that stuff! But FUN! Yesterday I finally got the 3 balls of Lion Tiffany in Camel that I ordered! Have you ever see it? Sooo soft! After the Paton’s, it should be a breeze to work with!
dawn said
Yay!!!!! Thank you! 😀 XxxxxxX