haramaki (tummy warmer) tutorial
I saw this post on Craftzine yesterday about the new Japanese fashion of wearing colourful haramaki aka ‘belly warmers’. I think this is the best idea I’ve seen in a long time! Ever since the advent of low-rise jeans, women have been stuck with a little cold gap between the bottom of our shirts and the top of our jeans. This is a cool way to cover that gap, and why import one from Japan when we can all make our own?
I whipped this one up this morning as a prototype, so I left it plain, but just imagine how amazing it could look if you freezer paper stencilled a funky design on the fabric before sewing it…

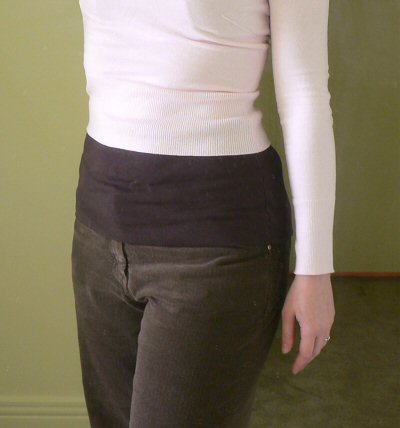
When it was finished, I tried it on and was surprised by how warm I felt – it really does work, even when it’s just made from 2 layers of t-shirt fabric.
To make your own haramaki:
You can use any fabric with some stretch, so you can pull your haramaki on and off. I used a knit jersey (i.e. t-shirt fabric).
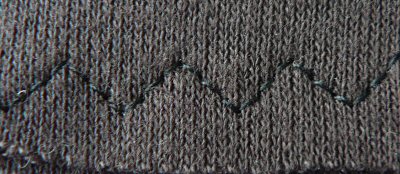
You will also need a sewing machine with a stretch stitch (pictured below).

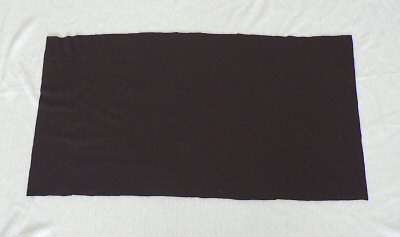
- Work out the dimensions you need. The height is up to you – I decided to go for an 8″ tall haramaki but you could make it longer if you want. The length of the haramaki depends on the size of your tummy..! Of course it would be easier to estimate for a skinny straight up-and-down Japanese model than for a regular curvy lady. I decided to make mine 30″ around (without giving too much away, that’s halfway between the measurements for my waist and my hips). If you want to wear it high up, make it a bit shorter than your halfway measurement, and if you want it to cover your hips, you may need to make it a little longer, depending on how stretchy your fabric is.
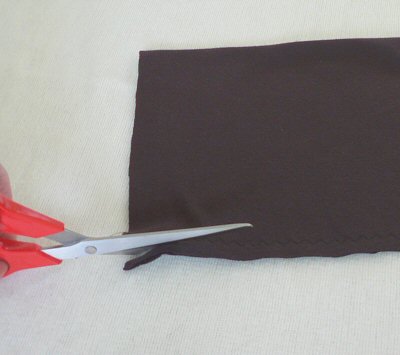
To get the fabric dimensions, the length is 1″ over the length you decided (mine is 30″ + 1″ = 31″) and the width is double the height plus 1″ (mine is 2×8″ + 1″ = 17″). Cut your fabric to these dimensions and lay out as shown (right side up):

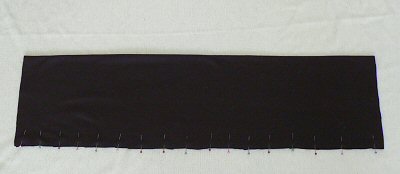
- Fold your fabric in half so the top meets the bottom, as shown below:

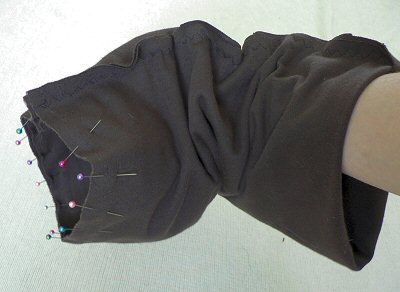
- Pin the 2 long sides together, all the way along. It’s better to space the pins more closely than you normally would, as the stretch fabric can get out of alignment more easily than a regular fabric:

- Sew along the line you’ve pinned. You have 1/2″ seam allowance, but that 1/2″ includes the full width of the zig-zag stitch, so you may need to practice on scrap fabric first to see which guide line to follow on your sewing machine. Trim the extra seam allowance after sewing:

- You have just made a long tube. Stick your arm through the tube and grab onto the far edge of the tube:

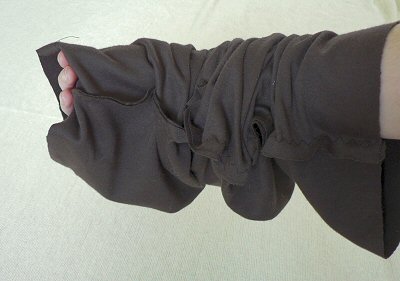
- Pull your arm back out of the tube, bringing that far edge of the tube back through the middle of the tube. Stop when the raw edges meet up, and align the edges:

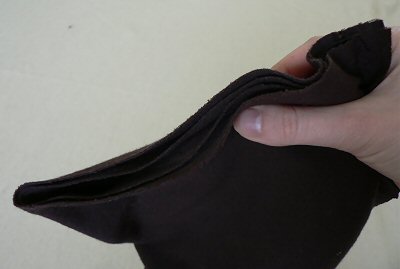
- Pin the inner and outer layers together, all around the raw edge:

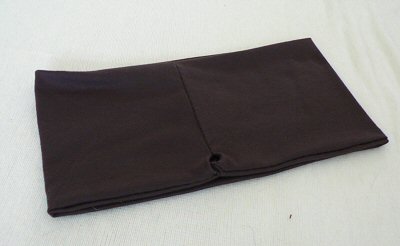
- To clarify, you should now have a tube that is half as long as before, made from 2 thicknesses of fabric. The pins should not close off the end of the tube:

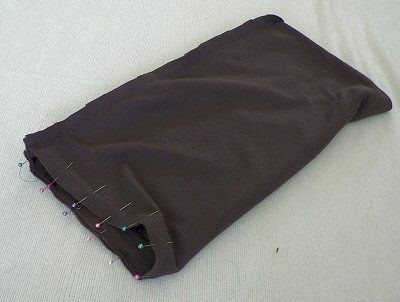
- Sew around the pinned edge (again, 1/2″ seam allowance), leaving a gap of about 3″. Turn the harimaki right side out through this gap:

- Fold the edges of the gap under, and hand-sew the opening shut. That’s it! All finished!

I’ve been wearing mine all day and it’s warm and comfy and like having a hug all day long ![]()
Please leave me a comment if you like this idea or if you make one!
RSS
Twitter
Facebook
YouTube
Ravelry: June
Flickr


Hi, I'm 
Allison Said,
March 22, 2007 @ 10:44 am
Love it! No more ‘muffin top’!
Christine Said,
March 22, 2007 @ 10:50 am
Very clever, going to the top of my “must make” list!
Sharakh Said,
March 22, 2007 @ 11:10 am
Fabulous! I was planning to try a version myself this weekend, but you’ve already done the hard thinky bits for me. Thank you!
lisa Said,
March 22, 2007 @ 11:41 am
i’ve been planning to knit some–amazed that it’s taken us all this long to figure this out, for just the reason you said: i hate that cold part between my jeans and my shirts! thanks for the tute!
Katrina Said,
March 22, 2007 @ 12:58 pm
Wow, thank you so much for this! I’m definitely going to have to try to make one. Ever since I saw that post I’ve been trying to figure out how to go about making one myself too. =D
The Point NYC - Home Said,
March 23, 2007 @ 2:54 am
[...] Japanese Belly Warmer – Haramaki Tutorial June at PlanetJune got inspired from my post about the Japanese belly warmers and decided to make her own. Using t-shirt fabric June made her haramki and has posted this great tutorial to share. Thanks June, it looks fantastic! Link. [...]
Søren Said,
March 23, 2007 @ 10:32 am
I’m so excited to make these! I’ve been wearing super long men’s undershirts to cover that gap, but they’re always white and a lot of the time the straps stick out the top and annoy me – this is so cool! Thanks!
gizmogal Said,
March 24, 2007 @ 12:36 pm
finally! i’ve been looking for how to make one, since getting a real one seems near impossible in the US. D’:
thanks so much!
katrin Said,
March 25, 2007 @ 4:55 pm
Yes, they’re so nice and cozy!
The hubby wears a similar one when he’s out in the woods and I have one for skiiing, but I didn’t recognize how stylish and “fashionista-like” those can be – Thanks for bringing this up!
blufaerie Said,
March 29, 2007 @ 11:30 am
This is such a fantastic idea. I never liked low rise jeans for just that reason. Now I can wear them. And also, I can let my daughter wear them without worrying about her showing too much, lol.
Jess Said,
April 2, 2007 @ 3:51 pm
Hi! Thanks so much for this! Here in New Zealand they have been popular for the last few years. I have objected to the $20 (!!!) price tag!!! The other benefit is, you don’t get a peek at your *builder’s crack* every time you bend down!
Haramaki! « lifelab Said,
April 4, 2007 @ 10:34 pm
[...] looks pretty simple, but here’s a tutorial that seems easy to follow. Posted by lifelab Filed in [...]
Tinkergirl Said,
April 11, 2007 @ 4:08 pm
I just finished making mine – however I needed to put a bit of an angle on it, or it gaped pretty badly at the waist. Could be the fabric I chose wasn’t as stretchy as yours though. Thanks for posting the tutorial though – I’ll be making loads more!
June Said,
April 11, 2007 @ 4:22 pm
Tinkergirl, yes, my fabric was fairly stretchy. I wrapped it around my waist after step 4 (remember: 1/2 inch of seam allowance at each end, so there should be 1 inch of overlap when you wrap it around yourself) and then figured out if my tube was the right size. It looked like it may be a bit big around the waist, so I trimmed the length down a bit at that point.
If you have a big difference between your waist and hip measurements, your haramaki could benefit from being sewn up at an angle (in step 9) so it’s smaller at the top than at the bottom. I just wanted to keep the tutorial simple! There’s plenty of room for customization to make it fit your own body and style
Tinkergirl Said,
April 11, 2007 @ 5:08 pm
I did the angle thing at step 9, just as you thought. Took about an inch in at the ‘top’ of the seam, which worked out as 2″ shorter when unfolded, but I still could have done with a bit more. Still – if it hand’t been for you posting this, I’d never have tried it, and if I’d tried to buy one, there’s no way it would have fitted! Thank you so much.
Le Borse di Gaya » Tutorials Said,
April 15, 2007 @ 9:16 am
[...] copri pancino (l’età avanza e medito di farmene uno per il prossimo [...]
Amanda Said,
May 4, 2007 @ 10:24 am
Great idea! I actually wore something similar when pregnant this past time (had a baby in Feb.) to help hold up pants and fill in for too short shirts. I have still been wearing it to hide that plumber’s crack. Nice to see a tutorial for them!
Miss "B" Said,
July 2, 2007 @ 10:47 am
Greetings’
Thanks so much for that great tute! I only discovered the Tummy Warmer yesterday and went to sleep thinking about having one to sleep in, one to exercise in, and a few to wear just anytime. I work with little children and now I won’t have to keep pulling on my t-shirt everytime I bend down or get on the floor with them. Thanks again for making my goal much easier.
PEACE!
Ellen Said,
July 23, 2007 @ 4:50 am
Super idea.
Harrison Said,
October 1, 2007 @ 7:43 pm
Haramaki’s have been around for a long time. If you really want to see great designs then you should look at the early 1920-70′s japanese movies. Those guys really look tough in their school black pants and kick @$$ Haramaki. But for real convience some of them even sported a pocket so such things as combs could be put in to keep the every fashionable hair-do in check.
Michelle taylor Said,
October 15, 2007 @ 1:01 pm
Hello! I was wondering if I could use this tutorial on my website? I’d be more than happy to credit you in whatever way you desire, to whatever page you wish me to.
I have a fansite devoted to someone that wears a haramaki and I’d be very grateful if you would allow us to use your lovely tutorial so that more fans that want to make this piece of clothing can find it. It’s the best one I’ve come across so far!
And also, thank you for posting it on the internet :3
Dana Said,
October 24, 2007 @ 9:55 am
Hi, the big trend in maternity clothes right now is “belly bands” it’s exactly what you have made. Just wondering if you have any suggestions to make one that would fit an “expanding” tummy?
Here’s a website with them selling for $30….come on, I should be able to make one and that’s what I’m hoping to do. Yours is the only pattern I’ve found so far.
Any tips/advice?
http://www.cheekymonkey.ca/BellyBands.htm
June Said,
October 24, 2007 @ 3:53 pm
Dana, I think the method would be the same – you’d obviously have to make the size a little larger to accommodate your bump! A finished height of 8 inches would clearly not be enough coverage – I would advise at least 12″ or more to cover the tummy comfortably.
Try wrapping the fabric around your middle and see where it feels comfortable – it needs to be stretched a little when you wear it so it will stay up, but you also want to make it large enough to still fit you as you continue to expand! I see that website sells 2 sizes – I think you would probably need 2 or 3 homemade sizes to fit through your entire pregnancy.
Also, remember to pick a fabric with stretch! If the fabric only stretches in one direction, make sure that’s the direction that goes around the belly (the “length” of your belly band), not the height.
Hope this helps! I’d love to see the finished result
(PS – I’ve just realised, I am assuming you are the expectant mother here – sorry if this is for a friend and I’ve referred to “your” tummy all the way through!)
Frankie Said,
October 29, 2007 @ 5:29 am
Oh, you really are the greatest. Thanx a million.
margie Said,
November 1, 2007 @ 3:17 am
Thanks for all the great ideas on tummy wraps. I’m wondering if anyone has any ideas/info about a wrap for the lower back/kidney area? I would like to make some warm wooly ones, either knitted, felted, or some combination of mediums and fibres. I am a fibre artist, and I am always cold in the winter. I find wearing an undershirt all the times helps tremendously, but sometimes I would like just a little more insulation in the lower back/kidney area. I would like to make some for myself, and possibly for sale.
Thanks for the forum!
Amber Said,
November 4, 2007 @ 3:51 am
I wear JUST the band and I get comments ALL THE TIME! Thank you for an amazing tutorial
Stephanie Said,
December 8, 2007 @ 2:24 am
This is fantastic! I’ve already made myself two and am making one for my daughter.. (she’s long waisted and has trouble finding shirts long enough to cover.. ) Thank you for posting this!
Cassandra Said,
December 10, 2007 @ 5:10 pm
I absolutely adore this idea! I’ll be making some very soon.
Andrea Said,
December 13, 2007 @ 10:30 am
This is a great idea! My shirts are never long enough to cover all I’d like, especially in the winter. I will definately be making some of these for myself.
Lori Said,
January 23, 2008 @ 1:22 pm
Thanks for the great directions!! I just finished making my first one and I can’t wait to do more!! I think I will do the angel next time though.
May I ask what type of thread you used? I just used regular and I could hear stitches popping when I stretched it.
Thanks again!!
Lori
June Said,
January 23, 2008 @ 1:51 pm
Lori, I use regular (polyester) thread. The key is in the stitch you use to sew it – if your sewing machine has a stretch stitch, you can use that, otherwise you can use a medium zig zag stitch. Close together, long zig-zag stitches will give the most stretch.
bloggy day isn’t it? » Blog Archive » haramaki, swapmeets, and suju Said,
March 18, 2008 @ 8:19 pm
[...] for a pattern or tutorial for a year now and i found 3 great sites: great info very easy tutorial a bit harder, but more sophisticated. i’m knitting one right now. i’ll post pics sooon. [...]
Jen Said,
May 6, 2008 @ 3:23 am
Thank you for this great tutorial! I too was searching for a pattern to make a maternity “belly band.” For $7 worth of fabric, I made something that seems to be just as functional as the ones you can buy for $20 or more! I’ve been wearing it around the house with my regular jeans, unbuttoned and unzipped, and it’s holding them up very comfortably!
Thank you for sharing!!
Tamara Watson Said,
May 21, 2008 @ 11:56 am
Thanks for the tutorial. I’ve got a maternity “belly band” that I still wear everyday because it is so comfy and its great for nursing (it hides my less than stellar belly when I pull up my shirt to nurse). I would love to have more, I can’t wait to try making my own!
Haramaki - šiltas pilvas « Geros nuotaikos užrašai Said,
August 31, 2008 @ 8:00 am
[...] kaip pasigaminti haramaki galima rasti ?ia. Ta?iau aš sav?j? gaminau iš viengubo, o ne iš dvigubo trikotažo sluoksnio, tod?l viskas [...]
Miriam Said,
September 28, 2008 @ 10:57 pm
Hi! Just a quick tip – I made maternity bands out of this as well, but I just used cotton ribbing – it comes in a tube already and if you are skinny-ish you don’ have to fuss with it – I wear a size 14 and I used these for my entire pregnancy! It is a great tutorial and a wonderful idea.. I’d lvoe to see some pictures of a detailed/designed one!
Molly Said,
October 4, 2008 @ 1:55 am
Hi! Like a lot of the other commenters, I wore a band like this during the early part of my pregnancy. I could only afford to buy one, though, because they were so pricy! Most of the time I didn’t like how it stuck out of the bottom of my shirt with such contrast (it was white). Maybe if I think of it as an under shirt sticking out it won’t bother me so much? I would love to see some more pictures as well. The one you made looks great! Thanks!
Susan Said,
October 13, 2008 @ 3:12 pm
I loved these for maternity….but Lord, I am so very tired of seeing bellies between the jeans and shirts…either pull up the jeans or pull down the shirts. I have two sons who are the perfect age to ‘appreciate’ this style and they cannot stand it. Both sons love women, but they are quite picky….my oldest daughter has the perfect figure for the low cut and short shirts…but she won’t wear them…
Nessa Said,
November 28, 2008 @ 7:12 pm
Thank you very much for this tutorial! I can’t wait to make some one my own for myself and friends for christmas! I have a Japanese friend who first introduced me to them by showin me hers and asking if we sold anything like this in Canada. I had to tell her that we don’t. But I loved the idea, so I decided to look it up online. I am very happy to have found you simple, yet wonderful tuitorial! I can’t wait to make one or two for her and surprise her on Christmas! Thank you so much!!!
Haramaki in a Winter Wonderland « JPBizDirect’s Blog Said,
December 9, 2008 @ 3:09 pm
[...] In the last year or two, haramaki have cast off unflattering comparisons to “granny panties” and been transformed into a fashionable accessory available in a wide variety of shapes, colors and styles, with or without pockets. My favorite is the tartan with matching blanket, but I may have to settle for making one myself (see how here). [...]
iris mishly Said,
January 27, 2009 @ 11:07 am
Hey this is just what i needed! i bought jeans which are SO LOW in waist and i need something to cover my *behinds* LOL
thanks!!
Iris.
Craft Sewing: Make a Haramaki and Hide that Muffintop – Mai Magazine Said,
March 10, 2009 @ 2:09 am
[...] that layered look with a leg-warmer type garment made out of t-shirt material for your torso. PlanetJune has a great tutorial. Try cutting off the bottom of a different shirt that you might not wear much anymore; follow [...]
April Said,
April 8, 2009 @ 11:07 am
Thank you so much for posting this! I made a maternity belly band last night, before reading your tutorial, but could not figure out the right way to sew so it could be turned right side out again. I was very frustrated, but I found your tutorial, made the correction and it turned out beautifully! Kindest regards, and again, many thanks!!!!
P.S. Ladies, for those of you sewing maternity belly bands, I used a height of 14in. To get the length, measure around the largest part of your belly, then subtract 2-4in depending on how snug you want it! If you are barely showing, or not showing yet, use your hip measurement and then subtract the 2-4in, you’ll grow into it! Happy belly banding!
Sue Said,
May 19, 2009 @ 1:51 pm
Thank you, the tutorial is great! I have made two so far and bought the cloth for a third one
.
carolyn Said,
May 25, 2009 @ 3:28 pm
This is awesome! Those low cut jeans don’t work so well for those of us in the over 35 group. They are comfortable but too revealing. And the high waist jeans are even worse. This is perfect. I can still wear my lower cut jeans, be comfortable, and not look like I’m trying to wear teenage clothes! Genius!
julie Said,
June 10, 2009 @ 8:24 pm
thanks so much, my pregnant sister in law will love me.
i could only find stretch lace and another stretch so i did it in those.
it looks awesome with the deep brown fabric behind the lace, kind of like a corset.very dressy.
thanks ever so much, great pattern.easy to follow.thrilled to bits.
jules from new zealand
vicky Said,
September 17, 2009 @ 10:41 am
Thank you so much – this is just what I needed – I’m going to make a whole wardrobe of these for the next few months
Tara Said,
September 19, 2009 @ 10:15 pm
Thanks!! I am going to make some for my little girl!! I hate how they cut clothes for pre-k girls these days they bend over and u see everything and they make the undies go down too!! This will be awesome and who knows start a trend. I also saw the “garden party” apron for girls too!! Can’t wait to sew!!
Tracey Said,
October 28, 2009 @ 5:18 pm
Thanks for this great tutorial! I used it for my first foray into sewing knits. I had trouble with the edges of the fabric curling up. Final result was slightly wonky and a little too big, but quite serviceable. My belly is warm and I’m inspired to try some more. Next ones will be slightly tighter, slightly taller (longer?). I need to taper mine because my hips are a lot wider than my midriff. I’m a plus-size.
I had the best luck using the overlock stitch setting on my sewing machine – zig zag stitch wasn’t as stretchy. If you have overlock then use that. This would be a great project for learning to use a serger.
haramaki belly warmer « her restless body stirring Said,
December 10, 2009 @ 4:55 pm
[...] they are pretty straightforward, here’s a tutorial from PlanetJune – no need to re-figure measurements if someone has done it [...]
bellywarmerlover Said,
January 30, 2010 @ 4:23 pm
Great tutorial! thank you so much for sharing this, I don’t have a sewing machine, but I have a black tube cotton dress( that I don’t use very often , I am going to try to convert this one into my own haramaky ^_^.
Selina Said,
February 13, 2010 @ 7:41 pm
Wish i’d seen this earlier, i bought two belly bands while pregnant and ended up having to re-sew them on an angle to make them sit right. could’ve saved time and money if i’d thought to make them from scratch.
This is a great idea for pregnancy but will now continue to wear it while nursing, thanks for the tip from Tamara Watson XOXOX
Tim Said,
March 9, 2010 @ 12:44 pm
Very good tutorial thank you!
Bump Bands - Pregnancy - First Trimester Forum Said,
March 19, 2010 @ 2:53 pm
[...] have actually made myself a few – I found the instructions here: http://www.planetjune.com/blog/haram…rmer-tutorial/ and made them because I'm tall so sometimes my tops aren't long enough. I think they are a great [...]
rokuchan Said,
June 11, 2010 @ 2:22 pm
If anybody out there wants to know how to KNIT haramaki, there is this one book, “cables on the go”, that shows a picture of a cabled neck warmer that works perfectly as a haramaki! All you need to do is use larger needles and yarn, and I prommise you it works!! (^_^) Though it only fits those who have about a 30 inch waist, so if you can calculate your patterns and how many stitches you need, then you’ll have to figure that out on your own. BTW, the pattern is near the end of the book, take it out from your library and find out!
Sewing project ideas « Creativity by Lolly Said,
June 18, 2010 @ 10:31 am
[...] PlanetJune by June Gilbank » haramaki (tummy warmer) tutorial [...]
Kirsten Said,
June 18, 2010 @ 10:57 am
Good Day,
I just wanted to let you know that I have linked to this fun tutorial and hope to make myself one really soon as it is winter here in South Africa.
Amy Said,
July 15, 2010 @ 8:22 pm
Thanks! I was looking for a practical pregnancy gift for my sister-in-law, and couldn’t justify the boutique price of a tube of knit fabric. I’ll be making my own now, Thanks!
Christine Said,
September 10, 2010 @ 7:24 pm
I have made this, but with a slight modification – 3 layers thick. Was a bit of fiddling to work out how to do it best, but very warm – currently wearing it. Thanks heaps for the instructions. My mum has also knitted me a couple.
Sandy Said,
September 30, 2010 @ 10:34 pm
Love the tutorial, thankyou! My acupuncturist recommended I use a haramaki as my belly is chilly, common amongst those of us who spend a lot of time sitting in front of a computer – apparently we get blood stagnation in the belly which causes the chilliness, and the harimaki helps to improve the situation (along with chi gong and needles of course)
So I’m off to dig into my fabric stash and make a couple this weekend – so they’re not just for pregnancy
Kristi Said,
October 6, 2010 @ 1:22 pm
I actually use this for my 12 year old daughter!! Alot of the shirts she has are too short for school (usually hit right at her hips) Since she is self conscious about bending over at her locker, I decided to whip up a couple of these in various colors for her to wear under her shirts for the layered look. They have worked FABULOUSLY even in the hot weather! She LOVES them and has asked me to make her several more! Thanks for the tutorial and the idea! Saved me from having to spend alot of money (even at the thrift store) to find school appropriate shirts!
susan Said,
October 8, 2010 @ 9:10 am
Yes I am wearing a Haramaki as I type this. I have made my own from just wrapping a length of stretch material around my abdomon,tucking the ends, then wear a mini skirt over that, very snug. I feel secure and will probably start making one on the sewing machine now that I have seen your excellent intructions, thank you, much appreciated, regards Susan
Haramaki ou, na nossa versão, tapa-cofrinho! | SuperZiper Said,
October 20, 2010 @ 6:01 am
[...] os que preferirem fazer a peça do zero, do molde até a costura, aqui tem um passo-a-passo detalhado (em [...]
Márcia Reis Said,
October 20, 2010 @ 7:51 pm
Amei a ideia!!! Há muito tempo venho enrolando e adiando usar um belo jeans que ganhei, só por causa do maldito cofrinho!.
Staying Warm with Ginger and a Haramaki « Whispering Earth Said,
December 10, 2010 @ 6:42 pm
[...] I got mine from this company here but you can also buy them from these people here. I have recommended them to so many people this winter I am considering ringing up and asking for commission! For those of you with a sewing machine and a bit of free time they are not difficult to make and instructions can be found online here. [...]
William Said,
December 21, 2010 @ 4:17 pm
Wished I’d read this before I started, I worked on one yesterday and thought it was going great, (I have a simple sewing machine but haven’t sewn a project in 20 years) I ended up with a pillow…
(
Tomorrow I’ll start seem ripping and follow directions.
mina Said,
April 1, 2011 @ 8:13 pm
thank you, i have copied your instruction, this will be my project.
Jennifer Said,
May 11, 2011 @ 10:16 am
Thank you! I am always befuddled by the “turn the tube halfway” concept, but it never fails when I follow the directions. My mom suggested the elastic stitch–looks like a fancy fence embroidery– as a stretchier alternative. I tried and almost 8″ difference between the top and bottom measurements: that worked 2 out of 3, but the tops slump down, so their either aren’t tight enough or I was making them too tall.
June Said,
May 12, 2011 @ 2:03 pm
I made a “haramaki version 2.0″ where I tapered the top half at each side before stitching up the tube, to make the waist narrower. I think it’s a better solution for curvier ladies (with a large difference between waist and hip measurements) because I found the same thing – if you make it narrower to fit your waist better, it rides up because it’s too narrow for your hips…
I must find time to write up the modified tutorial when I’m settled here in South Africa and my luggage (including the sewing machine and photo equipment!) has arrived
Bella Said,
June 12, 2011 @ 10:03 pm
Thanks heaps for this. I have to go out dog walking and i wouldnt go without something to comfort me. Made a belly warmer out of two old tshirts and it took no time at all. Hurrah!!
sherry Said,
June 19, 2011 @ 10:33 pm
I never heard of a belly warmer before. It’s hard for me to find shirts long enough. I am going to make several of these in different colors to use as a layered look. Thanks! Great idea.
Hanni Said,
November 12, 2011 @ 4:02 am
Thanks for this nice tutorial. I made two waist warmers.
Noura Barakat Said,
January 11, 2012 @ 3:46 am
What lovely idea, I was making my own by knitting cotton thread, I will try -hopefully soon- this briliant idea.
Thank you
Chris Simpson Said,
February 4, 2012 @ 8:17 pm
I just saw these on TV. They were called a Hip-T and were selling for – I can’t believe it – $35. I thought it looked like a great idea at the time but the price was not what I would pay. I will have to try this for my daughters using thrift store shirts. I should be able to make 1 or 2 for a dollar. Thanks.