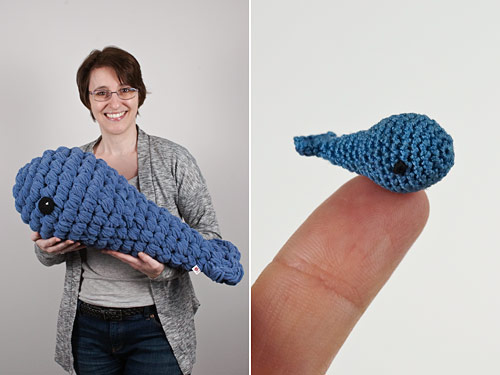
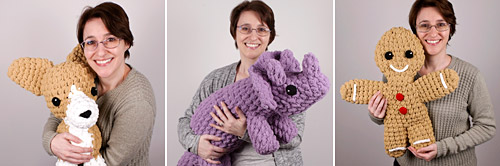
Craft Blog Shop Mailing List

Archive for Tutorials

which is the ‘right’ side?

Amigurumi are typically crocheted in the round, in a continuous spiral, which means that the two sides of the crocheted fabric that is produced will look completely different. You can choose which side faces out by flipping the piece inside out at any stage before closing up the piece, and then continuing to spiral around. It doesn’t really matter which side faces out, unless you want to use the invisible decrease technique, in which the ‘right side’ of the fabric has to face outward for the decreases to be invisible.

I keep getting asked which side is the ‘right side’, so I thought I’d put this side-by-side comparison together to show you the differences between the two sides.

The ‘Right’ Side

the 'right' side of a spiral-crocheted piece

  • Each stitch looks like a V shape (I’ve highlighted one in white for you).
  • Note also that you can see the sideways V shapes around the edge that you will crochet into to form the next round.

The ‘Wrong’ Side

the 'wrong' side of a spiral-crocheted piece

  • Each stitch looks (to me, at least) like a pi symbol (π) – but maybe that’s just my geek side coming out again! Otherwise, you could say it looks like a little table – an upside down V with a bar on the top – again, I’ve highlighted one stitch in white for you. You won’t see any of those horizontal bars if you look at the right side – that’s a big clue.
  • Also, the sideways V shapes around the edge of your piece will be facing to the other side, so you won’t be able to see them.

Also, if you’re working ‘inside out’, you’ll be working around the inside rim of the piece – see my Worked inside out section for an illustration of what I mean by that. You’ll probably find that when you start crocheting an amigurumi piece, this is the way the piece will naturally want to curve. You can just flip it inside out so it faces the ‘right’ way after you’ve crocheted a few rounds, and then continue to work around the outside rim after that.

I hope this has helped you to be able to tell the difference between the ‘right’ and ‘wrong’ sides – and once again I’d like to stress that I’m only calling them ‘right’ and ‘wrong’ by convention: there is nothing wrong in having the ‘wrong’ side face out if you prefer the look of the stitches that way, or it’s just what you’re used to. Just remember, if you want to use invisible decreases (which I do recommend; they’ll make your pieces look soo much neater!) you’ll have to crochet with the ‘right’ side facing out :)

  • Share/Bookmark

Comments (6)

fuzzy to brushed crochet tutorial

I know that some people, especially beginner crocheters, are a little scared of my fuzzy yarn patterns. And now that eyelash and novelty yarns aren’t as easy to find as they once were, I wanted to come up with an alternative to give my old patterns (pictured below) a new lease of life…

fuzzy crochet patterns by planetjune

And here it is: you can make them with regular yarn and brush them to make a fluffy animal like the sweet yellow Fuzzy Bear below!

Fuzzy Bears by planetjune, made with eyelash yarn and acrylic yarn (brushed)

And if that, by itself, isn’t enough information for you, I’ve written a whole tutorial on how to convert Fuzzy patterns to Brushed Crochet patterns. The tutorial also features a discussion on back loops only vs crocheting into both loops, and which side is the ‘right’ side when making amigurumi, so it’s worth checking out!

crocheting amigurumi, working from inside and outside

Continue to the Fuzzy to Brushed Crochet tutorial >>

  • Share/Bookmark

Comments (5)

clean silver with foil

I saved a tweet from @craft_tips:

Warm water, baking soda, aluminum foil. Insert tarnished silver, remove after 10 minutes. Clean!

The idea of a quick and easy method to clean it without any effort was too good to pass up – I have a lot of silver jewellery (because I only wear silver or white gold jewellery) and some is horribly tarnished. I googled to try to find more details and the consensus seems to be that foil, baking soda, a little salt, and boiling water are the magic formula.

Let’s see it in action!

silver cleaning: before
Before (I chose the blackest, most tarnished pieces for this photo. Note also the green tarnish on the two earrings next to the horseshoe charm – I’ll refer to this later!) )

silver cleaning: ingredients
Aluminium foil in the bottom of a glass bowl, with baking soda and a little salt

silver cleaning: bubbles
Boiling water added – bubbles!

I added the jewellery – the trick is to make sure that each piece is in direct contact with the foil. Here comes the science part (I probably haven’t mentioned this before, but I used to be a Materials Scientist in a past life): the black tarnish on your silver is silver sulphide. An electrochemical reaction causes the sulphur to transfer from the silver to the aluminium foil, and the tarnish disappears! You can tell it’s working when you smell the sulphur (bad eggs)…

silver cleaning: dirty water
Look how dirty the water becomes (I’d taken out most of the jewellery by this point)

Most of my jewellery came out clean and shiny. Some had a whitish powdery residue (probably from the salt etc) but after rinsing them in clean water, they were fine. Some still looked black, but the black came off easily when I dried it on some paper towel:

silver cleaning: clean
The remaining black tarnish rubbed off easily on a paper towel

Now here’s something interesting: the silver that started with green tarnish to begin with didn’t get clean – it turned orangey/black. This makes sense – pure silver is very soft, so the standard 925 silver (sterling silver) is made from 92.5% silver, and the remaining 7.5% is often copper. It would have been the copper content in the silver that produced the green tarnish in the first place.

Look at the result of the ‘cleaning’ of the green-tarnished pieces:

silver cleaning: copper
Yuck – discolouration from the copper content in the silver

The good news – this isn’t permanent. I used silver polish on these pieces and they turned back to shiny silver (phew!). But I recommend that if you have any silver with green tarnish, don’t use the baking soda method – it won’t help!

After rinsing (and polishing the copper from the surface of the above earrings), here’s all my jewellery:

silver cleaning: clean shiny jewellery

And here’s the final proof that it does (mostly) work – remember my blackened flower ring from the first picture? Look at it now!

silver cleaning: ring after cleaning
Clean and shiny!

Yay! I can wear it again! And I didn’t have to polish into all those little crevices by hand :)

If you’d like to try this technique yourself, you just need aluminium (that’s aluminum to the Americans) foil, baking soda, salt, and boiling water to make most of your silver look like new again with zero effort! Just don’t forget to rinse the pieces after cleaning (if you leave the salt residue, it’ll corrode the silver).

I hope you found my review interesting – just tell me if I get too science-geeky and I’ll scale it back in future :)

  • Share/Bookmark

Comments (31)

amigurumi tutorial: fastening off

Okay, so you know all the crochet basics, you’ve mastered the magic ring, you know how to change colours and how to join pieces together, you’re even down with the invisible decrease. What more do you need to know to create the perfect amigurumi?

fastening off (crochet, amigurumi) by planetjune

It’s time for one more tutorial to join my Amigurumi Help resource: how to fasten off. I’m going to cover three different methods:

  1. Closing up a piece
  2. Finishing an open edge that will be joined to another piece
  3. Finishing an open edge that will be visible (a neater finish)

You may think you know it all already, but #3 is another piece of magic that I bet you’ll find useful at some point in the future! Look all around the open edge on this piece – there’s no clunky join in sight:

fastening off (crochet, amigurumi) by planetjune

How did I do it? Check it out here: Fastening Off tutorial.

I was just thinking, with all these crochet tutorials I’ve been writing, I almost have the makings of a book! A handy go-to techniques book. Wouldn’t that be a useful addition to your crochet library? Hmmm….

And, on a related note, if there are any more how-to topics you’d like me to cover, just let me know, and I’ll put some more tutorials together. I hope you’ve realised by now that I’m always happy to help and to share my knowledge :)

  • Share/Bookmark

Comments (3)

how to: invisible decrease

Remember in the ‘early days’ of making amigurumi, when we didn’t know about the Magic Ring? Remember what an aha! moment it was when you figured out how to do it, and how we’ve never looked back since?

Today I have what I think will be the next aha! moment for amigurumi makers: the invisible decrease. I’m showing it here because nobody I have spoken to knows how to do it (or even that it exists!), and it really does make a difference to the finish of your pieces.

Let’s briefly look at other options for decreasing in single crochet:

  • skipping stitches: leaves gaps in your work where the stuffing can show through
  • sc2tog (sc decrease): leaves a slight bump and a longer bar visible in the stitch

amigurumi decrease problems
L: skipped stitches (arrow marks hole);
R: sc2tog (arrow marks obtrusive ‘line’ made by bar of stitch)

The invisible decrease (invdec) method is different; as good as its name, it’s practically invisible, even if you know what you’re looking for! The reason for this is that it groups the previous stitches together at its base, so the stitch itself looks identical to a regular single crochet.

amigurumi invisible decrease
L: the invdec (marked with arrow) looks just like the other stitches in the row;
R: the result is smooth and even

See? It’s like magic! Now click through to the Invisible Decrease tutorial…

  • Share/Bookmark

Comments (5)

« Previous entries