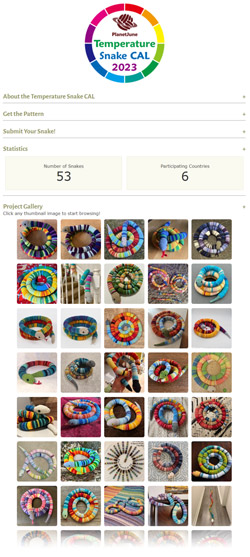
Craft Blog Shop Mailing List

Archive for General

yarn ho!

I’m fortunate to live only an hour’s drive away from the Bernat/Patons Yarn Factory Outlet store (in Listowel, ON). Twice a year, they have a massive sale, and it’s winter sale time again! Last winter, I went to the same sale, had an amazing time and bought a boatload of yarn. This year, it was a totally different experience for me: since becoming self-employed, my attitude to spending has changed. I’ve always been careful with money, but these days I rarely buy anything! As I walked around the store filled with amazing bargains, all I could think was “do I really need that?” and “24 balls of Patons Grace for $48 – I can’t spend $48 on yarn I don’t need!”

Yarn Factory Outlet
Just noticed that this photo makes it look like a fabric store with a bit of yarn! In every other direction, the store is floor to ceiling yarn :)

Everyone else in the store was literally filling black garbage bags with yarn! They probably make sweaters and afghans and other bulky items. My typical crocheted item takes less than 1 skein of yarn, so how could I justify that kind of buying? One lady stepped away from her bag of goodies for a moment (to pick up some more yarn), so I took the opportunity to snap this photo as evidence:

bin bag full of yarn
No, that’s not rubbish – it’s a bin bag full of yarn!

I was actually prepared to leave empty-handed, and then I saw the bin filled with mill ends of novelty yarns and other oddments, priced at 20c/oz. That’s practically free! I combed through the entire bin (and it was a big bin!) and managed to find some treaures. I ended up with 21 balls of various yarns for around $8:

bin bag full of yarn
My meagre haul

I also picked up this handy pair of snips with a cap that will be perfect to keep safely in an on-the-go project bag:

snips with cap

So, even though I didn’t really take advantage of the sale, I don’t feel too bad – I’m actually quite proud that I only spent $10!

  • Share/Bookmark

Comments (8)

photo studio for craft tutorials

Yesterday on Twitter I let slip that I had just turned in the manuscript for my new book! I’m so excited – I’ve been wanting to write this book for a long time and I’ve finally had the chance. I’ll share details of the book itself closer to publication – there’s still a long process of editing and printing to go through before it’ll hit the shelves.

This is the big secret project I’ve been alluding to for months, and the reason why I haven’t been blogging as much as I’d like to for a long time – so now I have some catching up to do! I’ve been making lists of things I’d like to do ‘when I finish the book’ – new patterns, new products for the shop, and a lot of improvements I’d like to make to the website. And my craft room/office is in serious need of organisation…

As I’m the photographer as well as the author of my book, I had to develop some novel methods for taking print-quality photos with only two hands at my disposal! I thought I’d share the method I came up with for taking step-by-step photos that include my hands – you’ll see the benefit of this when I next make a tutorial, as the pictures should be much improved with this new setup.

(By the way, in case you’re wondering how I took this shot of myself at work, I used a 2nd camera on a 2nd tripod with a 10-second self-timer!)

tutorial photography setup by planetjune

A: White bristol board used as a seamless backdrop

B: 2 very bright lamps aimed at the backdrop to make it as white as possible in the photos

C: 2 less bright lamps aimed at my hands (one on each side of the camera) to light them without shadows

D: This is where the camera is pointing – at my hands

E: My DSLR camera on a tripod, angled so that I can comfortably look through the viewfinder as I sit

F: (Out of shot) Remote detonator control for my camera so that I can operate it with my toe when I have the perfect shot set up

I bought the remote control on eBay and it’s literally changed my photo-taking life. I’ve always had to take my tutorial photos by setting up the shot, moving my right hand to press the shutter release while keeping my left hand hand still, then scrambling to get my right hand back into position before the 10-second timer ran down and the picture was taken… Now I can just press the remote button with my toe (minimal dexterity required) at the appropriate time and I don’t need to use the camera’s timer at all. Huge, huge improvement.

Of course, this isn’t the only way, or even the best way, to light for this kind of photography, but it works for me and only cost me 2 cheap IKEA work lamps, 2 clip-on spotlights, and a sheet of bristol board, all of which I already had from my light box (shown below, click through if you’d like details of that too):

lightbox setup by planetjune

So, when you see the clear and helpful pictures in my new book, you’ll know exactly how I managed to take them – I hope this hasn’t ruined the magic! But seriously, if you make tutorials, I hope this little glimpse into my lighting setup has been helpful :)

  • Share/Bookmark

Comments (12)

making cat toys

Today is my furbaby Maui’s 6th birthday. (Well, we adopted him when he was a year old, so we don’t know his actual birthday, but we settled on this date for him so it wouldn’t be too close to Christmas.) If you don’t know my lovely boy, here he is:

Maui
Awww, handsome cat!

The actual subject of this post is making toys for your cat, and whether it’s worth the effort. I’d like to demonstrate with a couple of toys that I made for Maui three years ago (please excuse the photos - my photographic skills have clearly improved since 2007!)…

__(‘Read the rest of this entry »’)

  • Share/Bookmark

Comments (14)

‘best of 2009′ award

crocheted lemmings by planetjune

What a lovely surprise! Out of tens of thousands of projects posted on Craftster in 2009, my amigurumi Lemmings were chosen as one of the 5 best crochet projects of the year. Yay!

Craftster Best of 2009 Winner
I’m a Craftster Best of 2009 Winner!

In other news, posts may be a little scarce for the next few weeks, as I’m entering the home stretch of the biggest, most exciting secret project I’ve ever been involved with!

  • Share/Bookmark

Comments (23)

Bobby award nominee!

Today I saw that the nominations for Ravelry’s annual Bobby Awards had been posted. I thought I’d take a look through and see the wonderful knit and crochet projects that made the cut this year. Imagine my surprise when I saw that my own amigurumi Discworld had been nominated – yay! As I continued to browse through the categories, I discovered that my Discworld has been nominated for not one, but three Bobby Awards!

I'm nominated for 3 Ravelry Bobby Awards!

I don’t think I’ve ever been up for an award before! My Discworld is nominated in three categories: Geekiest Pattern, Coolest Toy and Best Personal Pattern Project. If you have a Ravelry account, and (of course) if you think my Discworld is worthy of the awards, please consider voting for me in any or all of the three categories :)

crocheted Discworld by planetjune

It would be lovely to win, of course, but right now I feel so honoured to even be nominated and be recognised as an artist and designer. Thanks, of course, to Terry Pratchett, for inspiring me to recreate his wonderful Discworld in crochet. And thank you, Ravelers, for nominating (and voting for!) one of my all-time favourite designs!

  • Share/Bookmark

Comments (5)

« Previous entries