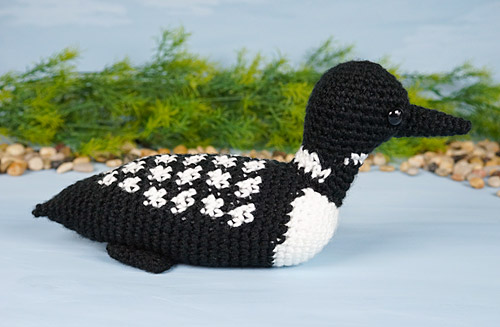
Archive for Crochet

Chains and Slip Stitches in Amigurumi

With all crochet, to keep your stitches even, you keep the yarn under tension, so a controlled amount of yarn forms each stitch and all the resulting stitches will be the same size. This is particularly true for amigurumi; if your stitches aren’t consistently tight, it’s very obvious.

tension on yarn when crocheting amigurumi
Tension is created by balancing the forward pull on the yarn from the hook (right) with the backward pull of your other hand on the yarn (left). Consistent tension keeps all your stitches the same size (middle).

Chains and slip stitches are different, though, because each stitch consists of only one loop. If you maintain the same tension as you use for single crocheting amigurumi, as well as tightening the stitch you’re forming, you’ll pull on the previous stitch and make that stitch much smaller and very difficult to work back into.

If you learnt to crochet the traditional way (working in rows to make scarves, afghans, etc) and then progressed to amigurumi, you’ll be familiar with making your starting chain loosely so you can easily work back into it (you can also achieve this by using a larger crochet hook, just for the foundation). But if you began your crocheting adventures with amigurumi, you may never have even made a starting chain foundation!

Problem: Too-Tight Stitches

In the examples of chains and slip stitches below, the ‘too tight’ photos show the results of using the same tension I use for single crocheting amigurumi, while the ‘just right’ photos show how your chains and slip stitches should look:

Chains:
tension on yarn when crocheting amigurumi
Each example has 6 chains. The difference may not be clear for each stitch individually, but notice how short the overall length of the tight chain (left) is compared with the correct chain (right).

Slip stitches:
tension on yarn when crocheting amigurumi
Each example has 4 slip stitches. In the tight example (top), the sideways Vs along the top of each stitch are noticeably smaller and stretched more tightly than in the surrounding sc stitches. In the correct example (bottom), the Vs of the 4 sl sts are indistinguishable from those of the surrounding sc stitches.

Not only do these stitches not match the rest of my work visually, but they are very difficult, or even impossible, to work back into: the loops are smaller than the head of my hook and there’s no slack in the yarn. Here I’ll try to work back into the slip stitched examples:

tension on yarn when crocheting amigurumi
I can’t work back into the left slip stitches without a serious struggle! The right slip stitches are almost as easy to work into as a normal sc stitch.

Solution: Reduce Tension

The goal with chains and slip stitches is to have the sideways V shape of each stitch be exactly the same size as the sideways V along the top of a single crochet stitch (see the ‘just right’ examples above). That requires relaxing your tension considerably and may feel strange and wrong if you’re only used to tight amigurumi control. Here are some tips to practice:

  • Slow down and pay attention to your stitches when you make a chain or slip stitch.
  • As you form each stitch, don’t tug on the yarn with your hook; draw it through smoothly.
  • Check the size of your stitch by comparing it with the Vs at the top of your sc stitches.
  • Only draw the yarn back with your non-hook hand if the working loop looks too large; it should sit loosely on the throat of the hook so the hook can move freely within the loop.

Once you get used to it, chaining with low tension should become easy – it just takes a little practice to make your chains evenly sized. Slip stitching with low tension is slightly trickier when you’re used to amigurumi: the stitches are so similar to single crochet stitches that I still have to remind myself with every slip stitch to keep it loose, so my stitches don’t shrink and tighten.

If you’d like to practice these stitches, here are a couple of examples from my amigurumi pattern collection that make great use of chains and slip stitches:

examples of chains and slip stitches in crocheted amigurumi
These patterns use chains (Baby Cephalopods, left) and slip stitches (Magic Lamp, right).

With this low tension technique, you’ll no longer have to battle to work back into chains and slip stitches, and your work will look smoother, tidier, and more even. It’s one more step along the road to becoming an amigurumi expert!

Comments (2)

Cuboctahedron crochet pattern

Time for another geeky-fun geometry-inspired pattern! The Cuboctahedron is one of the Archimedean solids – a group of polyhedra made from two or more types of regular polygons, where every vertex (corner) is identical. The 13 Archimedean solids have up to 92 faces each, but the Cuboctahedron is perfect to crochet because it has only 14 faces and the resulting shape is a nicely balanced, satisfyingly large ball.

cuboctahedron geometric ball crochet pattern by planetjune
Cuboctahedron is a faceted geometric ball – how fun is that?!

I’m releasing the Cuboctahedron as an expansion pack for my Polyhedral Balls pattern, so you can extend the value of of that pattern if you’ve already bought it, without having to pay the full price again for something similar.

What is an Expansion Pack?

Expansion Packs by PlanetJune

  • An Expansion Pack is an add-on to an existing PlanetJune pattern.
  • The Expansion Pack lets you modify or add to the original pattern to create something else.
  • You cannot use the Expansion Pack alone – you must also purchase the original pattern in order to be able to complete the pictured items in the Expansion Pack pattern.

Cuboctahedron, in particular, includes:

  • All the modifications required to crochet and assemble a cuboctahedron.
  • Tips for colour selection to give your ball the most impact.
  • Full right- and left-handed step-by-step assembly diagrams as separate appendices, so you need only print the pages you need.

Cuboctahedron dwarfs my other Polyhedral Balls! It makes a lovely toy as it’s 6″ (15cm) in diameter:

cuboctahedron geometric ball crochet pattern by planetjune
Cuboctahedron with its smaller Polyhedral Ball cousins

You can buy the Cuboctahedron Expansion Pack for only $2.50 individually from the shop, or, if you haven’t yet bought the Polyhedral Balls pattern, you can select it as an add-on to that pattern before you add it to your shopping cart, and save 50c on the pair.

Launch Discount

I know you’ve probably already bought Polyhedral Balls, so you won’t be able to save that 50c. But, for this week only, if you add the Cuboctahedron Expansion Pack pattern to your shopping cart, together with anything else (totalling $5 or more), then use the code GEEKYFUN at checkout and you’ll still get your discount! (Valid until next Monday: 6th May 2013.)

Note: If you don’t need anything else right now, this also applies to Gift Certificate purchases, so you can pick up a $5 gift certificate now, get your discount, and have $5 in your PlanetJune account ready for your next purchase, or to send to a crocheting friend!

cuboctahedron geometric ball crochet pattern by planetjune

I really like this cuboctahedron – it’s interesting and unusual, and it doesn’t take too long to crochet and assemble. I’m not sure if I’ll make any of the other Archimedean solids though: the other small (few-sided) ones are too unbalanced to make good balls, and, discounting the 64- and 92-sided ones, the remaining interesting ones still have at least 26 faces!

(I assume a pattern for a polyhedral ball with 26, 32, or 38 faces would be off-putting, but do let me know in the comments if I’m wrong about that – I’d be happy to make more of these geometric designs if there’s demand for them…)

Happy geometric crocheting!

Comments (5)

crocheted giraffe motif

I first saw this amazing realistic giraffe pattern on Pinterest last year, but the pin was linked to an illegal pattern-sharing site, with no credit to the original designer (a pet peeve of mine). After searching through several pages of results on Google’s Search by Imagesee my tutorial post for instructions! – I eventually managed to find the original Japanese page, hidden among many Russian and Italian pattern-sharing sites.

But – good news – since then, a ravelry page has popped up for the designer, Chinami Horiba, so you can see all her pretty patterns without having to navigate her Japanese site. (She has lots more of these shaped motifs as well as more traditionally-shaped doily designs.)

giraffe by chi-sa-ko
Chinami Horiba (aka chi-sa-ko)’s giraffe and chart – I’ve blurred the chart intentionally! – please visit her site for the pattern if you’d like to crochet this giraffe.

I’d never seen anything like this before! I’m not even sure what this would be called – it’s not a doily; it’s too lacy for a typical applique; it’s not a toy… (Does this technique for making lacy 2D motifs have a name? Let me know in the comments if it does, and I’ll update this post – it’d be nice to know in case anyone wants to search for more of this type of pattern.)

Even when you know hundreds of techniques, there’s always something new to learn, so I couldn’t resist grabbing some yellow yarn immediately and having a go to see how it works. Crochet charts are just magic; I followed the chart and made a perfect giraffe without needing to know a word of Japanese.

mystery stitch 1

I did get a bit stuck when there was a stitch I didn’t understand: it looks like a Y-shaped treble crochet, with two tops and only one bottom. A V-shape would have been obvious, but a Y? I decided it must mean a tr with a dc worked into the side to form the second top line of the Y. It looks right, so I think that must be what was intended.

mystery stitch 2And there was one other stitch I couldn’t understand from the diagram: the bobble at the end of the tail. I decided to go with a 3 hdc bobble, but now I look again it looks more like an hdc on the right (or an arrow? maybe it’s a long pulled-up loop?), and then a 2hdc bobble. No idea what the black triangle means. Still, my bobble is close enough.

I crocheted my giraffe with worsted weight acrylic and an E hook (I didn’t have a more appropriate yarn to hand), so it was fairly stiff and sturdy to begin with. The bottoms of the legs wanted to curl up though, so I stiffened the finished piece with a mixture of white glue and water, pinned it to shape and let it dry.

crocheted giraffe
Better too many pins than too few!

And here’s the result:

crocheted giraffe
Now isn’t that clever? (btw I’m left-handed, so my giraffe faces the opposite way – the crossed tr and dtr stitches didn’t lie nicely if my giraffe faced left.)

Crochet is so versatile because there’s only ever one live stitch, so you can turn or rotate the work to any angle and insert your hook anywhere to begin the next stitch. That versatility is what allows us to easily create amazing shapes like this giraffe. Well, I say ‘easily’, but that’s when you have a charted pattern to follow – I’m sure it’s a challenge to develop patterns like this, and almost impossible to write a written pattern that clearly describes where to go next after you complete each stitch.

I’m going to try to resist that design challenge, but, who knows, I may be able to take elements of this technique to incorporate into future designs; it’s already given me some technique ideas. That’s why I always like to keep learning – you never know when something will spark new inspiration!

Comments (13)

Magic Lamp crochet pattern

After I completed my Orca pattern, my designing brain felt a bit tired – all those colour changes make for a fabulous-looking whale, but if you think it’s a bit fiddly crocheting the colour changes, try designing them at the same time – it’s 10 times more difficult, and quite a brain-bender to get size, shape and colour all working together at once! So, before I jumped into the next commission (Red Panda – awww!) I needed a little palate cleanser: a design with no colour changes, so I could concentrate on my favourite part: the shaping.

I wanted to make something truly original, and I’ve been watching Once Upon a Time so I had fairy tales on the brain. I thought a magic lamp would make a fun toy for kids wanting to play Aladdin and the Genie, and an elegant decorative piece for anyone else! So I set out to create a beautifully-shaped life-sized magic lamp, and here’s the result:

magic lamp amigurumi crochet pattern by planetjune

Fun Fact time: I’d always wondered why Aladdin’s magic lamp is called a ‘lamp’ when it really looks more like a metal teapot. In case you’re wondering too, this is an ancient type of oil lamp. The oil was poured in through the lid at the top, and a wick inserted through the nozzle (that’s the bit that’d be the spout if it were a teapot). The oil is drawn up through the wick and the flame burns at the tip of the nozzle when you light it. So there you go!

I’ve designed a decorative raised diamond pattern for the lid and base of the lamp (and I’ve developed a new technique for creating these details without leaving big spaces around the taller stitches that will gape when the pieces are stuffed). I think they add something special to the design; I hope you agree!

magic lamp amigurumi crochet pattern by planetjune
I spent a happy evening making the paper gemstones for these photos :)

These details are slightly trickier than your standard “all single crochet, all the time” amigurumi, but the additional crochet stitches are fully explained, and I’ve documented the entire process of creating the diamonds with step by step photos, for both right- and left-handers (in separate appendices, so you can save ink by printing only the page you need, or neither!)

But if you’re still daunted by the diamonds, I’ve also given an option in the pattern for a simplified lid and base. The undecorated pieces omit the diamonds, but still have exactly the same shaping as the standard lid and base, so your lamp will still look elegant and shapely.

magic lamp amigurumi crochet pattern by planetjune

I designed this lamp while I was stuck with no internet for 2 weeks last month. As I crocheted it, I wished that my internet connection would be restored, and lo! it was! Maybe your Magic Lamp will grant your wishes too… While I can’t promise that, it will, at the very least, be something interesting and different to crochet :D

If you’d like to make a lamp of your own, you can find the Magic Lamp crochet pattern in my shop right now! If you’re not ready to get started, how about a little ravelry love? Click to favourite or queue my Magic Lamp design:

So tell me: do you like my magic lamp design? I really hope you do! It’s always nerve-wracking to come up with something so unusual – I really can’t predict ahead of time if it’ll be wildly successful or a massive flop…

Comments (12)

crocheted icord scarf

You may remember this finger-crocheted infinity scarf I made as part of my ruffle yarn review:

ruffle yarn scarf: finger crocheted
Finger crocheted cowl (12 wraps of giant chain stitches)

Although I made it just for fun, I quite liked the result, and almost wanted to wear it. Wrapping an ultra-skinny scarf 12 times around my neck felt a bit stupid though, so I unravelled it and came up with another fun use for the yarn: I used my own crocheted i-cord tutorial (which, incidentally, was my first ever video tutorial!) to make a finger-crocheted i-cord scarf:

ruffle yarn scarf: finger crocheted i-cord
I-cord infinity scarf (4 chunky wraps of i-cord)

The great thing about i-cord is it makes a round braid instead of a flat chain – it’s thicker and stronger than a chain. For knitters, you can just knit i-cord on dpns, but, if you don’t knit, you might like to try crocheting an i-cord too. There are lots of things you can use i-cord for: in amigurumi-making, as a trim, to make drawstrings or tiebacks, as bag handles, to coil into a mat, etc, etc…

crocheted i-cord

It was easy to make my i-cord scarf – I used my index finger as a giant crochet hook and otherwise followed my tutorial exactly. And the colour changes of the yarn worked out well: by coincidence, they matched up almost perfectly with the length of one row, so each row is a different colour:

ruffle yarn scarf: finger crocheted i-cord
My finger is the ‘hook’ – I’m left-handed, remember!

My finger was a bit tired after finger-crocheting the entire skein of yarn into i-cord, but I’m happy with the resulting scarf. As each row of i-cord is essentially 3 chains arranged together into a circle, it reduced the length of my scarf from 12 skinny wraps around my neck to 4 chunky ones. It was fun to make, and who knows, I may even wear this version out of the house…

Comments (3)

steam-relaxing yarn

When you unravel something you’ve crocheted, the yarn looks kinked up and squashed. Re-using this yarn can leave your crocheting looking noticeably different from starting over with fresh yarn. Wouldn’t it be nice if there was a way to refresh the yarn and return it to its unused state so you don’t have to waste it or put up with the re-used appearance? Guess what: there is!

steam-relaxing yarn
Can you turn ‘stressed’ yarn back into ‘relaxed’ yarn? Yes!

I first read about this technique at TECHknitting but I wasn’t really convinced it’d work on acrylic (although I really hoped it would), so I decided to put it to the test with the yarn recovered from one of my prototype pandas.

(You may be wondering ‘why bother?’ The nicer acrylic yarns are actually quite expensive, and, if you’re a crochet addict, the cost of yarn soon mounts up; if there’s an easy way to save money, why not take it? But, for me, the real reason is availability – now I have to import all my amigurumi acrylics from the US, they’re like gold dust to me, and I hoard every metre! Making 3 prototype pandas took a whole skein of white Red Heart Soft, and that’s not something I can easily replace. Reclaiming the yarn so I can use it to design another amigurumi would be ideal, but not if it’s going to look messy and obviously re-used.)

steam-relaxing yarn
A 65m length of kinked up acrylic yarn reclaimed from a prototype panda.

Steam-relaxing

You can steam yarn with a clothes steamer or ordinary steam iron, and it will magically relax, de-kinking and fluffing itself back up! And yes, as I discovered, you can even do this with acrylic yarn – you can see my results in the photos below.

Note: to reclaim an entire skein of yarn, it’s probably easier if you wind it into a hank (a large loop), soak it, and let it dry (for more details on this method, see Webs’ article: How to Recycle Yarn). But for the yarn length recovered from frogging amigurumi or other small projects, steaming is simpler and faster.

Steam-relaxing yarn really is like magic: the yarn wriggles about as it relaxes and it looks quite eerie, like a pile of snakes – watch TECHknitter’s video to see exactly what I mean – but soon the yarn will turn from a kinked tangle into strands of fluffy yarn spaghetti.

My iron doesn’t have a ‘shot of steam’ feature, so it took a fair while to steam the entire 65m pile you see above, but the method really does work. I didn’t touch the yarn at all between these two photos – this is how it moved, by itself, in reaction to the steam:
steam-relaxing yarn
Before (left) and after (right) comparison of a small section – you can see that the yarn has de-kinked and untwisted itself.

steam-relaxing yarn
Pre-steamed (left) and post-steamed sections of my big pile of yarn.

Top Tips

Learn from my experience!

  • It’s much more effective if you spread the yarn out so you’re only steaming one layer at once, and work over a small area.
  • Watch to see when the yarn stops wriggling about when the steam touches it – that’s when it’s fully relaxed and time to move on.
  • For acrylics in particular, it’s critical that you don’t ever let the iron touch the yarn. Sit so you’re at eye level with your ironing board, then you won’t have to bend to see what’s going on, and you’ll be able to keep an inch between your yarn and the iron (you do need to keep it close though, so the steam is most effective).
  • If you have the option to avoid it, don’t start with a big tangle of yarn (as shown in my photos) – once it’s de-kinked, you’ll still have to untangle it and wind it. I’d recommend you wind the yarn into a ball as you unravel your work, then unwind a couple of metres at a time and lay it in rows along the ironing board. Steam-relax that length of yarn, then wind it immediately into a new ball before pulling out the next kinked length. (Once it’s all relaxed, you can re-wind the yarn into a neater ball if you like.)

steam-relaxing yarn
The 65m pile of yarn, post-relaxation. (Don’t leave it in a pile like I did here!)

I’m almost tempted to buy a handheld clothes steamer now, after seeing how effective this method is. And, as an added bonus, the yarn goes from feeling quite hard when it’s kinked up and squashed, to lovely and soft and bouncy again – it really does seem as good as new!

steam-relaxing yarn
After winding it into a centre-pull ball it’s practically indistinguishable from new yarn and ready to use for another amigurumi design!

Steam-relaxing is a bit of a niche technique, but if you frog a project and want to reclaim the yarn, I highly recommend it. You’ll save money, you can re-use the yarn so it’s not wasted, and I promise you’ll have fun watching the yarn wriggle about – what’s not to like?

Comments (10)

Orca (Killer Whale) crochet pattern

It’s time to release another commissioned design!

orca killer whale amigurumi crochet pattern by planetjune

The Orca, or Killer Whale, was a design challenge I was looking forward to – the distinctive black and white markings weren’t going to be easy to replicate. Biased (slanting) stitches just wouldn’t cut it with this design, and neither would zig-zag colour changes, so I’ve spent weeks swatching to refine and improve my colour changing techniques to give smooth, symmetrical colour changes over practically the entire length of the orca’s body. Here’s the result:

orca (killer whale) amigurumi crochet pattern by planetjune

I have to state right now that this is definitely an intermediate-level pattern: although it is worked in pure amigurumi-style (it uses only single crochet stitches with increases and decreases), it includes a lot of colour changing to create the beautiful smooth killer whale markings down the entire underside of the body. So, while it isn’t difficult in terms of crochet stitches, it is vital that you pay close attention to the pattern in every round that includes a colour change, and make the increases and decreases in the correct places, otherwise the colour pattern will shift. This is a pattern that requires concentration!

orca (killer whale) amigurumi crochet pattern by planetjune

While we’re looking at details, I’m also debuting a new technique that makes a perfect whale tail – this one is really quite magical, and took me 5 attempts to perfect, but, if you just follow the pattern carefully, it’s easy to replicate this amazing shape.

orca (killer whale) amigurumi crochet pattern by planetjune

If you’re up for the challenge, I think you’ll find this pattern is worth it – the end result has a level of detail in colour and shaping that makes it a truly special amigurumi. Plus, I think this orca is really cute; she’s definitely one of the nice fish-eating killer whales, not the scary seal-eating kind…

I’d like to thank everyone who commissioned this design – thank you for trusting me to do justice to something so complex! I hope you’re happy with the result and you’ll enjoy making your own spectacular orcas.

orca (killer whale) amigurumi crochet pattern by planetjune

How about a little ravelry love? Click to favourite or queue my Orca design:

And, if you didn’t get in on the commissioning action but you’re ready to get orca-making, you can pick up the orca (killer whale) crochet pattern from my shop right now!

(The next design that was commissioned is the Red Panda, and I’ll be collecting the pledge monies shortly. I can’t wait to get started on that one; red pandas are adorable…)

Comments (12)

Warning! Foam blocking mat colour transfer

As I told you in my wet blocking tutorial, children’s play mats make an inexpensive and easy to find alternative to dedicated blocking mats. BUT, I’ve discovered a problem that you need to know about if you use these mats – please read this and learn from my experience!

foam play mats used for wet blocking

I’ve blocked all kinds of lace with these mats before with no problems, but my crocheted bamboo cardigan was a different story. My laceweight items felt practically dry by the time I pinned them to the mats, but thicker yarn retains much more moisture, so, even after rolling my cardigan in a towel to squeeze out as much excess moisture as possible, it still felt heavy and noticeably damp to the touch. It was still damp 24 hours later, and when I flipped it over so the underside could dry better, I was horrified to find areas of my beautiful cream cardigan were now bright, shocking pink.

I don’t have a photo, as my priority was trying to fix the disaster, not documenting it. Luckily, my story ended well; I’m not sure if it was because the yarn was still damp when I spotted the problem, or if the pink dye isn’t permanent, but after a few soaks in Soak wash, with some delicate but persistent agitation by hand in the sink, all the pink colour came out of my cardigan (phew). But you don’t want to take a chance that your mats may permanently dye your handiwork!

Looking back, I should have suspected that there may be a problem with colour transfer from the pink blocks – if you look at this photo from my blocking tutorial, you can see that some of the bright pink colour from a different mat has transferred onto the lower yellow block, at the right-hand side:

wet blocking on foam mats
My cream cardigan also had this pink colour transfer before I managed to soak it all out!

Foam Mat Colour Transfer Experiment

Although I assumed this colour came from the bright pink coloured blocks – the same colour as the pink stain – to be safe, I decided to conduct an experiment to figure out which of the blocks are the culprits. (I’m very glad I did, because the results surprised me!)

Method

  1. Select enough blocks to have a sample of each foam colour: orange, yellow, green, blue-green, blue, purple, light pink, dark pink. (I also tested a solid purple mat I bought from a different source.)
  2. Lay a piece of paper kitchen towel over each colour of foam. Spray all the blocks with water until the paper towel squares are completely saturated.
  3. Leave overnight to dry.

foam mat colour transfer experiment
The setup for my experiment – wet paper towel squares on a sample of every foam colour

When the paper towel was completely dry, I numbered each piece as I removed it, so I could compare them with my reference layout photo (top row L-R: samples 1-6; bottom row L-R: samples 7-10).

Results

  • Samples 1 and 2 (orange and blue-green) were clear.
  • Samples 3 and 4 (dark pink and green) were stained in only the dark pink areas.
  • Samples 5 and 6 (blue and yellow) were clear.
  • Samples 7 and 8 (light pink and orange) were stained in only the light pink areas.
  • Sample 9 (purple and blue) was stained in only the purple areas.
  • Sample 10 (all purple) was stained all over.

Example of my results:
foam mat colour transfer experiment
Sample 8 (top right in this photo) is mostly over the light pink foam, except the lower left corner which is over the orange O.

foam mat colour transfer experiment
Sample 8 clearly shows that colour has transferred from the background pink foam, but not from the orange O (dotted line added for clarity).

Conclusions
My samples clearly show that pink dye leaches out of light pink, dark pink, and purple foam when wet. The colour transfer seems to be equal between all these colours. All the other foam colours (orange, yellow, green, blue-green, and blue) appear to be colour-fast when wet.

This surprised me – I thought that only dark pink would be the problem, and possibly the light pink. I never even considered that purple foam might also leave pink stains, and equally badly as the over-saturated bright pink blocks! Note: My set didn’t include any red blocks, but I suspect they would suffer from the same problem.

My Recommendations

If you haven’t bought foam mats yet, you may prefer to look for some that avoid the problem pinks and purples (and, probably, reds). I’ve seen all-grey sets sold as utility mats, and individual coloured blocks sold at dollar stores. Grey, blue, green, yellow and orange should all be safe.

If you already own foam mats, I’d recommend that you replicate my simple kitchen towel experiment – it’s easy to do, and then you’ll know for sure, one way or the other. If you do have the problem, you have some options to get around it:

Prevention Option 1: Only use the blocks with ‘safe’ colours that do not contain pink (safe: orange, yellow, blue, blue-green, green). Do not use light pink, dark pink or purple. Note: If your mats are different colours or types, test them to see which of your colours are affected.

Prevention Option 2: Lay out an old towel over your blocks, so any colour will transfer to the towel, not your precious handiwork. You can pin straight through the towel and into the foam.

If there was any colour transfer when I blocked this cardigan (below), it doesn’t show against the dark grey yarn. Look at all the blocks that could have stained my yarn pink!
foam mat colour transfer experiment
Arrows mark ‘dangerous’ colours: light pink, dark pink, and purple.

Below, you can see the second blocking for my miraculously-unscathed bamboo cardigan – now safely protected from any pink transfer by the towel. The underside of the towel was stained pink after this, but it all came out in the wash. (And, in case you’re wondering, the plastic containers at the corners of the towel are filled with water – I used them as weights to stop the towel from blowing away while I dried the cardigan outside!)
foam mat colour transfer experiment
Cardigan protected from colour transfer by a towel on top of the foam mats.

If you’re blocking lightweight yarn and you roll it in a towel before blocking so it feels almost dry when you lay it out to block, you shouldn’t have a problem with colour transfer, but you may wish to err on the side of caution – my results may not always apply. For anything that still feels damp/heavy after a towel squeeze, you should definitely be careful of potential colour transfer, and I’d recommend you test your mats and/or use one of the prevention options above, especially if you’re using light-coloured yarn. Why take the risk?

Comments (20)

free pattern: Shamrocks

It’s Donationware time again! I’ve created a set of 2 beautiful shamrocks for you to crochet for St Patrick’s Day, or any time you want a splash of green in your life.

Shamrocks crochet pattern by PlanetJune

Shamrocks is a clever little pattern to make sweet shamrocks with a dimensional 3D effect, in two sizes: a realistically-shaped design, and a tiny miniature version. String them into a garland, attach one to a greetings card, add a pin back to make a cute brooch or lapel pin, or layer them for a novel look.

Shamrocks crochet pattern by PlanetJune

This pattern comes a few days later than I’d planned, thanks to a catalogue of disasters including broken internet at home (I’m currently in Dave’s office so I can actually post this!) but luckily, my shamrocks work up in minutes, so you still have plenty of time if you’re planning on some St Patrick’s Day decorations.

If you’ve made my ever-popular Love Hearts pattern, you’ll have no problem making Shamrocks – just like the Love Hearts, all the stitches of Rnd 1 are worked directly into the magic ring. The difference with the Shamrocks is that both sizes of shamrock are completed in just one round each, which makes them very, very quick to complete! I timed myself making the Mini Shamrock and it took 90 seconds (excluding weaving in the ends)…!

I really love this pattern – I hung the garland over my fireplace for this photo, but now I think I’m going to leave it up there for a while; it’s just so cheerful!

Shamrocks crochet pattern by PlanetJune

As I like to reward people who chose to donate for my donationware patterns, the PDF version of this pattern includes bonus crochet stitch diagrams for both shamrocks, in both right- and left-handed versions. As always, the pattern is free for you to use, and you need only donate if you’d like to thank me for my time in creating it, or if you’d like the easy-to-print PDF version.

I hope you enjoy my Shamrocks pattern!

Go to the Shamrocks pattern >>

Crochet-Along with us…

And here’s a bonus – a Shamrock is a definite sign of spring, so that means you can enter your crocheted shamrocks into this month’s Spring/Easter CAL – and maybe win the Suncatcher Eyes CAL prize! Check the PlanetJune Ravelry group for all the details :)

Comments (4)

3 fuzzy chicks (brushed crochet revisited)

fuzzy bunny & chick crochet pattern by planetjune

When I designed my Fuzzy Bunny & Chick pattern in 2007, I used Bernat Baby Lash yarn for the chick. It was perfect – a curly-lashed eyelash yarn with a thick yarn core in the perfect shade of chick yellow – but, of course, that yarn has long since been discontinued.

I stopped designing with novelty yarns in 2008: the frustration of yarn-specific patterns (yarn not being available to the majority of my customers worldwide, and then getting discontinued with no suitable replacement) means it’s very rarely worth the hassle of using an unusual yarn in a pattern.

Still, my Fuzzy Friends patterns are good designs, and I’ve always felt it’s a shame there are so few yarns that would be appropriate replacements to use with my sweet little Fuzzy Chick pattern. So, after a little experimentation, I’ve come up with two easy options so anyone can make a very, very cute Fuzzy Chick – maybe even cuter than the original, do you think..?

fuzzy chick crochet pattern by planetjune
L-R: Tiny Chick, Medium Chick, Fuzzy Chick (original)

The best part is that the new Tiny and Medium chicks both use standard everyday worsted weight acrylic yarn, so you can just use the same yarn you do for normal amigurumi! (Specifically, I used Bernat Satin in Banana for both chickies.)

Tiny Chick is just over 2″ tall, and uses worsted weight yarn, an E US/3.5mm hook, and 4.5mm eyes.
Medium Chick is 3″ tall, and uses 2 strands of worsted weight yarn held together, an H US/5mm hook, and 6mm eyes.

You can also use the above yarn/hook sizes as a starting point for any of my other Fuzzy patterns, if you don’t want to make them with a novelty yarn – this technique will work equally well with all of them!

A Miracle Brush

Let’s pause for a moment so I can tell you about my new amazing amigurumi brushing tool. I’ve seen it called a Teasel Brush (UK), Nap Riser Brush (US), and Bunka Brush (Japan) – if you google each of these names you should be able to find a stockist in your country under one or other of the names. Basically, it’s a very small wire brush with stiff angled prongs, used for brushing out the seams of teddy bears, brushing pile fabrics, or creating brushed areas in needlework or (of course) crocheted or knitted fabric. Some of these brushes slip over your finger, and others are mounted on a small wooden handle (like mine, below), but the prongs are the same in both cases.

teasel brush and pet slicker brush for brushing crochet
A small tool for a small job like a tiny chick makes all the difference – compare the size of my teasel brush (front) with the pet slicker brush (back).

Using one of these brushes follows exactly the same principle as using a wire pet brush to create brushed amigurumi, but, as it’s far smaller than a pet brush, it’s more suited to brushing detail areas and small amigurumi. I’ve left visible scratches in my thumbnail more than once when brushing my crochet with a large pet slicker brush, but, since I bought the smaller brush, I have finer control over where I’m brushing, and haven’t scratched up my nails once!

Of course, it does take longer to brush the same size area with a smaller brush, so, as usual, it’s your personal preference as to which type of brush is the best option. I’m happy to keep both in my toolkit now, and use the most appropriately-sized brush for the job at hand.

Making the Chicks

To make my chicks, I followed the original Fuzzy Chick pattern, together with the instructions from my Fuzzy to Brushed Crochet tutorial (you’ll have already received the tutorial as a bonus PDF if you’ve bought any of my Fuzzy patterns) but I brushed the chick pieces for longer than I did the bear in the tutorial, to get them nice and fluffy. This should give you an idea of the process:

fuzzy chick crochet pattern by planetjune
L-R: Head (brushed), Body (unbrushed), Wing 1 (brushed side up), Wing 2 (brushed side down)

As you can see, the pieces are very small after crocheting them, but the fluffiness adds to the size considerably after they are brushed. After brushing, my double-strand-of-worsted chick is almost as large as the original chick.

As the chicks are heavily brushed, I gave the fluff a little trim around the face (particularly the eye area) with a pair of small sharp scissors, to get rid of any extra-long fibres and neaten then up a bit.

fuzzy chick crochet pattern by planetjune

It’d be a bit fiddly to brush such small amigurumi with a pet brush, so, if you feel like small brushed amigurumi might be something you’d like to add to your repertoire, I highly recommend you seek out a Teasel/Nap Riser/Bunka brush to make the task less perilous!

fuzzy chick crochet pattern by planetjune

Now you know you can use any yellow yarn to make a Fuzzy Chick, how about making one – or a handful – of tiny chickies for the Spring/Easter crochet-along? The brushing probably takes longer than the crocheting, but with only 4 tiny parts, it’s still a very speedy project, and would be lovely for Easter…

Comments (5)

« Previous entries
  • Welcome to PlanetJune!

    June Gilbank Hi, I'm June. Welcome to my world of nature-inspired crochet and crafting. I hope you enjoy your visit!
  • Follow me

    RSS FeedSubscribe to my blog by EmailFollow me on TwitterFollow me on Facebook
    Friend me on RavelryWatch me on YouTubeFollow me on PinterestMy photostream on Flickr
  • Categories

  • Archives

  • Like me on Facebook

  • Follow me on Twitter