Crochet Basics (right-handed)
Looking for the left-handed version? If not, read on:
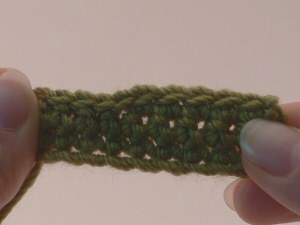
Basic stitches for Amigurumi
To learn to make amigurumi, you only need to know a few very basic crochet stitches. This brief guide will teach you all the basic stitches you’ll need to be able to follow an amigurumi pattern and start to crochet your own toys!
Note: This guide, as with all my patterns and tutorials, use standard (US) crochet terminology.
Contents
- Slip Knot (starting loop)
- Chain (ch)
- Single Crochet (sc)
- Single crochet increase (2 sc)
- Single crochet decrease (sc2tog)
- Slip Stitch (sl st)
- Crocheting in the round
For more advanced techniques, e.g. magic ring, colour changes, joining pieces, see the main Amigurumi Help page.
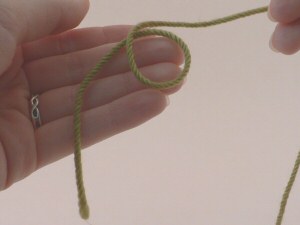
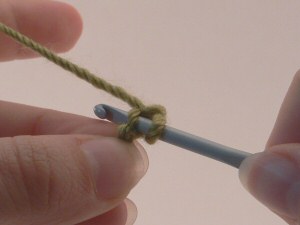
Slip Knot (starting loop)
Make a loop about 6” from end of yarn:
Insert hook through loop and hook the long end of the yarn:

Use hook to draw yarn through loop:
Pull loop tight:
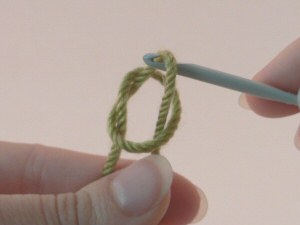
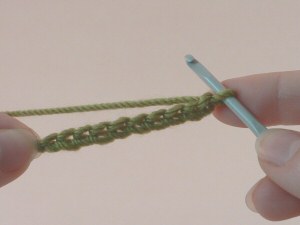
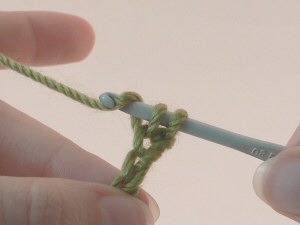
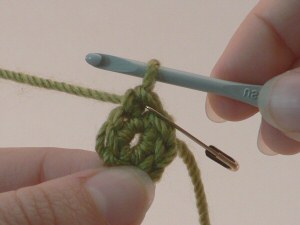
Chain (ch)
With starting loop on hook, yarn over:
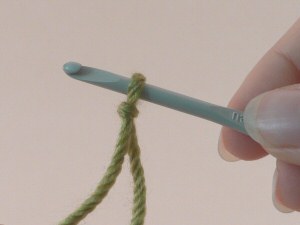
Draw hook back through loop on hook (1 ch completed):

Repeat the steps (yarn over, draw hook back through loop on hook) to make each ch st:
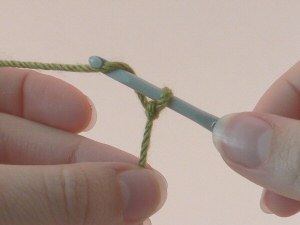
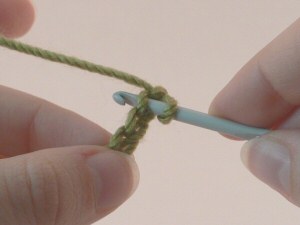
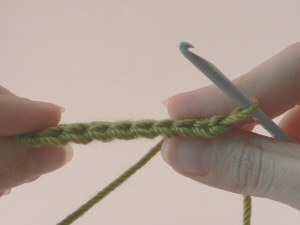
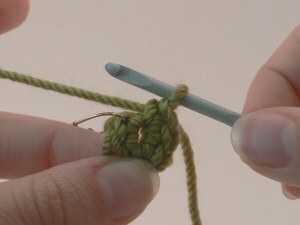
Single Crochet (sc)
Single crochet into a chain (usually first row/round only)
Insert hook into 2nd ch from hook.
Note: loop on hook does NOT count as a chain:
Yarn over:
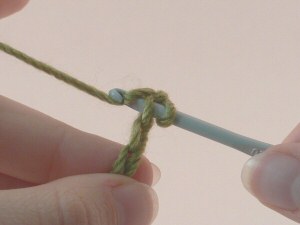
Draw yarn through chain (2 loops on hook):
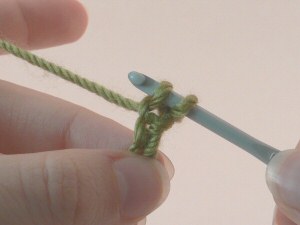
Yarn over:
Draw yarn through both loops on hook (1 loop on hook, 1 sc made):
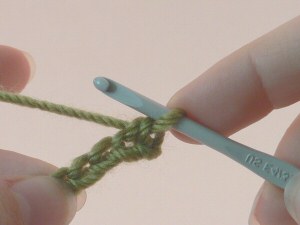
Make a sc in each ch (or as specified in pattern):
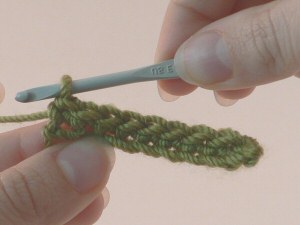
Single crochet into a single crochet (usually all rows/rounds except first)
From the top, each crocheted stitch looks like a ‘V’ shape:
Unless otherwise specified in a pattern, insert your hook under both top loops to begin the stitch, as shown below:

Complete the stitch as shown for single crochet into a chain: yarn over, draw up a loop (2 loops on hook), yarn over, draw yarn through both loops on hook.
Single crochet increase (2 sc)
To increase in single crochet, make the first stitch as usual:
Insert hook back into the same stitch to form the 2nd sc:

Complete the sc as usual:
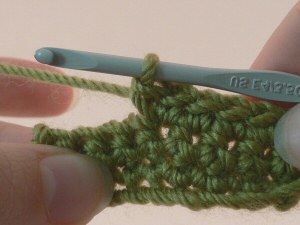
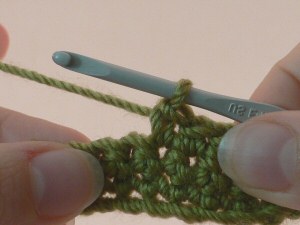
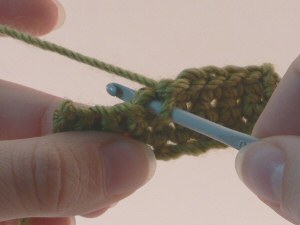
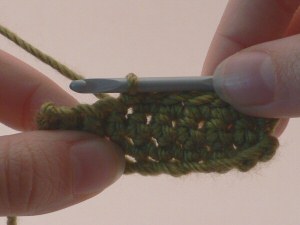
Single crochet decrease (sc2tog)
Insert hook into stitch:
Yarn over and draw up a loop:

Insert hook into next stitch:

Yarn over and draw up a loop:

Yarn over and draw through all three loops on hook:

1 sc decrease completed:

Once you are comfortable with this method for a basic decrease, try learning the Invisible Decrease to make your decreases practically invisible!
Slip Stitch (sl st)
Insert hook into stitch:

Yarn over and draw up a loop; draw through loop on hook:
1 sl st completed:
Crocheting in the round
Ch 2:

Insert hook in 2nd ch from hook:
Complete sc and place stitch marker into the top of this stitch:

Continue to make sc into the same space (number as specified in pattern). Stitches will form a circle:
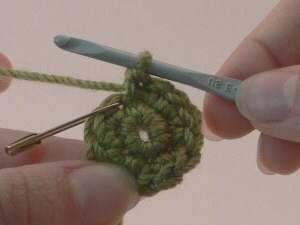
To begin the second round, insert hook into the first st of the previous round (as marked by the stitch marker). It is easier to first remove the stitch marker, then make the stitch:

After completing the first stitch, place the stitch marker into this stitch:
Continue to crochet around the circle as specified in pattern. Picture below shows end of Rnd 2; to begin Rnd 3, remove stitch marker, make first stitch then place stitch marker into this stitch:
Once you are comfortable with this method, try the Magic Ring method to avoid leaving that hole in the middle of your starting round.
Now you should know everything you need to know to be able to crochet your first amigurumi! Have fun!

Loved this tutorial? I have so many more amigurumi tips and tricks to share with you!
Boost your amigurumi skills with my latest book, The Essential Guide to Amigurumi, your comprehensive guide to amigurumi techniques and tips.
Do you find my tutorials helpful? If so, please consider making a contribution towards my time so I can continue to create clear and concise tutorials for you:
Thank you so much for your support! Now click below for loads more crochet video and photo tutorials (and do let me know what else you’d like me to cover in future tutorials…)


Jeanette said
Augh! I am making a little longhorn! The horns have three stitches and starting it almost impossible!! I’ve tried for hours! Managed to get one horn done, don’t know how! So frustrating! I’m leaning my stitches to start not too tight! Just about to give up! I’m one horn away! Help!
June said
Jeanette, take a look at my Narrow Pointed Tubes tutorial – it demonstrates exactly how to make these tiny fiddly pieces!
Sedra said
I’m slightly confused! When a pattern says (2 sc in next st, sc in next st) twice. (6 st)
What does it mean when I need to do 2 single crochet in next st? Do I make two loops in it so I got three to drag through or do I make one, and then somehow put it though the same st again and make a second one..? And then make a single one in the next one? I don’t quite understand.
June said
Don’t worry, the instructions for both parts are on this page!
Kristina Flynn said
I must be missing something because the total stitches at the end of my rounds don’t always add up. For instance, I’m told to do:
[2sc in next, 3sc] repeat around (24)
I did that and wound up with 22 total.
Next round is [2sc in next, 3sc] repeat (30)
My count is now off even with most careful planning ahead.
Does “next” mean to skip a stitch? When I count next as a skip, it sometimes adds up, but not always. It’s driving me crazy. Thank you for being there for all of us!
Kristina
June said
Kristina, it’s not your fault! Try one of my patterns and you should find that your total stitches always add up correctly. 🙂
Unfortunately, not all patterns are equally well-written or error-free. Yours has a basic error: as a designer and tech editor, I know that a multiple of 5 stitches (each repeat in the parentheses) can never add up to 24 stitches, so try replacing the ‘3’ with a ‘2’ in the first round you quoted and it’ll probably work. (Please note that I can’t offer support for other designers’ patterns, so, if you suspect any more mistakes in the pattern, you should contact the designer directly for support/assistance).
And ‘Next stitch’ always means ‘the stitch immediately following the stitch you just worked into’, so no, don’t skip any stitches unless the pattern specifically says to!
Kristina Flynn said
June,
Thankyou so much for your response! I read after I sent that message that I should have been commenting on only your patterns, so I apologize. I will certainly find one or more of your patterns to work on. Thanks again! Kristina
lauren said
what is a chain space?
June said
Lauren, please see my answer to that question here 🙂
zelna said
total rookie great stuff very very helpful indeed thanks alot
Eva said
Hello!
I’ve been following your tutorials, great tutorials by the way! Thank you for sharing.
I’m still a rookie on amigurumi and I’ve been reading some patterns, I thought maybe you could help me with a question I have. As I understand, amigurumi is crochet in a round, we don’t build up rows. But some people make patterns where we finish each row with a slip stitch and chain one. Can you tell me if that makes any sense? Can we just crochet in a round without doing the slip stitch and chain 1, or does that really make a difference?
Thank you for your help!!
June said
Yes and no, Eva – it really depends on the pattern.
aisha said
thanx
Immaculate said
Wonderful site 🙂
Brittany said
Dear june
I am still having trouble with the sc2tog. Your explanation was very helpfull but i dont know where the stitch i am suppose to put on the hook is so im very confused so could u please help me asap
Thank u
June said
Brittany, the working loop should already be on the hook from the end of your previous stitch. You make the sc2tog b working into the next two stitches after the one you worked into with the stitch before the sc2tog.
Alex-Drew said
Hello June!,
Thanks so much for all of these tutorials, I started this only two days ago, and already feel like a pro with your simple and easy to follow guides 😀
I just have a silly question, I don’t recall it being in any of your tutorials….but…how do you switch threads? I under-estimated the size of the pattern that I was following, and need more yarn, should I treat it the same as switching colors, or is there a better way? I’m trying to keep it as clean and simple as possible xD
Thank you in advance xoxoxo
Alex-Drew, Hyde Park, New York~
June said
Alex-Drew, you’re exactly right! The method is exactly the same as a colour change, but, instead of a second colour, you’ll just use the new ball of yarn. (If you’re making something worked in rows, it’s best to change to the new yarn at the end of a row, if you can.)
Alex-Drew said
Okay, thank you for your reassurance in the manner xD you are so helpful and I want you to know everyone respects and loves you and what you do! thanks again June!
Dorre said
Hi June! I’m a little late to the party, but I stumbled upon your directions and they are so clear, thank you for the pictures! I only learned from watching my Grandma, so I’m glad she taught me the “right” way to crochet. I’ve done many big projects, but amigurumi’s terrify me! I do have one silly question, what does the “mm” at the end of the pattern line mean? Ex: R5 thru R11- sc in each stitch around, mm
Thanks again for the great tutorial!!
June said
Dorre, it’s not standard terminology because it’s a bit redundant (and it should be explained in the abbreviations if it’s used in a pattern!) but some people write ‘pm’ (place marker) at the end of Rnd 1 or the start of Rnd 2, and then ‘mm’ (move marker) in every subsequent round to remind you to move the marker up at the end (or beginning) of each round.
Ashley said
Hi,June
I am new at crocheting and making amigurumi.I am going make the tiny whale for my first amigurumi and I was wondering what size hook I should use.
Thanks
June said
Ashley, the hook size is given in the pattern: www.planetjune.com/tinywhale
– it’s an E US/3.5mm. If you have problems with using such a small hook for your first project, you could go up to an F or G 🙂
Kendra said
Oh my goodness I couldn’t figure out why none of my amigurumi were turning out but somehow I managed to get a slip stitch and a single crochet mixed up. No other tutorials were as clear as yours! Thank you so much! Now my amigurumi’s won’t be gibbled little creations!
Chelsy Askren said
Hello,
First off THANK YOU for the detailed instructions you’ve taken the time to post! Could you perhaps help me with Jogging? I have attempted to make the amigurimi doll on the stitch website but the stripes don’t line up evenly & i assumed this was the jog you referred to. Would it be possible for you to upload a video on how to avoid jogging? I have come so far from using these instructions but am hung up on this one area. Thank you in advance for your help with this! You’re awesome!
June said
Chelsy, sorry it’s taken me so long to reply! There’s no way to avoid a jog if you crochet in a spiral. The only way to avoid it is to join with a sl st at the end of each round and start the next round with a ch 1 (in the new colour), but then you’d have a visible seam instead: there’s always a compromise! NeedleNoodles has a tutorial on ‘jogless stripes‘ – her methods would help to make the jogs less visible, but there’s no method (yet!) to entirely avoid a visible change at the join.
sandra park said
when i make anything circular in ami (whether round body, arms, or legs), the stiches do not look very neat. In fact, it looks so much better (the stiches look much more distinct) when I turn it inside out! Any idea why?
confused in arlington, tx.
June said
Sandra, it’s hard to say for sure without seeing a photo of your crochet, but I do have a couple of ideas for you.
I hope that helps! I can give you more specific advice if you can take a pic of your work, so I can see exactly what you may be doing 🙂 You’ll also find lots more amigurumi tips and advice in my book, The Complete Idiot’s Guide to Amigurumi…
Ashleigh said
I’m a crochet newbie and I have a pattern that read “Ch 2,8 sc in second stitch from hook” and I couldn’t understand how to execute that until I saw your tutorial here so thank you very much for the very clear and detailed instructions!
Elaine Howard said
I have never made an amigurumi before and have been intrigued by them, the pictures of them just seem to beg you to make them. I still know the basics of crocheting, but only know English crochet hook sizes. What size do you use, and are they equivalent?
Elaine
June said
Elaine, I always give the hook sizes in my patterns in US size and mm. The hook I use most often for amigurumi is a US size E (3.5mm). I believe that’s a UK size 9, but it’s always best to use the mm measurement to make sure you’re using the same size, wherever in the world you are, and whatever brand of hook you use (the sizes aren’t entirely standardized between brands, but you can’t argue with an exact measurement in mm!)
Kay said
hey June.
I know this will be a silly question but thanks to some friends of mine I am very confused.
I wanted to start doing amigurumi, but when I was talking to some friends of mine one says that she only ever goes under one of the top loops on of the “v” whereas another says she goes under both, so now I don’t know which one I should do.
Please help, thank you in advance 😀
June said
There are no silly questions! Unless the instructions specify that you should crochet in “back loops only” or “front loops only”, you should always go under both loops of the V 🙂
TaraLB said
Hi June!
Thanks so much for your tip on my blog! I did read this tutorial but clearly I didn’t read it carefully enough! I’ll definitely be trying again and I’ll be sure to read the tutorial carefully!
Thanks!
Tara
June said
Sarah: yes, cut the yarn leaving a long tail. Draw the tail through the last loop remaining on your hook, and then pull the end tight to close up the loop so that the crochet won’t unravel.
sarah said
hey june,
ur info is soo helpful…
i have a question.. at the end of a patterns when it says “break yarn” does that mean cut it off and knot it ???
cleo said
THANK YOU SOOOOOOOO MUCH!! this was what I was looking for. Thank you for taking the time and effort to share this with us.
Cleo
South Africa
Pallavi said
Thank you so much for this tutorial. Every single thing I wanted to learn is here with pictures!! I am a beginner at crocheting. I bought an amigurumi book but your instructions are way better than the ones in the book. I feel like I can finally start my amigurumi!! 🙂
Katelyn said
Hi, great tutorials. I’m a beginner amigurumi maker but an old crocheter. I the new things I can create.
I have a question for anyone that can help. I have a pattern and one part of it says:
R6 – *2sc in first stitch, 1 sc in next 4 stitches, repeat from * around, mm
Work 5 more Rounds
Does this mean 5 more rounds of row 6? or just 5 rounds of sc’s, one in each stitch?
Thanks
June said
Katelyn, that sounds like a badly written pattern! My guess would be work that you should 5 more rounds without increasing, just sc in each st around. If you can send me a link to a picture of the thing you’re trying to make (and which part of the ami has those instructions), I can verify that for you 🙂
Claire said
Hi regarding your question I to see this all the time in patterns I finally found out after many attempts and getting it wrong that when it said continue 5 more rounds etc it means to repeat the round u have just done, so u would repeat 2SC in the first stich 1 SC in the next 4 stitches.
It’s a real pain when some don’t explain the instructions well.
Good luck
emma said
hi… i think i have created the 7 loop ring to start my pattern but am having some difficulty figuring out what stitches are the ones i have to loop to create the double stitches (so i end up with 14)…. do you have any other pointers?
Maria said
Thanks so much for posting them!!!
Nichole said
Another Question! The fuzzballs wouldn’t be fuzzy, but would making one work with regular yarn? Thanks