This is a tutorial for a really simple cushion cover. It’s really quick and easy to make (and cheap!) as it doesn’t require a zip – the cushion is inserted like a pillow into a pillowcase.
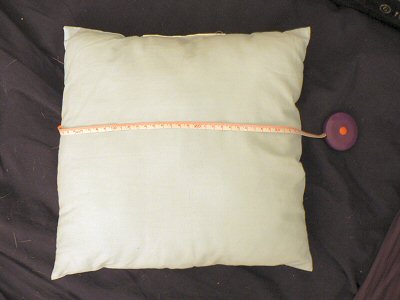
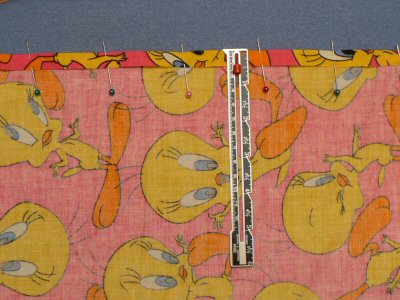
- Measure your cushion’s length and width. My cushion is a 35.5cm square but any rectangular cushion will work just as well – it doesn’t have to be square.
- This is the hardest part – working out the size of fabric you need. Add 2x the seam allowance to the width (I’m allowing 1cm for my seams, so I need a 37.5cm width). For the length, you’ll need twice the length of the cushion, plus a flap on one end, and a finished edge on the other.
- I chose a big 12cm flap, so the cushion will always be well hidden inside the case. I also saved some work by cutting my fabric so the selvedge formed the edge of the flap. It saves having to finish another raw edge, and the edge of the flap will be hidden, so it doesn’t have to be very pretty. If you don’t use the selvedge, add a little extra to your flap so you can finish this edge in the same way as you’ll finish the other edge.
- You’ll need a double fold on the other end, so add slightly more than twice your seam allowance (20mm for me, so I used 25mm).
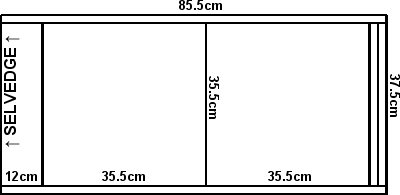
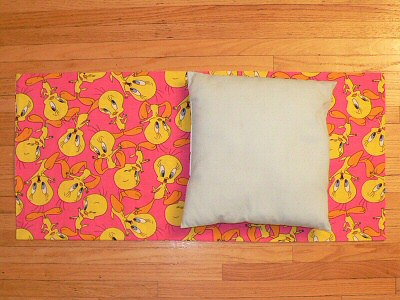
Okay, so my rectangle to cut is 85.5cm x 37.5cm. That’s the hard part over – promise! It’s all easy from here. - Cut your fabric to the size you worked out. Here’s mine with the cushion for comparison.
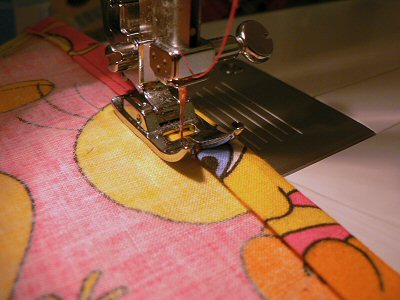
- Now to finish the raw short edge on the right (the edge opposite the selvedge). Starting with the fabric face down, fold the edge over by half of the extra you added (12mm for me), and press in place. You may find it easier to pin the fold before pressing.
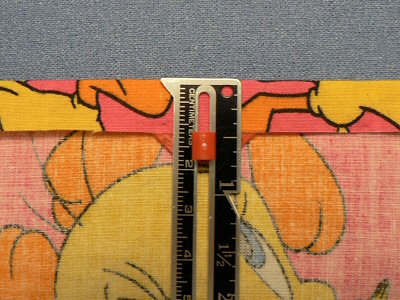
- Fold over by the same amount again, to trap the raw edge inside the fold. Press in place.
- Sew along the whole edge to keep the folds in place.
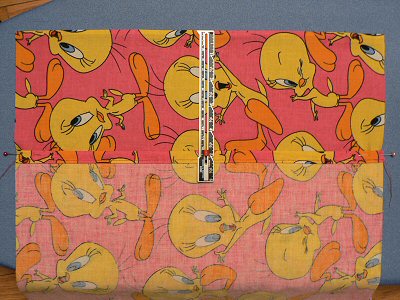
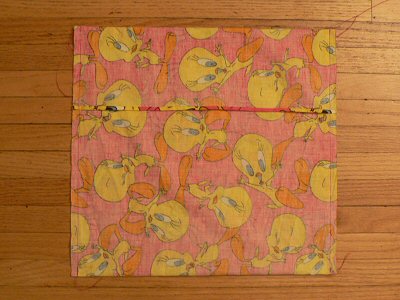
- Starting with the fabric right side up, with the selvedge at the top, bring the edge you have just finished up so the fabric has a fold at the bottom. Arrange it so that the length of the flap is uncovered by the second layer of fabric (see picture: 12cm of the right side of the fabric shows at the top; the fold is off the bottom of the picture):
- Fold the flap down over the top of the second layer. Pin along both sides of the cushion cover.
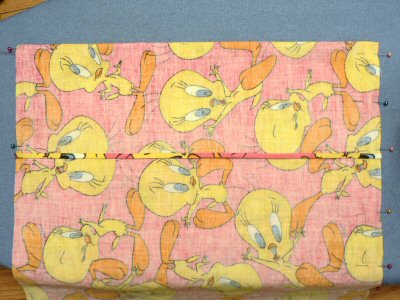
- Sew along each of the sides, from top to bottom.
- That’s it! Turn your new cushion cover inside out and press. Then insert your cushion and admire your handiwork!
I hope this tutorial is useful – please let me know if you have any questions or comments.


karen said
it’s looks so easy
and worth to try
thanks for tutorial june 🙂
Aditi Sinha said
Thanks for this post! Very easily explained, well done.
Jaz said
Great post thanks for sharing this 🙂
John Winston said
Thanks for lovely tutorial making cushion cover.
Sarah said
Thank you for your turtiol on making cushion cover! I hate zipper’s and one of my down falls hehe! So when i come arcoss this i was so excited went out and brought myself some cushions!! 🙂
may said
Dear June
Thank you for making the calcs so easy to follow and saving me all kinds of time. You have a gift for explaining and illustrating.
Great work!
Helen said
Just wanted to say thanks for the tutorial. I got chucked out of my textiles class at school aged 14 because I kept breaking sewing machine needles (I have no idea how, but I think the teachers thought I was doing it on purpose!!). At aged 29, I decided it was time to get over my fear of ‘the machine’, so I bought a mini one and have just made cushion covers using your tutorial and WITHOUT breaking the needle. Chuffed of Brighton UK!
Caryn said
Hi, June,
I am very inexperienced in sewing, but I needed to make a cover for a couch pillow as the old one was falling to pieces. I googled a pattern for a cushion and your site came up. Your instructions were absolutely fantastic! I had to sew by hand, but even so it came out beautifully. Thank you very much.
Helen said
Found the blog via search engine and thank you so much! Love it, the photos really helped!
Lorna said
Hi
I like the fact that you show illutrations to accompany the instructions. I need to make a cushion that I already made a patchwork front for, but I want ribbon ties rather than a zip fastener. Can you do this one?!
Hope you might be able to.
Ani said
Hi,
Found your tutorial through the google search engine and it was fantastic. Im not that skilled at sewing or textiles but I actually made a pillowcase! Very happy and thanks for explaining it so easily!
Ani
Home Furnishing said
Thanks for this. i love this pattern and you have explained it very easily really amazing. cartoons always looks great and cute
D. Virginia said
Hi!
I found you through a google search. I wanted to thank you very much for your post! Since I don’t have a sewing machine, I’ve actually sewn everything by hand, which took a bit longer; but still with the help of your tutorial, I’ve just completed my first hand-made pillow!
Again, thank you so much for posting such a helpful tutorial! I’ll be “coming back” for more and checking out your site!
Melanie said
Thankyou! Enjoyed making this cover and had great success. First time i’ve used a sewing machine since high school!
Great, simple easy to follow instructions. The pictures and diagrams helped loads.
Debbie Bright said
Wow!! Very easy to do and fit the cushions perfectly. Thank you for the great tutuorial.
gita said
what an amazing tutorial! i’ve been putting off making my cushion covers but now i feel i can do it! thank you!!!!!
Ella said
Thanks for this tutorial!
After literally not having sewn since high school, I bought a machine and tried this cushion.
Fantastic, easy to use instructions… I can’t believe I managed to get it first go!
Thank you so much.
You’ve introduced me back into sewing!!
Rachel said
Hi,
Thanks for this tutorial.
My questions are about the SIZING/SIZE of pillow/cushion pad which goes in the cover.
I bought a pad which is supposed to be 18″ x 18″ but seems to measure a bit less than that.. When I made a cover following instructions for 18″ x18″, it ended up at about 16″ x 16″…
I know you should add a size up pad to make the cushion/pillow more full but how does all this sizing actually work..?
If I want to say, this is a 18″ x 18″ cover, but actually it measures about 16.5″ x 16.5″…
thanks,
Rachel
Ruth said
Thanks June
This is a truly simple to follow pattern and it worked perfectly on my first attempt with my new christmas sewing machine. do you have a next stage pattern or tutorial to demonstrate how to add a couple of buttons please?
Thanks
Ruth
Eddy said
I have just resigned from police to pursue a course in fashion designing.
no question about it, I need your help. God bless you.
Mary said
Hi, Great step by step, but do you have a cushion cover, same style but my large pillows are like an old fashion baby mattress. How do I make it fit properly. Its OK if you don’t know.
del said
Hi thanks for instructions, just what i wanted I may even take a picture if they look good enough. You don’t have an easy pattern for sofa covers do you?
mclianne said
Awesome! You saved my life tonight making a last minute swap item. I wasn’t looking forward to whipstitching my pillow cover closed by hand at 1 am. You saved me from having to do that!
mags said
Hi
Very easily explained, well done. Can you now do the same for other basic household things. I would like to make curtains properly, of various designs but don’t follow diagrams too well. I have always hoped that someone would bring out a dvd or video on how to sew and to use various applications and you did this one well so it’s worth asking.
Thanks
mags
Paperdaisies said
Hey there!
I discovered your tutorial here somehow (I think it was from Craftster.org) and I just used it to make a cushion cover for a swap I am doing there.Your tute was wonderful! Thanks so much for sharing! I was so happy to find a pattern for a cushion cover that didn’t require a zipper or buttons! Thanks again!
-Rosie
Ps. I made a felt applique thingy to go on the front, I can’t show you yet…but when my partner has received I’ll send you a pic if you like!
Shana said
Hi. You write fantastic tutorials. Would you be interested in posting any of them at Craftacular?
jill said
Hi. I found this pattern throguh a link from Craftster. I was dreading making this pillow, but your tutorial made it very easy. Thanks!