This tutorial is Donationware – the instructions are available for free, but if you like it please consider sending me a donation to show your appreciation:
Send me a donation and receive the easy-to-print PDF version of the tutorial as a thank you!
Donations of any size are much appreciated. Just add the amount you wish to donate, and, once you have checked out and paid, your PDF will instantly be available to download from your PlanetJune account.
The complete instructions are available below, regardless of whether or not you choose to pay for them 🙂
This is a PlanetJune original tutorial. Please do not share or reproduce this tutorial; instead post a link to www.planetjune.com/pincushion
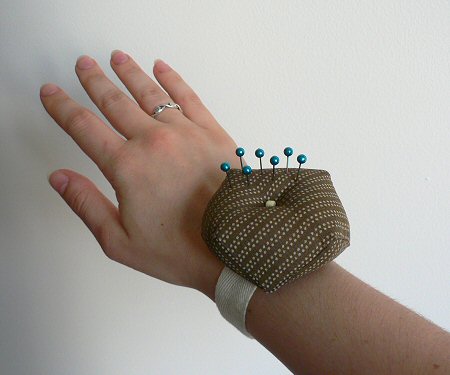
I designed my pig wrist pincushion last summer, and it’s been so useful – I wear it whenever I use my sewing machine. This month’s Whiplash challenge theme is Zakka so I thought a tutorial for my pincushion might fit into that category. I have named this pincushion the Offset Square Wrist Pincushion because it’s made from two squares of fabric, offset before sewing, which results in an interesting shape in the finished pincushion:
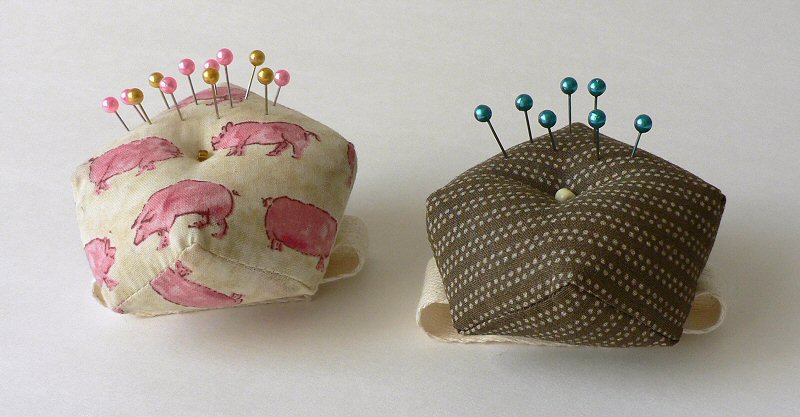
Click for the full size picture
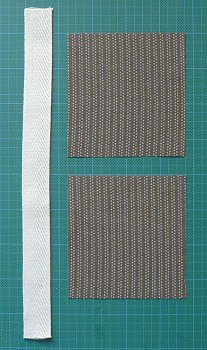
You will need:
2 squares of fabric, each 3.5″
3/4″ width twill tape, approx 10-12″ (depending on the size of your wrist)
3/4″ width Velcro, 1.5″
A small bead or button
Sewing thread in colours to match fabric and Velcro
A small quantity of polyester fibrefill stuffing
Instructions
- Measure the circumference of your wrist and add 3.5″. Cut a length of twill tape to this measurement.
- Lay the twill tape down on a flat surface, and fold up 1 inch at one end of the tape. Position the ‘hook’ piece of the Velcro at the same end so it covers the raw edge of the folded tape. Pin in place if required, then sew all around the edge of the Velcro.

- Turn the twill tape over so the Velcro is face down. Fold up 1 inch at the other end of the tape and position the ‘loop’ piece of the Velcro over this end so it covers the raw edge of the folded tape. Pin in place if required, then sew all around the edge of the Velcro.
- Cut two 3.5″ squares of fabric using scissors or a rotary cutter. Using a fast-fade fabric pen or tailor’s chalk, mark one square (square A) 3/8″ from the edge around all four edges, then mark the centre of each edge. Mark the second square (square B) with registration points 3/8″ down from the top, at each side.

- Position A face up and lay the twill tape along a diagonal of the fabric with the loop side of the Velcro facing up, so that an equal amount of the tape extends over each corner of the fabric. Pin the tape to the fabric.
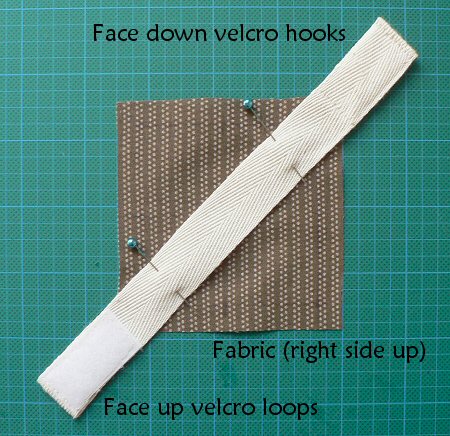
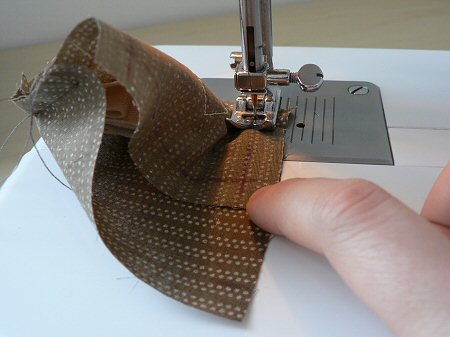
- Sew the tape to the fabric with a 1.5″ long rectangle in the middle of the fabric and tape (turned over in photo below so you can see the stitching).
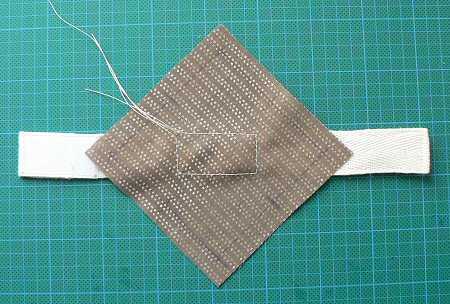
-
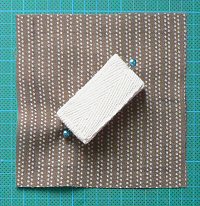
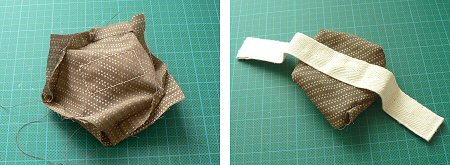
Place B face up with the registration marks at the top edge. Close the wrist strap and pin to itself to keep it out of the way while you sew up the pincushion (see right), then place A face down on top of B. Now offset A by moving it upward until A’s centre marks are aligned with B’s registration marks. Pin the squares together along the right hand side.
Now, to sew the squares together. You will be stitching 7 lines, each half the length of one side of the square, and then rotating either the upper or lower fabric square before stitching the next line. The fabric you have already sewn will get bunched up while you are sewing, but it will all work out in the end!
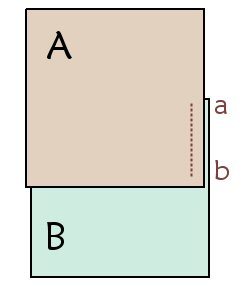
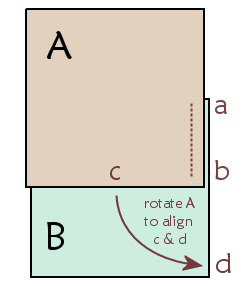
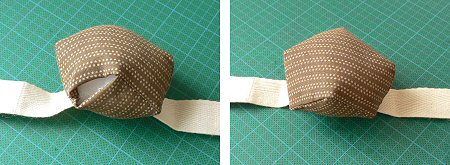
- Starting at the centre of the right edge of A (point a), sew the squares together from a to b. Make sure the sewing machine needle is down, then lift the presser foot. Rotate A so that the next side of A is aligned with the remainder of the first side of B and point c is directly over point d. Pin in place if desired (as the piece is so small, I find it easier to just hold the two pieces together and feed them through the machine), then lower the presser foot.
- Sew along this edge until you reach point d. Make sure the sewing machine needle is down before raising the presser foot. Rotate B so the next side is aligned with the remainder of the side of A. Pin if desired, lower the presser foot, then sew along the next edge.
- Continue in this way, repeating 8 and 9, until you reach the final side. Leave this side open to turn the pincushion through. Finish off securely.
- Clip the excess fabric from all the corners of the pincushion, then turn it right side out through the open side. It will be a tight fit so be patient with it. You can use a pen or your finger to push out the corners.
- Fill the pincushion with fibrefill until it is fairly solid, then fold the seam allowances inside the cushion and hand-stitch the gap closed.
- Thread a needle with both ends of a length of strong sewing thread, leaving the loop of the thread longer than the two ends. Push the needle through the centre of the pincushion from the middle of the cushion top through to the middle of the tape. Do not pull the thread all the way through – leave the loop extending from the top. Insert the needle close to where it came out and stitch back up through the pincushion and through the loop. Pull tight to dimple the centre of the cushion.
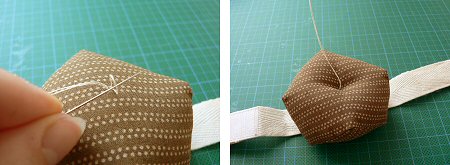
- Add a small button or bead to cover your stitch and then go back through the pincushion, make one more small stitch on the back and come back through to the top. Unthread one of the two ends from your needle, go through the button or bead once more with the other end. Tie the two ends together and then lose them inside the pincushion.
- Attach the pincushion to your wrist, add some pins, and you’re ready to go!
I hope you enjoyed this tutorial! Please leave me a comment if you did, and consider leaving me a donation. Thanks!


Rhonda said
OMG, I am not getting this. Spent at least 3 hours get the first side done and that’s. In the trash it goes. Trying again, later on. I know it’s not hard but the ABCD twisting around is not working for me. I’ll try again another day when I. Not so frustrated, I think I need to have it more laid out like specifics instead of repeat steps 8-9. Not you just me, I. Much more visual than what’s given.
Trudy H. said
this looks like a really good tutorial and wrist pincushion…can’t wait to make it
Terri Ann said
Thanks so much for sharing this. After a recent misstep in a major project I need a quick & satisfying finish and this pin cushion is certainly the one I needed!
Terri Ann said
I made the pincushion and used some of my Moda twill tape for the wrist band and LOVE it 🙂 childlikefascination.com/2015/01/pincushion-finish/
Anne Everett said
Mine tirned out really cute. Love it and these clear instructions. Thanks (PS Why do you need our email? Pleeeeease don’t use mine)
June said
All blog comment forms (not just mine) require an email address so the blogger has the option to reply to the commenter. So please don’t worry, Anne; I’d never use your email address without permission!
Mindy said
I just finished this cushion with bright pink and black zebra striped material. I left off the wristband and just made a standalone cushion. It is GORGEOUS and I love it! For beginners, marking your lines and midpoints is crucial. This is such a great piece and super quick to finish! It is extremely easy to change the size of this since it uses only squares. Thanks for the idea!!!!
-Moon
rosemeire g.m.zampirolli said
Hi, I’m from Brazil and I like to browse and learn more with blogging, and thank you for your generosity in sharing with me, with us these beautiful things that both delights us. thank you.
Annarae said
I have a Ring pin cushion that I made using soda caps. Stuff some material and hot glue it into cap with a piece of eclectic for your finger.
Mimi petite souris said
Je n ai pas compris le texte mais les images parlent,donc j ai compris comment il fallait faire.je trouve les biscornus supers ,cordialement
Helene said
Thank you very much.. I made one today:)
odete said
com que facilidade exexcutei o trabalho apresentado.ficou um amor,e olhe que eu desconhecia o termo,nome e o tipo de alfineteiro. Um abraço e parabens.
bianca said
thanks for the great tutorial. My pincushion has a good home on my wrist most of the time. here is a link to a picture.
twolittletornadoes.blogspot.com/2011/05/square-wrist-pincushion.html
Susan said
Love this adorable wrist pin cushion. I guess I’m directionally challenged, because it took me a couple of tries to get it right, but delighted with the result. A printer-friendly link would be a great addition, so I wouldn’t have to keep running back & forth between my sewing room and computer room!
marcela said
lindo este trabalho voce ja fez almofada com este modelo?
oh sew sweet said
Just finished your off set wrist pincushion and it’s already being put to use. love the shape, size and tutorial! thanks.
Ruth Michaels said
Love the look of this little pincushion. There are 5 of us in our Sew Pals sewing group. We make each person a Christmas gift, plus one for ourselves. This seemingly easy project could be one of my Christmas gifts for 2011. Can’t start too soon. Thanks so much for sharing.
Barbara Abbott said
I have been looking for a neat pin cushion for some time now and hey, this fits the bill perfectly. Thank you so much for the idea and tutorial, I must get cracking.
La r said
Bravo! C’est très joli et pratique
Tortue said
Nice and easy to make!Thank you!
Terri said
Thank you for this great pattern. I love my little pincushion which was quick and easy to make. I have posted it on my blog with a link back here. I think I will be making some more as gifts. Thanks again for the tutorial.
Rose said
I know this isnt exactly relevant but what is whiplash? I really like crafting and am probably getting a sewing machine soon and am very interested. The pincushion is really cool!
June said
Whiplash was a monthly craft challenge hosted at WhipUp, with a different theme each month. They sadly stopped doing it a few years ago. I used to love it – it was great to have a challenge to get the creativity flowing! Plus I made some great crafty friends through it.
June said
Great idea, ErinAnn!
ErinAnn said
Oh, by the way… I also put a piece of plastic in the bottom of mine before I stuffed it. That way I get a little protection from needles. 🙂 I cut a clover shape to fit the design.
ErinAnn said
I just made one! Thanks for the easy tutorial!
glisteneyes said
Oh man. Tried to make one tonight. Miserable fail! Will try again another time. Strap came out fine, first two corners too. But I tuffed with scraps from plastic yarn that my friend makes (out of strips of plastic bags) and the pins don’t want to go through the plastic. Round two will happen after I get better at sewing! Yours looks marvelous, though!
Nilou said
Thanks for this tutorial.I’ve been looking so long for a tutorial easy to understand. A it’s so crazy that it’s an english one which is the best to me because i’m french and my english level is bad…
Gwenddydd said
A nice idea !
thanks for this tuto.
zabelle said
thank you
I will make one!
caroline said
Thanks so much for the tutorial! I just made my pincushion using fabric and the waistband (for an elastic wristband) from a pair of old boxer shorts (plus a square of leftover quilting fabric). Perfect!
Karen said
Hi, Just made the pincushion in about 30 minutes. Couldn’t believe how simple it really was with the great instructions. I didn’t have any tape or velcro so I used an offcut of 1 1/2″ wide non-roll elastic. Works perfectly. Showed my mum and she loves it, but she said, beware of getting used to it, then when you don’t have it on, you stab yourself in the back of the wrist without thinking.
Thanks again for a terrific project.
Stacey said
I completed four of these for Christmas presents for family and friends. I struggled to keep from freaking out when I sewed the first one. I had to keep telling myself to just trust in the instructions. Sure enough; it turned out great! Thanks for taking the time to create this tutorial. Now I have it in my head to make a large one to use as an ottoman. To see a few of them: www.flickr.com/photos/98714465@N00/2106534328/
Sadie said
June,
I just realized that you posted it on here, lol, so I’ll just put my response to the email I received on here, too.
I really appreciate your responding to my questions. I understand your point about pushing the needle all the way in, I usually don’t do it either, but have, on occasion, when in a hurry or not paying attention, put it right to the band, so that’s why I was wondering.
I will have to think about the flannel, too. I’m not sure if I want to use it or regular fabric, I just have the flannel on hand and that’s why I was wondering that. It’s really ‘baby’ patterned flannel, so I’m not sure about using it, anyway.
On another note…I just found your blog and really like it! I already have a lot of ideas for gifts from your blog! Thanks so much for your work keeping it up.
Thanks again!
June said
Sadie, if you were to push the pins straight down into the pincushion so that only the heads stick out, they could go right through and stick into you… but it’s inconvenient to pull the pins out if they are like that anyway! Just push them in partway (as in my photographs) and then it’s easy to grab one quickly if you need it, and your wrist will be safe 🙂
As to flannel, I have never used it to make a pincushion, but it should work well. I tried to use flannel to make a small toy once before and I found that the fabric pulled apart at the stitching when I tried to turn it right side out, so my advice would be to finish the raw edges of the squares before you begin (by doing a zig-zag stitch all the way around the edge of each square). The zig-zag will be hidden in the seam allowance, and it will stop the flannel from fraying or pulling apart when you try to turn the pincushion right side out.
Sadie said
Sorry, one more question. Have you ever used flannel? I have some extra and am just wondering if it will work ok.
Thanks again.
Sadie said
I was wondering if the pins stick you at all. My mother-in-law has one of the ones with a plastic band that she made years ago, for the most part, the pins don’t go past the plastic band, but sometimes I do touch the plastic with the pin (I use it, too) and occasionally I stick myself, but rarely since the band keeps them away. I’m just wondering if you do something that I didn’t notice to keep it from doing that.
It’s a really cute design and I’m planning on making one, I just want to know if this has been a problem.
Thanks,
Sadie
eileen said
This is so sweet! I was watching Project Runway and one of the designers had a wrist pin cushion, and I thought: oh, that’s exactly what I need. I’ll buy one. And then I went: Duh. Make one. Who needs another imported poorly made item? Not me.
So I used a teeny bit of fabric from an old project and stitched one up. Handful of stuffing from another project. And behold: just what I needed.
Thanks so much for spelling this out so clearly.
Akhila said
What a fantastic little pin cushion and handy to have it attached to you (I always ending up with a mouth full of pins as I never find the pin cushions when needed). So super cute – think I just have to make one for myself, and maybe more for Christmas presents. Thanks for the inspiration.
Akhila
Hashi said
Thank you, June! I made one in about an hour this morning. I didn’t have any twill tape so I just made the strap from the same fabric. Worked out great! It really makes me smile!
Berry said
Great tutorial. I desperately need one as I don’t have any 🙁 I’m gonna do it asap. Thanx a lot!
Florence said
Thanks a lot… I just made one ! Your explanations are really clear. I’m not fond of “little details”… and this time I managed !
I hope I will use it instead of spreading all over the room 😉
CraftyRachel said
Wonderful tutorial! My wrist will thank you once I’ve finished mine. I, too, have been using an uncomfortable plastic one. I love the shape – it may have been around, but it’s new to me!
Melanie said
I like the idea of the wrist strap, very handy. I’ve made biscornu before as well – they gained a lot of popularity in the cross-stitching community a little while ago – the other name I’ve heard this shape called is a ‘tuffet’.
Kate said
well june, i think it still counts as a new invention since you didn’t know about them. plus the wristband is innovation! 🙂
ps i will see you around the amigurumi-along as soon as i pick a pattern to do; i’m excited that you and your expertise will be there too!
Katrina Madlock said
I wold like to sewing a pincushion
owntwohands said
I’ve been making biscornus for a while but I’ve never seen one with an attached wrist band. What a great idea!
June said
Thanks everyone!
Kate, I am amazed. Apparently it is a biscornu, but I had never heard of that until today – I made up the design myself and had no idea it already existed! I guess there is nothing new in the world… 🙂
Kate said
very cute! is it a biscornu? own-two-hands.livejournal.com/4186.html
Gail said
Just in time. I am sick of my “store bought” pin cushion. The plastic digs into my wrist. Thank you. I will, also, make one for my Daughter-in-law.
dawn said
adorable! what a great project and your instructions are very clear. Thanks so much for sharing.