Poinsettia crochet pattern
© June Gilbank 2007
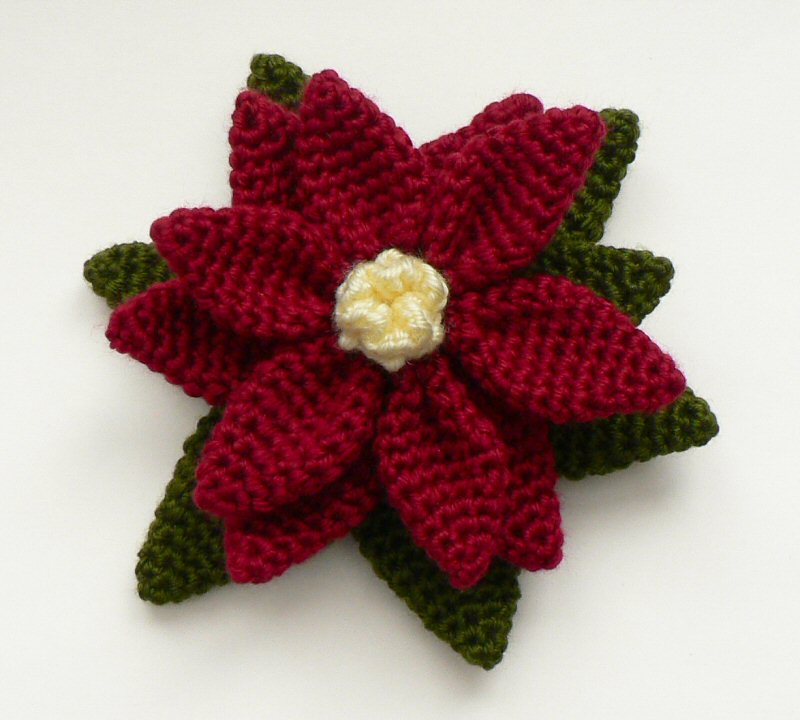
Crochet a large poinsettia flower for Christmas – perfect as a table centrepiece or as a decoration. Or make a smaller one in fine yarn or thread to wear as a pin on your coat, a Christmas tree decoration, or anything else you can think of!
This Poinsettia pattern is Donationware – the pattern is available for free, but if you like it please consider sending me a donation to show your appreciation:
Send me a donation and receive the easy-to-print PDF version of the pattern as a thank you!
Donations of any size are much appreciated. Just add the amount you wish to donate, and, once you have checked out and paid, your pattern will instantly be available to download from your PlanetJune account.
The complete pattern and instructions are available below, regardless of whether or not you choose to pay for them 🙂
This is a PlanetJune original crochet pattern. Feel free to use items made from this pattern however you wish, but I’d appreciate credit as the pattern designer. Please do not reproduce the pattern anywhere else; instead post a link to www.planetjune.com/poinsettia
Not ready to make it yet? Add it to your Ravelry queue: 
Terminology
| ch | chain |
| invdec | invisible decrease Note: If you prefer, you may use a standard sc2tog decrease in place of each invdec. |
| sc | single crochet (double crochet for UK/Aus) |
| sl st | slip stitch |
| st | stitch |
Notes
- Do not join at the end of each round; rounds are worked in continuous spirals.
- Use a stitch marker to mark the beginning of each round. Move the marker up each time you start a new round.
You will need…
- E US/3.5mm crochet hook
- Small amount of worsted weight yarn in red, green and yellow
- Yarn needle to weave in ends
- Stitch marker
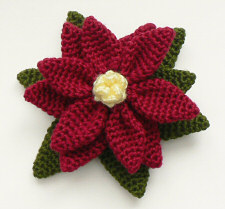
I used worsted weight yarn and a size E hook, which produced a large 6.5″ diameter flower (approx 5″ diameter for the small poinsettia). Try using a finer yarn or crochet thread with a correspondingly smaller hook to give a more compact flower.
Ingredients
Large Poinsettia:
- 6 of Style A in red
- 6 of Style B in red or green
- 6 of Style C in green
- 1 centre in yellow
Small Poinsettia:
- 6 of Style A in red
- 6 of Style B in green
- 1 centre in yellow
Crochet Instructions
Style A
Make a magic ring, ch 1.
Rnd 1: 4 sc in magic ring. (4 st)
Rnd 2: (2 sc in next st, sc in next st) twice. (6 st)
Rnd 3: (2 sc in next st, sc in next 2 st) twice. (8 st)
Rnd 4: (2 sc in next st, sc in next 3 st) twice. (10 st)
Rnd 5: (2 sc in next st, sc in next 4 st) twice. (12 st)
Rnd 6: (2 sc in next st, sc in next 5 st) twice. (14 st)
Rnds 7-8: sc in each st around. (14 st)
Rnd 9: (invdec, sc in next 5 st) twice. (12 st)
Rnd 10: (invdec, sc in next 4 st) twice. (10 st)
Rnd 11: (invdec, sc in next 3 st) twice. (8 st)
Join with sl st to next st. Fasten off, leaving long end of yarn.
Style B
Make a magic ring, ch 1.
Rnd 1: 4 sc in magic ring. (4 st)
Rnd 2: (2 sc in next st, sc in next st) twice. (6 st)
Rnd 3: (2 sc in next st, sc in next 2 st) twice. (8 st)
Rnd 4: (2 sc in next st, sc in next 3 st) twice. (10 st)
Rnd 5: (2 sc in next st, sc in next 4 st) twice. (12 st)
Rnd 6: (2 sc in next st, sc in next 5 st) twice. (14 st)
Rnd 7: (2 sc in next st, sc in next 6 st) twice. (16 st)
Rnd 8: sc in each st around. (16 st)
Rnd 9: (invdec, sc in next 6 st) twice. (14 st)
Rnd 10: (invdec, sc in next 5 st) twice. (12 st)
Rnd 11: (invdec, sc in next 4 st) twice. (10 st)
Rnd 12: (invdec, sc in next 3 st) twice. (8 st)
Join with sl st to next st. Fasten off, leaving long end of yarn.
Style C
Make a magic ring, ch 1.
Rnd 1: 4 sc in magic ring. (4 st)
Rnd 2: (2 sc in next st, sc in next st) twice. (6 st)
Rnd 3: (2 sc in next st, sc in next 2 st) twice. (8 st)
Rnd 4: (2 sc in next st, sc in next 3 st) twice. (10 st)
Rnd 5: (2 sc in next st, sc in next 4 st) twice. (12 st)
Rnd 6: (2 sc in next st, sc in next 5 st) twice. (14 st)
Rnd 7: (2 sc in next st, sc in next 6 st) twice. (16 st)
Rnd 8: (2 sc in next st, sc in next 7 st) twice. (18 st)
Rnds 9-10: sc in each st around. (18 st)
Rnd 11: (invdec, sc in next 7 st) twice. (16 st)
Rnd 12: (invdec, sc in next 6 st) twice. (14 st)
Rnd 13: (invdec, sc in next 5 st) twice. (12 st)
Rnd 14: (invdec, sc in next 4 st) twice. (10 st)
Rnd 15: (invdec, sc in next 3 st) twice. (8 st)
Join with sl st to next st. Fasten off, leaving long end of yarn.
Centre
Make a magic ring, ch 1.
Rnd 1: 6 sc in magic ring. (6 st)
Rnd 2: in front loops only, (sc, ch2, sc) in each st around. (6 loops formed)
Rnd 3: in remaining back loops of Rnd 1, 5 sc in each st around. (30 st)
The stitches of Rnd 3 will want to crinkle up into a loopy ruffle – let them do this! You want them to stick up to form the centre flowers of the poinsettia.
Assembly Instructions
Style A
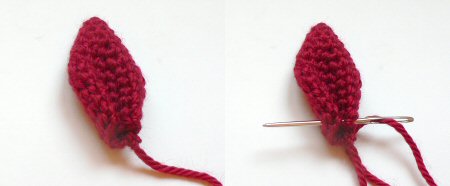
- Flatten out each petal/leaf.

- Fold the petal up along the centre line, so the two ends of the open edge meet. Using a yarn needle and the long yarn end, make a couple of stitches at the open edge between the two ends, to keep them together.
- String all 6 petals together by running a length of yarn on a yarn needle (you can use one of the yarn ends or cut a new length) through the folded edge of each petal.
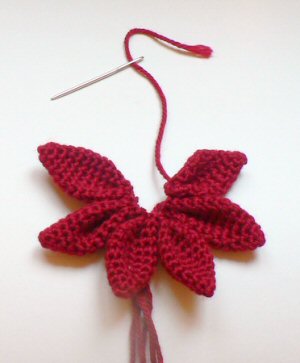
- Run the yarn through the first petal again to form a circle, pull tight and knot to keep it in position.
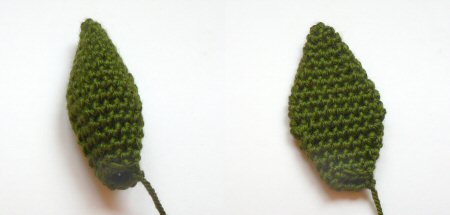
Styles B and C
- Flatten out each petal/leaf.
- Arrange one leaf over a second, so that one side of the open end of one is over the midpoint of the open end of the next, and they are arranged at approx 60 degrees (think snowflakes or slices of pie to judge the angle – you don’t have to be accurate).
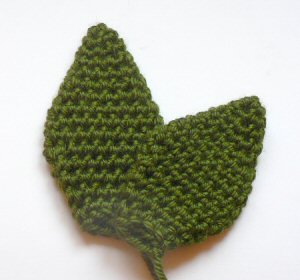
- Use a yarn needle and the long yarn end from one of the leaves to stitch them together, joining the two leaves with small stitches at the end and about a third of the way up the leaves.
- Arrange another leaf over the top leaf, in the same position and angle, and stitch in the same way.
- Continue until all 6 leaves are joined, and each leaf overlaps over one leaf and under another. There should be a small gap in the centre.
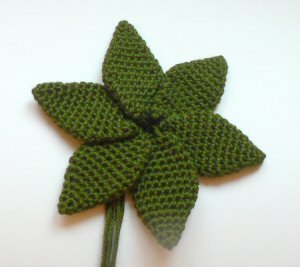
- Pull any loose yarn ends through to the back.
Final Assembly
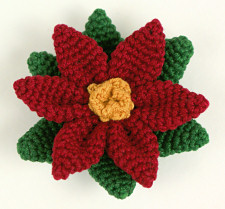
You should now have two (or three) rings of petals/leaves and one yellow centre. To finish assembling, arrange each layer by pulling the loose yarn ends through the centre hole of the previous layers, so they are all at the back of the flower. The layer order is (bottom to top):
Large poinsettia: C-B-A-centre
Small poinsettia: B-A-centre
Rotate the layers so their angles are offset and all the leaves are visible.
Divide the yarn ends at the back into two groups and tie the two groups in a secure knot. Depending on what you’d like to do with your flower, you can weave in all the yarn ends, leave them long to tie it onto something, or trim them down.
I hope you enjoy this pattern. Please leave me a comment below if you do!


Violeta said
This is such a fun holiday craft, and your crochet poinsettia looks incredible! Today I’ve featured your pattern on Crafts on Display – hope you enjoy it!
Marie Lopez said
Thanks for sharing this pattern.This is the prettiest pattern that I have seen.
Debra said
Thank you so much for sharing your poinsettia Pattern I can’t wait to make it …also I love your ami dogs… You are very talented ..they are absolutely adorable..!! Will post picture and Credit to your pattern and website thank you so much again Debra Scampoli
June said
Thank you, Debra! I hope you’ll enjoy my patterns 😊
Lalo said
This is what I was looking for. Christmas Flower Patterns are easy and quick projects. I will do It on weekend. Btw, do you have Christmas Wreath Pattern ? Please let me know!
Thank you, Lalo
June said
Yes, I have a Mini Wreath Ornament, and the Christmas Decor Collection that you can make into a full-sized wreath!
Verona Dewar said
beautiful will try it out soon
Karla Fowler said
Thank you so much for this free pattern. I think it’s very realistic and I love the stitch detail it’s makes it very elegant in my opinion. I want to make several to put on my tree.
Elizabeth Lewis said
This is the most realistic and prettiest of the patterns.
Thank you!
Kim R said
I’ve been looking for a poinsettia to add to a basket I crocheted. Don’t know why I didn’t look here first. Having bought several of your patterns already, they never fail to impress. Thanks for another!
Ruchi said
Thanks for sharing the lovely pattern of Poinsettia.
Made one today and it looks great.
Gloria said
Thank you for the free pattern, enjoyed making while I was healing. Will look pretty on anything you add it to. Merry Christmas! Again thank you.
Cathy said
This is in regards to the comment about not wanting to waste paper printing the comments. On my computer, I’m given the chance to preview the pages before I print. I scroll through them and make a note of the page numbers that contain the pattern and just print those. It’s very simple. It’s not as clean, nicely formatted, or convenient as the donation pdf as there might still be a few ads, but it’s an option I use all the time on patterns/recipes, etc., that don’t offer a pdf. The page with the finished item can be printed in color and the rest in black and white to save on colored ink. I hope this helps as I’ve seen this comment on other pattern sites.
June, your pattern is lovely. You’re very talented.
JoAnn said
you know what the problem is with your patterns
People don’t want to waste paper and ink on comments ink cost to for that
other than that your web site might be GREAT
June said
This web version is intended for online viewing only, JoAnn. Just click the ‘donation’ button above and you can pay whatever you feel it’s worth for the nicely formatted, easy-to-print PDF version – all my free patterns have this option!
JNew said
Hello,
I am working on this beautiful pattern and enjoying it very much. I’m still working on the petals, but I glanced ahead to the yellow center, and I wondered if you could help me understand the instructions a little better.
So I will work 6 sc in the magic ring. And then in Rnd 2, I’m supposed to end up with still only 6 st, but that is where I’m having trouble understanding. If I work one sc, ch 2, and one more sc in each stitch around, wouldn’t that mean a total of 24 st?
I’m sorry I’m having trouble, and thank you for any help you are able to give. It is such a lovely pattern!
June said
Sorry for the confusion: it’s 6 of the resulting looped stitches, where each loop is formed by a sc, ch 2, and another sc in the same stitch. (I agree it could have been phrased more clearly – I’ll update that now!)
JNew said
Ah, got it, thank you so much!
Annie Oper said
I have seen a lot of poinsettia patterns and this one is by far my favorite! I plan to make myself a pin. Thanks for sharing!
Naomi Lacken said
This is so beautiful. Thank you so much for the pattern. I can’t wait to try it. this is the nicest one I have seen too. Well done.
Naomi Lacken
Keron said
The poinsettia is beautiful. It will make beautiful Christmas pins for my friends and the ladies at church. I am anxious to make. Thank you for sharing.
Jennie Waite said
Waite is the level of doing this project easy moderate or hard
June said
I don’t assign difficulty levels to my patterns, as it’s very subjective depending on your specific previous experience!
If you look at the Terminology section at the top of the pattern, you’ll see that it only uses single crochet stitches, so, if you know how to make a magic ring and invisible decrease, this is a very easy project – just a little time-consuming.
If not, you’ll need to learn those skills (from the tutorials I linked to in the previous sentence) before you can start.
Constanta Istrati said
Va multumesc ,si va admir!
Ruth Ann Bull said
That is so beautiful . Very nice work .
juliet said
i think the pattern is good but there is not a difference in petal or leaf size
June said
It’s a stylized, decorative poinsettia ‘flower’ design – it’s not supposed to look like a realistic poinsettia plant 🙂
Rebecca Taylor said
YOU ARE TALENTED. Thank you for the plumeria pattern. I can’t wait to see more. Thank you
neda said
tank you .I am in iran
lanio chantal said
Bonjour
il y a plein de beaux modèles mais comment les avoir en français
Merci
Chantal
June said
Chantal, please see my FAQ for the reasons why my patterns are available in English language only.
Beatriz Moreira de Oliveira Reis said
Que Flor Maravilhosa, fiquei encantada
Nelie Pretorius said
Can I print the poinsettia pattern? I’d like to have it next to me and to write on it as I work.
June said
Hi Nelie, this is a donationware pattern – you can see the full pattern for free, above, on this page. If you’d like to buy the handy printable PDF version, it’s available for a donation of a dollar or more – whatever you feel it’s worth. Just click the ‘make a donation’ button above, and you can download the PDF version immediately after completing your order 🙂
MANUALIDADES CROCHET said
MUY HERMOSAS
MARIA DEL SOCORRO HIDALGO CORNELIO. said
muchísimas gracias por tan bonito detalle el proporcionar la manera de hacer estas obras de arte, porque es lo que son una maravilla y disculpa pero yo no hablo ingles, a ver si alguien lo traduce.
Chellie said
Once again, another masterpiece June! This poinsettia is the most beautiful flower I have come across ! I would love to attempt making it but I, in no way could ever come close to the perfection you create with each item you design. Thanks so much June !
Chellie
Pallie Spadafino said
Hi June,
This is a really great pattern. I am glad that I found it again as I had lost it when my hard drive died a couple of years ago.
I also lost the flowers I had made due to a storm we had here. They were on a wreath that looked much nicer than all the stuff you find in the stores.
I wanted to let you know that I had done the flowers using size 10 crochet thread instead of using yarn. They came out beautiful and I put them together so that no two looked exactly alike. I plan on doing this again for next year now that I have the pattern. This time I will also take pictures to show the work.
Thank you,
Pallie
Sue said
Thank you for this wonderful pattern.. it’s by far the prettiest poinsettia I’ve ever seen. I want to make the small one to use for a pin. Thanks again for sharing your pattern!
Carla said
thank you so very much for this pattern. Have so many ways I can use this flower.
Linda said
Of all the patterns for poinsettas that I have seen , I think this is the prettiest. I want to try making it with some of the yarn that “sparkles” , I have to get a little better at crocheting though.
michelle said
Love this pattern I love to crochet please make more patterns
forouzandeh said
hi
it’s so beautifull.thanks
Denise. Evans said
Thanks for the lovely flower can’t wait to try it please come up with more lovely flowers thanks denise
Debby said
This is the prettiest poinsettia pattern I have seen yet!!!
sheena4672 said
Una belleza, gracias.