This post comes to you from beautiful Jersey, where I’m visiting my parents at the moment. My chair and I are actually on different continents right now, but I finished making this cover and took the photos before I left on my travels…
You may remember that the only way I was able to fix my badly-ripped office chair seat was with ugly frankenstitches:
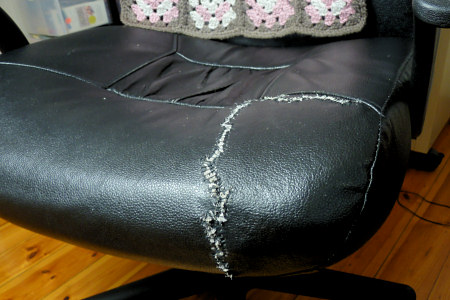
I fixed the rip, but it’s certainly not pretty…
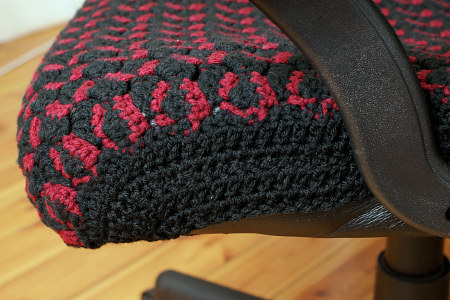
I decided to crochet a quick seat cover to hide the unsightliness. I picked a stitch pattern from a Japanese stitch pattern book and looked through my stash for some suitable yarn. I decided on Loops & Threads Impeccable – it feels hard and tough compared with the soft acrylics I usually use, so I’m hoping that means it’ll be hard-wearing too. I picked black to match the chair, with a dark red accent to match my fireplace, and started crocheting…
This stitch pattern was really fun to crochet!
(These really aren’t my colours, but working from stash means making compromises, and at least it matches the chair. Anyway, I won’t really see the finished cover much as I’ll be sitting on it almost all the time, so it doesn’t matter too much what it looks like – I just don’t want to see the ugly ‘scar’ from the giant rip any more!)
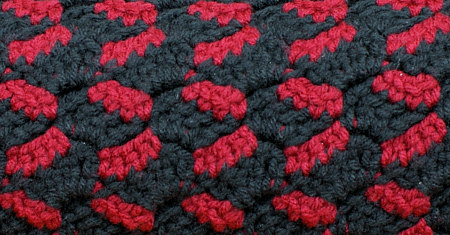
My one skein of black Impeccable just covered the seat top, with no yardage left over to crochet the side edges to keep it in place. I thought I’d use up some dark grey Impeccable for those, but at the first fitting I realised that wasn’t going to work:
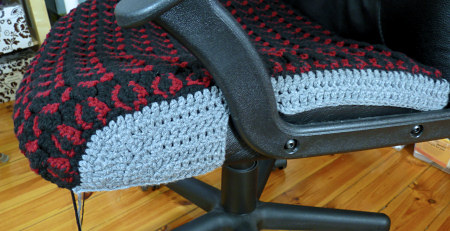
Yuck!
So I sacrificed some of my precious Vanna’s Choice so I could redo the sides in black, and I ended up with this:
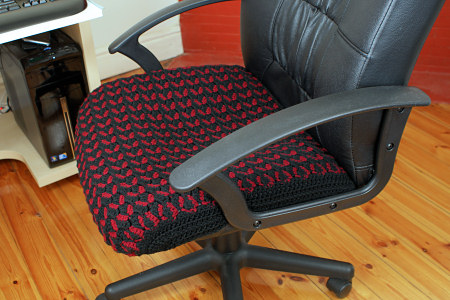
Much better!
A few details:
A custom-curved side at the front helps the top piece fit over the curved front of the cushion and stay in place.
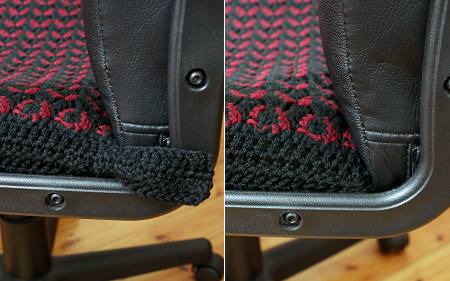
I crocheted extra tabs at the back to tuck into the very tight space between the back and seat cushions (left: untucked tab; right: wedged into place). The tabs hold it all very firmly in place without visible ties.
And the end result is a nicely fitted cover:
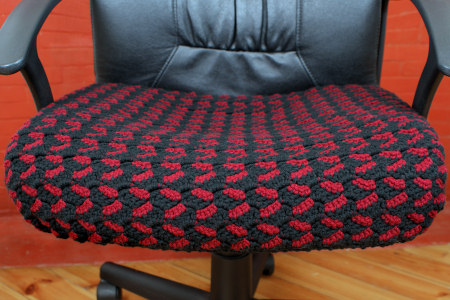
It fits like a glove!
This was a satisfyingly fast project to complete, and it’s really nice to be able to use my crochet powers for good (I mean, to solve a problem by making something I actually need). The finished seat cover is a big improvement over the frankenstitches, and now I’m saved from buying an expensive new chair – mission accomplished! 🙂


naila said
Hi. My name is Naila. And i am from Azerbaijan:) great seat cover woww! i love it. i aslo made a seat cover but this one is great! i love sides. coul you say me how you crocheted them? have you got a pattern? thank you for sharing patterns 😉 love from Azerbaijan
June said
Thanks Naila! I’m afraid I can’t share a pattern, as the details are specific to the exact size and shape of my chair, but, if you look at my replies to the previous comments on this post, they’ll give you an idea of how I made the sides. 🙂
Lydia Ortega said
I just wanted to know how did you do the curve on the chair cover. I am a beginner and I need help with the curve. Thank you for your time.
June said
You can create a curve by adding some increase or decrease stitches. (In this case, if you’re starting from the bottom edge, you’ll need to increase; if you’re working from the top down, you’ll need to decrease.) The number of inc/decs depends on which stitch you’re using and the shape and size of the piece you want to create – you’ll have to experiment until it looks like it’s making the right shape!
Playing around with a hook and yarn to see what happens when you make different stitches is the best way to learn how to design a piece in any shape and size you need.
Temi Ogundipe said
I like the crochet office seat cover. I would like the same like that. how much is the cost pls.
June said
Thanks, Temi! I’m afraid it’s not for sale – I just made one to fit my own chair, and I don’t intend to make more.
Nomi said
Hi June I know you have written that you don’t have the pattern of the chair cover. The post in 2012 . Can you pleas tell me were you find it or it’s naim.
Thank you nomi
June said
Nomi, there is no pattern for the chair cover, as I made it up as I went along. If you’re asking about the black and red stitch pattern I used, it doesn’t have a name, but it’s number 254 from this Japanese stitch pattern book 🙂
Dawn Friday said
What an awesome idea!! You did a wonderful job on this! Love the colors. I know you said you made a square…. but what did you do from there? Some of us, hehem, me, can’t do stuff like this. LOL Would you be so kind as to share? Either way, this is one awesome chair! 🙂
June said
Dawn, I can’t really give you specifics, I’m afraid, as they would vary for each chair! You’d need to arrange the square crocheted piece over the top and front of the chair seat, then look at the sides to what shape you’d need to crochet to cover the sides – in my case it had a curved front and a cut-out from halfway back where the arm is mounted to the seat. If you look at the third photo down, with the grey crocheted stitches that I didn’t end up using, it’ll give you an idea of the sort of shape I had to make (I used decreases to create the shaping). As you can see, that side shape is very specific to my chair and if you covered a different chair you’d probably need a different shape – if you’re lucky it’d just be a plain rectangle, which would be much easier!
Erich Treeby said
I have the same chair, and the seat got thrashed after 2 years of use. This gives me a great idea about how to get some more life out of the chair. Thanks, June!
JO said
I like. It’s a good idea.
Heidi said
Awesome seat cover!
Marie/Underground Crafter said
Genius! I’ve been thinking about a chair cover, too, and this has totally inspired me to do it!
val said
That is so nice looking, I think I’d have to cover the rest of it! Just awesome!
June said
Thanks, Val! I don’t have any matching yarn to cover the back too – the downside of being in South Africa is that once my stash is gone, there’s no way for me to get more of the same! And actually, I already have a crocheted granny throw (you may remember it from the days of the old Crochet Along blog and you can just see it at the top of the first picture above) that I made to cover the back, so almost all the pleather is hidden now 🙂
Tina said
What an awesome idea for a quick fix, and such a pretty one too! I should do that for my office chair at work 🙂
Johanna said
I’m guessing you just made the pattern up yourself? Too smart! It looks great 🙂
June said
Yes and no, Johanna! The stitch pattern is from a book, and I just made a rectangle using that pattern that fit the top of my seat. The sides etc are my own design 🙂
Yasmin said
I’ve gotta make one of these for the other half!!! One of our charming kitties has ruined the top and the seat is split!!!! Guess i know what i’ll be working on next!!! Loving the pattern though very different
Monica Ballinger said
Poor Vanna’s Choice- atleast it will always be with you 😉 hehe The seat cover looks awesome! The stitch work looks really cool. A very neat idea to use your skills! Enjoy the rest of your Holiday! 😀
Carmen said
It is very cool how you have saved the chair’s life :). You are very right that it is worth spending some time for repairing things instead of throwing them away whenever the first damage appears.
kp said
I really like that – great pattern.
Kara said
Great new seat, June 🙂