Invisible Decrease
If you’ve been making amigurumi, you may be lamenting the gap or bump that forms when you decrease. The standard methods of decreasing are to sc2tog, which can leave a bit of a bump and a small gap, or to skip a stitch, which leaves an obvious gap. There has to be a better way… and there is! The invisible decrease really is as good as its name claims – it’s almost impossible to see, even if you know what you’re looking for. (See my blog post for a comparison of these three methods.)
The invisible decrease method will probably take a few attempts to master, but, just like the magic ring, it’s one of those techniques that’s so good, you’ll wonder how you ever crocheted without it!
How do I make an Invisible Decrease?
Choose your preferred learning method! I have video and step-by-step photo tutorials, all for right- and left-handers. Continue to:
- Invisible decrease video tutorial (right- and left-handed versions)
- Tips for perfecting your invdec stitches
- Invisible Decrease for right-handers (photo tutorial)
- Invisible Decrease for left-handers (photo tutorial)
Invisible Decrease for right-handers
Before we begin:
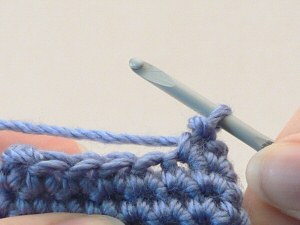
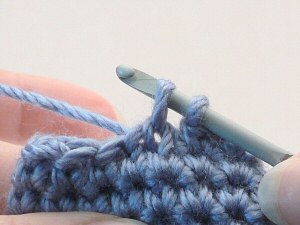
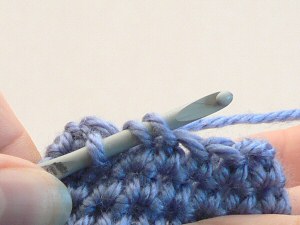
Insert the hook into the front loop of the first stitch (2 loops on hook). DO NOT YARN OVER:
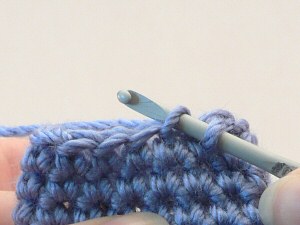
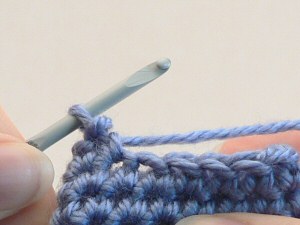
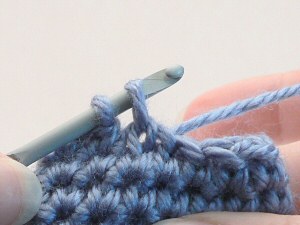
Insert the hook into the front loop of the next stitch. To do this, you’ll need to swing the hook down first so you can insert the hook under the front loop. (3 loops on hook):
Swing hook down…
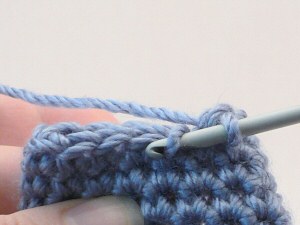
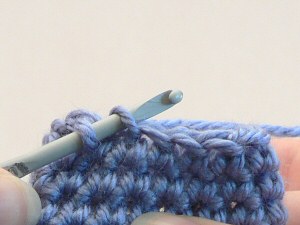
…then up through the front loop of the next stitch
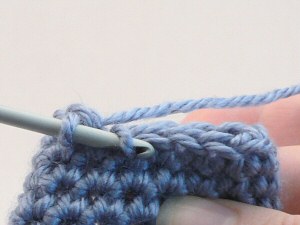
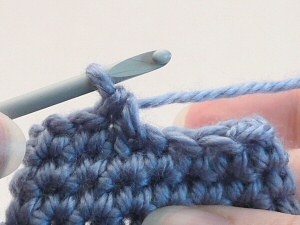
Yarn over and draw through the first two loops on the hook. (2 loops on hook):
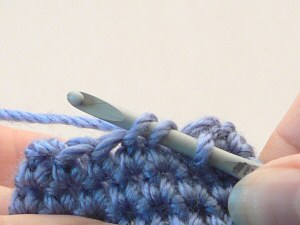
Yarn over and draw through both loops on the hook. Invisible decrease completed:

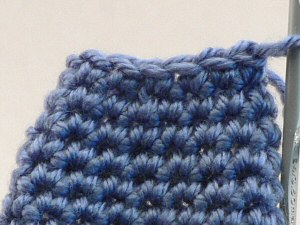
Now let’s play a game: spot the decrease…

Good, huh? Give it a go with your next ami – I promise you won’t regret it…
Invisible Decrease for left-handers
Before we begin:
Insert the hook into the front loop of the first stitch (2 loops on hook). DO NOT YARN OVER:
Insert the hook into the front loop of the next stitch. To do this, you’ll need to swing the hook down first so you can insert the hook under the front loop. (3 loops on hook):
Swing hook down…
…then up through the front loop of the next stitch
Yarn over and draw through the first two loops on the hook. (2 loops on hook):
Yarn over and draw through both loops on the hook. Invisible decrease completed:
Now let’s play a game: spot the decrease…
Good, huh? Give it a go with your next ami – I promise you won’t regret it…

Loved this tutorial? I have so many more amigurumi tips and tricks to share with you!
Boost your amigurumi skills with my latest book, The Essential Guide to Amigurumi, your comprehensive guide to amigurumi techniques and tips.
Do you find my tutorials helpful? If so, please consider making a contribution towards my time so I can continue to create clear and concise tutorials for you:
Thank you so much for your support! Now click below for loads more crochet video and photo tutorials (and do let me know what else you’d like me to cover in future tutorials…)


Lana said
Hello! Im attempting to make an amigurumi hippo and the pattern im following calls for a full round of *SC4TOG, SC 1* repeat. no matter what yarn or hook size i try i cannot manage to do this drastic decrease without 7 large bumps appearing (each about the size of a dime around). is there a way to decrease 4 st at a time with a method similar to this one, so they wouldnt be so noticeable?
All the best,
Lana
June said
I’m afraid not; decreasing 4 stitches at a time is a huge change in stitch count, and it’s going to leave a bump or a gap no matter what you do! I’d never use such a steep decrease in my designs for that reason.
elham said
hi, thankyou very much beacuse of ur teaching
bernadette said
will that invisible dec work when decreasing along neck edge.
also can you show dec in basket weave stitch please
Roberta S. said
Love your website–I am just starting with amigurumi. You are a wealth of knowledge. My question is this: is the only difference between a sc2tog decrease and an invisible decrease that fact of where you put your hook/pick up a stitch? It appears they both operate the same (go into one stitch, don’t yarn over and go into the next stitch and pull through 3 loops) but with the invisible you are only picking up the front loop, whereas with the sc2tog (even though they don’t really say) you pick up both loops of the stitch? Is the key in picking up the front loop only?
June said
Not quite, Roberta: for a sc2tog, in addition to using both loops, you yarn over and draw up a loop in both the first and second stitches – see my tutorial for the full sc2tog instructions 🙂
Roberta S. said
Understood! Thank you for pointing this out. Again, you are a wonderful resource for crocheters!
Carrie Mather-Crowner said
Thanks for sharing your knowledge! I’m going to try this decrease as soon as I get home! 🙂
Deedre Sigmond said
Dear June, I love the instructions, tutorials.
Had a problem with invisible stitch and magic ring. I now have that, but what is magic ring. I am doing the tiny cat balls.
Thank You, Deedre S.
June said
Deedre, see my magic ring tutorial; if you have other crochet questions, just see my help page for the list of all my tutorials 🙂
cathleen said
THANK YOU SO MUCH for catering to the left-handed crocheters!! I can’t tell you how much I appreciate the picture tutorials you have provided!
Bless you!
Sam said
Can this stitch be done with double crochet?
June said
Yes, Sam, any standard crochet stitch can be made ‘invisible’ using this method. The key thing to remember is that the decrease occurs at the base of the invisible decrease (not at the top as with a standard decrease), so you only create one stitch that covers two stitches of the row below. That’ll be clearer with an example – follow these instructions and you’ll understand!
To create an invisible double crochet decrease:
TK said
Thanks Bunches for sharing! I am making a doll and this technique will finish her very nicely.
BIG Hugs ~ TK
Tamara said
Thank you! Thank you! Thank you! When I saw invisible decrease on a pattern I was worried that it would be extremely difficult. Your tutorial has explained it wonderfully. I like that you have it for left handed people as well. My granny is a lefty 🙂 now back to making a kitty keychain 🙂
Lee Ann said
I love there tutorials! I JUST started in ami work, and even started a doll for my daughter, with all parts done (hoping to finish by Christmas, but can’t find the right size eyes locally), but with FINALLY figuring out the magic circle, and with these other tutorials, I think I will start a new doll for her, finish this one and give it away. I’m excited to start over (sort of, LOL!) and do it right! Can’t thank you enough for these awesome tutorials! I may go ami crazy! =D
Rachael said
Thank you for taking the time and effort to make your invaluable tutorials.. I have learned so much as a beginner and I am much more confident in making my amigurumi now.. Your site is the only one I refer to if I ever have a problem.. and you have gorgeous patterns as well!
metoob said
this is amazing! i love it, but one question, will it work for 3 or 4 sc decreases?
Lianne P said
Haha I’ve been doing decreases like this all along! I *thought* I was doing sc2tog but I guess not. 😛 You may remember me from Facebook….I’m the person who had been doing a back-loop-only slip stitch all along (since I started crocheting in June 2012) thinking that was a single crochet! Your tutorial on front/back/both loops showed me the error of my ways. 🙂
Love your tutorials…I’m learning so much!!!!
Kawaii Blythe said
Hi thank you so much for this info! I have shared a link to this fab tutorial on my blog and included two pictures … I hope that is ok … I am new to the world of blogging and hope this is the correct etiquette 🙂 thanks x
Trystan said
Hi June. I taught myself to crochet at the very end of last year, and found your tutorial in march of this year. when i first tried this back in march, i didn’t like it because i couldn’t SEE where the decrease was! being new to crochet and making amis, i relied on seeing that decrease so i could find my place if i lost count of my stitches.
just yesterday, i figured since it’s now five months later, i should give it a go.
and now my only question i have is: why didn’t i come back to this stitch earlier?? it’s amazing!! thank you. 😀
Adriane said
This is completely brilliant! I’ve always wondered if there wasn’t a better way to work a decrease! Thank you for the excellent tutorial! I’m going to give this a try on my next amigurumi piece!
LeAnn said
I dont know which has made my life and Ami better, this or the magic circle! Genius idea, thanks a bunch!
Jessica said
Just found your blog via a Ravelry page, and I love it!! I’ve made a bunch of ami spheres and toys this year and never liked doing the decreases. Will be making more now and using your tips. Thanks!
Umberta said
Brilliant!
Cynthia Stenquist said
This is the smartest tip I’ve read! Thank you Thank you!!!!!!
Simone said
I’m really thankful. I never liked the way this decresing looked and I had really big trouble with little balls I loved to make… but your way just made my day and I think there will be a lot of little balls now everywhere around me. Really really thanks to you.
Krista said
Thank you so much for sharing this, saved my ami from looking horrid! Thank you thank you!!
Renee` said
OMG’osh! This is fantastic!!!!!
Thank you for sharing with us!
Jennifer said
It’s been said but I’ll say it again, THANK YOU!! I’m new to ami’s and can’t wait to add this technique to my arsenal of tips and tricks!
Nancy Clark said
I thought you’d like to know that I posted on my blog how to convert this dec so that it won’t show on the WS.
antsfibers.blogspot.com/2012/03/back-loop-invdec-tutorial.html
Michelle said
YOU ROCK!!!!! I literally googled “how to decrease crochet without gaps” and this was the first thing I found. SWEEEEEET!!!!!!! I will use this forever and NEVER go back to decreasing the old way that leaves unsightly gaps. THANK YOU!
Tibbles said
It’s the only way I decrease now, thanks a ton!
Shar said
Great instructions! Any suggestions on how to do a sc-blo (sc-back loop only) decrease? I am making a hat (www.classiceliteyarns.com/pdf/LushAngoraCap.pdf) with alternating sc then sc-blo stitches for texture. I’m at now ready to work the decrease rows and was hoping your invisible decrease might be applied, rather than the pattern’s standard sc2tog decrease directions. The only hitch might be the alternating sc, sc-blo stitches and how to make the decreases look appropriate for the next stitch.
Thanks for the great tips! I think, with the help of your video, I can do a rsc edging on my baby beanies. Always wanted to perfect that stitch. You made it look simple.
shar
June said
I don’t think any kind of invisible decrease would work at all for that pattern, as the pattern says to work into the back loop of half the decrease and both loops of the other half. I don’t think there’s a better way to do it… You could try doing it as a sort of invdec by using the front loop of the 1st st (instead of both) and the back loop of the 2nd (or vice versa depending on where in the pattern you are), and don’t yarn over between the two loops, as with an invdec – but I don’t know if it would look any good!
Shar said
I was afraid of that. I’ll try your suggestion, as I was mulling the same thing over while attempting to apply your invisible decrease to this pattern. If all else fails, I’ll follow the pattern as is, despite its decrease issues. Thanks!
Al said
Hi, thank you so much for this tutorial! But if it comes to a time when I make an amigurumi with the wrong side facing out, how do I do an invisible decrease?
June said
Al, if you’re working inside out (so the wrong side will be the outside) you can use the same technique, but go through the back loop instead of the front loop of each stitch when you make the decrease.
Al said
Thank you!!
Shanti said
Thank you!!! I’m not big in amigurumis but it’s always great to lear a new technique and this is absolutely fantastic!!!
sarah said
Thank you!!! This blew my mind, I thought I was just crocheting wrong!!
Rachel C. said
So can you just replace this for any sc2tog or dec? Can you do that?
June said
Rachel, you can replace almost any sc2tog or dec:
Julie said
I’ve been struggling with the ugly gaps in sc2tog for years… glad I finally thought to look for an alternative. Thank you thank you!!
sally said
OMG thats fantastic you have changed my crocheting for ever!!!
I always hated the way the decreases made my ami’s look, thank you, thank you, thank you 🙂
x
Thea said
Yup. That works great and very easy. Thanks!
Thea said
Just found your tutorial. Thank you so much! I’ve been making little baby balls and they were looking very gappy.
Blaize said
As with the magic circle, which I did have trouble with I will admit, it makes absolutely no sense to learn a different, inferior, technique and then have to retrofit oneself with better options that are no more difficult than the less-satisfactory ones. The magic circle, the invisible decrease. I have been crocheting for only a couple years, and have only made crocheted creatures for less than one, but I do NOT understand why these are not standard in every pattern, taught at every juncture, and considered foundational, rather than extra frills or tricks one learns later, after struggling with problems one has no idea how to solve. Brava! and thank you.
micheline laplaine said
hello ! bonjour
it is always agreable to discover many ideas to work, thanks to persons like you, thank you very much.
en fran
SuellotoSlesk said
baie interessant, dankie
Jaki said
This is brilliant – thank you
Ana said
Thank you for remembering us left-handers!! It is a pretty awesome decrease.
Talia said
I think I’m the only person on here who can’t do this stitch. I am following directions exactly but still getting a noticible bump each decrease. Do u know what I could be doing wrong? Lol it’s driving me batty that I can’t get them neat! Love your site by the way 🙂
June said
Hmm, well without seeing your work it’s hard to say, but I have a couple of ideas for why it may be bumpy:
Good luck!
Emily said
This technique is fantastic! I’ve linked to it from my blog – I hope you don’t mind! Thanks for writing all your great tutorials, your site is really helping me get into having more satisfying fun with crochet! Em xxx
June said
Yay, I’m glad you’re finding my site helpful, Em, and of course I don’t mind you linking to me! In fact, thank you for doing so 🙂
Lori said
I have crocheted for over 40 years and never knew this Invisible Decrease. I am working on a project today, tried the decrease method above and it looks flawless. Just goes to show you CAN teach an old dog new tricks.
Thank you for sharing,
Lori
Amanda said
How is it I’ve crocheted for decades and never heard of this??? Thank you sooooo much for sharing! You’re right, this will definitely be my go-to decrease method (just like magic ring is my go-to starter). Thank you!!!
ShirinElric said
Omg!! I was already getting frustrated by the wholes…
Thank you so much!!! I really needed this 😀
jess said
So clever! Thanks for this tuturial.
Dianne Unterbrink said
I cannot thank you enough for this tidbit of EXTREMELY valuable info,!! So many times, so many less-than-invisible results. But now, thanks to you, my projects can look more professional than I ever dreamed possible. You are my new best friend!! 🙂
Za said
WOW!!!
Caz from Never Knew said
This is fantastic! I’ve never heard of this method, and I’m so glad that I’ve found your blog and these great instructions! Thank you SO MUCH!
Caz 🙂