Colour Changes in Amigurumi
The Basic Explanation
To make a neat colour change, keep an eye out in your crochet pattern or instructions for the approaching change. As you make the last stitch in the old colour, pause before the last step of that stitch. For the final ‘yarn over and draw through all loops on hook’, substitute the new yarn, so you draw the new yarn through your loops. This gives a cleaner edge to the colour change.
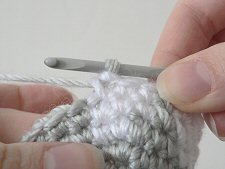
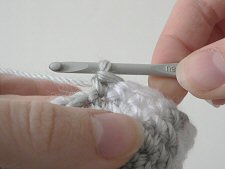
Left: last loop of previous stitch uses new colour; Right: first complete stitch in new colour
Full Tutorials
Need more details? For full illustrated step-by-step instructions, jump to:
- Changing Colour video tutorial (right- and left-handed versions)
- Changing Colour for right-handers (photo tutorial)
- Changing Colour for left-handers (photo tutorial)
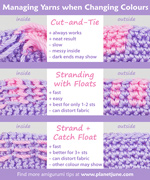
Managing the Yarns
There’s no one ‘right’ way to deal with yarn ends and carrying colours, and it’s up to you which method(s) you find to be the best combination of fast, easy, and with a good end result.
But if you’d like my recommendations for how best to manage your yarns when you make multiple-colour amigurumi, see my tutorial Changing Colour: Managing the Yarns.


Paula Griebler said
Hello June. I am making an amigurumi animal- the face is a lighter color than the body. I change from brown to light color for face then back to brown. I am working in continuous spiral. When the face is facing me – the right side looks good (rounded) but the left side seems straight and the colors don’t line up like they do on the right side of the face. The face looks off balance. I am color changing:in the stitch before you change in the last two loops to the new color. This eems to work fine on the right side of the face but not the left side. Any suggestions or ideas as to what I am doing wrong? Thank you so much for your help. I have your book Complete idiots guide to amigurumi but still can’t seem to correct this issue. I seem to do this every time a make an ami with this type of color change….
Any suggestions, ideas or help would be wonderful. Thank you Paula
June said
Paula, the sides of a coloured patch will always look different from each other because a) crochet stitches aren’t perfectly symmetrical and b) they don’t stack perfectly on top of each other – they always drift backwards slightly in each round. In my more complex patterns, I attempt to compensate for this with precise colour placement to make the sides match as closely as possible. If you’re working from a PlanetJune pattern, please feel free to email me (june@planetjune.com) with a photo of your work so far so I can see if you’re doing anything wrong, and advise on how you can improve the look of your work!
Kathy said
Thank you very much!
alum said
at last i found very usefull instructions and very easy and clear tutorials! can’t see the time to try my first amigurumi, I’ll tell you. many thanks to June and greetings from Italy
Dorothy Atkinson said
I understand now where I was making my mistakes re: starting a new colour. I have tryng to follow directions for the stripes. I just want to change the colour once for a large piece so, should be using the simple basic colour change. I just figured that if one uses the Invisible Join or the second tutorial that would be fine. It wasn’t. Sorry June for asking the dumb questions I have been asking, I just thought a colour change eas a colour change Q
sandy said
hi,
am new to this website.and to crochet.am confused by the info you have given about colour change because the pictures show grey and white. can you add pictures with more prominent color? like say white and red? Please.
Thank you June.
June said
Sandy, please see my changing colour video tutorial for a more colourful demonstration 🙂
DOULOS said
June, thank you so much i can not wait!!!! , my question is : when you make the magic ring you close it and then chain one, that chain do you count as your first sc? thank you again you got me inspire and help me to to see crochet with other eyes, have a blessed and creative week 🙂 p.s i got your book i can hardly wait.
June said
No, the chain doesn’t count as a stitch, so if your pattern has 6 sc in Rnd 1, you chain 1, then make the 6 sc. To begin Rnd 2, you’ll ignore the ch 1 and work into the first sc of Rnd 1.
Kathy said
when I crochet amigurumi I change colors and go around my doll. when I get back around it seems like my 1st row of color change is above where I did the color change. I s there a way that the row can be done without looking like that?
xxxxxxxxxxxxxxxxxxxxxx
xxssssssssssssssssssss
s is the first color.
x is the color change
Is this how it always comes out?
June said
Kathy, see my Perfect Stripes for Amigurumi tutorial to eliminate this problem 🙂
DOULOS said
June thank you for sharing your tip and talents…. i absolutely lvoe your site and have reffer some many people to it… as a new fan to this craft i found your site helpful you are a great teacher….i would like to know when you make the majic ring and start the sc that chain you count it as one sc ( not the one you do before that chain) and also when do you close the ring i know it is a dummy question but i would like to know if you do close the ring the second row when you make the 12 stchs? ….i am reading this method to get it down to adventure with colors next, mean while i am enjoy learning, i was hesitante if i needed another craft i do so many things aleeady but i am alwais looking for ways to help to support my family and bring smile to my kids i just finis my first amirugumi mouse by using the body of the acorn…..thank you from the bottom of my heart…your fan #1
June said
Hi Doulos, I’m not quite sure I understand your question but I’ll be making a magic ring video soon to accompany my magic ring photo tutorial, so look out for that and I hope it’ll answer everything for you 🙂
heidy ball said
every thing you explain is very clear,thanks a lot yo ar a great teacher.
Meg said
Thank you for posting this tutorial! It’s a huge help. I’m not quite getting the results I want, and I think part of the problem is that I’m not joining rows.
I’m making a stripe in a contrasting color, but the end of the stripe and the beginning of the stripe don’t match up. There’s a weird mismatch on one side. Is there any way to correct this problem when you’re not joining rows? Is there a crochet “jog” that I could do?
Thanks so much, again, for your awesome tutorials and patterns. I adore them!
June said
Meg: you’re right, there’s no way to make the stripes join up when you crochet in a spiral; the only way to avoid it entirely is to join at the end of each round and then ch 1 (in the NEW colour) to begin the next round. If you don’t want to do that, Christen at NeedleNoodles has a method to minimise the appearance of the ‘jog’ – the stripes still don’t match up seamlessly (because one end is always higher than the other when you crochet in a spiral), but her method does smooth the transition between the start and the end of the stripe quite effectively: needlenoodles.com/home/?q=node/139 (see Method #1).
Ginger said
This is fantastic! What a clear and concise explanation. Thank you!! This works so much easier than the way I have been doing it!
Samantha Moon said
Wow! that’s so much easier than what I’ve been doing for years! haha! amigurumi is a new venture, I’ve actually only ever knitted. Thanks!
cheryl said
OMG THANKYOU! I have been stressing about this so much and if I’d only had the sense to consult June sooner! You’re fab!
Tracy said
I just started working on your Lemur pattern. I got frustrated with the head because of the color changes, but after reading this, I started over and got it! Thank you!
DLY said
This is just what I needed! Very helpful.
Tilia Linden said
Your tutorials are very helpful to newbies such as me. Thank you for placing them online.
June said
Holly, when you make your amigurumi, it forms a sort of ‘bowl’ shape as you crochet. I’m wondering if you are crocheting ‘inside out’ – that would explain why the threads end up on the outside…
When you insert your hook into a stitch, does your hook go from the outside edge of the ‘bowl’ to the inside, or from the inside edge of the bowl to the outside? If your hook goes from the inside to the outside, you’re working inside out. All you need to do is flip the ‘bowl’ shape the other way out, and then when you insert your hook into the next stitch, it will go from the outside of the bowl to the inside, and all your thread ends will be on the inside.
Poonhog said
Thank you so much! Did not realize I’ve been working inside out the whole time.
Holly said
I still cant get this very well. all the threads end up on the outside and it looks really stupid. I have tried many times but it still wont work for me.
Thnakyou anyway. I will try some more.
ana said
gracias x la info es exactamente lo que andaba buscando.
Thanks
Rebekah said
Your amazing! Thankyou!
Melisa Sriwulandari said
Hi, if you don’t mind, I’m placing a link to your tutorials in my blog.
ami-quelle.blogspot.com
Thank you very much!
Regards,
Melisa
Joel said
I’m working on a little ‘rumi dog in blue and white, and have been adding little spots on the body. This gives me more options — thanks!
mocaloca said
This is exactly what I was looking for. Thanks for putting the time!
Joy Abara said
A crochet beginner dreading a color-change, so far I’ve been sticking to the ‘monochrome’ amigurumi. But this tutorial is so encouraging, I’m excited to try a 2-toned amigurumi!
Heather Sayyah said
I would look into tapestry crochet for a neater version color changing techniques. With tapestry crochet, there are no loose ends inside the amigurumi piece. It makes a much neater piece. Plus, you don’t have to go back and tie knots.
Wen Rou said
Thanks, that was very useful 🙂