Magic Ring (right-handed)
Looking for the left-handed instructions? Or the video tutorial? If not, read on…
What is this ‘Magic Ring’, anyway?
A magic ring is a way to begin crocheting in the round by crocheting over an adjustable loop and then pulling the loop tight. The advantage of the magic ring method (below, right) is that, unlike the regular “chain 2, x single crochet in 2nd chain from hook” method (below, left), there is no hole left in the middle of your starting round.
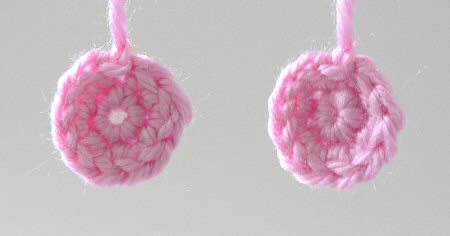
L: ch2, 6 sc in 2nd ch from hook, 2 sc in each st around.
R: magic ring, ch 1, 6 sc in magic ring, 2 sc in each st around.
How do I make a Magic Ring?
This demonstration shows a piece made using the following pattern:
Make a magic ring, ch 1.
Rnd 1: 6 sc in magic ring. ( 6 st)
Rnd 2: 2 sc in each st around. (12 st)If you’re following a different pattern, you’d complete steps 1-2 of this tutorial exactly as shown below, then work the chain and the stitches of Rnds 1 and 2 as specified in your pattern.
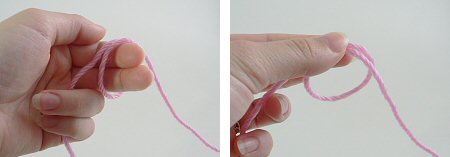
Please note: in the following photos, the starting yarn tail is always on the left and hanging down. The working yarn begins on the right and is then picked up over my left forefinger in Step 2.
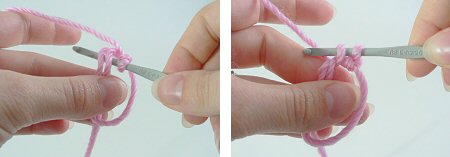
- Make a loop a few inches from the end of your yarn. Grasp the join of the loop (where the 2 strands of yarn overlap) between your left thumb and forefinger:
- Insert hook into the loop from front to back. Draw up a loop:
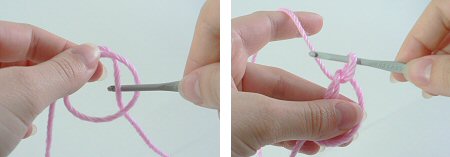
- Ch 1 (or as many as stated in your pattern). Note: this does NOT count as a stitch:
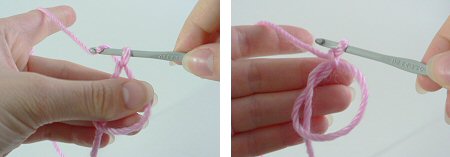
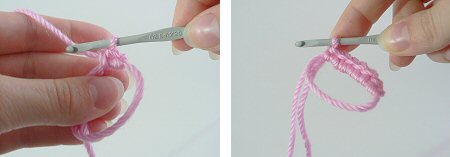
- Insert hook into the loop, so you are crocheting over the loop and the yarn tail. Draw up a loop to begin your first sc of Rnd 1:
- Complete the sc. Continue to crochet over the loop and the yarn tail until you have the required number of sc for your first round (6 sc shown here):
- Grab the yarn tail and pull to draw the centre of the ring tightly closed:
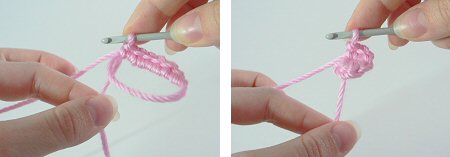
- Begin your second round by crocheting into the first stitch of the first round (below, left). At the end of round 2 your work will look like this (below, right):

You’ll never go back to your old method again, I promise!

Loved this tutorial? I have so many more amigurumi tips and tricks to share with you!
Boost your amigurumi skills with my latest book, The Essential Guide to Amigurumi, your comprehensive guide to amigurumi techniques and tips.
Do you find my tutorials helpful? If so, please consider making a contribution towards my time so I can continue to create clear and concise tutorials for you:
Thank you so much for your support! Now click below for loads more crochet video and photo tutorials (and do let me know what else you’d like me to cover in future tutorials…)


eartha pratt said
I love the magic circle however i an having a problem understanding the pattern I’m hoping you can help. It says 7-7-7-8-8sc in magic circle??? What am i suppose to do??
June said
Eartha, you need to contact the designer of the pattern you’re using and ask him/her to explain what they meant – I’m afraid I can’t offer support for other people’s patterns 🙂
Alesha said
I’ve been crocheting over 10 years and I can’t believe I’ve gone this long without hearing about this! Thank you…you’re right, I will never go back!
Alesha <3
Pat Stauffer said
Oh my gosh!!! This is fantastic!!! Never heard of this, but will use it from now on. Thank you so much for posting this!!
Jenna said
My pattern starts with: magic ring, ch 3 dc10, pull ring tight, join to top of ch 3. I don’t understand if if that is supposed to be after the magic ring? How many stitches do I do on my ring? I am new to this and your site is really helpful so far.
June said
Jenna, all stitches before the ‘pull ring tight’ are worked into the ring. Please note that if you have other questions about specific patterns like this, your best bet is to contact the pattern designer directly and ask them for help – I can’t offer support for other people’s patterns 🙂
Shelly Lewis said
June
Thank you for the easy to understand instructions. I have been looking for a way to close off the circle instead of leaving a hole so thanks again. I will definently be keeping an eye out for new ways to do things by visiting PlanetJune
Cindy Outland said
Thank you June for the instructions on the magic ring. It took a couple of hours practicing, but I was able to do this.
Sincerely,
Cindy Outland
Anita said
This is cool…but what do you do with the yarn end after you pull it tight? Cut it off? Tie it off? Weave it in?
Thanks!
June said
Don’t cut it off, or your work will unravel! It’s the same as any other yarn end – if it won’t show (e.g. inside an amigurumi) you can leave it hanging; if it will be visible (e.g a coaster or hat) you’ll want to weave it in so it doesn’t look messy.
BeeZeeDee said
Hi June –
You can’t imagine how many other videos and tutorials I looked at before I found yours – I wanted to try making tiny things for my soon-to-be granddaughter, and I was so frustrated! Your clear step-by-step pictures, with accompanying explanations, did the trick!
One of the things that was most helpful was the identification of which yarn was which (starting yarn and working yarn) in the note at the start of the instructions. Maybe because I am so new at this, the distinction wasn’t clear to me in the pics, but with your ‘aviso’ up front, I figured it out.
Whoopee, and thanks!
Jill said
Ive been making hats for a while with no pattern but my own imagination, but I always start from the bottom and go up just decreasing as I go. It seems to work for me but sometimes it’s difficult to get my large starting round perfect. Super excited to try the magic circle with a “real” pattern for a baby beanie.
Jess Copland-gemmell said
Thanks so much for this. I found all other demos of this really hard to use.
lindsay said
Do you have a video for this?
June said
Yes! There’s a link to my video tutorial at the top of this page 🙂
Dee001 said
Thank you so much for showing the magic circle. I have tried doing it before but your explanation answered it all. Love it!!! Thanks much for sharing.
Keep it up.
Hoda said
Oh my good, it ‘s unbelievably easy. Thank you so much for sharing .
neyah said
awww tanks now i can make my teacher miss foote a babby hat .
./
ola said
Thank you that was helpful for a beginner
Stay well
Ola
Robin said
Wow! I love this technique. It reminds me of being a kid and learning macrame for the forst time. …but now I can incorporate into crochet. BRILIANT!
Carolyn Nicely Bradley said
Found your instructions on making the magic circle most helpful , esp with pics….. I found the pattern for making a flower using the magic circle, then I clicked on the link for the instructions ….. glad I found you ! Thanks
Corinne said
Just completed my first magic loop! Thank you so much for sharing, I’m never going back now! 🙂
Carol Newman said
Oh my goodness, I finally learned how to make the magic ring from your instructions. I have made so many patterns that reference the magic ring without instructions I could figure out. I am a lefthand crafter in a righthand world lol.
Thank you for simplifying it to my level lol.
Carol
June said
I’m glad I could help, Carol, but I hope you realise that I have left-handed versions of all my crochet tutorials for people like us (yep, I’m a lefty too)! You can find them all at www.planetjune.com/help 🙂
Margie Echevarria said
Do you have a video for the Frothy Flower? I just can’t seem to grasp how to do Row 4 (going to the back of the flower)
June said
Margie, I’m afraid I can’t provide support for other people’s patterns – I suggest you contact the designer of that pattern for assistance 🙂
Lisa said
Thank you so much for posting this. 🙂 I am new to crocheting and my boyfriend’s mother taught me rounds but I had no idea that you could make it without a hole this easily!! I have had more practice with double crochets than singles, but I found this easy to do with doubles as well.
Kathleen said
Thank you so very much!!! To say that I am a novice crocheter is a vast over-exaggeration of my skill!!! With no guidance whatsoever I progressed from being able to make a single chain as long as a skein of yarn to creating a sort of dense pot holder looking thing….then I bought beginner’s crochet guide only to find out that the world of crochet stich nomenclature was WAY beyond my ability to understand! My holy grail at the moment is to make a simple cap…I found instructions elsewhere on how to increase and decrease a circle in crochet and created something that kept my head warm on a recent trip to NY…but there was a hole at the top that I had to cover with a pathetic looking pom-pom…Today I sat down with your instructions and have created a successful (if a little wonky) magic circle!!! I am feeling there is a slightly less odd looking cap in my near future!!! I love your beautiful site and your clear and simple instructions!!!
Beth Nieto said
That’s great! Thanks for sharing! As a beginner I’m still trying, but maybe one time I’ll learn! LOL
Robin said
Thank you SO MUCH for making this tutorial!!!
I refer to it every time I start a hat. I’m sure as my crochet skills grow I will have to use it for other projects too. I wouldn’t have been able to learn it without your steps and pics.
Monika L. said
Thank you so much for the photos. With video tutorials I have to pause all the time to figure out what I’m doing. I’ve been making a lot of amigurumi toys for my niece and nephews and some Caps for Cancer and this is the perfect way to start those projects.
MaryMargaret said
YOU are a GENIUS! Thanks for sharing!
Linda Greer said
Have been crocheting for lots of years and love seeing this. Feel clumsy doing it and isn’t as neat so I know I need more practice. Thank you for sharing.
Joann said
Hello June ~ gosh I have been crocheting for years and never thougt of this or have ever seen it before. I can’t wait to try it, my only problem, I am LEFT Handed. I can usually figure it out, I may have to try this today. I will let you know how the “leftie” did. 🙂
June said
Hi Joann, I’m actually a lefty too! All my tutorials come in right- and left-handed versions – look for the link to the lefty version (and the video version, in both-handed versions) at the top of this page 🙂
sharon swander said
Thanks for making this easier for me. But I still can’t pull the tail tight enough to close the hole. I know it’s just me but any suggestions will help
June said
Sharon, take a look at my magic ring video to see exactly how I do it – I find you can pull it much tighter if you tug really hard at the end of Rnd 2.
If that doesn’t help, it could be the yarn you’re using. Some yarns just aren’t compressible enough to fit all those loops into such a tiny circle that no hole at all remains. Other yarns aren’t strong enough, and when you tug hard enough to close the hole, they snap! So maybe try a different yarn and see if that works better.
MJo said
I was looking for directions that were not a video so I could print them out and have them on hand.. thank you!!
Ollie Ruzgal said
its really a great help for a beginners like me.. i often use a ring w/ a hole and using a button to hide it.. i’ll use a magic ring this time. well, thanks a lot! ^_^
Dianne said
What a trick! I’ll be using this often. Thanks so much.
Alasia said
I won’t go back! So awesome! I always wondered how people were able to do this without a hole! SOOOO excited!!! L!
linda sencenbaugh said
I what to the search but nothe come up it side not found sorry but no matched your criteria
June said
You must be misspelling the word poinsettia if nothing comes up, Linda! Try this instead: you can find links to all my other poinsettias here www.planetjune.com/blog/tutorials
linda sencenbaugh said
I love your poinsettia i wish your would send me the patti for all the poinsettia you have please help me love linda
June said
Hi Linda, I’m not quite sure what you’re asking for, but if it’s my crocheted poinsettia pattern, you can find it here: www.planetjune.com/poinsettia
If you’re looking for any of my other poinsettia designs, try using the search box near the top right corner of this page – type in poinsettia and hit search, and all the related posts will come up 🙂
Betsye Rose said
Simply genius! Thank you a million times!
linda sencenbaugh said
Thank You so much I love your work
Wai Sam said
Hi June thanks for the tutorial. I have made my own Magic adjustable ring tutorial too! It took me one full day to take and edit the pictures. Kudos to you for making the tutorial. XoXo
Mary said
Love this! Is there a printable version available? I need to carry with me in case I get stuck when I am at appointments & waiting. Like to carry small projects with me to keep busy 🙂 Thanks so much!!!!
Mary said
Love the tutorial with the pictures! I really would love to share this with an older friend that doesn’t have internent. Is there any way to print this so I can share with her? Tried to highlight & print, but that doesn’t give but one picture. Thanks so much!
Ashley Carlson said
Hello! I am a new to crochet but quickly came across this tutorial and the video. Unfortunately after the 5th or 6th beanie, this is still SO very difficult for me!! I am not sure if I am doing this correctly and the tops of my beanies just seem to be a big circle of thrown together yarn!! They sort of make sense around row 3-4. How many sc do I do into the ring before I pull tight? Is it always the same or does it depend on the pattern?
Thank you!
Ashley
June said
Ashley, the stitches you make into the ring are the stitches of Rnd 1 of your pattern, so yes, the number does vary. If you’re still having difficulties, I suggest you watch my video tutorial too, to make sure you’re doing it right!
Julia said
I don’t understand how you got your loop to stay and still have your circle. following your directions, it did NOT work for me.
June said
Julia, I suggest you view my magic ring video tutorial for further assistance.
RoseOniel said
wow…. that is confusing lol…. But i will try… I just started doing crochet.. i know how to stitch but making loops and rounds is still a little hard for me but your pictures and distributions help :).
Amy said
Hello and thank you for your tutorial. I have achieved the magic ring, however I was wondering how to secure it? If I just pull closed, then it opens back up ever so slightly as I am crocheting other rows, so my question is this, do I need to tie a knot to secure once pulled close? If so when, a couple rows in or when the project (a hat for now) is done? I would greatly appreciate your help, and thank you!
June said
That probably means you haven’t pulled it tightly enough, Amy. See my Magic Ring video for exactly how I do it. If you can’t pull it that tightly, there’s no harm in making a knot. You can tie the knot at any point after pulling it tight.
sandra bolser said
thank you so much for showing how to make the magic ring!
Anna said
I was looking to make, by crotchet, some tiny, tiny five petal flowerettes to salvage my daughter’s expensive, moth eaten, fine woollen jacket but couldn’t make the first ring tidy enough for the quality of the item.
I have tried your ‘magic ring’ method with great success. Using a very fine cotton sheen, like sewing thread, and the finest crotchet hook I could find in my rummage box. I am so very pleased with the finish and I’m sure the eccentric placement of the moth larvae holes (only on the two front panels) will add to the quality look of the garment.
Many thank for posting these clear and easy to follow instructions with pictures. I like pictures!
Birdie said
How nice! ;D I am sure it is a lovely sweater now! :):)
dotb said
Thank you! Will try it soon!
Jennifer in MamaLand said
Thanks! Very simple directions… just what I was looking for!
Ada said
Hi June
This is my first time on your site, I just saw your video on how to do a loop stitch (crochet), and I found it very helpful. I have this project that reguires a double loop stitch (crochet) and double-loop-st2tog and I can’t find a video on it any where, I was hoping you could help.
June said
Hi Ada! I create my videos to support my own patterns. Each one takes me several hours to film and edit, and nobody pays me to make them – I just create them as a service to help my customers. I’m afraid I only have time to make videos that demonstrate the techniques I use in my designs – I’m very sorry I can’t help you.
misty hernandez said
Glad i ran across this site very helpful. Thanks
Liz said
Is the first single crochet tougher to find than the others, or am I doing something wrong?
June said
Liz, the first stitch of Rnd 2 is always hard to work back into, but especially so if you