Magic Ring (right-handed)
Looking for the left-handed instructions? Or the video tutorial? If not, read on…
What is this ‘Magic Ring’, anyway?
A magic ring is a way to begin crocheting in the round by crocheting over an adjustable loop and then pulling the loop tight. The advantage of the magic ring method (below, right) is that, unlike the regular “chain 2, x single crochet in 2nd chain from hook” method (below, left), there is no hole left in the middle of your starting round.
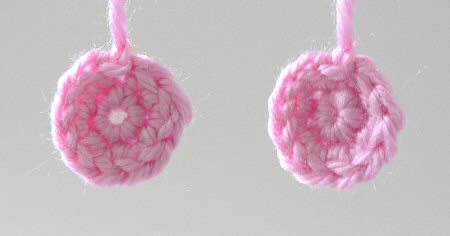
L: ch2, 6 sc in 2nd ch from hook, 2 sc in each st around.
R: magic ring, ch 1, 6 sc in magic ring, 2 sc in each st around.
How do I make a Magic Ring?
This demonstration shows a piece made using the following pattern:
Make a magic ring, ch 1.
Rnd 1: 6 sc in magic ring. ( 6 st)
Rnd 2: 2 sc in each st around. (12 st)If you’re following a different pattern, you’d complete steps 1-2 of this tutorial exactly as shown below, then work the chain and the stitches of Rnds 1 and 2 as specified in your pattern.
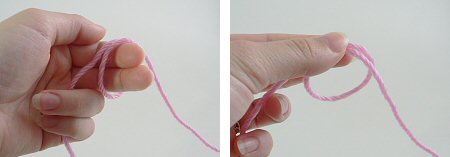
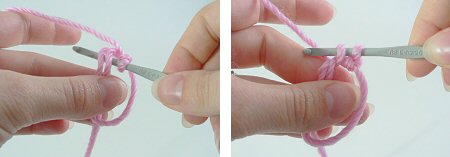
Please note: in the following photos, the starting yarn tail is always on the left and hanging down. The working yarn begins on the right and is then picked up over my left forefinger in Step 2.
- Make a loop a few inches from the end of your yarn. Grasp the join of the loop (where the 2 strands of yarn overlap) between your left thumb and forefinger:
- Insert hook into the loop from front to back. Draw up a loop:
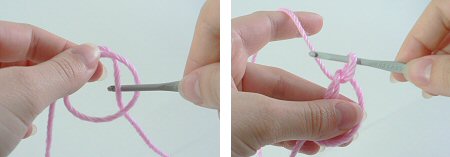
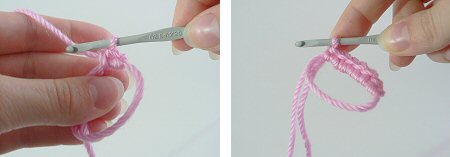
- Ch 1 (or as many as stated in your pattern). Note: this does NOT count as a stitch:
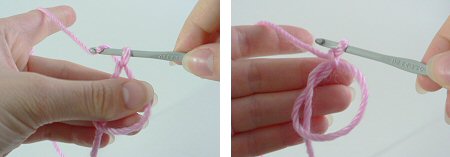
- Insert hook into the loop, so you are crocheting over the loop and the yarn tail. Draw up a loop to begin your first sc of Rnd 1:
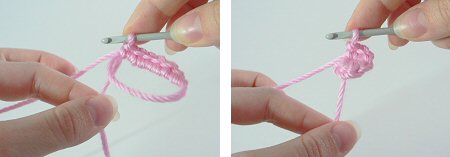
- Complete the sc. Continue to crochet over the loop and the yarn tail until you have the required number of sc for your first round (6 sc shown here):
- Grab the yarn tail and pull to draw the centre of the ring tightly closed:
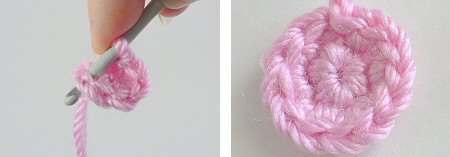
- Begin your second round by crocheting into the first stitch of the first round (below, left). At the end of round 2 your work will look like this (below, right):
You’ll never go back to your old method again, I promise!

Loved this tutorial? I have so many more amigurumi tips and tricks to share with you!
Boost your amigurumi skills with my latest book, The Essential Guide to Amigurumi, your comprehensive guide to amigurumi techniques and tips.
Do you find my tutorials helpful? If so, please consider making a contribution towards my time so I can continue to create clear and concise tutorials for you:
Thank you so much for your support! Now click below for loads more crochet video and photo tutorials (and do let me know what else you’d like me to cover in future tutorials…)


Valerie Lever said
Thank you so much for your “magic ring” instructions….I have enjoyed everything I’ve seen so far on your site….I was introduced to it by my niece when she croqueted the “butterfly baby hat”….It is adorable….I’m still going over your patterns…I croquet hat and scarf sets (I also can up with my own pattern to make the hat and scarf together so that you don’t misplace one or the other). I donate these to Cancer patients…..we’ve had many family members over the past two years diagnosed with cancer…a couple have lost the battle…so my heart goes out to these brave people…..thanks to your patterns they will now have a wider variety…..thanks again….
Valerie
Trystan said
hi June!
i love your rose pattern, so i thought i’d try one of your other patterns – the hearts, plumeria, and daffodils. so i tried the magic circle, and i have a few questions.
it feels like i’m doing something wrong in step to draw up the loop, and my yarn doesn’t look like the second picture in step three.
when i finally do get stitches crocheted around the loop and the yarn tail, it doesn’t pull like it’s supposed to – like there’s a knot back on stitch 1.
also in step 5, you say to crochet until you have the “required number of sc for your first rnd.” this “required number of sc” is the number you have in Rnd 1 of your patterns, correct? like the plumeria, you have “rnd 1: 4 sc in magic ring” – so that “required number of sc” would be 4, yes?
Trystan said
please ignore most of this…. i was able to find a video on another site for “adjustable rings”… and i got it!
however, i’m still cuious about my question on step 5. thanks. =)
June said
That’s right, your first round is Rnd 1 of the pattern, so however many stitches are specified in Rnd 1 of the pattern is the number you make into the ring (4 in the case of my Plumeria). You draw the ring closed at the end of Rnd 1 (for some reason, the convention is to not specifically mention that in patterns).
Trystan said
thanks so much for your answer. =)
Danielle said
thank you for the instructions. I am left-handed and your clear pictures and description made it easy for me to figure out! thank you!
Fiona said
I’m with everyone else…thank you for the very clear instructions and illustrations! I tried looking at Youtube and couldn’t get it. This is by far the simplest and most effective description!
Thanks again!
Fiona
Miranda said
Freakin genius! LOVE IT!
Jen said
I linked to your post here in a free pattern tutorial on my blog
Sara said
Hi! I just wanted to say thank you soo much for explaining this so well! I have been trying to grasp this concept for a few days now and could not get it. I tried to understand this from another site I was looking at and ended up very frustrated and confused. I just took a six week beginner crochet class near my house and am now obsessed with anything and everything crochet! Love your website! Thanks for the help 🙂 Have a nice holiday!
amanda said
After I make the ring for the cluster hat im having trouble understanding the directions. I am new to crocheting, this will be my first project! I just can’t figure out how to chain 3 inside the ring because there is no loop to start the chain as far as I can tell 🙂 if you could help I would greatly appreciate it! Thank you! Amanda
June said
Amanda, follow my instructions exactly up to Step 3. Make the ch 1 I show in Step 3, then make 2 more chains, and there you go: ch 3 made 🙂
Then work your dc stitches into the ring instead of the sc stitches I show from Step 4 (so you’ll yarn over before you insert your hook into the ring to begin each dc).
Carol lozinski said
If the hat is a double crochet pattern or a half double should you do those stitches into the circle instead of a single crochet? Or is the magic circle always done with single crochets?
June said
Carol, you can do your hdc or dcs into the ring instead of scs – the magic ring method will work for any stitch worked in the round; I was just demonstrating it from the point of view of amigurumi, which are always worked in single crochet!
To use a taller stitch
Donna D said
As a Newbie to the world of crochet I am so glad that I came across this article, thank you for writing it very clearly and with pictures! 🙂
Carole Denson said
Hi,
I have been trying to find someone who can help me make koala bear fingers and toes from a magic circle. The pattern I have is not much help to me as I have never made them before. All help appreciated.
June said
Carole, without seeing the pattern I’m afraid I can’t help. I’d suggest you try contacting the designer of your pattern first, and if you don’t have any luck from them, email me with the details of what’s confusing you and I’ll see if I can help!
donna rios said
TY TY TY for the “magic ring” pics– I have tried and tried- and so far yours is thee easiest– Do U have free patterns? such as for hats and scarves i can make for the kids at schools or babies in hospitals?
ty ty
donn rios
Rebekah said
Thank you so much for this post!
I am a beginner with crocheting and I was able to understand and follow your instructions very well. It was so neat how it all came together to form circle in the end. Thanks again!
make handmade said
Great tutorial. Thanks for sharing
Karen said
Thank you so much for the clear pictures explaining how to do a magic circle! I just started crocheting again after many many years and I’m thrilled with the instructions that can be found on the internet. Your time and effort is appreciated!
Jill said
Thank you, thank you, thank you!!! I have looked at SO many tutorials for this technique, and yours actually makes sense! Thanks again for sharing this with such a clear description.
Jill
Hemapriya said
Thank you so much Planet June! You make a very ideal instructor
Di P said
Thank you so much for being the only one on the web whose magic ring instructions I can actually understand. You rock!
Rachel C said
Thank you very, very much for clearing that up!
Rachel C said
Hello, and thanx so much for your magic adjustable ring tutorial. It’s really great but I was just wondering how to interpret it into a pattern. The pattern says, like shown, ch 2 then 6 sc into 2nd ch from hook. But when I think about it, I do a slip knot, and then ch 2, which would equal 3 loops. Now does this mean as I am interpreting it into the magic adjustable ring, that the string circle I make that holds all the stitches and adjusts acts as the slip knot? Cuz then step 2 would act as the 1st chain and step 3 would act as the second chain, afterwards working onto the 6 sc for the beginning of my project. Please tell me if I am correct or correct me! Thank you SOOO much! I can’t wait to continue my amigurumi projects!
June said
I think you’re overthinking this, Rachel! It’s just a straight substitution:
“Ch 2, 6 sc in 2nd chain from hook” becomes “make a magic ring, ch 1, 6 sc in magic ring”.
(To answer your specific question, the magic ring is equivalent to the 2nd chain from the hook that you work all the stitches into, and the “ch 1” is equivalent to the 1st chain from the hook that you don’t work into in either case. But you really don’t need to think this hard about it.)
In general, “X sc in 2nd chain from hook” becomes “X sc in magic ring”. The goal is to end up with the same number of stitches (X) at the end of Rnd 1, whichever method you use. I hope that clears things up for you 🙂
donna said
hi – you have an awesome tutorial here. I have just finished writing a pattern that begins with a magic ring. Some of my testers suggested I add a link to a magic ring tutorial since they had never worked one before. Since your tutorial is one of the best I’ve seen, with your permission, I would love to add a link to it in my pattern.
Thanks
~donna
June said
Donna (and anyone else reading this), you have my permission to link to any of my tutorials and/or the main amigurumi tutorial list (www.planetjune.com/help) in any of your patterns!
Judy said
Thank you for the Magic Ring. what a concept! And the Love Hearts is adorable! I am always looking online for ideas to crochet! I have 4 grandchildren and they are still young yet. So, I can get away with making things for them. I am interested in donating too! I would just rather send a check in the mail to you instead of using my credit card online. Hope that you understand. Thank You June……………Judy
June said
Thanks Judy! As I’m in South Africa now, I can’t accept checks, only online payments. Online shopping with a credit card is very safe (provided you only input your details on a secure site like PayPal), but if you don’t feel comfortable with it I understand. Thank you for thinking of me anyway 🙂
sri said
Aha! at last I can make it !! (after 10 minute try) just like you said, I”ll forget the old method cause “your magic ring” is a lot more better. Thank you for your generosity.
sri said
I try to make the magic ring, but it won’t work ! when I pull the tail it’s stuck and don’t tight. I must be miss some thing. Please help me on this, thank you.
sri
June said
Sri, try crocheting into the ring more loosely – maybe your stitches are very tight and that’s why your yarn won’t pull through them.
Ashley said
I had this same problem… I had the tail in the wrong direction. keep the tail in your palm and the yarn going to the ball going away from your hand (on the right side of the first pictures)
Ladybug Crossing said
Thank you so much! I’ve been trying to figure this out and your instructions are simply awesome… I can’t wait to try it out.
LBC
Kathy said
Thank you so much for this clear illustrative instruction!!
renee said
hello at last a clear pic of the magic ring i have looked at two You Tubes and looked at a few books but this is the best am so happy , as i am new at this and trying too make this childs dress with the granie tiny weeny crochets sq. by LP’s book . but will keep in touch with you always when i get good will order by for now thanks again Renee
Beverly said
I LOVE it!!!
Gh said
Is it really magic
June said
You be the judge: try it and see! 😉
MojaTu Unique said
Thanks for posting. I’ve been trying to figure out how to make the rings with no circle in the middle for the longest. Thanks for helping me out!!
Belinda Lindhardt said
Thankyou for the fantastic explanation, it seems very clear but i am still having problems. When i try to pull it through like someone else says it pulls half way then stops. I am pulling very very hard but its like into a knot and wont go further.
I am using quite a fine wool 5ply. could it be that this is too fine or something? it seems to be in the first loop area that the problem is happening cause where i have SC that mostly has pulled but i still have the big loop that i originally created 🙁
June said
Belinda, I’ve been trying to think what your problem may be, and I have 3 suggestions:
Barbara said
I have just mastered the magic circle. I am trying to do a snowman, it starts with 6 sc in the circle. I have to have 12 after the second round, then 18, then 24, then 30 and finally 36 sc. Do I need the extra chain that is always done the conventional way. I always seem to end up with an extra sc, which I don’t want, as I am doing it in a continuous circle and not a joining chain.
June said
If you’re working in a continuous spiral, you DON’T use a chain between rounds. If you join with a sl st at the end of each round, you DO need a chain to begin the next round. (Which method you use depends on the pattern you’re using, or your personal preference.)
Either way, I recommend you mark the first stitch of each round with a stitch marker after you complete it, to help you keep track of how many stitches you’ve made in the round and make sure you don’t overshoot the starting point!
Beth said
Thank you for the very clear Magic Ring instructions, I think I’ve got it!
I’ve been crocheting awhile (mostly afghans) but I’m new to amigurumi, and I have one nagging question: Which side is the right (outside) side? Say, with your last picture of the pink ring – is the side with the tail hanging loose the outside, or the inside? They’re different, and I can’t decide whether to go along with the way it seems to be bending, or flip it the other way.
I really appreciate your willingness to answer questions!
Sara said
No joke…this really changed my life. I was trying to figure out the other method and couldn’t get it. Now I can make my octopus!
Kim@eggbirddesigns said
Hello 🙂 This is a really brilliant tutorial! I hope you don’t mind that I linked back to this as part of a pattern on my blog?
Much love,
Kim
June said
I don’t mind at all! Thanks for linking 🙂
Pia said
I normally use your magic ring.
But how come almost every where else I look, the magic ring starts with a 3xchain that’s the first dc, and then dc as many stitches as needed?
It is used for other things when starting this way, instead of a sc ring?
June said
Amigurumi are worked in single crochet, so that’s why my magic ring tutorial shows it done that way. Other crochet patterns worked in the round, for example hat patterns, usually use taller crochet stitches like dc, because it makes the item work up more quickly, with fewer stitches than working in single crochet! But any pattern that’s worked in the round can use the same technique of working into a magic ring (with whichever crochet stitch the pattern uses).
Heidi said
Hi June!
I will be selling crochet patterns in my Etsy shop soon, and have written up instructions for making a “magic ring.” However, I know that many people will want more detailed instructions with photos of the process. After searching around quite a bit, I think that this tutorial is the most clear and has the best photos.
So, here’s my question: May I refer people to this post if they need more instruction?
Thanks!
June said
Heidi, of course you may! Good luck with your new patterns 🙂
Kelly-Ann said
I never crotchet anything before but I am bookmarking this, because I really want to learn how to do these things! Thank you for the tutorial 🙂
MELISSA KROLL said
Good Evening,
I was reading how to do this magic ring! I can’t wait to learn and use it myself. I just have one really quick question. Can this type of ring be used on all projects that require a person in work in rounds or can it only be used on certain projects?
June said
Hi Melissa! The magic ring is a technique for starting to crochet in the round. It replaces the traditional chain method and eliminates the hole left in the middle. You can replace the
Kiki said
After looking at a lot of different magic-ring tutorials, yours is the one that finally made me understand! Thank you so much for explaining!
Kiki from The Netherlands
Stephanie said
ok, so I’ve seen patterns that say “start with a magic ring” and I’ve always just went ugg, and passed them by!
Well NOW I do not have to! thank you sooo much! This tutorial really helped me and I got it right on my first try!! thank you!
Mary said
great tutorial! I was finally able to make the magic ring! Thanks!
Barb Schnepf said
I’m having a heck of a time tyring to figure out how to make a dc with the magic ring. Can you explain it to me?
June said
Barb, it may be easier for you to see it than to read my explanation! There’s a good photo tutorial here: www.crochetme.com/forums/t/28917.aspx
Mindy said
Hey there,
After reading thru most of the comments especially towards the end of this post I need you to clear this up for me.
I get from your tut. that you don’t need to sl st or ch when using the magic ring with single crochet.
So, when you have a combo of stitches like single crochet in the fist round, and double crochet in the second round, do you chain & sl st?
If you use other stitches like double/treble for the whole pattern using this magic ring do you chain & sl st?
June said
Mindy, oh dear, it seems that I’m confusing people by answering people’s questions that aren’t really relevant to the magic ring technique… I’ll try to make it clear:
Here’s my final word on this:
If in doubt, join your rounds (unless your pattern says otherwise, or you’re making amigurumi).
I hope that’s cleared everything up now!
Dick Huertas said
i tryed 2 ordr 20 copee of ur book, but i get a blank page wit a box and a x in the corner i not good in english so it hard for i to get book and i want book for class in school we liv in tha phillipines. can i send u money for 20 copee of book?
we use book in school for class. we have 20 studant.
we wire money transfer. wut ur address mamm?
June said
Dick, I have 14 signed copies of my book remaining for purchase in my shop, and I won’t be getting any more. If you’d like to order 20 copies of my book, you should order from a bookstore. If there aren’t any stores locally to you in the Phillipines, I know that amazon.com will ship internationally. Amazon have much better prices than I could offer, anyway – at the time I write this, my book only costs $10.33 per copy! Here’s the direct link: amzn.to/buONPe
MythedUp said
Thank you for such beautifully clear instructions!
I spent hours watching videos, looking at web tutorials and reading instructions in books on the magic ring. The pictures never made the method exactly clear and eventually I worked out my own way of doing it which was much more complicated. Now I finally know what I’ve been doing wrong! Utterly brilliant.
Lili said
Hello,
I am completely confused about one thing.
Do you, or do you not slip stitch or chain when using the Magic Ring Technique?
In one of the comments you said no, and that’s why there would be no seam, like there would be if you used the traditional method of crochet in the round.
However, when another person post about doing 14 double crochet stitches in the 3rd chain from hook which is the traditional method, you said you could convert that to the magic ring method by chaining 3, and making 14 double crochet stitches into the ring.
So, do you chain or not? Is it only in single crochet that you don’t have to chain?
Also, I have been to several websites like Ravelry, and Crochet Cabana etc., and they all say that you DO chain and slip stitch, even when using just single crochet stitches when you use the Magic Ring Technique. They said even if you use a combination of stitches like say 10 single crochet in the first round, and 20 double crochet in the second round, you must chain, and slip stitch like in the traditional method.
Please be VERY SPECIFIC, when you have to chain, and or slip stitch while using the Magic Ring Technique.
June said
Lili, I’m sorry you’re confused. There are 2 places where you could chain, and I’ll go through both separately for you:
I hope that’s clear – when you start with a magic ring, you can then choose to work in a continuous spiral, or in joined rounds, or even in joined, turned rounds (where you turn the work at the end of each round, as with many afghan square patterns worked in the round). The method for ending each round and starting the next depends on your pattern and not on whether you began with a magic ring or with a traditional “ch X, make Y stitches in Zth ch from hook” start.
Lili said
Hello June,
First off let me thank you so very much for your clear explanation, and timely response. You don’t know how much I appreciate it!
I have a few more questions for you to please answer for me. I would really appreciate it.
1) In your response when you said that “when you crochet each round in a different colour, and want to avoid the ‘jog’ “, what does ‘jog’ stand for / mean? I am new to crochet so I don’t know all the abbreviations, and lingo, yet.
2) When writing your own patterns, must all patterns start with an even number of stitches like Rnd 1, 6 SC, or is it okay to start with an odd number of stitches like Rnd 1, 5 SC?
3) I am trying to write out a few flower patterns of my own. The one I am working on now is the yellow flower with an orange center. The exact flower that Dot Warner wears in her hair. (Dot Warner is from Animaniacs in case you didn’t know her. If you google the name “Dot Warner”, you will see her picture. She is hard to miss, because she is really cute, and she always has a yellow flower in her hair. 🙂
The following is the 3 different options I have come up with for the orange center of Dot’s flower. Now, keep in mind the orange part is not very big, but I don’t know which option to choose, and I need your help.
Please note, I am using the magic ring technique for starting each of these circles.
Option A) Rnd 1, 10 sc
Rnd 2, 20 dc
Now, for this circle (option A), I do slip stitch, and chain 3, at the end of Rnd 1, because I am going from sc to dc. I know, I can skip the slip stitch, and just chain 3, but I think it’s better to slip stitch, and then chain 3, right?
Option B) Rnd 1, 10 sc
Rnd 2, 3 in each stitch around = 30 sc
I have never seen 3 in each stitch before in a pattern, and I’m not even sure is this is the right thing to do, ever?
Option C) Rnd 1, 10 sc
Rnd 2, 2 sc in each stitch around = 20 sc
Rnd 3, 2 sc in first stitch, 1 sc in next stitch
repeat around = 30 sc
For the above 2 last options b, and c, I didn’t slip stitch or chain at the begining of the 2nd, or 3rd row, because I was working in only single crochet stitches.
The reason I needed 30 stitches total in the last round of the circle is because Dot Warner has 5 petals total in her flower, and each petal I made 5 stitches wide to give it that square shape, and I have a single stitch in between each petal so it would look better.
Therefore for the petals this is what I came up with.
I pick up the orange circle, and attach my yellow yarn, and go around the circle as follows:
1 sc, 1 dc, 3 treble crochet, 1 dc, 1 sc, repeat round 5 times.
June, I hope this was not confusing to you. I am really trying hard. Crochet is brand new to me, and I have never written a pattern before. I would really LOVE to crochet Dot’s flower. I would really appreciate all your help. Thank you so very much!!
Sincerely,
Lili
Lili said
Oh, June, I forgot in option A) to add the 3rd round. So again, Option A is: Rnd 1, 10 sc
Rnd 2, 2 dcin each stitch =20
dc
Rnd 3, 2 sc in each stitch, 1sc
in next stitch, repeat
around = 30 sc
Thank you, June.
June said
Lili,
To see the ‘jog’ I’m talking about, try this:
Make a magic ring, ch 1. Crochet in a spiral throughout.
Rnd 1: 6 sc in magic ring. (6 st)
Rnd 2: change to a different colour, sc in each st around. (6 st)
Rnd 3: change back to the first colour, sc in each st around. (6 st)
You’ll see that there’s a height difference between the start and end of each round, so the ends of the stripe of the second colour don’t match up – that’s the ‘jog’.
I discuss this more fully, and have lots of tips for designing (including how many stitches you should put into your magic ring and why!) in my book, The Complete Idiot’s Guide to Amigurumi – you may find it helpful if you have more questions like these.
As for your other questions, if you’re designing a crochet pattern, there is no right and wrong! All you need to do is make some samples (as you’ve done) and see which you prefer. Is the flower ruffling up instead of staying flat in some of your examples? Are there big spaces between some of the stitches that don’t look good? Just examine each flower closely and decide which you like best, and that’s the right answer. If it looks like Dot’s flower, you’ve done it right!
Lili said
Thank you so much June for the confidence. I appreciate all your help.
I just have 2 more questions for you about the magic ring, and I’m all set after this.
While using the magic ring, if you have a first round of single crochet stitches, and then you have a second round of double crochet stitches, you still will have to chain 3 at the begining of the second round, right? Do you have to slip stitch, because you have gone from single crochet to double crochet?
And finally…
If you have a first round of double crochet stitches, and then a second round of double crochet stitches, do you still have to chain 3 at the begining of the second round? And do you have to slip stitch at the end of each round?
Thank you June once again for all your help.
I will definitely check your book out.
Sincerely,
Lili
June said
To start a round of double crochet, which is a tall stitch, you need to ch 3 first to get your hook up to the height of the following stitches. It’s best to sl st before that so the chains are started from the first stitch. You’re not slip stitching because you’ve changed from sc to dc, you’re slip stitching so that your ch 3 (which typically replaces the first stitch of the following round) are at the position of the first stitch of the round, not the last stitch of the previous round.
Unless you have a pattern that calls for a dc spiral (very rare), you should start each round of dc with a chain and end each with a slip stitch to close the preceding round.
I’d just like to make this clear to anyone else reading: what I’m saying here is not at all relevant to the magic ring! It seems that by answering these questions here I’m confusing people. The way that you end a round and start the next one (in a continuous spiral or by joining with a sl st and chaining) can vary from pattern to pattern and it makes no difference whether you started with a magic ring or with the traditional chain method.
Taru said
Hi! Thank You for Your wonderful instructions. Those were very helpful. 🙂
Kara said
Hi June,
I’m a beginner to crochet and I’m having trouble with one of the hat patterns I bought offline. The first step for one says to chain 3 and then in 3rd chain from hook dc 14, but if I only made 3 chains I don’t understand how I can work 14 double crochets? Hope this makes sense to you. Thanks!
June said
Hi Kara, the pattern means you to make all 14 dc into the same chain (the 3rd chain from the hook). If you prefer, you could instead replace those instructions with a magic ring: make a magic ring, ch 3, make 14 dc into the magic ring.
Denise said
HI! Thanks for such a simple way to learn the magic ring. I have followed online video tutorials and many written explanations. Yours is by far the best. I followed your instructions once through and got it right away. Other methods I have spent several tries to get it right and never did. Great job and great instructions. Thank you so much for making the magic ring so easy!!!!!
Colleen Burns said
Hi June,
I just wanted to say thank you so much for these instructions, I was about to give up on learning how to do the magic ring when I cam across this. It will make the Easter eggs I am creating for my one year old daughter’s first real Easter (she was born Dec 23, 2010) much nicer and safer. Thank you again.
Happy Crocheting,
Colleen Burns
claire said
hey! great tutorial, i did it right the first try! thanks a lot