Magic Ring (right-handed)
Looking for the left-handed instructions? Or the video tutorial? If not, read on…
What is this ‘Magic Ring’, anyway?
A magic ring is a way to begin crocheting in the round by crocheting over an adjustable loop and then pulling the loop tight. The advantage of the magic ring method (below, right) is that, unlike the regular “chain 2, x single crochet in 2nd chain from hook” method (below, left), there is no hole left in the middle of your starting round.
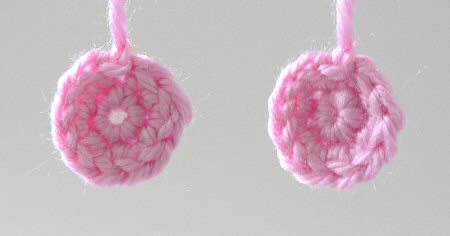
L: ch2, 6 sc in 2nd ch from hook, 2 sc in each st around.
R: magic ring, ch 1, 6 sc in magic ring, 2 sc in each st around.
How do I make a Magic Ring?
This demonstration shows a piece made using the following pattern:
Make a magic ring, ch 1.
Rnd 1: 6 sc in magic ring. ( 6 st)
Rnd 2: 2 sc in each st around. (12 st)If you’re following a different pattern, you’d complete steps 1-2 of this tutorial exactly as shown below, then work the chain and the stitches of Rnds 1 and 2 as specified in your pattern.
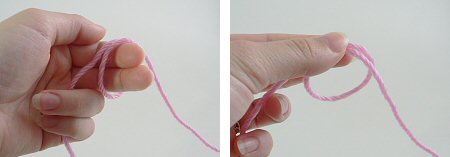
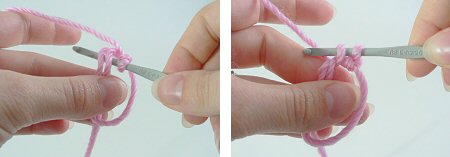
Please note: in the following photos, the starting yarn tail is always on the left and hanging down. The working yarn begins on the right and is then picked up over my left forefinger in Step 2.
- Make a loop a few inches from the end of your yarn. Grasp the join of the loop (where the 2 strands of yarn overlap) between your left thumb and forefinger:
- Insert hook into the loop from front to back. Draw up a loop:
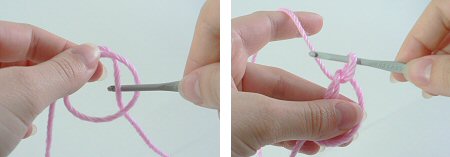
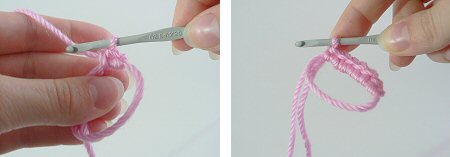
- Ch 1 (or as many as stated in your pattern). Note: this does NOT count as a stitch:
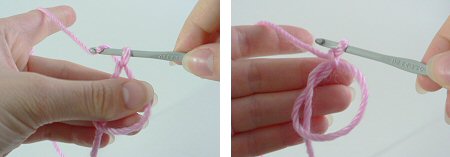
- Insert hook into the loop, so you are crocheting over the loop and the yarn tail. Draw up a loop to begin your first sc of Rnd 1:
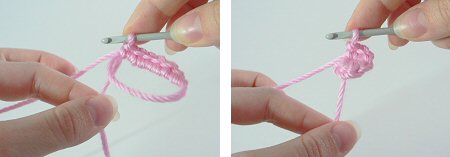
- Complete the sc. Continue to crochet over the loop and the yarn tail until you have the required number of sc for your first round (6 sc shown here):
- Grab the yarn tail and pull to draw the centre of the ring tightly closed:
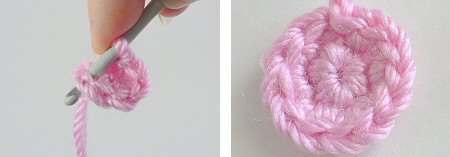
- Begin your second round by crocheting into the first stitch of the first round (below, left). At the end of round 2 your work will look like this (below, right):
You’ll never go back to your old method again, I promise!

Loved this tutorial? I have so many more amigurumi tips and tricks to share with you!
Boost your amigurumi skills with my latest book, The Essential Guide to Amigurumi, your comprehensive guide to amigurumi techniques and tips.
Do you find my tutorials helpful? If so, please consider making a contribution towards my time so I can continue to create clear and concise tutorials for you:
Thank you so much for your support! Now click below for loads more crochet video and photo tutorials (and do let me know what else you’d like me to cover in future tutorials…)


deb said
Hi June,
If my pattern calls for a chain join, but I would prefer to use a magic circle, how would I convert it?
Thanks,
Deb
June said
Do you mean a loop of chains joined into a ring with a sl st? If so, you’d replace “ch X, join with sl st into a loop” with “make a magic ring”, so the “ch 1” that locks the magic ring together will be the first chain in your pattern after the sl st. To make it clearer, I’ll just make up an example for you.
Original pattern: Ch 4, join with sl st into a loop. Ch 3, 11 dc in chain loop. Join with sl st.
Converted pattern: Make a magic ring, ch 3. 11 dc into the ring. Join with sl st. (Use yarn tail to pull ring closed.)
Sandra Stewart said
This is the very first magic circle i was able to make thanks to your pictures and instructions. I will always go to your sight from now on. THANK YOU Sandra Stewart
Deb said
I cant figure out magic circle…oh well. Thats why I can only crochet afghans.
Diane said
Deb, Did you watch the video tutorial? That is the only way I was able to figure it out. The written instructions just didn
Nana K said
Thank you so much for this wonderful tutorial. It was so easy to follow.
A very grateful fellow Canadian.
MiMilla said
Thank you for the tutorials. It’s nice to avoid the round holes at the start. My magic circle doesn’t look as neat as yours. There are kind of bumps in the first row. It’s better than holes, but is there anything I can do to make my magic circle start better?
Just now I’m making meat balls and pasta so thats’s not a big problem. I’m planning to crochet a cat after the meat balls. I’d love to make the head perfect with perfect symmetry, without bumps.
Yvette said
Just make sure you are not twisting the chain.
Verna M. Smith said
Thank you so much for your tutorial. I am left handed but I was taught around ages 8 or 9 but a righty. She sat me on the floor in front of her, and I could follow her “backwards” motions and they made better sense.
Katria said
Thank you so much for sharing your talent and knowledge!
Katria Jakee
Tami Bloom said
Do you have instructions for left handed?
June said
Yes – all my crochet tutorials have right- and left-handed versions! They’re linked from the top of this page, or, for convenience, you can also find my left-handed magic ring tutorial here 🙂
Den Hunter said
Hi June, is it possible to use the magic ring for a blanket? Many thanks!
June said
Yes, Den, you can use this for any piece worked in the round (unless a hole in the middle is part of the design!) The only difference is that, if you’re making an amigurumi, you can leave the yarn tail dangling inside the piece, whereas for any other crochet (garments, accessories, home decor, etc) you’ll weave in the yarn tail on the back of the work to secure it, as you do with all your other yarn ends.
Kathryn Pless said
This is one of the best tutorials I’ve found on the magic ring. I really like the nice big and clear pictures you’ve included. They make it very easy to learn how to do this technique.
Tel said
Yay finally a tutorial for a magic ring that has madeit easy for me to do this, never used one before,but now i’ve got the hang of it, I will be using this in future. Thanks June 🙂
Gloria Wagstaff said
Thanks to you, I understand the magic ring. But I’m a bit confused because my pattern says after Round 1 to “Chain two into magic ring”. I know all the basic stitches, but how do I chain INTO the magic ring? Am I being thick? Thanks for your help.
June said
Gloria, I think it’s just a badly-phrased pattern! Of course you can’t make chains into anything – that wouldn’t make any sense. I assume your pattern should have said “Make a magic ring, ch 2” – in the same way as, in my tutorial, I have “Make a magic ring, ch 1”. So follow my tutorial, but make an extra chain before you work the first stitch of Round 1 into the ring 🙂
Ellen said
Is it possible to show this for left handed people?
June said
Absolutely, Ellen! The links to the left-handed version of this tutorial, and the video tutorial (which has right- and left-handed versions) are at the top of this page 🙂
Mel said
I just want to say thank you very much for this tutorial! Like so many others have noted, yours is the only one I’ve found that is absolutely clear in the images and explanations. I also appreciate that you show Round 2, because I wasn’t sure how to continue haha. Thank you so much again, your blog is very lovely 🙂
Anna F said
This is, by far, the best and easiest description I have found of how to do a magic ring. Thank you so much!
Hermione impettt said
I have been knitting for over 30 years but could never crochet. I decided it was time I learnt and have made 2 very uneven granny squares. I then made a rose, which actually looked ok. Your detailed explanation of a magic ring is brilliant, even I can’t mess that up haha. Thank you so much for sharing this tutorial, it makes it so much easier
All the best
Hermione
Georgi said
Thank you so much for these instructions – the best ever for a magic ring. Will have to investigate the rest of your website.
John Watson said
Sorry to rez an old thread, but thank you for the excellent tutorial June!
Sasi' said
Hello~
Simply, Simple. Period. And I’m a lefty (but never researched your (or any), LH’d – tutorial – they’d probably ruin me), as it was (and still can be), extremely complex turning the directions around (and inside out), to concur many different projects! Both knitting/crocheting (and prof.seamstress), over; a half century, just now creating my very first “Aruguriami Project”, ironically enough, this stitch/step is one used for many different projects (no problems ever staying closed/opening after taughtly tugging.
Goig to ckout your patterns while here, a few have caught my interest!
Truly thank you for the knowledge, I make it my business learning something new everyday!
BeSafe!
Paige Mitchell said
Hi June! I love your work and like the others, I do so appreciate your lovely tutorials! So clear!!
I am hoping that you may have a tutorial on the crocodile stitch.
June said
Hi Paige, my tutorials are all to support my patterns, and I don’t (currently) have any designs that use crocodile stitch! If that changes, I’d definitely make a crocodile stitch tutorial to accompany my pattern(s) 🙂
megan said
Mine didn’t tighten.What am I doing wrong?
June said
Megan, take a look at my Magic Ring video tutorial to see this in action – that should help 🙂
LavendersBlueLily said
Thanks so much! The photos don’t show the ends of the yarn so I wasn’t sure which end was the tail and which end comes from the skein. So I tried it both ways, and it only works one way. I don’t know if this will help anyone else but basically for me, the ring is exactly backwards of the standard way to make a slip-knot, and you don’t pull the slip-knot closed till you’re done putting stitches into it. Cool! I’ve been crocheting for almost 30 years and still learning new things. So nice! Thank you again.
June said
I do explain that above the photos, but well done for figuring it out for yourself anyway! It’s a great technique, isn’t it?
sylvia said
Thanks so much! I couldn’t follow instructions from any other site. this one was very clear!
Elaine said
thanks for this, was struggling to work this out to make pokeballs with, much appreciated
Norma Lambert said
Like many others who have spent hours trying to follow instructions for the Magic Ring. I have found that being able to print your instructions and when necessary refer to your video it has become so easy to follow your instructions and achieve a perfect result.
After finding your site I am also looking forward to spending a long time looking through it.
Thank you so much.
Sparkly Jane said
At Last! Clear instruction that I could follow easily and achieve a perfect result first time. I make dozens of crochet hats which I sell to raise funds for women working on textile projects in developing countries. This Magic Ring will prove invaluable I. Future.
Thank you so much Sparkly Jane
robyn said
So my magic ring looks like the “old” way LOL. Why does it not stay closed? By the time I’m done with the piece the hole is so big. Any suggestions how to keep it closed?
June said
Robyn, see my previous reply to this question, and you can also watch my Magic Ring video to see exactly how I do it.
Tessa said
I’m confused. When you crochet single stitch in the round for your videos (such as the invisible decrease and the perfect amigurumi stripes) you crochet by inserting the hook from the outside of the piece. After the last step im stuck with my book inserting from the inside of the piece. So like, the hook inserts into the stitch from where the inside of the body will be instead of the other way around. Does that make sense? How can I make it so the hook inserts from the outside of my amigurumi after the magic ring?
Tessa said
Do I just turn it around and crochet in the other direction so I’m inserting from the outside and the hook is facing me? I could crochet from outside in but the piece I just crocheted is between me and the hook, unlike in your video tutorials where the hook is between you and the piece.
June said
Tessa, no, don’t turn the work; all you need to do is turn it inside-out. Please see my video ‘Which is the Right Side?’ at www.planetjune.com/rightside for a demo – it should all be clear once you’ve seen it in action 🙂
Carole said
Great directions, thanks!!
Carol said
Just starting amigurumi–lots of pieces which start with the “magic ring” and your instructions are really helpful. Thank you.
Deb Che said
Hi June,
I’ve only learning how to crochet a few weeks ago and your videos have helped me tremendously. I’m learning how to make amigurumi dolls starting with the magic circle.
My question is this: after you finish making the 6 sc of the magic circle and you begin row 2, do you hook into the next stitch’s back loop, front loop or both loops? As you carry-on in the pattern, are you supposed to hook into the back loops, front loops or both? I hope I’m being clear, and sorry if this sounds like a silly question.
As well, in Step 7, it says to “Begin your second round by crocheting into the first stitch of the first round”. Do you need to do a slip stitch first – if not, will there be a large gaping hole?
Thanks so much!
June said
Deb, the standard way to crochet amigurumi is: 1) in both loops of the stitch below and 2) in a continuous spiral without joining at the end of each round. BUT, this is not always true – you should always follow the instructions in your pattern, which may specify to crochet in front or back loops only, and/or to join at the end of each round. If the pattern doesn’t mention anything about which loops to work into, or to join at the end of each round, you may assume that it’s worked in both loops and in continuous spiral rounds with no slip stitches.
So, as there’s no slip stitch or joining specified at the end of Rnd 1 in my tutorial, you should just continue with Rnd 2 exactly as I say in Step 7 (my tutorials always tell you every step you need to follow!) You may like to watch the video version of this tutorial too, so you can see me crocheting the continuous spiral as explained above, and watch how it works in practice.
Janet said
Thank you! I was afraid this was going to be one of those things I wouldn’t get, but your description is easy to follow.
Brenda said
YOU WOULD NOT BELIEVE HOW MANY TUTORIALS I’VE WATCHED ON THE MAGIC RING/CIRCLE. AFTER SEEING YOURS I CAN NOW DO IT THANK YOU VERY MUCH
Merri Wood-Schultz said
This suggestion is for those wanting a way to keep the loop of the magic circle tight.
Try threading the tail through a needle with a large eye (like a large darning needle) and using it to do a “clove hitch”*(clarification below) through the two loops of yarn that make the center of the ring itself; there are the loops that let you pull the ring closed.
I do this on the inside of the piece, but it should be relatively easy to work between the stitches of round one. More than one “knot” may be necessary, and it is important to pull it or them really tight. You can thread the yarn through the base of the crochet stitches in between multiple knots, if you need to separate them. The remaining tail can be woven in as usual.
This method is stronger than just weaving the tail, because it binds the two threads of the center loop together so they don’t slide against each other, so it actually takes some of the tension off of the tail.
*A clove hitch (at least that is the name I learned for it) is a knot where you just make a loop around something and pull the tail of the rope/thread/yarn through that loop, and them pull it tight. Here, you use the needle to loop the thread through those central loops of the magic ring and then just put the needle through loop of thread left on the surface before pulling the stitch tight. It’s the same as making a blanket stitch.
I hope this is helpful.
AunT said
I looked at four different websites before yours, trying to figure out the magic circle. Yours was the first to actually make sense. I made a successful magic circle, yay!
Kris said
I have been crocheting for decades and have never liked the hole in the middle when making things. This is simply brilliant and can’t believe I didn’t think of it! Just so practical. Thanks for sharing!
Jenifer Dave said
Wow! I love this technique. It reminds me of being a kid and learning macrame for the forst time.
KitterKats said
I have been crocheting for a long time and never heard of the magic ring till I bought the Ami Cats pattern. I tried it with a fuzzy yarn and couldn’t get it to pull tight. I think the fuzz was getting trapped in the stitches and wouldn’t pull. I love cats and the pattern and plan on making a bunch of them using all different types of yarn. So, I’ll definitely try again. It will be nice to make a ring and be able to close up the hole. With the fuzzy yarn, the fuzz itself closed up the hole.
Your instructions are wonderful and easy to follow.
Thanks for your wonderful website. I love it and could really go crazy with all your supper cute patterns, if I had the time.
June said
Yep, the magic ring is definitely not designed for use with fuzzy yarns, but it’s amazing with regular yarn! (If you want to make more of my designs with fuzzy yarns, I recommend you use the substitution in the Terminology section on p1 of all my patterns – using the ch 2 start with a textured yarn will give you a more consistent result.)
Amy said
Thank you so much June for making such a great written tutorial and thanks for putting in pictures. I’m a visual learner so pictures help a lot! It’s really nice that you try to respond to everyone’s comments and help everyone out. 🙂
Heather said
If you can see where the yarn is binding, grab a seam ripper! It’s tiny point lets you cut just the threads causing you problems!
Seriously, I have a foot of starter chain somewhere because the binding threads were stronger than the yarn itself, and the yarn broke when I was trying to undo the chain to try a diffrent pattern. Then I found the seam ripper trick.
Theresa said
Thanks so much for sharing this, I was never able to quite understand the concept of the magic ring but now I won’t use any other method for my beanies. Your instructions were simple and easy to follow after a few tries I was able to do it on my own…Thanks again!!
Dot said
My only question is…what keeps the ring from unravelling? I know you pull it tight and then that thread just hangs there. How do you secure it so that when washed, it doesn’t pull apart? That is the only thing that keeps me from trying this.
June said
Dot, if you’re making an amigurumi, you can leave the yarn tail dangling inside the piece. For any other crochet (garments, accessories, home decor, etc) you’d just weave in the yarn tail on the back of the work to secure it, as you do with all your other yarn ends.
Rosemary L. said
I have used the magic ring and it looks great. I have found that the ring loosens and I don’t know how to keep it tight. I do weave in the ends but it still relaxes. It looks as though no one else has this issue. But, it could be my teacher – a book called “I Tought Myself To Crochet”! Learned in 1974 after breaking down in Kingman, AZ for 7 hours. Never had a real crochet buddy so I still have not advanced to semi-complex patterns ????. Thanks for your site.
June said
It depends in part on the yarn you use, and in part on how tightly you pull it closed – after it feels like it’s closed I can usually give it an extra-hard tug and it’ll lock up tighter, but that does depend on the yarn.
Kimberly Cline said
Perhaps a helpful tip for Rosemary L:
I love the ‘magic ring’, especially for granny squares and like items, because you can control the size of the “donut hole” which in turn gives the larger project a uniform appearance. I can see where stretching would be an issue when using this method on wearable items. Might I suggest that you use a little extra tension when loading the foundation sc stitches onto the ring? That is to say, make these stitches a bit tighter than the gauge calls for. This will compensate for the stretching in the finished item.
And for June:
Love your site and have bookmarked…I’m sure I’ll be back soon! Found you by following a link on future girl.com. ~Kim
Vanessa said
Thank you so much. I am new to crochet and have been struggling with the magic circle but got it straight away with your instructions, they are very clear and easy to follow. I can now get to work on my beanie 🙂 Thank you for taking the time to share your expertise.
Shradha said
This is the best explanation ever. I had been struggling with it for 2 years and got it in 2 mins. Thank you
Parita said
i don’t get the instructions can u be more specific please
June said
Parita, try my magic ring video tutorial – you may find that easier to understand 🙂
Caz said
Thank you so much for the easiest method I’ve tried for this – usually every time I need to make a magic circle (obviously not often enough lol) I have to search for the instructions, but I think I’ll actually be able to recall your instructions easily. Thanks again!
Helene said
Oh. So THIS is a magic. Haha, I always skip that part when I crochet. Now I see what I’ve missed. Thank you so much for this, and for linking it in the flower tutorial so that I clicked it (after 13 failed attempts to fit 15 stitches in one small hole).
Have a creative day!
May said
Thanks for the Magic Ring instructions. I am mostly a knitter only because there are some things about crochet that I had no idea could be done. I will never go back to the old way again!!
Elizabeth said
Hi June, I just started crocheting last month, so please excuse me if this is a ridiculous question, but can you use the magic ring to start a hat when the pattern DOESN’T call for it? Is there a particular substitution? Thanks so much!
June said
All you need to do is replace whatever your pattern says to work the stitches of Rnd 1 into (probably either a single chain stitch, or a loop of chain stitches) with the loop of the magic ring 🙂
helen weintraub said
Thank you SO SO SO MUCH for making the magic loop easy to follow. I’ve done hours of on-line searching for directions, but for whatever reason, your directions and instruction is the only one I’ve been able to easily follow and work consistently without any problems again and again.
Susie said
DITTO! Thank you!
Cori Cline said
Thank you! I searched several websites, my own books, and several tutorials. I want to keep practicing over and over so it will become a technique I can always remember. It really is easy!