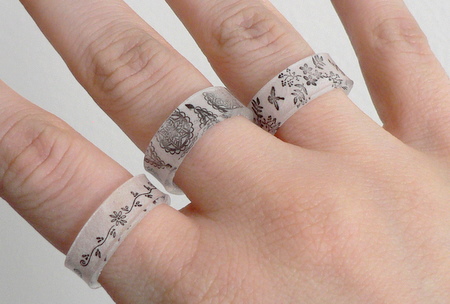
Thank you to everyone who requested a shrinkydinks ring tutorial! This tutorial is an experimental method, not an exact science – you should have fun playing with it…
UPDATE: Since posting this very popular tutorial in 2008, I’ve answered every question imaginable in the comments of this post. If you have questions, you’re welcome to trawl back through the hundreds of comments to find my answers, or, to make things easier, I’ve compiled a 3-page shrinky rings FAQ, which is available exclusively when you donate $2 or more towards my tutorial (this also entitles you to further help from me by email, should you need it). Please see the end of this post for more details about this policy 🙂
Please note: if you’ve come here via the lovely bird ‘ring’ picture on Pinterest, read this post to answer your questions.
This tutorial is Donationware – the instructions are available for free, but if you like it please consider sending me a donation to show your appreciation:
Send me a donation and receive the easy-to-print PDF version of the tutorial as a thank you! The PDF also includes a bonus 3-page FAQ compiled from all the tips I’ve shared in the comments since creating this tutorial.
Donations of any size are much appreciated. Just add the amount you wish to donate, and, once you have checked out and paid, your PDF will instantly be available to download from your PlanetJune account.
The complete instructions are available below, regardless of whether or not you choose to pay for them 🙂
This is a PlanetJune original tutorial. Please do not share or reproduce this tutorial; instead post a link to www.planetjune.com/shrinkydinks
I’ll answer some questions from the comments on my previous shrinky rings post before I get started, and add more hints and tips throughout the tutorial.
Shrink plastic, for the uninitiated, was originally marketed as a toy for kids. It starts life thin and flexible. You draw on it and then bake it in the oven, and it shrinks to become about 1/3 of the starting size, but 9 times as thick. This thickness makes it strong and hard. It will not bend after baking, so if you try to pull your ring open, or stand on it, it may snap, but it is strong enough to withstand regular use as a ring.
The last step (bending the ring into shape) is the most difficult, so I highly recommend that 1) you read through all the instructions before starting, and 2) practice on a blank piece of shrink plastic so you can get a feel for it and test your size and bending technique before putting too much effort into your design!
Full tutorial instructions are after the jump…
1. Find your shrink plastic
I use Shrinky Dinks Frosted Ruff N’ Ready, which accepts rubber stamped images beautifully. Any transparent shrink plastic will work. If you use the coloured opaque shrink plastic, you would have to decorate the outside of your ring instead of the inside. You could also use the inkjet printable type of shrink plastic.
An alternative source for shrinkable plastic is #6 plastic, commonly used in food packaging. Look for the ‘6’ recycling symbol to make sure you’re using the right type! You’ll have to sand one side before use, as the plastic needs a rough (not shiny) surface so the ink won’t smudge and rub off.
Note: If you are looking for sources, search for “shrink plastic” (generic term) not “shrinkydinks” (brand name) and you may have more luck. For example, if you’re in the UK, googling ‘Shrink Plastic UK’ (without the quotes) will give you lots of online stores that sell it. You’re looking for large sheets of it, not pre-cut shapes.
2. Measure and cut to size
Note: Different brand of shrink plastic may shrink by different amounts, so you might want to try baking a plain test piece to make sure you’ve got the size right before spending time on decoration.
Measure: The best method to find the right length for your strip of plastic is by trial and error.
- A: Simple Method: Use my measurements for your first attempt, then modify the length if they turn out too small or big! My rings fit small ladies’ fingers, and are 6mm (1/4″) tall.
My starting dimensions were 14.2 x 1.6cm (5 5/8 x 5/8″). - B: Attempt to Calculate Size: If you know your ring size, you could calculate the desired circumference of your ring with a ring size converter. (The circumference would be equal to the length of your strip of plastic after shrinking.) However, I found that, although Shrinkydinks is supposed to shrink by ~3 times, my strips needed to be ~10% longer than the length I calculated in this way.
This isn’t an exact science. I recommend you just use your best guess to make a test ring; you’ll soon find out if your strip should have been longer or shorter!
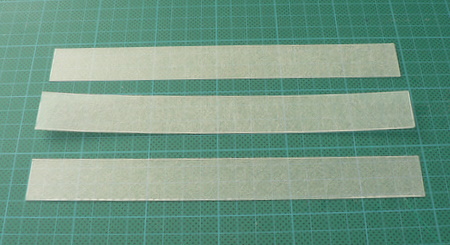
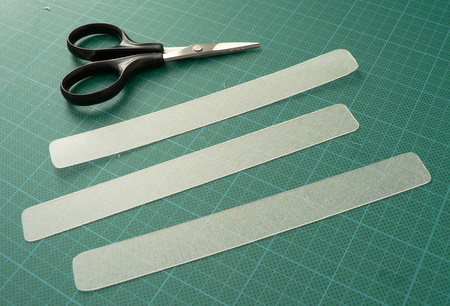
Cut to Size: To cut the plastic, I like to use a guillotine (paper cutter) to get straight lines, but it’s probably not good for the cutter blade (I use an old cutter blade). You could also use an xacto knife and metal ruler, or just cut the plastic with scissors.
The corners can be very sharp, so I like to round them off slightly with scissors before baking (don’t worry if you forget this step; you can file or sand them down after baking).
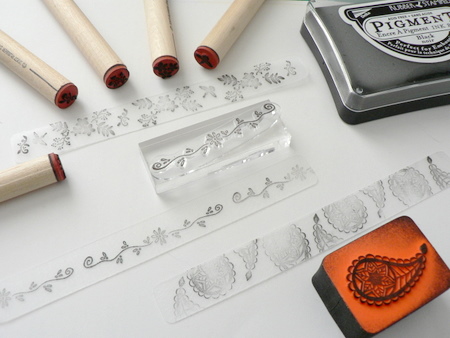
3. Decorate shrink plastic
Follow the decorating instructions that come with your shrink plastic. Here are some ideas:
- Rubber stamps + alcohol-based permanent inks (be warned: other types of stamp ink will smudge)
- Fine-point permanent marker (e.g. Sharpie) to draw or trace your designs
- Coloured pencils (use in combination with the above to add colour)
- Print designs directly onto your plastic (inkjet shrink plastic ONLY)
If you’re using the frosted type, remember to decorate the rough (frosted) side. For other types, consult your instructions.
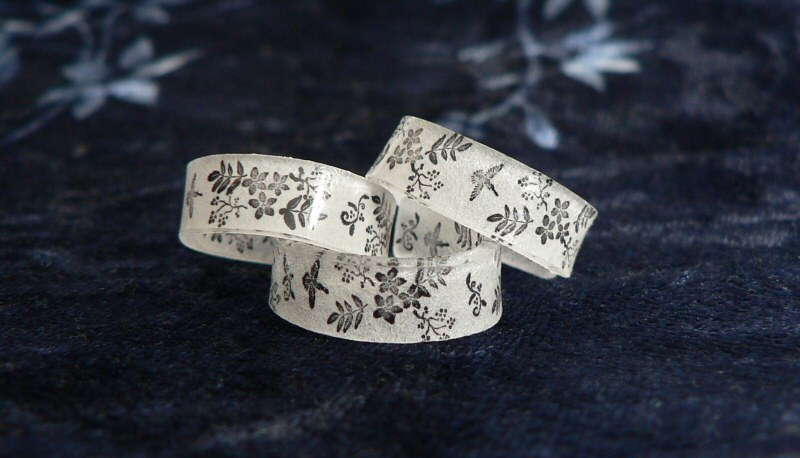
I used peg stamps to decorate my first rings. The designs are only 1cm tall so fit my rings perfectly. Below I have also tried some other rubber stamps:
Don’t forget to let your ink dry before adding any coloured pencil embellishments, and remember that colours will become more saturated and vibrant after baking, so less is more in this case.
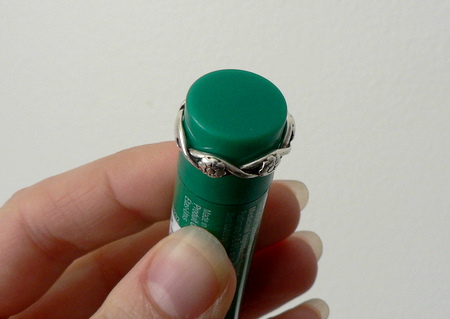
4. Find a suitable form to bend plastic around
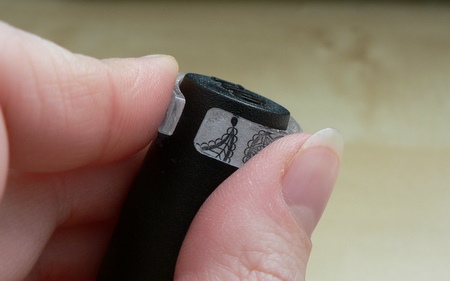
Here’s a useful tip to find an object of the right size to create your ring: take an existing ring, and try to slip it over various thin cylindrical household objects, e.g. marker pen barrel, wooden spoon handle, lip balm tube. You are looking for an object that is a tight fit inside your ring. If you don’t have anything suitable, you could buy a short length of wooden dowel of the right diameter. Your object will come into contact with hot plastic, so don’t use any treasured possessions for this step.
5. Shrink your plastic
This is the fun part!
Preheat a toaster oven or conventional oven to the temperature specified on your packaging. Make sure you are in a well-ventilated area so any fumes don’t build up.
Note: Please read the instructions below all the way to the end before baking your ring – the shaping happens very quickly after baking so you need to be ready…
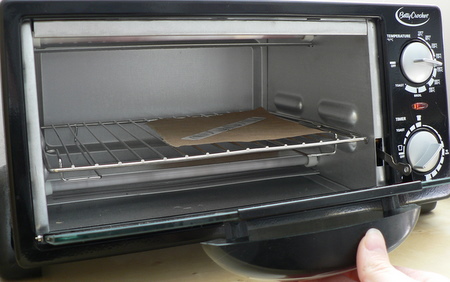
Place your strip (decorated side up) on a piece of brown paper on an oven tray, and put it in the oven. Keep watching… this is where the magic happens. Your strip will begin to curl up and wiggle about as some parts heat more quickly than others and so begin to shrink more quickly. Don’t worry if it looks like it’s stuck together – in my experience it always flattens out as it continues to shrink. When it has finished shrinking, leave it in the oven for another 30 seconds to heat through evenly.
Here’s an animation of the shrinking process:
6. Shape your ring
When your strip comes out of the oven, you’ll have to work quickly – you only have about 10 seconds before it has cooled and becomes rigid. Disclaimer: to protect your hands from the hot plastic, you should probably wear a thin glove (for more control) or an oven mitt (for better protection against the heat) but I don’t bother – it is very hot, but the plastic doesn’t stay hot for long enough to burn my skin.
Remove the brown paper from the oven. Wait for about 2 seconds (so it’s not too hot to touch), then carefully wrap the strip around your forming tool, with your decorated side facing in towards the tool. Hold it in place for a few seconds until it becomes cool and rigid.
I’m not going to lie, this step is tricky. You really do have to work quickly, and not make any mistakes, otherwise you won’t have time to wrap the entire strip around your object before it cools. But don’t lose hope! There is a magic fix for a badly-formed ring like the one below…
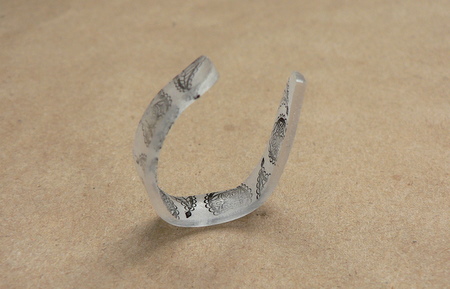
Pop your misshapen ring back into the oven on the brown paper, balancing it upright on its curved surface so the join is at the top (as in the picture above). After a minute or so, the plastic will relax back out of its shape, and revert back into a flat strip… I told you this stuff was magic! Let it heat through for about 20-30 seconds, then try to form the ring around your tool again.
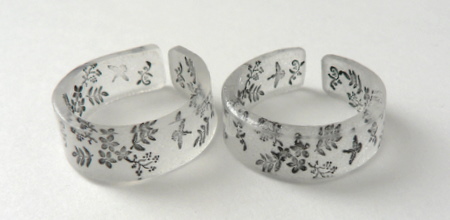
Left: unsanded edges; Right: sanded edges
That’s it! You can sand down the edges to give a smoother finish, but this may partially obscure your design. You could also paint the edges after forming for a different effect. For more durability of your design, use a clear coat to carefully varnish the inside of the ring (one coat should be enough).
You can make matching earrings, charm bracelets or necklace pendants – just punch holes for the jewellery findings before shrinking the plastic, and remember that the holes will also shrink, so don’t worry that they’ll be too large.
Enjoy your new jewellery!
Please note: if you’ve donated for this tutorial and read the included 3-page FAQ, and still have problems or questions relating to the instructions in my tutorial, you’re very welcome to email me for further help; please include your order number in your email.
I do not have time to respond to any other questions – if you look back through my many past answers to questions left in the comments here, you’ll probably find the answer anyway, or you can just donate $2 or more and receive the PDF version of this tutorial together with a 3-page FAQ which should answer any remaining questions 🙂
Happy shrinky ring making!
Please leave me a comment if you enjoyed this tutorial, and consider leaving me a donation. Thanks!


Dori said
really nice tute!
Michelle said
I had no idea you could curve the shrinky dinks like that and make rings out of them. I would actually wear that. I get so bored with my daughter putting flat pieces of plastic in the oven. Thank you for the detail of your blog. I am going to “try” to make these.
Sharon at www.momof6.com said
This is such a great idea! I will be sharing your picture and link on my Links to Love post on Sunday 4/17 at www.momof6.com!
Malinda said
Nevermind, I think I figured it out. Thanks again for the fabulous tutorial! 🙂 <3
Malinda said
Hi June! Stumbled across your tut and I can’t wait to try it out! Except, I’m having a hard time figuring out how you got your starting dimensions since I’m comparing with the size converter you linked. My ring size is 8…do I multiply the circumference (in the cm listed, which is 56.6) by 3 since it will shrink to a 1/3 of the size?? so my starting strip will be 169.8cm x 1.6cm??
June said
In case anyone else has the same problem, the ring size converter I linked to gives the circumference in mm, not cm, so you’ll need to divide by 10 to get the cm value (so closer to 16.9cm than 169 cm) 🙂
Also, Malinda, if your ring has a small gap between the ends like mine do, that will be included in the final circumference measurement, so you can start with a slightly shorter length of shrinkydinks. If you want to make sure you get the size right, try baking a plain one first and see if it fits before you go to the trouble of decorating one that may be the wrong size!
vt said
Hola quiero saber si Ud me puede hacer el anillo transparente pero q el aro sea CUADRADO Y CON DIBUJO DE CÓMIC
Kelly said
Thank you for the great tutorial.. I linked you on my blog…runwithglitter.blogspot.com/2011/02/shrinky-dink-ring.html
Angie said
I just tried making one of these rings. When I put it in the oven, it did the shrivel up thing but then it got all stuck together. I tried straightening it out to let it flatten out, but it wouldn’t…any suggestions?
June said
Angie, if it’s really stuck together and doesn’t uncurl when you reheat it, when it’s hot you can use a chopstick (not fingers!) to help free it, and then it should straighten out again.
If it comes unstuck but won’t flatten, use a piece of cardboard to press down on the piece when it’s just come out of the oven, and you should be able to flatten it out. (You’ll then have to reheat it so you can bend it into the ring shape.)
If all that fails… scrap the ring and try again with a new piece! It’s all a matter of trial and error. If you shrunk it at too high a temperature, it could be fused together permanently, so check your baking temp if it doesn’t come apart even when you reheat it – you may need to use a lower temperature in future.
alison said
it didn’t work it got stuck all together 🙁
g said
thank you nice design
Lori said
SSSSoooooo cool! Thank you for sharing!
Kirsty said
has anyone has trouble with the ink transferring to fingers? I used permanent markers and sharpies but the picture ended up on my hands! Is there a way to finish your design so this doesn’t happen. I’ve tried nail polish, pva, varnish etc and the all make the inks run instantly? Thanks.
June said
Kirsty, see my answers from a few months back, here: www.planetjune.com/blog/shrink-plastic-ring-tutorial/comment-page-3/#comment-94393
kring said
thanks a bunch for this! you’re awesome!
Petalbelles said
Brilliant! Thank you for the tutorial and a great idea for a children’s activity. As an aside, I attended a local environmental fair where one of the activities was using clear plastic food containers (#6, I think) instead of shrinky dink material. We used sharpies and a tiny toaster oven to make little pendants. I wonder if those food containers would work instead of the shrink material. Probably not as nice but cheaper which is a plus for children’s activities. I’m not sure of it was #6 or #7, but it had to be that particular number. I’m sure we could find the exact number on the web.
June said
Yes! I haven’t tried it personally, but I’ve seen many people mention it. The correct plastic to use is #6. You’d have to experiment to see how much it would shrink, though – different #6 packaging may shrink by a slightly different amount, which would affect the size of your ring!
Shelagh McFarlane said
what a brilliant tutorial. will definitely be trying this one. thank you
Peggy Schofield said
I love love love this idea and I would love to do this for girls camp. My problem is this I suck at the math. Is there any way you could help me figure out the different ring sizes… they will range from US 5-12. The girls are ages 12-18
I would really appreciate the help
Peggy
June said
Peggy, the problem is that different brands of shrink plastic shrink by different amounts, and even shrink slightly differently along the length and width of the plastic! So my advice would be to make a shrinky ruler:
Cut a strip of the plastic (in the same direction you’ll be making the rings)
Mark it in 0.5cm or 1/4″ increments
Bake it (don’t form it into a ring!)
Once it’s shrunk, you’ll know exactly how much your plastic shrinks by, and so how long you need to make your starting strip to form the right size ring.
Also, remember that the internal diameter of the finished ring will be the same size (or slightly larger if you can’t form it tightly before it sets) than the object you wrap it around to form the ring, so you’d need different sized cylinders to match those ring sizes.
And one more thing: it’s okay if there’s a little gap between the two ends of the ring! So you might want to make all the strips the same length, and then just wrap them around a larger cylinder to make a larger ring (with a larger gap).
Peggy said
Thank you so much…that helped me alot 🙂
I’m doing them this year instead
thanks again
Chandra said
That was the best tutitorial I have seen yet, Great going to get started very soon!!
Thanks a bunch!!
getcha said
I hope someone sees this since this thread is a couple years old =o)
I’m using Shrinky Dink Frosted Ruff n’ Ready and StazOn Solvent Ink Pad
Each time I stamp (on the rough side) the ink runs. I’ve tried less ink, blotting the stamp before stamping on the SD, but it keep running into the roughed up lines.
I’ve used both clear mountable stamps and rubber wood mounted.
I’ve let the ink dry on its own as well as gently blowing across it and it still runs.
Does anyone have any suggestions? Hints or tips? Thanks!!
June said
That’s strange – StazOn Solvent Ink is one of the brands that Shrinkydinks specifically recommends. I’d suggest you email Shrinkydinks to ask for help – they have an email address on their website 🙂
getcha said
thanks for responding June. I’d sent them an email and am waiting to hear back from them, I was hoping maybe someone had also had this experience and could help.
Mair said
Hi there
You may like to try Archival Ink from Rangers.
All the best
Mair
Tammy F. said
You might also try using a very, very fine grit sandpaper to sand the piece in a cross-hatch pattern before stamping. I have done this before running it through my inkjet printer when using the regular Shrink Plastic sheets from Ranger. I have to let it sit a while so the ink fully dries, but the light sanding seems to make the ink set better.
Gaelene said
Great tutorial! I have the shrinky dinks plastic sheets somewhere. Will definitely have to try. Thanks.
Gaelene’s Creative Korner
Laura said
I ment to let you know I tried it for a bangle. It worked well check out my results here-
community.livejournal.com/egl/14439111.html
Thanks again fo this awsome tutorial. =D
Lisette aka Liszha said
Wow, supergreat idea! thanks for sharing
Dedou said
Thanks loads for this tutorial! I’m inspired to do all sorts of things with this cool stuff – glad I found your blog, kind of you to share so freely:)
HELLO said
Me and my mom tried a couple of times to do this but the ring snapped like a twig immediately after we tried to shape it , any suggestions would be greatly appreciated!
June said
You must be waiting too long after removing it from the oven – you have a very short time while the plastic is still hot enough to shape. That’s why this is a tricky project: by the time it’s cool enough to comfortably handle, it’s too cold to shape! Try wearing thin gloves so that you can handle it more quickly and shaping it within seconds of removing it from the oven.
Mary said
No, even RIGHT out of the oven the plastic often times is too cool to shape. This project has been one of the most frustrating to me. Out of at least 20 rings I’ve tried to make, only 2 have turned out decently, and one is a bit cracked. All the others did not shape properly, snapped when I tried to shape them, curled up and stuck together in the oven, snapped when I tried to re-shape them after trying once before… it’s so aggravating!
One tip I have learned is not to make the rings too thick. I made them 6 inches by 1 inch the first time and quickly found out that making the width that thick causes them to crack EVERY SINGLE TIME you try to shape them. Now I make them 5 1/2 by 1/2 an inch and it seems to crack less (but still has all the other problems.)
In the end, I don’t think this project is worth it. Making charms with shrink plastic is still a safe bet, but ring making is iffy at best and wastes a LOT of plastic before you can procure ONE decent sample.
I am going to try it one more time before I give up- this time with gloves so my fingers don’t hurt and my image doesn’t smear due to the material pattern in the mittens I was using. I doubt I will have more success, but if by some miracle I do, I will post extra tips here immediately.
June said
Sorry to hear that, Mary – none of mine have ever cracked or snapped. If you do want to give it one more try, the only thing I can think of to suggest is that maybe your oven should be a few degrees hotter (and be extra careful not to burn your hands if you try that)? If the plastic is hotter, it’d be more flexible – i.e. easier to shape – and would give you more working time before it cools to the point where it won’t shape properly any more and might crack if you keep trying to bend it.
Teresa Chen said
I love this (: I tried making a keychain, but I noticed that I could easily scratch off the color (which I colored with sharpie). (For some reason, the black wasn’t easy to scratch off, but the pink was). I tried using a clear finish “triple thick brilliant brush on gloss glaze” but as i pbrushed it on, the pink sharpie smeared along with the strokes of the brush. Again, black didn’t.
What did you use for your clear coat?
June said
1. You must use a permanent (alcohol-based) ink. Make sure you’re using a permanent marker, not a water-based marker!
2. You have to draw on the frosted (rough) side of the Shrinkydinks so that the ink will set.
3. I didn’t use a clear coat for my rings, but I have used one for other projects. The Shrinkydinks packaging recommends Krylon Crystal Clear spray glaze and I can confirm that it works well. You have to use a spray-on glaze, not a brush-on, when you’ve used Sharpie markers, to avoid smudging your design when you glaze it.
Mary said
Using Krylon Crystal Clear spray is the fastest way to ruin your charms or rings- it’s like pouring nail polish remover onto your project. If you want to get the permanent marker OFF, I recommend it.
Out of 25 rings I have now tried, I have a total of ONE decent ring, one cracked ring, and one that is straighter than desired on one side. All my other attempts broke, cracked badly, or curled up on themselves. You will use an excessive amount of plastic to get ONE decent ring. Then, as OTHERS have already commented, there is the problem of the marker scratching off very easily.
If you are masochistic, please enjoy this project.
June said
Mary, I’m sorry you’ve had such a frustrating experience 🙁 All I can say is that my method does work for at least some people; here are some links from people who’ve sent me pics of their completed shrinky rings:
www.flickr.com/photos/muckyfingers/2369527133/
www.flickr.com/photos/kukeit/2943840571/
www.flickr.com/photos/54416353@N00/3699666228/
stickersanddonuts.com/2010/01/04/embarking-new-adventures-in-life-like-shrinky-plastic/
joniphippin.wordpress.com/2008/07/23/shrink-plastic-rings/
community.livejournal.com/egl/14439111.html (This last one is a bracelet made using my method – you can see it also worked in a larger size for her)
I’m very sorry you weren’t able to replicate the same results. Did you try my suggestion of turning the oven a few degrees higher to make the plastic more flexible and give you a longer working time (being careful not to burn yourself, of course)?
Arabela said
That is such a great tutorial, i love it.
Where do you buy this shrinking plastic ? I did a quick search on google, but don’t find many sites who sell this, and none who ships internationaly. I will search more, but would apreciate your help. Thanks
June said
I think from your email address that you’re in Germany, Arabela? I searched www.google.de for ‘shrink plastic’ and selected ‘Seiten aus Deutschland’ and found this site immediately. There are probably lots more if you do a similar search!
If you’re not in Germany, do a similar search with your country’s Google site and choose ‘pages from
I hope that helps!
Kathy Walker said
How cool is this? I love Shrinky dink. Thanks for the Tutorial.
Lisa said
Wow, what a great idea. I wanted to add that I use a heat gun (the kind for embossing when you stamp) to shrink my plastic. Will have to try it to make rings, though I’m not sure if it will heat enough to leave it pliable long enough to shape, if that makes sense. I’m thinking using dowel would mean it could be re-heated on the mould… hmmmm
Ashley said
Great tutorial!
I’m thinking about making some rings to add to my boyfriend’s band’s merch table. My question is, since you decorate the BACK of the shrink plastic how would I go about stamping the bands name on there? Wouldn’t it come out backwards? There has got to be a way.
Thanks!
June said
You’re right, Ashley – a normal rubber stamp would come out backwards. You could print the band name backwards and then trace it onto the shrink plastic with a marker pen (remember, any mistakes shrink too, so the effect won’t look as ‘hand-drawn’ once it’s shrunk!), or get a custom rubber stamp made with the lettering reversed.
Katie nebber said
I can’t get the rings molded fast enough. any tips?
June said
Not really, Katie, you just have to be really quick on the draw! And remember if you do mess it up, you can reheat it and have another go 🙂
Caitlin said
Hey thanks I am 12 and me and my friend are going to sell a whole bunch of crafts we made, mostly jewelry, like friendship bracelets so I made many rings, well like 7 last night until 10 ‘o’ clock and I was having so much fun. The first 2 I made I broke because I forgot to read the tip that said I could reheat them. Oops! Well now I know. THANK YOU!
laura said
that is very cool
katkaif said
Wow! Thats so cool. Thanks for sharing this nice and interesting product.
D2 said
This rocks!!!!!!!!!!!!!!
OneDay said
Excellent tutorial. These look amazing and very fashionable.
michelle said
does anyone know what type of ink is in that picture?????
I used to have an ink pad just like that and LOVED it but I cannot remember where I got it or what brand it was.
ANY HELP would be great!!!
Laura said
I stumbled upon your tutorial with google, and I can’t wait to try it, I do have a question though.
Bangles?
I think a strip cut diagionally form an 8×10 sheet would be long enough (between 12 and 13 inches pre-shrunk) since you would need a siginifacantly larger gap then with a ring. Is my brain functioning correctly, or does that make no sense? Also I was wondering, if I were to try a bangle, would tradition shrink plastic be thick enough or should I opt for the new “SHRINKY DINKS ULTRA THICK MISTY WHITE” (pardon the caps, it was a copy/paste)?
In the end I want to more or less replicate this
www.angelicpretty.com/shopping/acce/ka/92ka-13170/92ka-13170.html
and I knew polymer clay wouldn’t haev the right look.
Mary said
Thanks so much! We’ve been working with shrinky dink plastic in my Jewelry class but so far we’ve been limited to tassels and jewelry pieces, I wanted to learn how to make rings and the like. Once again, Thank you!
June said
Elbie: I know you can fuse shrinkydinks together by overlapping it and baking it at higher than normal temperatures (then you’d have to let it cool and then reheat at the normal temperature to bend it – you’d run the risk of being seriously burnt otherwise), but it would leave a big bump at the join and probably wouldn’t look very good.
Your best best would probably be to make the piece in 2 separate sections and make the join a part of the design, e.g. for a bracelet you could punch a couple of small holes at the end of each piece, then connect them with jump rings or lacing after baking. Without knowing what you plan to make, I don’t know if that would work in your case! But that’s my best suggestion – hope it helps 🙂
And now I really want to try making some curved shrinky bracelets…
Elbie said
You made this look so easy!! Nice tutorial.
Is there any way to join two sheets together? I want to make a 4″ circular(ish) shape but the sheets are too small. Any suggestions would be greatly appreciated.
Thank you!
Poze said
Very nice tutorial, the ring looks great. Thank you.
June said
Karen: do you mean you’re leaving fingerprints on the plastic while it’s hot?! I’ve never experienced this! I’d suggest you try letting it cool for a couple of extra seconds before trying to bend it, or wear thin gloves to protect the piece from your fingers.
Christine said
Wow, this shrink wrap ring is a really neat craft. I never thought you could make things out of something like that. The wine glass charm is a really clever idea too!
Karen said
This is a great tutorial! I have a question: I have problems with making marks on the plastic as it cools with my fingers. What is the best way to avoid this? Thanks!
Fiona said
What lovely rings! I love the idea of using them as wine glass charms as well.
Fiona
Events said
Great little rings!
Monica Marie said
thanks June. I’ve featured your rings on my blog and linked it back to you!
www.thecraftjunkieblog.com/2009/07/how-to-make-shrinky-dink-rings.html
Meredith said
Beautiful rings. I was just looking at my pack of shrinky dink paper and wondering what to do with it…
I initially had trouble with the edges rolling in and then fusing together. I think it was because I was using a large oven (no toaster oven) and it was perhaps a little too hot. I ended up reaching in with chopsticks and pulling apart any stuck curls.
I tried again with the oven set a smidge cooler with much better results. Only one ring became stuck. Yay!
Love them! Here’s a link to a pic of my first one www.flickr.com/photos/54416353@N00/3699666228/
photo jewelry said
This is a cool tutorial. Your rings are cute! I do photo jewelry on my site also so I am always interested in blogs posts like yours.
June said
Kelsey: I’ve never heard of this happening, but I’d suggest you try putting your shrinkydinks decorated side DOWN (shiny side up) instead and see if that helps.
athena: I didn’t glaze my rings and I haven’t had any problems with them. I’m thinking that if you do want to glaze yours, the easiest way may be to form the ring with the decorated side facing out – that way you could put the ring over a dowel or similar and use a spray glaze/sealer on the outside. Let us know what happens if you try it!
athena said
awesome.
question: what did you use for glazing?
thanks!