Candy Cane crochet pattern
© June Gilbank 2008
This candy cane crochet pattern is so fast and simple, it’ll take no time to whip up enough to decorate your Christmas tree!

This candy cane pattern is Donationware – the pattern is available for free, but if you like it please consider sending me a donation to show your appreciation:

Send me a donation and receive the easy-to-print PDF version of the pattern as a thank you!
Donations of any size are much appreciated. Just add the amount you wish to donate, and, once you have checked out and paid, your pattern will instantly be available to download from your PlanetJune account.
The complete pattern and instructions are available below, regardless of whether or not you choose to pay for them 🙂
This is a PlanetJune original crochet pattern. Feel free to use items made from this pattern however you wish, but I’d appreciate credit as the pattern designer. Please do not reproduce the pattern anywhere else; instead post a link to www.planetjune.com/candycane
Not ready to make it yet? Add it to your Ravelry queue: 
Terminology
| ch | chain |
| sc | single crochet (double crochet for UK/Aus) |
| st | stitch |
You will need…
- E US/3.5mm crochet hook
- Small amounts of worsted weight yarn in white and red
- A white 12″ (30cm) pipe cleaner (also known as a chenille stem)
- Yarn needle
Pattern
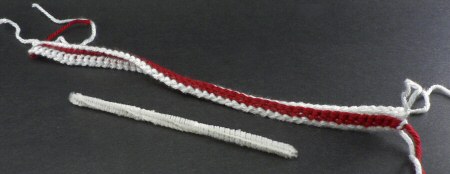
With white yarn, leave 6″ at the end of the yarn, then ch 50. With red yarn, ch 1.
Row 1: With red yarn, sc in 2nd chain from hook and in each chain across. (50 st)
Row 2: With white yarn, ch 1, turn. Sc in back loops only of each st across. (50 st)
Fasten off, leaving a long yarn end of the white yarn.
Assembly
The assembly is straightforward, but I have spelled out the directions below to make sure the method is clear. Once you have stitched the first candy cane together, you should find it easy enough to make more without referring to these instructions at all.
Fold a white pipe cleaner in half and twist together. I also like to fold the sharp ends of the pipe cleaner back against itself for safety reasons.
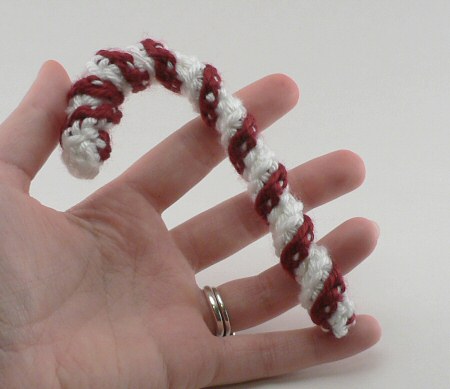
You will now have a 3-striped piece of crochet, and a short fat pipe cleaner. Note that the right side of the crocheted piece has a thicker stripe of red showing. You can see the difference in this picture – the wrong side shows at the left of the picture:
Hold one end of the pipe cleaner in front of one end of the wrong side of the crochet, then wrap the crochet at an angle across in front of the pipe cleaner:
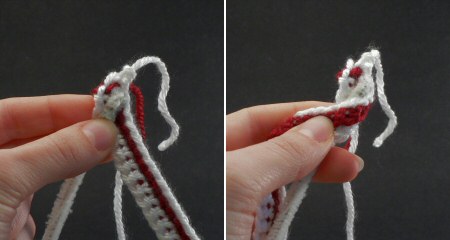
Pull the top end of the crochet over the end of the pipe cleaner to the front, and use the long white yarn end and a yarn needle to stitch the top edge of the crochet to the side edge of this first wrap (3 or 4 stitches should be sufficient to hold the end in place). Do not fasten off yet:
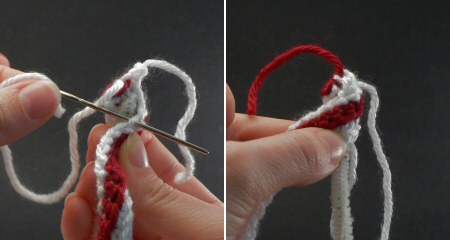
Now continue to wrap the crocheted piece gently around and around the pipe cleaner. Each wrap should just touch the wrap before. Don’t wrap too tightly – it shouldn’t be so loose that it gapes, but you shouldn’t pull it tightly around the pipe cleaner. The idea is to reach the end of your crochet at the same time as you reach the end of the pipe cleaner…
- If you have leftover pipe cleaner, pull the wraps of the crochet a little tighter so the crochet will reach the bottom (or snip off the excess pipe cleaner with wire cutters).
- It’s more likely that you may have a little leftover crochet when you get to the end of the pipe cleaner. In this case, shuffle the wraps up so they are snuggled more tightly together, and continue to wrap.
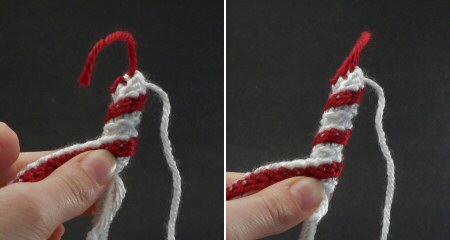
When you get to the end, use the long white yarn end from this end of the crochet and a yarn needle to stitch this end of the crocheted piece over the end of the pipe cleaner, so the pipe cleaner is completely covered.
Tweak the wraps until the red stripes look fairly even, then stitch them in place. If you wish, you can whipstitch every stitch all around the length of the pipe cleaner, but I have found that as long as the ends are securely fastened, all you need to do to keep it together is to weave the long yarn end through several wraps as shown (insert needle down into a stitch over the white edge, passing underneath the red stripe and up through a stitch at the other white edge):

Repeat this process to weave the first yarn end along the candy cane in the other direction. Fasten off all the yarn ends and bury them all inside. You will be left with a red and white striped stick. Bend one end of the stick into a candy cane shape – the pipe cleaner will hold it in this position:
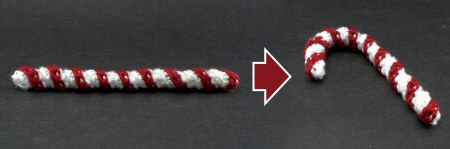
Now make a few more and hang them from the branches of your Christmas tree!
Happy Christmas! I hope you enjoy this pattern. Please leave me a comment below if you do, and consider leaving me a donation. Thanks!
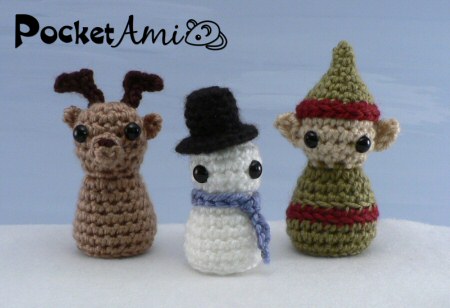
If you like this pattern, you may also like my PocketAmi Set 4: Christmas patterns!


Anni said
June I think your patterns and designs are great! ? unfortunately, I can’t make a donation as I live in South Africa and my “salary” is equal to about $20???? But i would like to encourage you to keep up your outstanding work!!!!
God bless!
I hope 2018 see you prosper beyond your wildest dreams!!!!
Hooked Goodies said
Lovely pattern with Photo-Tutorial
Giulia said
Hi June. I’m Giulia and i’m looking for Christmas decoration. I find your Candy Cane very easy to do and the effect is wonderful, so i wanted to ask you if I can translate your pattern in italian language and put it on my blog notifing your website.
June said
I’m glad you’re enjoying my pattern, Giulia. Please see the translations policy in my FAQ for the reasons why I do not allow any translations of any of my patterns to be posted/published/shared. Thanks for checking with me, and for your understanding!
Jane said
I’ve seen several candy cane patterns & tried one but this seems to be the easiest one I’ve come across. The directions, along with your pictures, make it look so simple. I’ve been trying to teach my 8 year old grand daughter to crochet. I believe she could make these after I show her the first one. The sense of accomplishment she will get from completing something will be wonderful for her. Thank you so much for sharing your pattern.
pura said
Hi june: I love the poinsettia pattern so much that Im spending the year making them to decorate my tree next year, My plan is to decorate it all with crochet decorations that I will be making all year-round. thank you for the poinsettia. Pattern.
naomi cummins said
it looks so cute cant wait to make them
Judy Gilson said
This is a great pattern! However, I’m looking for a old pattern of the candy cane that was twisted and frilley. I work in a retirement home/nursing home, and one of the residents wanted that pattern. Thanks for your help!
June said
I can’t help you track down other people’s patterns, Judy, but if you do a pattern search on Ravelry you should be able to find whatever you’re looking for 🙂
Ginny said
Thanks for this great and easy pattern! My friend and I are making these to put on Christmas presents for the grandkids. She’s a beginner and I’m an intermediate and she was just thrilled with this pattern.
Carol said
Gosh! These are adorable! I actually quite forgot that fiberfill ISN’T the only thing that can be used to stuff ami crafts @_@
Dana Hill said
Ms. June, Thank you for this pattern. Being a new crocheter this was an easy pattern to do. I plan to do many of these as Christmas presents for next year. As I’ve done already done most of the ornaments this year in plastic canvas.
Thank you again.
Alisha said
I looked up “easy crochet candy cane” and this looks exactly like what I wanted mine to look like. I am just beginning my crocheting for christmas now, so this will be great.. Thank you. I may make some to give to friends as well as to use on our tree.
Joy Burkhart said
Hi June! Thanks for this super cute and quick pattern! I’ve posted it on my blog, linking back here.
christmasspiritallyearlong.blogspot.com/2011/03/crocheted-candy-canes-pattern.html
XoXoXo
Joy
gail said
This is cute, quick thank you. My gdaughter and I made small gifts for our ss class. I added a small clasp pin and made coat oraments attached to the Candy Cane story.
Have a blessed Holiday!
Thanks again,
Gail
Patti Hodge said
Wanted to say Thanks for sharing this.I make candy canes then add lil eyes a red pompom nose and brown 2 in. pipe cleaner twisted at the top and bent to make reindeers.This will be my last christmas.I have stage 4 mastatic breast cancer with a whats called HER2 gene in my DNA that causes it to spread and multiply rapidly.I’ve been making so many of my crafts to leave behind and even taught my daughter-in-law how to crochet recently.if i had the monies right now,i would make a donation but my treatments and travels to the cancer center of america in Philadelphia from my home in Fries, Va. have been extremely expensive. But wanted to say Thank You for sharing this,it’s wonderful and very easy too. Sincerely, Patti Hodge. age 42.
sarah said
Hi, I have a quick question about this pattern- I feel kind of silly asking it since I didn’t notice anybody else asking it, and I feel like maybe I’m missing something obvious.. but anyway, how do I connect the red and white yarns? I think I did it wrong because what I ended up with did not quite look like the picture.
June said
Sarah, if you follow the pattern correctly, the chain should be in white, Row 1 in red, and Row 2 in white.
Changing the colour is done with a ch 1 in the new colour (you’ll see the “ch 1″s written just before Row 1 begins, and at the start of Row 2). To make that ch 1, it’s just like a regular chain stitch, except you drop the old yarn and draw up the loop in the new colour instead. Then you continue on in the new colour.
I hope that makes sense!
CandaceM said
This pattern is adorable! It will look perfect along with our other handmade xmas decorations, and stringed popcorn on our tree! Thank you!
Jenn said
WONDERFUL!!!
Mimmy said
This is soooooo cuuuuute, im gonna start making them for my tree and the so many other ones from my families >_< thanks for the idea and keep them up your very creative ^_* thumbs up
Clora Stephens said
i love to try to corochet . that is one thing i love too do. i wish i could knit. i learn too crochet by watching my sister do it. she would lay it down and i would try. if it didnt look like hers i would pull it out. then one day it was just like hers. i dont know much how to do it. but if it is easy i can do it. thanks for the ones i have done so for. if i had your add i would send u some money.i dont have a card to put it on here. it wouldnt b much . but so u well know i thank u. my husband is sick. so pray for us please. i dont know what uri is . clora ps:it didnt show me how it look on here . but i do love too try. send me your add and i well try tooo send u something for the pattern.
Sue Linke said
Crocheted Candy Cane Pattern will be used by the Trinity Episcopal Women for a church project. How Much of a donation do you need? I live on Social Security as do most of our women’s group, but I am sure we could do something. Who benefits by this donation? Thanks
June said
Hi Sue, it’s not a donation in the sense that a charity will benefit. It’s a payment to me, the designer, of whatever you can afford and feel the pattern is worth, as a thank you and an encouragement for me to continue to produce ‘free’ patterns and tutorials.
This is how I make my living, and if you’d like to say thanks with a donation (of any amount) to help support me, I’d be very grateful, but it’s not compulsory; if you can’t afford anything, you are still welcome to use the pattern!
Sharon said
I’m so glad I came across this tutorial. This is definitely something I will try. Thanks so much!
mammabarb said
thank you so much for sharing this problem i am going to make my 5 grandchildren and 5 children all a complete set for their own for next christmas I make a homemad thing each year and this is something to keep me busy for the next year again thank you and have a wonderful Christmas
Pat Winship said
I love your patterns. Your poinsettia is the best one I’ve seen-gorgeous.Thank you for the candy cane pattern. It looks fun and easy.I’m sending you a donation for the three patterns I’ve copied. Thanks again.
Debra said
these are so cute.
you really are a treasure to the crocheting workd.
Expat Mom said
These are perfect for making last minute to fill in the gaps on the tree, thanks!
Christy said
June, you are amazing! Thank you!!
Donna said
WOW.. this is too cute! THANK YOU June for sharing that!
jeannette said
wonderful!! thank you for the fun pattern they are too cute