Amigurumi Acorn crochet pattern
© June Gilbank 2007
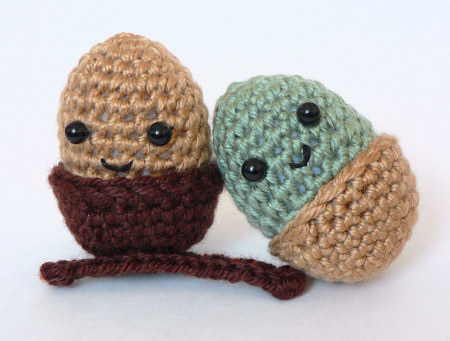
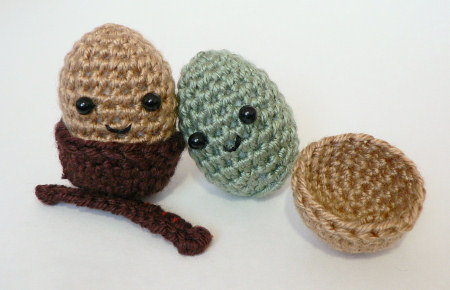
Make your own amigurumi acorn complete with removable cup! Standing at just over 2 inches tall, these little acorns are quick and easy to make.
This pattern is Donationware – the pattern is available for free, but if you like it please consider sending me a donation to show your appreciation:
Send me a donation and receive the easy-to-print PDF version of the pattern as a thank you! It includes some additional info that you’ll only find in the PDF version:
– How to invisibly stitch the acorn to the cup
– An unwired (child-safe) twig pattern
– Suggestions for use, and bonus tips
Donations of any size are much appreciated. Just add the amount you wish to donate, and, once you have checked out and paid, your pattern will instantly be available to download from your PlanetJune account.
The complete pattern and instructions are available below, regardless of whether or not you choose to pay for them 🙂
This is a free PlanetJune original crochet pattern. Feel free to use items made from this pattern however you wish, but I’d appreciate credit as the pattern designer. Please do not reproduce the pattern anywhere else; instead post a link to www.planetjune.com/acorn
Not ready to make it yet? Add it to your Ravelry queue: 
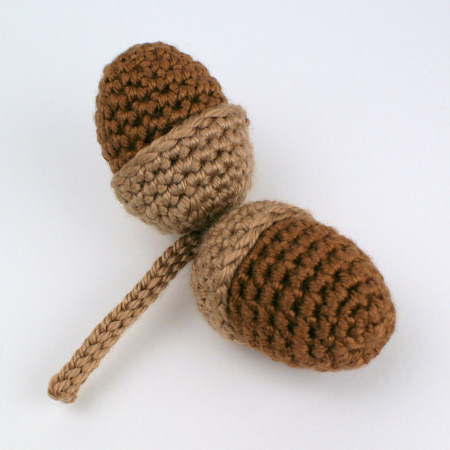
Omit the eyes to make realistic acorns!
Terminology
| ch | chain |
| invdec | invisible decrease Note: If you prefer, you may use a standard sc2tog decrease in place of each invdec. |
| sc | single crochet (double crochet for UK/Aus) |
| sl st | slip stitch |
| st | stitch |
| sc2tog | single crochet decrease (insert hook into stitch and draw up a loop, insert hook into next stitch and draw up a loop, yarn over and draw through all 3 loops on hook) |
Notes
- Do not join at the end of each round; rounds are worked in continuous spirals.
- Use a stitch marker to mark the beginning of each round. Move the marker up each time you start a new round.
You will need…
- E US/3.5mm crochet hook
- Small amount of worsted weight yarn in 2 colours (for acorn and cup)
- Polyester fibrefill stuffing
- Yarn needle to weave in ends
- Stitch marker
- Embellishments (see below for ideas)
- Pipe cleaner to make twig (optional)
Acorn Pattern
worked from top to bottom
Make a magic ring, ch 1.
Rnd 1: 6 sc in magic ring. (6 st)
Rnd 2: 2 sc in each st around. (12 st)
Rnd 3: sc in each st around. (12 st)
Rnd 4: (sc in next st, 2 sc in next st) six times. (18 st)
Rnds 5-10: sc in each st around. (18 st)
Rnd 11: (sc in next st, invdec) six times. (12 st). Stuff acorn through hole.
Rnd 12: invdec six times. Close up remaining hole, fasten off and weave in ends.
Acorn Cup Pattern
Make a magic ring, ch 1.
Rnd 1: 6 sc in magic ring. (6 st)
Rnd 2: 2 sc in each st around. (12 st)
Rnd 3: (sc in next st, 2 sc in next st) six times. (18 st)
Rnd 4: (sc in next 5 st, 2 sc in next st) three times. (21 st)
Rnds 5-6: sc in each st around. (21 st)
Rnd 7: sc in next 9 st, sc2tog, sc in next 8 st, sc2tog. (19 st).
Join with sl st to next stitch. Fasten off and weave in ends.
The acorn should fit snugly in its cup so it won’t fall out by accident.
Customizing
Unless you want to make a realistic acorn, you’ll need to add a cute face. This can be as simple as just two eyes, or you can embroider on a nose and/or mouth as well – it’s up to you!
Suggestions for the eyes (approx 6mm diameter):
- sew on small round beads or buttons
- use animal (safety) eyes
- embroider circles to make an alert acorn
- embroider ‘u’ shapes to make a sleeping acorn
- glue on googly eyes
Optional extra: make a twig for your acorn’s cup by single crocheting around a short length of pipe cleaner and then stitching it to the bottom of the cup with the same colour yarn. (NB please don’t do this if your acorn will be a toy for a small child, as the wire is not safe for children.)
UPDATED TO ADD:
For those of you with an autumn-themed Christmas tree, you could also attach the face upside down (so the cup becomes a ‘hat’ at the top), stitch the cup to the acorn so it won’t fall off, and make a hanging loop on the base of the cup so the acorns can dangle from your tree branches!
I hope you enjoy this pattern. Please leave me a comment below if you do, and consider leaving me a donation. Thanks!


Leave a Reply