How to Change Colour in Amigurumi
Changing colour in crochet can be confusing at first, because the colour change actually happens in the stitch before the new colour appears in your pattern.
The rule is simple: always pull through the last loop of the stitch before the colour change with the new colour. That leaves the new colour already on your hook, ready to make your first stitch in the new colour.
Watch the short video below to see the colour change technique in action, and what happens if you don’t use this method! (If you prefer text or want something visual to refer to, I’ve also included a photo tutorial.)
If your project has multiple colour changes, you’ll also need to decide how to deal with the unused yarns as you switch between the colours. There isn’t a single right answer, but I’ll explain the options I use, and examples of when I’d recommend each one so you can get a great result with the minimum of cutting yarns and tying knots.
Quick finder:
- Video Tutorial (right- and left-handed)
- Managing the Yarns (recommendations & case studies)
- Step-by-Step Instructions (right-handed)
- Step-by-Step Instructions (left-handed)
How to Change Colour in Amigurumi – Video (right-handed)
Note: Although I’m demonstrating this technique with single crochet for amigurumi purposes, you can also use the same method with any crochet stitch, to give cleaner colour changes.
Click to watch this video on YouTube.
How to Change Colour in Amigurumi – Video (left-handed)
Note: Although I’m demonstrating this technique with single crochet for amigurumi purposes, you can also use the same method with any crochet stitch, to give cleaner colour changes.
Click to watch this video on YouTube.
Note: The videos may look a little small embedded in the blog: if so, you can fullscreen them or click through to YouTube to watch them full-sized 🙂
How to Manage the Yarns
I’m often asked how to deal with the other yarn when changing colour in my patterns. If there’s a specific technique I recommend for a specific pattern – one that makes the colour changes much neater or faster than any alternative – I give you that information in the pattern itself.
But, in general, I don’t give specific details within a pattern for every colour change, because a) there’s no one ‘right’ way to deal with yarn ends and carrying colours, and b) it’s up to you which method(s) you find to be the best combination of fast, easy, and with a good end result.
In fact, I tend to intuitively use a combination of several options, but how do you know what to use when? I’ll give you my tips below, and then some case studies so you can see my recommendations in action.
(If you’d like to see more about how I reached these conclusions, see my Colour Changing Investigation, where I analysed all the options to discover which work best in various scenarios.)
My Recommendations
I can’t prescribe the ‘best’ method – that’s always up to you, and I recommend you use whichever method(s) you like best that give you a result you’re happy with. But I will tell you what I do – you can choose to follow my advice if you prefer more guidance, or make your own choices.
Here’s a summary of each of my recommended techniques, with their advantages and disadvantages:

I tend to use a combination of all these methods, sometimes even within the same amigurumi, so let’s look at each in a little more detail:
Cut-and-Tie
My go-to solution is cutting and tying, to make sure I get a clean result. If I’m not happy with the results of one of my shortcut techniques, I’ll rip back and redo it with cut-and-tie. (The advantages of trying a shortcut first are that they are faster to work, and, as they don’t involve cutting the yarn, you can easily undo your stitches if necessary and reuse the same yarn.)
Cut-and-tie can be a bit time-consuming, but if you tie each pair of ends together after you’ve crocheted a couple of stitches past the colour change, it’s not too much trouble. Do tie the knots as you go – it can be difficult to reach them once you’ve crocheted a few more rounds.
Tip: the knot is simply to prevent your stitches from working loose, so don’t pull the ends too tightly when knotting them together; the goal is to maintain the tension in the yarn so the stitches stay even.
Dealing with Yarn Ends After Cutting
Cut-and-tie will always work well, provided you can hide the yarn ends so they don’t show through from the outside. When you stuff the piece, take care to push all the yarn ends so they’re hidden behind the darker colour stitches and aren’t trapped against the insides of the lighter stitches, where they may show through from the outside.
If that’s impossible and you want the best result, you can weave the dark ends into the backs of your dark stitches before you stuff the piece, then trim them off.
Stranding
For one or two stitches I often strand the other yarn behind my stitches, to save time. To strand the yarn, all you need to do is drop the yarn to the back (inside) of the work and pick it up again when it’s needed.
Note: It’s important to leave the right amount of yarn so the float (the loose length) will lie smoothly against the inner surface of the piece when it’s been stuffed (judging this becomes easier with practice!). If you pull the float too tightly, it’ll buckle your work, but if you leave it too loose, the stitches on either side of the float can work loose and look untidy.
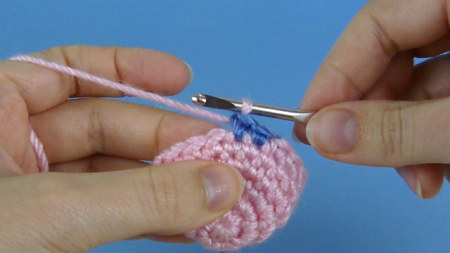
Catching the Float
If I want a longer span, to help maintain the tension on the float (to avoid puckering or loosening), I may catch the float behind a single stitch, every few stitches (as shown in the photo here).
Doing this only once every few stitches keeps the floats from getting too long, while minimizing the tapestry crochet bias/lengthening effect.
Note: I don’t recommend stranding a dark colour of yarn behind a light colour, as the dark yarn will show through between the lighter stitches. See Case Study #5 (below) for an example!
Tapestry Crochet
A word of warning! Although tapestry crochet – working over the unused yarn(s) with every stitch – is a great crochet technique in general, I don’t recommend you work an amigurumi pattern in tapestry crochet (unless your pattern was specifically designed to be worked that way).
As I showed in my colour-changing investigation, using tapestry crochet will skew the colours so you’ll end up with misshapen markings. This technique also makes it more likely that the carried colour will show through between your stitches (particularly if you stuff your work firmly, which can stretch the stitches open slightly), and the final shape of your piece may be affected, as the technique adds bulk and height to each stitch.
Case Studies
Let’s look at some examples of the yarn-wrangling techniques I use in specific circumstances, so you can see the options in action:
1. Small Spots (1-2 sts)
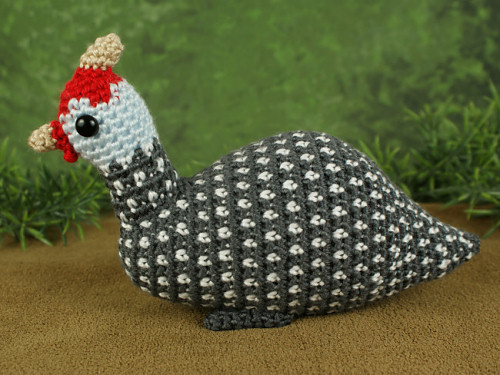
For my Guinea Fowl‘s spots, you change colour with every stitch. In this case, stranding the other yarn behind the stitch and picking it up again for the next stitch is the most sensible choice.
2. Wide Bands
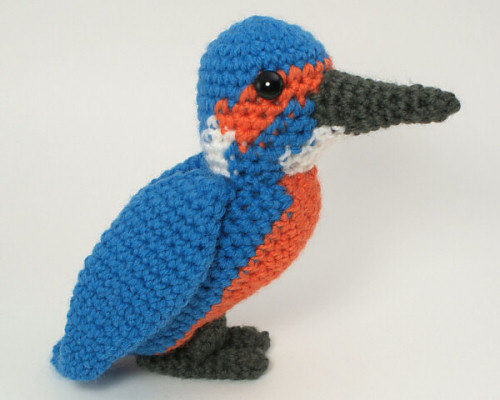
For my Kingfisher‘s body, half of each round is orange (for the breast) and the other half is blue (across the back). In this case, the only sensible option is to cut and tie at every colour change – stranding the yarns across such a wide space would distort the work, stranding plus catching the float occasionally would probably leave a ghost of blue showing between the orange stitches and vice versa, and using tapestry crochet to crochet over the other yarn would skew the colour pattern so the orange breast wouldn’t look symmetrical (see my colour-changing investigation for proof).
3. Full Stripes
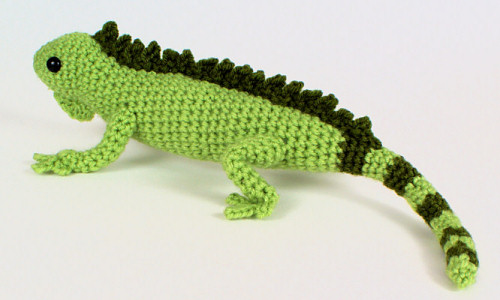
For a simple stripe like my Iguana‘s tail, where the colour always changes at the end of each round, I drop the unused yarn to the inside, and pick it up again when I’ve crocheted around back to it.
(I also recommend using one of my Perfect Stripes techniques to improve the look of the ‘jog’ at the point where you change colour.)
4. Partial Stripes

For a partial single-row stripe of one colour against a base of another colour, like the black stripes on the sides of my Flame Angelfish, I cut the black yarn for each stripe, but instead of cutting the main (red) yarn too, I may choose to carry a float of red with the stranding technique, and catch the float at the back of the work for a single stitch, every few stitches.
Whether I choose to do that depends on the length and width of the stripe. For 3-8 stitches in a single row I’d probably strand the yarn (and catch the float once or twice, as necessary), but for anything much longer, or a thicker stripe, I usually cut and tie both yarns at both ends of the stripe, to give a clean result. Neither option is wrong in this situation, so you can do whichever you prefer.
5. Everything Else
For the ‘in-between’ situations, which usually involve switching after a few stitches of each colour, the best answer isn’t so obvious – you can use your judgement in each case. There’s a balance between getting a good result on the outside of the finished piece, not wasting more time than you need in cutting and tying the yarn, and not having the yarn ends show through from the inside.

For example, for my Giant Panda‘s eye patches, you have two small black patches separated by a small white patch in the middle. Carrying the yarn on the inside with the stranding technique (and catching it at the back of the work for a single stitch every few stitches) would usually be a good technique in this situation. In this case, however, you don’t want to carry a dark colour across light/white areas, as that stranded black yarn (pink arrow, top right photo) would show between the white stitches of the panda’s face.
You can plan around this by carrying both colours across the dark areas only (bottom right photo). Here, I used one length of black yarn to crochet each eye patch and carried each one back across the eye patch to re-use the same yarn in the next round. I stranded the white yarn across each eye patch too, and continued to use the same white yarn for the whole head without any cutting.
In Conclusion
I hope this tutorial has helped you see that there’s no definitive answer for how to deal with the other colour(s) of yarn for multiple-coloured amigurumi, and given you some options you can try, to see which you like best in various situations.
If in doubt, check your work as you go: push some stuffing against the stitches and see if the result looks satisfactory from the outside, and try a different method if you don’t like what you see! With practice, you’ll get a feel for where you can get away with using a faster method, and where only cut-and-tie will do.
How to Change Colour in Crochet – Step-by-Step Instructions (right-handed)
The basic rule of colour changes in crochet is to always pull through the last loop of the stitch before the colour change with the new colour, so you’ll have a loop of the new colour on your hook before you start your first stitch in that colour.
Here’s how that looks in amigurumi:
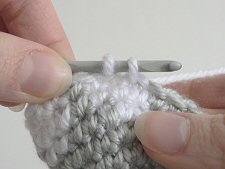
Colour change after a single crochet stitch
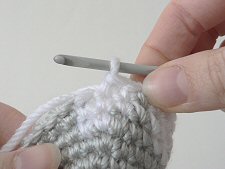
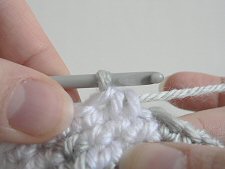
Note: In the photographs, A = white, B = grey
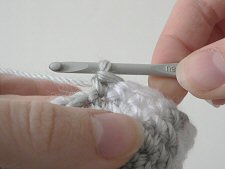
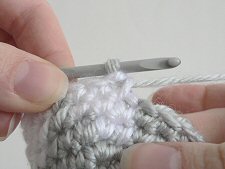
Crochet with colour A until you come to the last stitch in colour A (below, left). To make the last stitch of A, insert hook into next stitch, yarn over and draw up a loop (below, right).
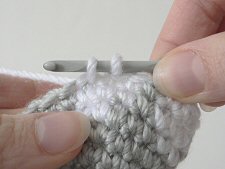
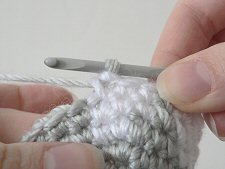
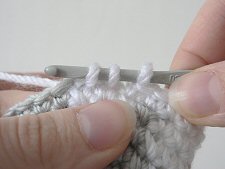
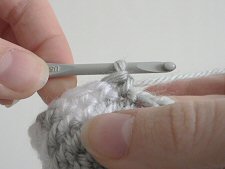
Holding the end of yarn B behind your work, yarn over with B, and draw through both loops on hook (below, left). Make the next stitch as normal, using yarn B (below, right).
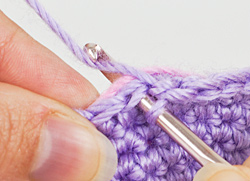
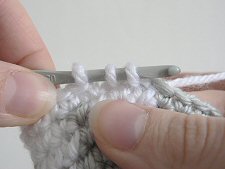
Colour change after a single crochet decrease
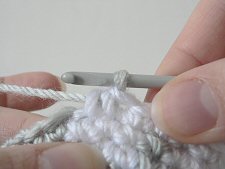
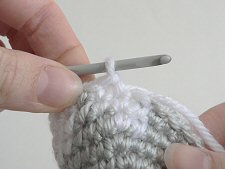
Work your decrease (invdec or sc2tog) up to the last step, so you have 3 loops on your hook (below, left). Yarn over with the new colour, and draw through all three loops on hook (below, right).
Make the next stitch as normal, using the new colour.
How to Change Colour in Crochet – Step-by-Step Instructions (left-handed)
The basic rule of colour changes in crochet is to always pull through the last loop of the stitch before the colour change with the new colour, so you’ll have a loop of the new colour on your hook before you start your first stitch in that colour.
Here’s how that looks in amigurumi:
Colour change after a single crochet stitch
Note: In the photographs, A = white, B = grey
Crochet with colour A until you come to the last stitch in colour A (below, left). To make the last stitch of A, insert hook into next stitch, yarn over and draw up a loop (below, right).
Holding the end of yarn B behind your work, yarn over with B, and draw through both loops on hook (below, left). Make the next stitch as normal, using yarn B (below, right).
Colour change after a single crochet decrease
Work your decrease (invdec or sc2tog) up to the last step, so you have 3 loops on your hook (below, left). Yarn over with the new colour, and draw through all three loops on hook (below, right).
Make the next stitch as normal, using the new colour.

Loved this tutorial? I have so many more amigurumi tips and tricks to share with you!
Boost your amigurumi skills with my latest book, The Essential Guide to Amigurumi, your comprehensive guide to amigurumi techniques and tips.
Do you find my tutorials helpful? If so, please consider making a contribution towards my time so I can continue to create clear and concise tutorials for you:
Thank you so much for your support! Now click below for loads more crochet video and photo tutorials (and do let me know what else you’d like me to cover in future tutorials…)


Paula Griebler said
Hello June. I am making an amigurumi animal- the face is a lighter color than the body. I change from brown to light color for face then back to brown. I am working in continuous spiral. When the face is facing me – the right side looks good (rounded) but the left side seems straight and the colors don’t line up like they do on the right side of the face. The face looks off balance. I am color changing:in the stitch before you change in the last two loops to the new color. This eems to work fine on the right side of the face but not the left side. Any suggestions or ideas as to what I am doing wrong? Thank you so much for your help. I have your book Complete idiots guide to amigurumi but still can’t seem to correct this issue. I seem to do this every time a make an ami with this type of color change….
Any suggestions, ideas or help would be wonderful. Thank you Paula
June said
Paula, the sides of a coloured patch will always look different from each other because a) crochet stitches aren’t perfectly symmetrical and b) they don’t stack perfectly on top of each other – they always drift backwards slightly in each round. In my more complex patterns, I attempt to compensate for this with precise colour placement to make the sides match as closely as possible. If you’re working from a PlanetJune pattern, please feel free to email me (june@planetjune.com) with a photo of your work so far so I can see if you’re doing anything wrong, and advise on how you can improve the look of your work!
vale said
Hello I have problems to change color , the item become like this :
i.postimg.cc/4HpWMstM/Screenshot-20221212-174947-Chrome.jpg
What to do to avoid that? Thank you so much for the help
June said
To avoid that colour jog, you’ll have to switch to joined rounds instead of continuous spirals. For the best result, I recommend my Ultimate Stripes technique for this: www.planetjune.com/stripes
Ana garzón said
Hello, i am trying to do the face of Frodo, but even i count each thing and follow the material, it doesn’t look like the picture in the manual, it got like , i don’t know how to describe. What i am doing wrong??
June said
Ana, I’m afraid that’s not one of my patterns, so I can’t offer any advice. Please see my FAQ for where you can get more crochet help. 🙂
Paulina Smith said
Thank you so much, this was really helpful 🙂
Camila said
thank you!!! this is just what I needed
Kathy said
Thank you very much!
Peter said
Great explanation!
Especially the case studies, very helpful in deciding when to try each method.
Camilla said
I have some issues with symmetry when I crochet say an animal with a base colour and a white tummy. My left side (from my perspective – i.e. the first colour change into white) looks neat and tidy while the right (i.e. changing back into the base colour) looks less tidy and the end result looks asymmetrical. I do use the above trick when doing every colour change. Is there something I’m missing?
June said
The differences you’re seeing are because single crochet stitches aren’t symmetrical, so the left and right side of each stitch will always look different, and the stitches also don’t stack perfectly on top of each other when you work in a rounds without turning the work between rounds, so the left and right edges of stacked colour changes will never look the same. See my Colour Changing Investigation for some examples. This is just a fact of amigurumi-style crochet!
In my patterns from the last few years, I’ve tried to design ways to improve the look and symmetry of patches of colour, but there’s no ‘best’ way to do this – it’s very dependent on the base shape and the shape and size of each patch, so I spend a lot of time refining each design to make the colour changes look smoother than you’ll see in other amigurumi patterns. See my Orca (Killer Whale) as an example.
Christine Bacon said
Thank you so much for this it’s amazing. After crocheting a heart on a giraffe over Christmas and not knowing “how to carry over yarn” I came across your tutorial purely by accident. Wow so well explained. You are my hero. Xx
Eve said
Hi June,
Thanks for the great tutorials – they’ve really improved my crochet! I have noticed though, when I change colors, it looks great until I crochet the next round – then a speckle of the “other” color becomes visible through the stitch above. Is there any way to remedy this?
Thanks,
Eve
Eve said
I’ve ready the “managing yarns changing colors” (properly this time!) And I think the #5 case is the answer for me! A combination of cut and tie and stranding should sort out the problem!
SARAH LANTHIER said
Hi June.
when using different colors, for contrast (eg. in Meerkat pattern, should I cut the beige yarn and knot the brown onto it, each time I need to switch yarns for this eye area……………or just allow the different yarns to hang in the back ?
By allowing them to hang in the back, it appears that it causes the premature rounding of the head.
Please advise.
Thanks.
June said
Sarah, for my advice on this, please see my tutorial Changing Colour: Managing the Yarns 🙂
Patricia said
Thanks very much for the article! Very, very usefull! I already used some, making the little panda.
Jennifer said
Thank you so much for taking the time to explore techniques, find improvements, and clearly write up and/or video the methods and results. You have developed some great improved techniques over the years, which I use not only on amigurumi but also on many other projects! Their use always makes the end result so much better! Thanks again!
TAM said
Such a great article again! Thank you, June!
alum said
at last i found very usefull instructions and very easy and clear tutorials! can’t see the time to try my first amigurumi, I’ll tell you. many thanks to June and greetings from Italy
Dorothy Atkinson said
I understand now where I was making my mistakes re: starting a new colour. I have tryng to follow directions for the stripes. I just want to change the colour once for a large piece so, should be using the simple basic colour change. I just figured that if one uses the Invisible Join or the second tutorial that would be fine. It wasn’t. Sorry June for asking the dumb questions I have been asking, I just thought a colour change eas a colour change Q
Susan said
I am crocheting the giant panda and am left-handed. The eyes are not coming out correctly. Do I need to change the pattern if I’m crocheting left-handed? I’m a new crocheter!
June said
Susan, not at all – in fact, I’m left-handed too! All my patterns work for right-or left-handers; the only difference is that your work will be a mirror-image of a right-handed person’s.
If the eye patches don’t look right, you’re probably miscounting your stitches or misreading the pattern. Those colour changes may be a bit of a challenge for you as a new crocheter, but, provided you count your stitches carefully and follow the pattern exactly, you should be fine. If you still have problems, send me a photo of the panda’s head so far and I’ll tell you where you’ve gone wrong 🙂
sandy said
hi,
am new to this website.and to crochet.am confused by the info you have given about colour change because the pictures show grey and white. can you add pictures with more prominent color? like say white and red? Please.
Thank you June.
June said
Sandy, please see my changing colour video tutorial for a more colourful demonstration 🙂
Melanie said
Love the leftie tuts, I had to teach myself from rightie books, etc., back in the day! Am working on your alpaca pattern ATM. Thank you!
DOULOS said
June, thank you so much i can not wait!!!! , my question is : when you make the magic ring you close it and then chain one, that chain do you count as your first sc? thank you again you got me inspire and help me to to see crochet with other eyes, have a blessed and creative week 🙂 p.s i got your book i can hardly wait.
June said
No, the chain doesn’t count as a stitch, so if your pattern has 6 sc in Rnd 1, you chain 1, then make the 6 sc. To begin Rnd 2, you’ll ignore the ch 1 and work into the first sc of Rnd 1.
Kathy said
when I crochet amigurumi I change colors and go around my doll. when I get back around it seems like my 1st row of color change is above where I did the color change. I s there a way that the row can be done without looking like that?
xxxxxxxxxxxxxxxxxxxxxx
xxssssssssssssssssssss
s is the first color.
x is the color change
Is this how it always comes out?
June said
Kathy, see my Perfect Stripes for Amigurumi tutorial to eliminate this problem 🙂
DOULOS said
June thank you for sharing your tip and talents…. i absolutely lvoe your site and have reffer some many people to it… as a new fan to this craft i found your site helpful you are a great teacher….i would like to know when you make the majic ring and start the sc that chain you count it as one sc ( not the one you do before that chain) and also when do you close the ring i know it is a dummy question but i would like to know if you do close the ring the second row when you make the 12 stchs? ….i am reading this method to get it down to adventure with colors next, mean while i am enjoy learning, i was hesitante if i needed another craft i do so many things aleeady but i am alwais looking for ways to help to support my family and bring smile to my kids i just finis my first amirugumi mouse by using the body of the acorn…..thank you from the bottom of my heart…your fan #1
June said
Hi Doulos, I’m not quite sure I understand your question but I’ll be making a magic ring video soon to accompany my magic ring photo tutorial, so look out for that and I hope it’ll answer everything for you 🙂
heidy ball said
every thing you explain is very clear,thanks a lot yo ar a great teacher.
Christine Chipman said
Could you tell me how you change colours in Amigurumi when working stripes so that there is no obvious change that shows in the row where the change is made?
Hugs
Christine
June said
Christine, see my comment about this on the main Colour Changes in Amigurumi page: www.planetjune.com/blog/amigurumi-help/changing-colour/comment-page-1/#comment-105583
Meg said
Thank you for posting this tutorial! It’s a huge help. I’m not quite getting the results I want, and I think part of the problem is that I’m not joining rows.
I’m making a stripe in a contrasting color, but the end of the stripe and the beginning of the stripe don’t match up. There’s a weird mismatch on one side. Is there any way to correct this problem when you’re not joining rows? Is there a crochet “jog” that I could do?
Thanks so much, again, for your awesome tutorials and patterns. I adore them!
June said
Meg: you’re right, there’s no way to make the stripes join up when you crochet in a spiral; the only way to avoid it entirely is to join at the end of each round and then ch 1 (in the NEW colour) to begin the next round. If you don’t want to do that, Christen at NeedleNoodles has a method to minimise the appearance of the ‘jog’ – the stripes still don’t match up seamlessly (because one end is always higher than the other when you crochet in a spiral), but her method does smooth the transition between the start and the end of the stripe quite effectively: needlenoodles.com/home/?q=node/139 (see Method #1).
Ginger said
This is fantastic! What a clear and concise explanation. Thank you!! This works so much easier than the way I have been doing it!
Samantha Moon said
Wow! that’s so much easier than what I’ve been doing for years! haha! amigurumi is a new venture, I’ve actually only ever knitted. Thanks!
June said
Lisa: yes, that’s right. The only way to make stripes without a ‘jog’ at the end of the rounds where you change colour is to join at the end of each round and then ch 1, instead of crocheting in a continuous spiral.
Lisa said
I have been using this method to change colours in for example, this pattern: www.lionbrand.com/patterns/80975AD.html
However, I find if I do use this method when working in a round, colour A interrupts colour B when I do change to it, and the whole colour A and B change is kind of abrupt. To remedy this, would I have to join, then chain one to start another round of the colour?
cheryl said
OMG THANKYOU! I have been stressing about this so much and if I’d only had the sense to consult June sooner! You’re fab!
Tracy said
I just started working on your Lemur pattern. I got frustrated with the head because of the color changes, but after reading this, I started over and got it! Thank you!
DLY said
This is just what I needed! Very helpful.
Bookworm said
This is helpful. I wanted to make something for a friend who’s beagle just died but wasn’t sure how to do this. Using your instructions, so far so good. I will say though, maybe the pictures would be slightly easier to follow if the color difference between the two yarns was more distinct, maybe a white and a blue? It was a little hard for me, sometimes the gray looked like the white and then things didn’t completely make sense to me.
Katja Majori said
OMG thanks I never knew how to do a clean color change. I kinda just improvised and it looked decent but damn… this it a lot better then my way! thanks much!
Tilia Linden said
Your tutorials are very helpful to newbies such as me. Thank you for placing them online.
Brittany said
wow! now it all makes sense! thanks so much!!
June said
Holly, when you make your amigurumi, it forms a sort of ‘bowl’ shape as you crochet. I’m wondering if you are crocheting ‘inside out’ – that would explain why the threads end up on the outside…
When you insert your hook into a stitch, does your hook go from the outside edge of the ‘bowl’ to the inside, or from the inside edge of the bowl to the outside? If your hook goes from the inside to the outside, you’re working inside out. All you need to do is flip the ‘bowl’ shape the other way out, and then when you insert your hook into the next stitch, it will go from the outside of the bowl to the inside, and all your thread ends will be on the inside.
Poonhog said
Thank you so much! Did not realize I’ve been working inside out the whole time.
Holly said
I still cant get this very well. all the threads end up on the outside and it looks really stupid. I have tried many times but it still wont work for me.
Thnakyou anyway. I will try some more.
ana said
gracias x la info es exactamente lo que andaba buscando.
Thanks
Rebekah said
Your amazing! Thankyou!
Melisa Sriwulandari said
Hi, if you don’t mind, I’m placing a link to your tutorials in my blog.
ami-quelle.blogspot.com
Thank you very much!
Regards,
Melisa
Joel said
I’m working on a little ‘rumi dog in blue and white, and have been adding little spots on the body. This gives me more options — thanks!
mocaloca said
This is exactly what I was looking for. Thanks for putting the time!
Joy Abara said
A crochet beginner dreading a color-change, so far I’ve been sticking to the ‘monochrome’ amigurumi. But this tutorial is so encouraging, I’m excited to try a 2-toned amigurumi!
Heather Sayyah said
I would look into tapestry crochet for a neater version color changing techniques. With tapestry crochet, there are no loose ends inside the amigurumi piece. It makes a much neater piece. Plus, you don’t have to go back and tie knots.
Wen Rou said
Thanks, that was very useful 🙂