PlanetJune by June Gilbank: Blog
PlanetJune Craft Blog
Latest news and updates from JuneMagic Ring (right-handed)
Looking for the left-handed instructions? Or the video tutorial? If not, read on…
What is this ‘Magic Ring’, anyway?
A magic ring is a way to begin crocheting in the round by crocheting over an adjustable loop and then pulling the loop tight. The advantage of the magic ring method (below, right) is that, unlike the regular “chain 2, x single crochet in 2nd chain from hook” method (below, left), there is no hole left in the middle of your starting round.
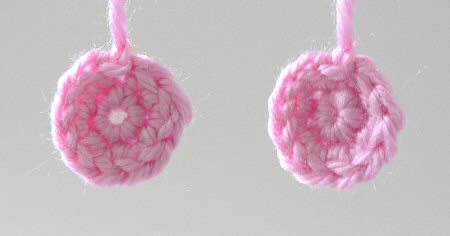
L: ch2, 6 sc in 2nd ch from hook, 2 sc in each st around.
R: magic ring, ch 1, 6 sc in magic ring, 2 sc in each st around.
How do I make a Magic Ring?
This demonstration shows a piece made using the following pattern:
Make a magic ring, ch 1.
Rnd 1: 6 sc in magic ring. ( 6 st)
Rnd 2: 2 sc in each st around. (12 st)If you’re following a different pattern, you’d complete steps 1-2 of this tutorial exactly as shown below, then work the chain and the stitches of Rnds 1 and 2 as specified in your pattern.
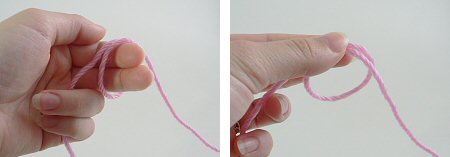
Please note: in the following photos, the starting yarn tail is always on the left and hanging down. The working yarn begins on the right and is then picked up over my left forefinger in Step 2.
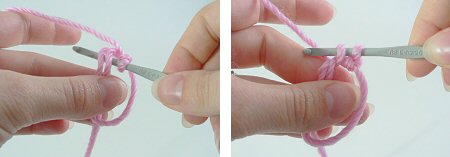
- Make a loop a few inches from the end of your yarn. Grasp the join of the loop (where the 2 strands of yarn overlap) between your left thumb and forefinger:

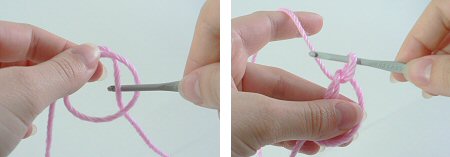
- Insert hook into the loop from front to back. Draw up a loop:
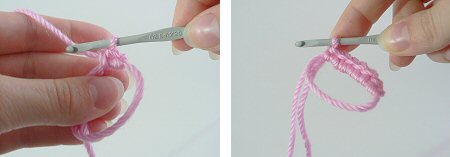
- Ch 1 (or as many as stated in your pattern). Note: this does NOT count as a stitch:
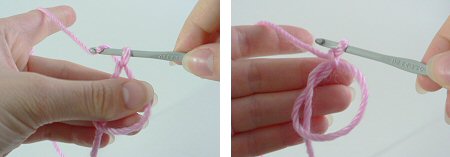
- Insert hook into the loop, so you are crocheting over the loop and the yarn tail. Draw up a loop to begin your first sc of Rnd 1:
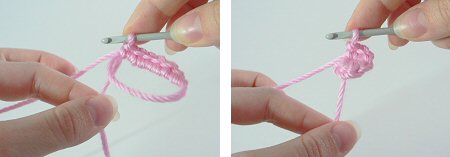
- Complete the sc. Continue to crochet over the loop and the yarn tail until you have the required number of sc for your first round (6 sc shown here):
- Grab the yarn tail and pull to draw the centre of the ring tightly closed:
- Begin your second round by crocheting into the first stitch of the first round (below, left). At the end of round 2 your work will look like this (below, right):

You’ll never go back to your old method again, I promise!
Do you find my tutorials helpful? If so, please consider making a contribution towards my time so I can continue to create clear and concise tutorials for you:
Thank you so much for your support! Now click below for loads more crochet video and photo tutorials (and do let me know what else you’d like me to cover in future tutorials…)

340 Comments »
Leave a Reply
Quick Links: Crochet
Quick Links: Crafts


Welcome to PlanetJune!
Hi, I'm June. Welcome to my world of nature-inspired crochet and crafting. I hope you enjoy your visit!
If you'd like to get in touch, you can contact me here.


Marie said
Thanks, this rocks!
Alene said
I’ve used the magic ring for the 1st time and in a snowflake pattern that has an open hole in the center. What do I do with the tail thread that remains afterward to secure it? My work is already complete and I have a long tail hanging from the center. I saw other posts from other websites that said to knot it, but I don’t understand how that would work. What do you suggest? Please be specific.
June said
I suggest you thread it onto a yarn needle and thread it right the way around the ring, inside the stitches of Rnd 1 (so it’s following the path of the loop you made originally). That will help to secure it so it won’t come undone. Then you can snip off the yarn.
Richard said
Wonderful directions for the Magic Ring! I have only been crocheting for 3 months now and I can use all the information I can get. I hope you and yours have a very Merry Christmas and a Happy New Year.
Lindsay said
For some reason when I go to pull the string after completing the the six stitches it pulls halfway and then stops, is there something I’m doing wrong?
June said
Lindsay, two possibilities (that I can think of):
I’d try giving the yarn end a really hard tug and see if it closes up the ring. At worst, if the yarn breaks, you’ve only made 1 Rnd so far so you can just start again!
And another tip: I find it’s easier sometimes to close the ring completely after completing 2 or 3 rounds – as long as you’ve closed it enough to bring the first and last stitches reasonably close together, you can continue onto Rnd 2 and then do the final tug to completely close the ring when you’ve completed a bit more of the piece. It might help 🙂
Amii said
Came across your website when googling for images of a poinsettia and am sooo delighted!
I learned to crochet last year (it was something my Grandma always did but I never took it up until she’d had a stroke and could no longer hold her yarn and hooks. She passed away this year and I’m so proud that I can carry on the craft).
Explanation of magic ring is perfect. Definitely useful for all the hats I make to keep out the cold British weather.
Lucille Hanselman said
This is the first time I even heard of the Magic Ring and I love it. Thank you for such a great tutorial.
LKK said
First off, a great tutorial! Thank you so much for this.
Secondly, I have a question I hope you won’t mind answering. I noticed that at the start of Round 2, you didn’t chain stitch before your first single crochet as you would in the traditional method. My question is for Round 3 and all subsequent rounds, do you or don’t you chain stitch before the crochet stitches?
June said
That’s right, you don’t chain at the start of each round, because you’re working in a continuous spiral. At the end of each round, you don’t join with a sl st to the first st of the round and then ch 1 to begin the next round. Instead, you make the first st of the next round directly into the first stitch of the previous round.
It’s a neat method because you end up with no seam at all – every stitch looks the same as every other! You just have to be careful not to lose your place (that’s why I recommend you always mark the 1st st of each rnd with a stitch marker) – otherwise it’s very difficult to work out how far through a rnd you are!
LKK said
Thank you very much for your reply. Right now, I’m working on a little mouse (my very first real project!) using the traditional round method. But when I’m done with this one, I plan to try the mouse again using the magic ring method. I’m sure the magic ring version will look better because I can already see the seam you mentioned in my current stitching.
Petra said
Wow! Thanks for these instructions. It’s such an epiphany when you get it right for the first time! 🙂
Bridget said
LOVE IT!! You made a real promise!
JessieMomma said
WOW! Thanks so much! I’ve been making hats and h-ATE the stupid hole in the middle…. I had NO idea how to make it tighter. Thank you SO much, my babies heads will <3 you!
~JM
Eve said
This is great, I’ve never seen a very good “magic loop” description before and so never got it right, but now I’ve got it, thank you! ^_^ Also easier to teach to those who are new to crotcheting.
Usually I’ve done a variation of “ch2…” but not exactly the same, so I got a spiral instead of a hole in the middle. When I got it right that is! ^_~
Jeanne said
These are great instructions and have really helped me. My question may be a dumb one, but are you working in the tail of the loop into the second round? Does that stop it from sliding open agail?
Thanks for your help.
Jeanne
June said
Jeanne, no, you don’t work over the tail after Rnd 1 – it shouldn’t come open again if you pull it tightly closed. If you have a really slippery yarn and you find it does start coming open again (although I’ve never experienced that) you could work over the tail in Rnd 2, as you suggest, or pull it back closed again after you’ve crocheted some more and then knot the end around the inside of one of the stitches. As I say, I’ve never needed to try it though – if your ring doesn’t stay closed I’d try pulling the ring more tightly closed before attempting anything else.
Jeanne said
Thanks for the suggestions. If it’s strange…it will probably happen to me! And I am working with a wild kind of yarn so that may be the problem. I love this technique and I might be able to go back to thread crochet now.
Thanks also, for answering so fast. I’m just starting a project and appreciate the information.
Julie said
June,
This is a little off the beaten path perhaps, but since you seem to be answering questions….. may I ask one?
First, your magic ring instructions are great! Now that I have that down, I am still having trouble with increasing rings. All patterns say, sl st into ch to finish off a row. I have a very hard time knowing which stitch IS my ch – whether it is sc or dc, I think they all look like they could be the one! Is there a trick to marking this stitch or somehow identifying it as I come around the ring?
Thanks very much in advance,
Julie
June said
Julie, I’m always happy to help with crochet questions! There’s a very easy way to mark the stitch: use a stitch marker. This can be a plastic stitch marker (like the ones I sell – see my link), or you could use a bobby pin or even a scrap of a contrasting colour yarn. When you make that ‘ch 1’ or ‘ch 3’ (or whatever) at the start of the round, slip your stitch marker into the last chain you made, before continuing onto the first proper stitch of the round. Then when you’ve completed the stitches of the round you’ll know you need to join with a sl st into the marked ch. It’s a foolproof method!
Cindy said
Thank you for your easy and informative directions. I’m getting over back surgery so I’ve picked the old crochet hooks up and am keeping myself busy making some Christmas presents. I’ve bookmarked your page! Thank you again.
Anna Dean Shields said
I’m so new at this and need help working on a hotpad with circle design. Round 1 with DC, then round 2 with 2 DC in each stich, so is Round 3 done with 2 DC’s also or do I have to go to 3 DC in each stitch and then 4 in each stich for round 4, etc.??
I’m getting like a wavy pad and I want it to lie flat.
June said
Hi Anna, the formula you need is to make the same number of increases in each round. So:
Do you see the pattern? Hope that helps!
Mindy said
Hey there it’s me Mindy again,
Just wanna know if you start your increases per round like you say RND 3 “2 DC IN NEXT STITCH, DC IN NEXT STITCH” Instead can you reverse this and say RND 3 1DC IN NEXT STITCH , 2 DC IN NEXT STITCH” etc.
Basically, what I’m asking is do you have to increase in the first stitch of RND 3, or can you increase in the second stitch right around?
June said
Mindy, they are both equivalent, so you can do whichever you prefer (or whichever your pattern specifies) 🙂
Sarina Eckhardt said
Thank you! I always wondered how this was done. Your directions were easy to understand too. =)
Louetta Lee said
Thank You June!!! For the first time, now I really understand! I have been crocheting for many years and have never used this trick. Thanks for all the effort and trouble you took to make it so clear. Your directions are great and are much appreciated! I will now use this technique forever!
Blessings and Best Wishes
Louetta Lee
Etha said
hehe, I just looked it up because it was mentioned in the patterns that I bought. I know no other way of starting a crochet ring, so I guess I’m good 🙂
Sandra said
Great tutorial. I had to try it three or fout times before I got it right, but now I have it down. No more holes!
Suzanne said
Hello, thanks for the pictorial. Will try it tomorrow. I have tried 50 times to make basic amigurumi. I think I am losing track of stitches. I am getting holes and stuffing showing through. Using right yarn and hook( I think) could it be tension. It looks good until I stuff and them looms Lacey. Help! My little girls are waiting so patiently!
June said
Hi Suzanne! There are a few reasons why you could be getting holes:
Crochet in both loops (if you crochet in back loops only the stitches will stretch when you stuff them)
Use a hook 1-2 sizes smaller than recommended for the yarn you’re using, e.g. for worsted weight yarn I typically use an E (3.5mm) hook
Tension is important – make sure you’re wrapping the yarn through the fingers of your non-hook hand so that your hook only pulls through just enough yarn to form each stitch
Don’t overstuff – if the stitches start to stretch open, stop adding stuffing at that point!
Hope that helps!
Holly said
Fab tutorial! I only learned to crochet yesterday and I still found this straightforward and easy to follow. Thanks so much for posting it 🙂
Tori said
Im sorry but I really dont understand this. Im sorta mentally challenged (not really, its just hard for me to understand instructions). If you had a video maybe that would be better? Just a tip
June said
Hi Tori, I know some people have problems with text-and-pictures instructions – making a magic ring video is already on my to-do list! Check back here soon 🙂
Tori said
Thank you =) Btw, great job with the website- One of my top crochet sites x)
Aubrianna said
Hello but I like your crochet planetjune!!!??????
Charles said
Would you please share where you learned this? I enjoy chasing references to find wonderful things.
(Of course, if you learned it from someone instead of from a book, then I’ll just
June said
Charles, I don’t remember if I first heard of the technique through Crochet Me or somewhere else, but quoting my original Magic Ring blog post from 2007:
Hope that answers your question!
Line said
Thank you – I’ve been reading patterns and they all start with a magic ring -now I know what that is 🙂
hannah said
*mind blown*! thanx for the help
Shanti said
Hi June!!
I just wanted to let you know that I linked your wonderful Magic ring tutorial, to a pattern in my blog… hope you don’t mind!
Thank you for your clear tutorial!
wiresandyarns.blogspot.com/2010/05/siena-dress.html
June said
I don’t mind at all – I’m glad you like my tutorial 🙂 Your dress pattern is very cute, btw!
Kati said
Hi June, maybe you could update your instructions and writing the “loose end being left” next to the pictures, I tried and tried and tried and tried and threw everything away thinking i
June said
Thanks Kati, I’ll do that right now 🙂
Jess said
Thank you so much for this! I can’t tell you how helpful it is. I spent two hours trying to learn this and finally found your instructions. The other sites had good pictures but you just couldn’t see what was going on. Thanks to your pictures and instructions I finally realize what I was doing wrong and I made my first magic ring 🙂
sue said
Thanks for the clear explanation. I’m left handed, but right-handed instructions are really no problem — the secret is to sit with your back to the screen!
June said
You’re welcome, Sue, but I do have a left-handed version too! 🙂
Emily said
I just love your pieces! I see your stuff on etsy and you’re just wonderful! Thanks for the patterns!
Freya said
Thanks for the tutorial! Way more helpful than the book I’ve been trying to decipher!
andrea mu said
hello . i want to know if is possible that you send to me the model of yoshi in amigurumi.
thanks so much i
Blaize said
Thank you for the clarifications. I will try again.
Blaize said
I find this confusing, because in the second photo, the yarn that goes off to the right is in FRONT of the loop, and in the third photo, the yarn is suddenly magically behind the loop, with no explanation as to how it got there. Then it says “draw up a loop.” Draw which yarn up?
I know I’m a beginner, but I don’t think of myself as a totally stupid person, yet I cannot understand this explanation, or, really ,any other tutorial I have seen for the “magic” loop. It’s frustrating, and I’m just going to have to have someone show me In Real Life.
June said
Blaize, the yarn is only held in the loop by my left thumb and forefinger. I’m sorry if I’ve confused you.
You’re actually right that to accomplish the third picture, the long yarn end (the one that goes to the ball of yarn, not the short starting end) will be pulled to *behind* the loop so that you can grab it with the hook, but there’s no knot there; it’s only my fingers holding the loop together, so that’s easily done – I actually just hold it at the point where they cross, so there is no obvious ‘in front’ or ‘behind’. All that matters is that you:
a) Hold the loop together with your thumb and forefinger
b) Insert the hook from front to back and use it to grab the yarn that goes to the ball before bringing the hook back up through the loop to the front
The loop won’t hold together by itself until you do the ch 1, so don’t release it from your thumb and forefinger until you’ve completed step 3.
Tessel said
This was very helpful, thanks a lot!
Tony said
A quick question what do you do with the tail after you tighten it? do you weave it in immediately? or do you leave it hang for a bit ? I can’t see where it went after you’ve finished round 2.
June said
Tony, if you’re making something like an amigurumi, you can just leave the tail hanging on the wrong side (the inside in the case of an amigurumi) – there’s no need to weave it in at all! For other projects where both sides of the work will be visible, you can just leave it dangling on the wrong side of the work until you’ve worked a few more rounds (or until you’ve finished the piece), and then weave it in.
In my example, the end is on the reverse side, but I snipped it short so that it wouldn’t show in the pic and confuse people by hanging down. I hope that clears things up for you!
%$#*&!!! said
I’m so frustrated. I can’t do this stupid magic loop. I’m an inexperienced crocheter and the photos don’t show which end is the loose end and which end goes to the yarn. It doesn’t say which end is pulled up to make a loop or anything. I hate it when I can’t figure out something that looks so simple. 🙁
June said
I’m sorry this isn’t clear to you – as I said in an earlier comment, the starting yarn tail is always on the left and hanging down in all the photos.
You should be able to see the overlap by looking at the first two photos
willow said
Great tutorial. Thankyou!
Nancy J said
Thanks! Yay. It works so well.
jane said
Thanks for this. I’d tried other tutorials on the magic ring, but always been confused by what to do after pulling that first loop through. At last!! I now understand and have bookmarked your instructions for the future. My chickens will no longer have holes in their heads!
Jane
x
June said
Janetta: there is another type of magic ring called the double ring. I suspect you must have been using that. The double ring is more difficult to tighten – you have to do it in stages:
1.Pull the end a little, to figure out which of the 2 rings is drawn tighter when you do
2. Grab the OTHER ring and pull that tight
3. When it’s fully closed, grab the end again and use it to close the second ring
This is why I prefer the single loop magic ring shown in my tutorial – it’s much easier!
Lynda A said
Thank you so much for the pictures and the wonderful instructions! I went to all sorts of websites and saw magic circle lessons on youtube, but I just cannot get the circle to work until I found your website! Your step-by-step instructions are very good and useful. Thank you very much!
Janetta said
when i tried multiple different types of magic rings, when I pull
the tail it doesn’t tighten. Theres another loopy thing that prevents it from tightningwhy is that???
Jan said
Thanks so much for this technique. It’s the first time I’ve tried it and it’s really nice to not have the hole! 🙂
Amy said
Wow….this is seriously a phenomenal trick! Thanks for sharing. =)
Bonnie said
Thanks so much for the magic circle technique-am crocheting your Alpaca pattern and this is working out great- I have been crocheting for about 49 years -I started when I was 6 with my Mum and don’t know how I got by without this fabulous starting stitch. Thanks also for the great pattern- my grandkids are anxiously awaiting their toy Alpacas.
Kira said
Lol thank you for replying June! But I believe I have it now! Still stuck on the cone pattern…
Melissa said
Thank you so much for this! I’ve tried half a dozen different tutorials on the internet and this is the one that I finally got!!! You win!
Britin said
I find the magic ring to be next to impossible and prefer working in a continuous spiral but your pictures and explanations are much more useful then the ones found in the Creepy Cute Crochet book. Hopefully I’ll be able to finish my friends wedding present now.
Thank you!