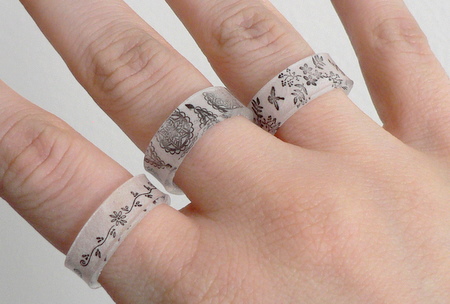
shrink plastic ring tutorial
Thank you to everyone who requested a shrinkydinks ring tutorial! This tutorial is an experimental method, not an exact science – you should have fun playing with it…
UPDATE: Since posting this very popular tutorial in 2008, I’ve answered every question imaginable in the comments of this post. If you have questions, you’re welcome to trawl back through the hundreds of comments to find my answers, or, to make things easier, I’ve compiled a 3-page shrinky rings FAQ, which is available exclusively when you donate $2 or more towards my tutorial (this also entitles you to further help from me by email, should you need it). Please see the end of this post for more details about this policy 🙂
Please note: if you’ve come here via the lovely bird ‘ring’ picture on Pinterest, read this post to answer your questions.
This tutorial is Donationware – the instructions are available for free, but if you like it please consider sending me a donation to show your appreciation:
Send me a donation and receive the easy-to-print PDF version of the tutorial as a thank you! The PDF also includes a bonus 3-page FAQ compiled from all the tips I’ve shared in the comments since creating this tutorial.
Donations of any size are much appreciated. Just add the amount you wish to donate, and, once you have checked out and paid, your PDF will instantly be available to download from your PlanetJune account.
The complete instructions are available below, regardless of whether or not you choose to pay for them 🙂
This is a PlanetJune original tutorial. Please do not share or reproduce this tutorial; instead post a link to www.planetjune.com/shrinkydinks
I’ll answer some questions from the comments on my previous shrinky rings post before I get started, and add more hints and tips throughout the tutorial.
Shrink plastic, for the uninitiated, was originally marketed as a toy for kids. It starts life thin and flexible. You draw on it and then bake it in the oven, and it shrinks to become about 1/3 of the starting size, but 9 times as thick. This thickness makes it strong and hard. It will not bend after baking, so if you try to pull your ring open, or stand on it, it may snap, but it is strong enough to withstand regular use as a ring.
The last step (bending the ring into shape) is the most difficult, so I highly recommend that 1) you read through all the instructions before starting, and 2) practice on a blank piece of shrink plastic so you can get a feel for it and test your size and bending technique before putting too much effort into your design!
Full tutorial instructions are after the jump…
1. Find your shrink plastic
I use Shrinky Dinks Frosted Ruff N’ Ready, which accepts rubber stamped images beautifully. Any transparent shrink plastic will work. If you use the coloured opaque shrink plastic, you would have to decorate the outside of your ring instead of the inside. You could also use the inkjet printable type of shrink plastic.
An alternative source for shrinkable plastic is #6 plastic, commonly used in food packaging. Look for the ‘6’ recycling symbol to make sure you’re using the right type! You’ll have to sand one side before use, as the plastic needs a rough (not shiny) surface so the ink won’t smudge and rub off.
Note: If you are looking for sources, search for “shrink plastic” (generic term) not “shrinkydinks” (brand name) and you may have more luck. For example, if you’re in the UK, googling ‘Shrink Plastic UK’ (without the quotes) will give you lots of online stores that sell it. You’re looking for large sheets of it, not pre-cut shapes.
2. Measure and cut to size
Note: Different brand of shrink plastic may shrink by different amounts, so you might want to try baking a plain test piece to make sure you’ve got the size right before spending time on decoration.
Measure: The best method to find the right length for your strip of plastic is by trial and error.
- A: Simple Method: Use my measurements for your first attempt, then modify the length if they turn out too small or big! My rings fit small ladies’ fingers, and are 6mm (1/4″) tall.
My starting dimensions were 14.2 x 1.6cm (5 5/8 x 5/8″). - B: Attempt to Calculate Size: If you know your ring size, you could calculate the desired circumference of your ring with a ring size converter. (The circumference would be equal to the length of your strip of plastic after shrinking.) However, I found that, although Shrinkydinks is supposed to shrink by ~3 times, my strips needed to be ~10% longer than the length I calculated in this way.
This isn’t an exact science. I recommend you just use your best guess to make a test ring; you’ll soon find out if your strip should have been longer or shorter!
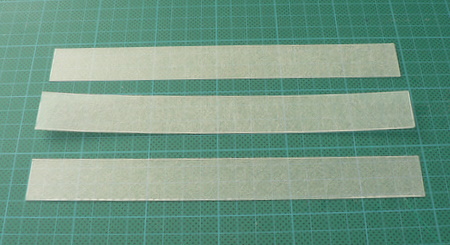
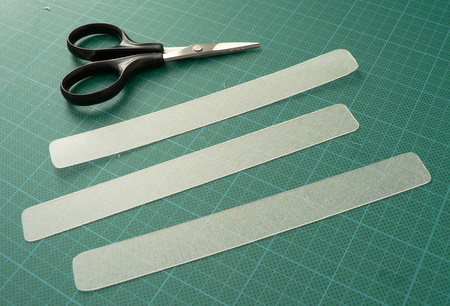
Cut to Size: To cut the plastic, I like to use a guillotine (paper cutter) to get straight lines, but it’s probably not good for the cutter blade (I use an old cutter blade). You could also use an xacto knife and metal ruler, or just cut the plastic with scissors.
The corners can be very sharp, so I like to round them off slightly with scissors before baking (don’t worry if you forget this step; you can file or sand them down after baking).
3. Decorate shrink plastic
Follow the decorating instructions that come with your shrink plastic. Here are some ideas:
- Rubber stamps + alcohol-based permanent inks (be warned: other types of stamp ink will smudge)
- Fine-point permanent marker (e.g. Sharpie) to draw or trace your designs
- Coloured pencils (use in combination with the above to add colour)
- Print designs directly onto your plastic (inkjet shrink plastic ONLY)
If you’re using the frosted type, remember to decorate the rough (frosted) side. For other types, consult your instructions.
I used peg stamps to decorate my first rings. The designs are only 1cm tall so fit my rings perfectly. Below I have also tried some other rubber stamps:
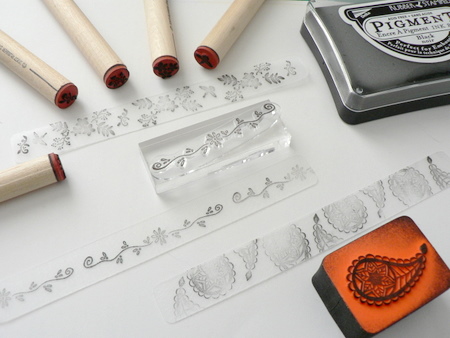
Don’t forget to let your ink dry before adding any coloured pencil embellishments, and remember that colours will become more saturated and vibrant after baking, so less is more in this case.
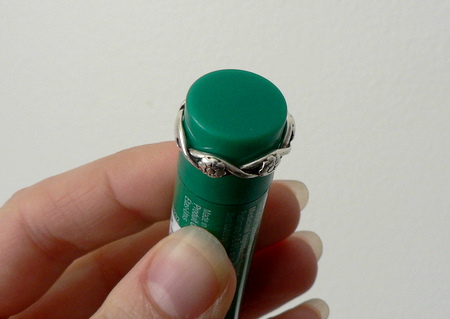
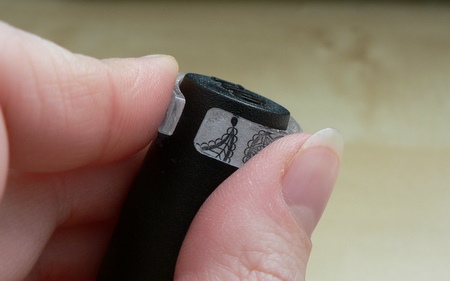
4. Find a suitable form to bend plastic around
Here’s a useful tip to find an object of the right size to create your ring: take an existing ring, and try to slip it over various thin cylindrical household objects, e.g. marker pen barrel, wooden spoon handle, lip balm tube. You are looking for an object that is a tight fit inside your ring. If you don’t have anything suitable, you could buy a short length of wooden dowel of the right diameter. Your object will come into contact with hot plastic, so don’t use any treasured possessions for this step.
5. Shrink your plastic
This is the fun part!
Preheat a toaster oven or conventional oven to the temperature specified on your packaging. Make sure you are in a well-ventilated area so any fumes don’t build up.
Note: Please read the instructions below all the way to the end before baking your ring – the shaping happens very quickly after baking so you need to be ready…
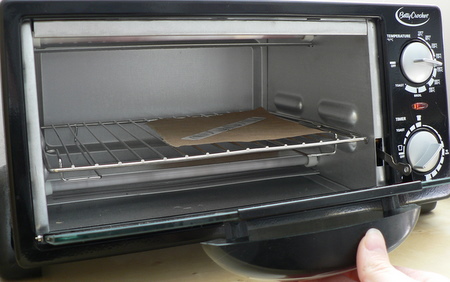
Place your strip (decorated side up) on a piece of brown paper on an oven tray, and put it in the oven. Keep watching… this is where the magic happens. Your strip will begin to curl up and wiggle about as some parts heat more quickly than others and so begin to shrink more quickly. Don’t worry if it looks like it’s stuck together – in my experience it always flattens out as it continues to shrink. When it has finished shrinking, leave it in the oven for another 30 seconds to heat through evenly.
Here’s an animation of the shrinking process:
6. Shape your ring
When your strip comes out of the oven, you’ll have to work quickly – you only have about 10 seconds before it has cooled and becomes rigid. Disclaimer: to protect your hands from the hot plastic, you should probably wear a thin glove (for more control) or an oven mitt (for better protection against the heat) but I don’t bother – it is very hot, but the plastic doesn’t stay hot for long enough to burn my skin.
Remove the brown paper from the oven. Wait for about 2 seconds (so it’s not too hot to touch), then carefully wrap the strip around your forming tool, with your decorated side facing in towards the tool. Hold it in place for a few seconds until it becomes cool and rigid.
I’m not going to lie, this step is tricky. You really do have to work quickly, and not make any mistakes, otherwise you won’t have time to wrap the entire strip around your object before it cools. But don’t lose hope! There is a magic fix for a badly-formed ring like the one below…
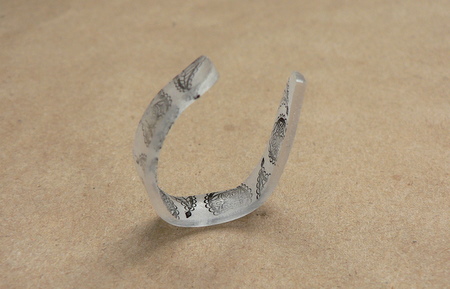
Pop your misshapen ring back into the oven on the brown paper, balancing it upright on its curved surface so the join is at the top (as in the picture above). After a minute or so, the plastic will relax back out of its shape, and revert back into a flat strip… I told you this stuff was magic! Let it heat through for about 20-30 seconds, then try to form the ring around your tool again.
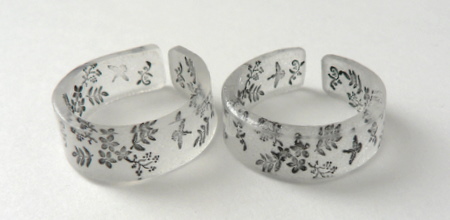
Left: unsanded edges; Right: sanded edges
That’s it! You can sand down the edges to give a smoother finish, but this may partially obscure your design. You could also paint the edges after forming for a different effect. For more durability of your design, use a clear coat to carefully varnish the inside of the ring (one coat should be enough).
You can make matching earrings, charm bracelets or necklace pendants – just punch holes for the jewellery findings before shrinking the plastic, and remember that the holes will also shrink, so don’t worry that they’ll be too large.
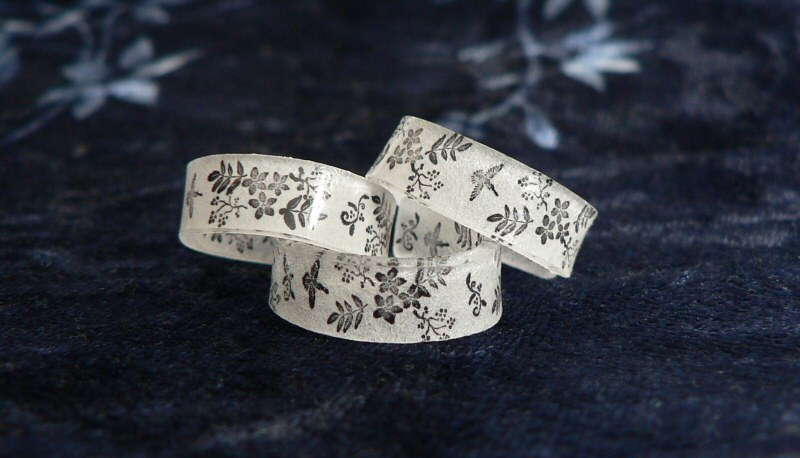
Enjoy your new jewellery!
Please note: if you’ve donated for this tutorial and read the included 3-page FAQ, and still have problems or questions relating to the instructions in my tutorial, you’re very welcome to email me for further help; please include your order number in your email.
I do not have time to respond to any other questions – if you look back through my many past answers to questions left in the comments here, you’ll probably find the answer anyway, or you can just donate $2 or more and receive the PDF version of this tutorial together with a 3-page FAQ which should answer any remaining questions 🙂
Happy shrinky ring making!
Please leave me a comment if you enjoyed this tutorial, and consider leaving me a donation. Thanks!


Kara said
Thank you for such a well laid-out tutorial with terrific pictures. You put a great deal of thought and effort into sharing with us – all the necessary particulars and answered any additional questions with continued thoughtfulness and grace.
I found this on Pinterest and repinned it from your site; can’t wait to make it! As with many crafts I realize it’s trial and error – but that’s just part of the fun!
Thanks again!
Kara from Canada
Alysha said
This is awesome! I love shrink plastic projects and I can’t believe that I never thought of this one! Great post, now off to color some plastic!!
Annamarie said
There’s a product sold at JoAnns, hobby lobby, any scrapbook store called “stays on ink”. It’s permanent. Sharpies? No. Stays on ink…yes. Great idea. I used my shrink to make earrings & findings for jewelry. Thanks for the inspiration.
Crafty Bug said
GGgRRRRRR Hate this thought it was easy. It took me 7 times to try to form the ring and ended up as a necklace. GGGRRRR
Jenovasilver said
Hello! I’m very grateful for this tutorial, thank you so much…I have a question, do you prefer to use sandpaper or a file to smooth the edges? And if sandpaper do you have a recommendation?
Leah said
I think this is a neat idea for girley Christmas gifts 🙂
Andrea said
Where do I get all the supplies I need like the plastic strips and r those stamps just reg stamps and u put a layer of clear stuff over stamp b4 shaping?
Kay said
You can also use things like Number 6 plastic from take out foods instead of adding to the plastics we already have around us. 🙂 Tried it and have some great plastic “jewels” I designed with funky patterns.
Stacy said
This is awesome June! Great instructions. I now have to go to a craft store and buy some shrinks dink stuff! I love it! Thanks for posting!
Penny said
June
Is it possible to attach the ends together and put on a dowel to bake so that it shrinks to the dowel size and eliminates the open ends?
Nicole said
Have you ever used glitter on the shrink plastic? I’m wondering if it would just burn in the oven… Thanks!
Mie said
Do not use glitter before you bake your shrink plastic, but it’s ok to use afterwards.
Love your tutorial. Thanks.
GeorgiegirlofRB said
Hi June,
Thank you for such a brilliant idea and easy to follow instructions. I use a heat tool to shrink my shrinkydinks and love watching it curl and uncurl again. When we were kids, we used to put chip packets in the oven and make them into charms! So much fun! For those asking about colours… you can colour plastic using the markers from Kaszazz – Alcohol Ink Art Markers. They’re new out and will colour almost anything!!! My Dad uses them to mark his golf balls! Just experiment and have Fun 🙂 Thanks again June!
kat said
Love the look of these rings and your helpful tutorial.
So excited to give it a try but ran into a problem.
After mine curled it would fall over on its side (tried 2)
and not recover. When I try to stand it up again in the oven,
it seems like it has hardened already and cant be fixed.
What do you think I am doing wrong ?
Should I just leave it in longer ?
Anyone run into this glitch ?
Emily said
Have you ever tried plastic from a take out container? I read somewhere it’s the same stuff but can’t remember which number plastic, any thoughts?
Jenni said
Love it! Great tutorial. I will try this as soon as possible!
Angie Perry said
I don’t have a website, but I found your shrink rings on a Pinterest board. Would you be interested in making these rings yourself – and I can purchase from you?
Thank you kindly. (please let me know, I will place an order for a size 8 and maybe you can do something I like through your website options)??
A. Perry
Greensboro, NC
3/16/2013
xiaoxi said
June, thanks for your details and I just want to know, where can I buy some shrink plastic material. would put a interlink on. thank you a lot.
Sonja K. said
I saw this on Pinterest and I love it! Thank you so much for taking the time to share this. I can’t wait to try it.
Gribou said
Dear you.
Where could I buy this one please : pinterest.com/pin/195414071302966937/
🙂 ?
Thank you !
Love.
Marianne
June said
Please see my Pinterest post for the answer to your question 🙂
CJ said
I saw another post for shrinking the packing that fresh fruit comes in. You know those thin plastic snap close vented boxes. Anyway, I haven’t tried it yet but I wonder if it would work for this also?
Taylor said
I featured this awesome tutorial on my blog today! Thanks for sharing!
Virginia said
I have not worked with this Plastic before so I was wondering can you make the plastic strip thicker by bakeing 2 layered?
Will the two layers fuse?
V
denice said
Thanks for sharing your expertise. I have seen some plastic jewelry with designs on front and back. Do you know if the ink print paper can be printed on both sides or would the back design be glued on? Thank you
April said
I just made 3 of these using shrink art plastic and sharpies…. I broke my first attempt and smudged a few not reading the last step about clear coat but the others came out wonderfully and now everyone is asking where I bought them! I love it and plan to make more once I get more plastic!
Gretchen said
I made these rings the other day (came out quite cute, by the way! 🙂 However, I’ve noticed that after wearing the ring for only a half a day, the design is starting to smudge off already? I used permanent markers (Sharpies) as you recommended. Not quite sure why it’s smudging already? I used the Matte shrinky dink paper….should I be using Clear instead? Also, should the design be on the outside of the ring, or on the inside of the ring (against my skin)?
Otherwise, a very fun project…and a bit challenging, like you said, to shape it correctly in the 10 seconds you have while it’s still pliable.
Want to try cuff bracelets next, but wanted to see what you recommended for the smudging first.
Thank you!
katey said
Where can u find the shrinky Dink plastic n how much does it usually cost?
isabel:D said
as I can do to fix the color better. I buy sharpie (permanent markers) but I feel that the color is erased. Pleas recommend something. already try putting nail varnish and lacquer but the color does not adhere well.
………..
LaughoutloudPaperProducts said
I came across your project and I am thrilled to try and do this myself. I do have a few questions… can you use colored ink and does the plastic come in colors? Can you hot glue embellishments also and then actually stick? Kinda thought to hide the gap or crease is to use beads, lace and feathers or pearls, the frilly stuff us know? Thank you very much for your help! I also plan on adding you to my website as a link if that is okay? I am currently in the process of cleaning it up, purchasing my domain and advertising and what not, so I’m just trying to get permission from other sites that are similar to yours to allow their link be on my site! Thanks so much in advance and I look forward to keeping in touch! Happy Holidays and hope you have a Merry Christmas!
June said
You’ll have to experiment for yourself if you want to modify my idea with embellishments 🙂 You can use any colour of ink provided it’s permanent alcohol-based ink. You can see the Shrinkydinks range at their website – any coloured shrink plastic wouldn’t be translucent though, so you might prefer to colour in the entire background with coloured pencils. And yes, you’re welcome to link to my website!
Becky Kennedy said
Just wondering what do bc I only found matte shrink paper n now my designs almost have to be on the outside? Bc it’s like an opaque white plastic once shrunk n noticing my ink is rubbing off great instructions though very helpful I am the one fishing this up now can u help advice??
June said
Yes, you’d have to have your design on the outside of an opaque ring to see it.
The ink would rub off if you didn’t use a permanent alcohol-based ink as I specify in the tutorial. Also, make sure you read the instructions for your specific shrink plastic to see if there are any other differences – I don’t know if this is the case, but opaque shrink plastic may need sanding before you can print on it. Regular Shrinkydinks comes with a roughened surface that will accept alcohol-based ink, coloured pencils, etc, without any preparation.
You can also seal your designs with a clear coat after shrinking – the Shrinkydinks website has some specific recommendations for types of clear coat.
Lore said
Thank you for posting this! Over the years I’ve collected some really beautiful stamps… and I’ve always had an itching to use them on more than journals, day planners, various cards, and just randomly…
Ring patterns is absolutely perfect for them! And this is so simple too!
Carrie said
in the last picture of the tutorial, the “background” of the ring is white. How did you do that?
LOVE this idea!
June said
Nothing clever! That’s just the natural colour of normal Shrinkydinks – the rough ‘frosted’ surface looks whiter when it’s been shrunk.
Jenifer said
Do u sell these rings? Or take orders?or anything like that?
June said
Sorry, Jenifer, I don’t – I’m a crochet pattern designer! But a quick Etsy search should find plenty of people who do sell them 🙂
Amanda said
You mentioned you are a crochet pattern designer? How does that work? I have an Idea for a afgahn, but no idea how to bring it to life! lol Could I send you an image of what I want in the pattern?
June said
I’m afraid not, Amanda! You may be able to find someone to commission to design an afghan based on your idea, but that’s not the sort of design work I do – you can see the sort of patterns I design if you look in my shop. 🙂
donna said
have you every tried to make a cuff bracelet with this?
June said
donna, please see my previous answer to this question, here 🙂
Susan said
Hi and thank you for your tutorial!! I can’t wait to give this a try!
Slummy to Yummy Mummy said
Your instructions are very clear and now I’m itching to try it! Thanks.
Rebecca said
What “clear coat” are you referring to?
maggie said
any coat of clear substance should be good. they sell clear spay paint, and since i am a crafter, i use that, but if this is all your using it for, you might want to find a cheaper alternative. for a thicker glossier coat, try clear nail polish, but test it on a scrap first to make sure the chemicals don’t interact and smudge the ink.
liz said
You can also shrink using an embossing gun. I have never tried something so large but i have made pendants before using just the gun.
ktlin said
Genial, j’adore cette id
Lee said
Hello there June! I have to say I LOVE your work!
you have all sorts of great ideas and style!
I do have a question though. I use the shrinky dink inkjet paper and i’m racking my brain. I’m doing rings of custom characters to fit people by their actual ring sizes and I can’t figure out the formula. I do the artwork in photoshop i.imgur.com/IaTWP.png and then keeping my fingers crossed and praying to the craft faeries they pop out i.imgur.com/iYbOy.png (as you can see there were MANY failed attempts) MY question is do you know of a equation for the sizes? as in Start at this size ___
so when it shrinks it fits this size____
I don’t know how else to explain it and I’m going nuts! please help!
and advice is GREATLY appreciated!
June said
Lee, I’d suggest you print a ‘ruler’ onto your shrinkydinks – draw lines at regular intervals (e.g. 50 pixels or something – the number would depend on your resolution). Then shrink the ruler and you’ll know exactly how large 50 px on the screen will be in the finished ring. Then you can do a basic calculation to work out any size using your conversion rate!
Laura said
That is such a simple answer-I cannot believe I have been putting off making these because I couldn’t figure out how to get the right size strips!!
Thanks for another great tutorial!
Ashley said
You can microwave the mini potato chip bags (Lays BBQ, lays original, etc…) and have teeny tiny bags! Pretty much microwave them until they shrink up and then get them out, they are so cute!
Summer Wenzel said
Back in the 70’s, we made pendants using the container lids from chicken livers sold in the grocery store. I have no idea if that would still work today (if they are still made of the same material), but if you happen to have liver lids around the house, it might be worth a try.
Amy said
Your blog is great! Thank you so much for being so helpful. I am new to pintrest and typically just hit the re’pin button but wanted to insure you get due credit.. can you tell me if I need to do something different? I will wait to re’pin till I hear your reply.
June said
Thanks for checking, Amy! Provided the original pin linked to this page, re-pinning it is just perfect 🙂
heather said
hi,
loved the rings, but when i went looking for takeaway containers, all i cud find was #5. Will it make do?
June said
Not at all, I’m afraid. #5 is polypropylene, #6 is polystyrene; they are completely different materials with different properties. Other plastics won’t shrink when heated, and may even give off toxic gases, so please be careful and only use #6 or buy a pack of shrink plastic.
heather said
thank u very much for your prompt reply. but i live in india and we dont get shrinky dinks here 🙁
InkBlotMom, Kimberly Calderon said
Wow!! That’s really neat! I love doing shrinky dink projects with my kiddos and this will be a fun project for me!
Dara @ I Love Paper Beads said
This is really clever! I love the idea of making these rings. I had seen several photos on Pinterest but they had no tutorial. So glad I found yours! I’m going to have to give this a try.
Angelia said
Hi,
Just a heads up to US crafters, Target sells sushi rolls in #6 plastic containers.. nabbed a BEAUTIFUL violet colored one with my lunch today.. can’t wait to try it !!
Thanks !
Alice said
Thank you so much
Katie said
Thanks for the great tutorial. I have a large shrinking plastic project in the works. I hadn’t thought about buying shrinking plastic because it is so readily availible if you are willing to look. Any number 6 plastic will work. I get a lot of mine from the bakery where my husband frequents for donuts. It is basically free minus the donuts. It is also green and a little exciting going on the hunt for various packaging made out of number 6.
June said
I think that depends on which country you live in, Katie! I’ve been in South Africa for over a year and have yet to find one item made from #6 plastic; it’s all #1, #2 and #5 here.
Jess said
Oh my word these are amazing! I have to try them. I just have one question… do you know of an place I can find this shrink plastic in South Africa? We name stuff differently here so I’m not sure what #6 plastic is?
Thanks!
June said
Jess, the plastic # codes are standardised worldwide – it’s the number you see inside the recycling symbol stamped onto anything plastic, to identify which type of plastic it’s made from. Unfortunately, I haven’t seen anything made of #6 plastic in South Africa, and I have been checking; the type of clear plastic food containers that are usually made from #6 plastic in the US seem to be made from #1 here 🙁
However, you can buy sheets of shrink plastic from craft supply shops and scrapbooking shops, so I suggest you try to look for a source that’s local to you! (Obviously, buying it online isn’t really an option here in SA either…) Good luck in finding some!
Tiffany said
I want to make one of these but I’m having a hard time figuring out what my starting demensions need to be. I need a size 8 and 5 ring. Can someone help me with this? 🙂