PlanetJune Craft Blog

Latest news and updates from June

adventures in 3d printing

My husband is a maker like me, but he prefers wood, metal and plastic to yarn and fibre, so our hobbies rarely intersect. But he has his own 3D printers, which means he can make custom plastic stuff for me if I ask. While I love that idea in theory, I’ve struggled in the past to think of anything that would be useful – there’s no point adding more plastic rubbish into the world just because it’s possible to make it.

Lately, though, I’ve been full of ideas for useful items, and Dave has brought them to life for me – I thought you might like to see what we’ve come up with…

USB Cable Holder

I use a long USB cable to plug my camera into my computer so I can transfer my photos without having to remove the memory card every time I want to check if I’ve captured the shot I needed.

I’ve been using a sticky-backed cable clip, but I’ve gone though two of them now – after a while, the adhesive fails and they fall off the edge of my desk. I thought that something that clipped onto the edge of the desk would be sturdier and less likely to fall off.

3d printed USB cable holder

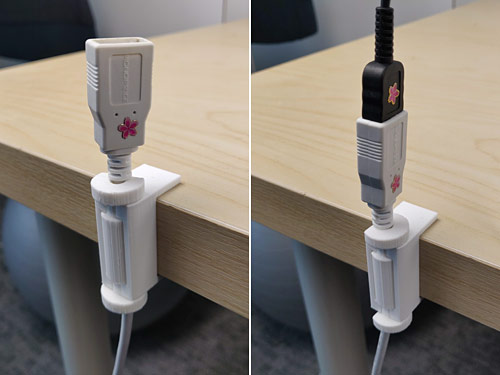
I found this design on Thingiverse – a database of free printable designs – and Dave customized it to fit the height of my desk perfectly. It has a clever swivel barrel so I can remove the cable if necessary, but it’s firmly locked in place the rest of the time. It’s perfect!

3d printed USB cable holder
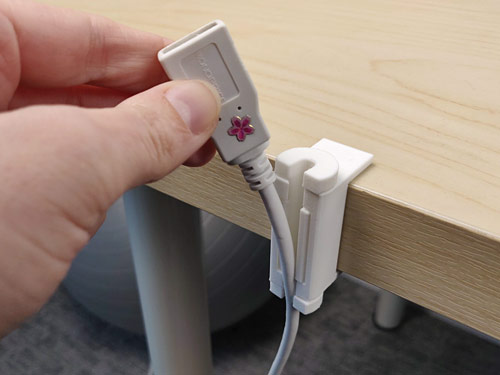
In case you’re wondering, the matching flower stickers mean I always know which way to insert the USB plug into the socket ๐Ÿ˜‰

Sprouting Jar Tray

You may remember that I grow my own sprouts on my kitchen windowsill. The jars leave watermarks on the windowsill, and, while the marks have wiped off easily so far, I don’t want to risk damaging the wood.

3d printed tray for a sprouting jar

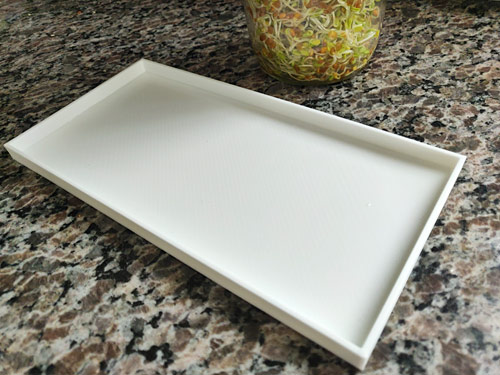
I requested a very shallow tray, just long enough to fit the sprouting jar and no wider than the windowsill. We measured up, Dave designed and printed it, and look what I have now!

3d printed tray for a sprouting jar

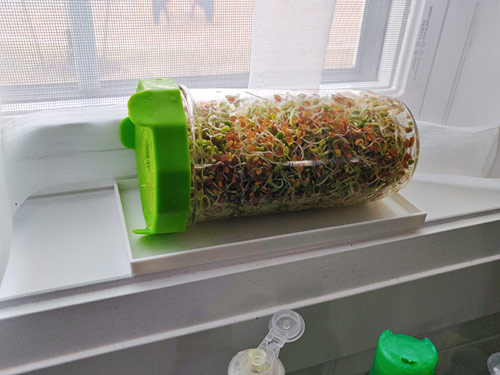
It’s just what I needed, and nicely unobtrusive in white to match the windowsill.

Tea Dividers

This is my best idea yet! I designed my kitchen to include a narrow spice cupboard, with the intention of using it for teas instead of spices. It’s great in theory, but boxes of individually-wrapped tea bags took up too much space horizontally and were too tall to fit vertically.

3d printed tea bag dividers

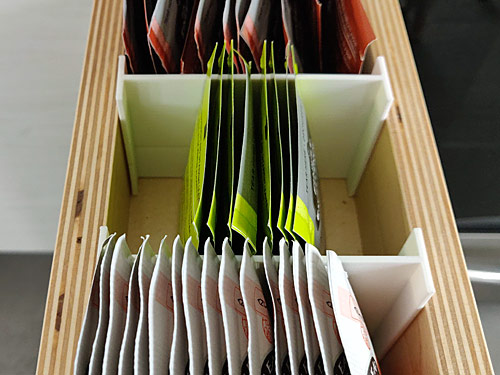
I figured out that by taking the tea bags out of the boxes, we could effectively double the space! We came up with this design between us using a few cardboard prototypes until we figured out that this I-beam shape would work well as a divider that always stays upright.

3d printed tea bag dividers

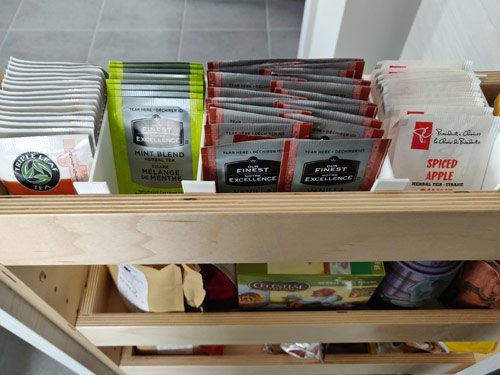
With these dividers, I can fit 4 different types of tea where 2 boxes used to sit, I can move the dividers to fit the current stock of tea bags, and, as a bonus, the tea bags are more accessible too.


I’m finally seeing the benefit of having a 3D printer (and an experienced operator) in the house! Isn’t technology great? It’s amazing, coming up with an idea and having the physical product in my hands just a few hours later.

I’m sure there must be more handy items that we could design and print to make our lives easier. I wonder what we’ll think up next…

Comments (9)

update: Complete Guide to Giant Amigurumi

This is a quick announcement to let you know that I’ve just updated my ebook, The Complete Guide to Giant Amigurumi.

The Complete Guide to Giant Amigurumi ebook by June Gilbank - available in right-handed and left-handed versions

What’s New?

I’ve added 2 new pages of instructional techniques (what to do if your original amigurumi pattern has wired limbs, and how to add an optional lining to contain the stuffing), and an inspiration gallery page with all the giant ami I’ve made since I first published the book (7 new additions!) with any special tips I have for each one.

giant and regular sized amigurumi geckos made from the crochet pattern by planetjune
Newly added: my technique for replacing the wire in an amigurumi that’s intended to have wired legs, like my gecko!

Free Update!

If you’ve previously purchased The Complete Guide to Giant Amigurumi, your licence entitles you to a lifetime of free updates! Your download link in your original order has been updated, so please log back into your PlanetJune account and re-download the PDF file to get the latest version. ๐Ÿ™‚

Tip: The copyright date in the footer of every page of the book has been updated from “2019” to “2019, 2022” so you can easily see which version you have!

Get Started with Giant Amigurumi

If you’re just beginning your Giant Amigurumi journey, this is the perfect time to grab your guidebook for this adventure!

You can upsize almost any amigurumi pattern with the techniques in The Complete Guide to Giant Amigurumi and get an irresistibly cuddly, adorable result. Youโ€™ll learn how to take a normal amigurumi pattern and enlarge it by 3 to 4 times to make a giant huggable amigurumi! All you need is your favourite pattern, a 15mm hook, and a super-bulky yarn, and youโ€™ll be ready to start.

The Complete Guide to Giant Amigurumi ebook by June Gilbank - scale up any ami by over 3 times!

Iโ€™ll guide you through every step along the way, from choosing your materials and learning how to work giant stitches, to stuffing, assembly and embellishment, and more. Everything is explained in my usual detail, with clear, close-up photos and instructions.

giant Amigurumi Apple, Pumpkin and Pear (crochet patterns by PlanetJune)

Giant amis are so fun and satisfying to make (and you can also apply all the techniques to Mini Giant amigurumi if you don’t want to scale up as far as full giant size).


I doubt this is the end of my giant amigurumi explorations, so there may well be another updated version of my ebook in a few more years, if I develop any more new techniques and tips to share with you – I love that there’s always more to discover on my crochet journey!

In the meantime, I hope you’ll find this update useful, and I wish you happy giant amigurumi making. ๐Ÿ™‚

Comments (10)

PlanetJune Stories: Maureen’s Armadillo

Today’s PlanetJune Story comes from Maureen Carter, a crochet enthusiast from Grosse Pointe Woods, MI. Last year, Maureen tagged me on Facebook with this picture of an incredibly colourful armadillo she had crocheted using my pattern and based on a child’s drawing:

Maureen's crocheted armadillo with Isabella's armadillo drawing

…and I just had to reach out to her to find out more about the story behind this incredible project!

Over to Maureen:


I learned how to crochet when I was 12 years old but have only been doing amigurumi in the last 4 years. I used to make mostly slippers, hats, mittens, blankets, scarves, sweaters, ponchos. Now I do a lot of amigurumi as well. It is a lot of fun seeing all the little parts come to life as a stuffed animal. My crochet teacher always said, “Make joy with your crochet.” Amigurumi always brings joy to those that receive the finished projects.

I have relatives in California who were involved with helping support and promote an online fundraiser by the Dominican Sisters Vision of Hope, a non-profit organization that raises funds to support several Catholic schools in the Los Angeles area and the San Francisco-Oakland California area. One of my sisters invited me to participate in the online auction.

One of the features of the auction was artwork made and donated by students in the schools supported by the auction. I was very taken with a colorful drawing called “Oaxacan Armadillo” by a first grade student, Isabella. I placed a bid for her drawing in the auction and was so happy to be the successful bidder.

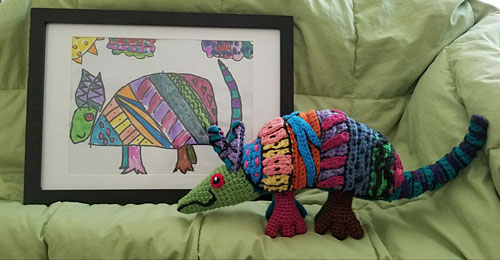
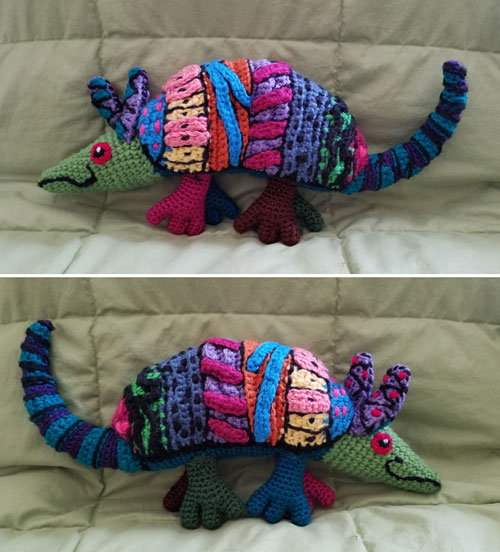
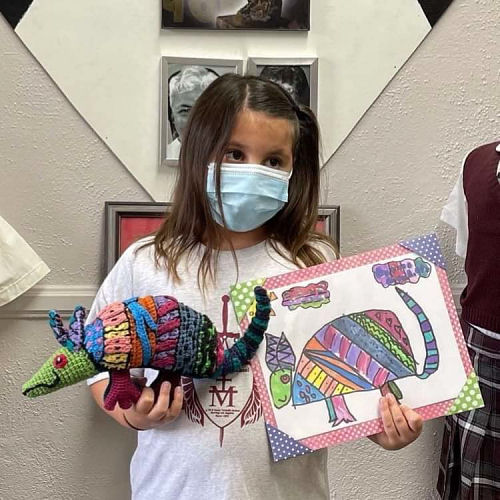
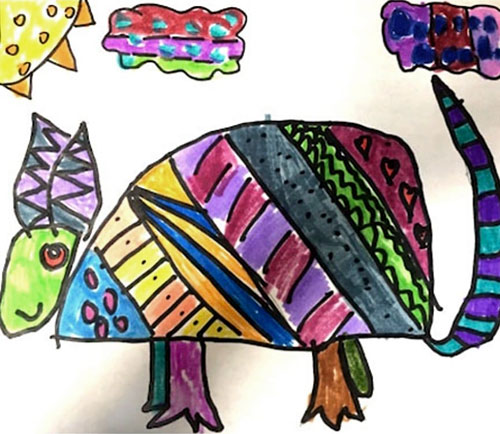
“Oaxacan Armadillo” by Isabella

When the framed artwork arrived at my home I came up with the idea that this artwork could be transformed into an amigurumi replica that I could send as a surprise to Isabella. I looked for armadillo crochet patterns and decided that I could work with June’s pattern as the base, but incorporate the colors and designs from Isabella’s drawing.

I have followed June’s work and often watched her tutorials and lessons on how to do certain stitches and techniques. I was happy to find her pattern which was a great help to bring this drawing to life. June’s armadillo design was the perfect one to use as my base, especially since the armor shell is made as a separate piece that attaches after it’s all done.

Armadillo crochet pattern by PlanetJune The PlanetJune Armadillo crochet pattern

I made each leg a different color with 3 toes, and made the ears and eyes and facial expression to match Isabella’s drawing as closely as possible. The color I added to the armor was achieved partly by crocheting in stripes, then I made small appliques and sewed them on and did some surface crochet to get the shapes and colors that were used in the drawing.

Maureen's crocheted armadillo

It took me 2-3 weeks working intermittently to recreate the armadillo. I also had a color copy of the drawing made up to send with the crocheted armadillo. I mailed it to Isabella in the care of her school principal. It was presented to her at school.

Isabella with her armadillo drawing and Maureen's crocheted armadillo

I sent a note thanking her for making the beautiful colorful drawing and sharing it with the fundraiser for her school. I encouraged her to continue to have fun making beautiful things using her imagination and talent. I told her that when I see it on my fireplace mantle every day, it brings me joy.

I recently received a note back from Isabella and her mother. Isabella’s handwritten note says:

Dear Ms. Maureen,
Thank you for my armadillo. I really like it. I like how it looks exactly like my drawing and it turned out very colorful. It is very special to me.
Love, Isabella

Isabella's note

Her mom also sent a beautiful note thanking me for making the armadillo for Isabella, which she named “Alice.”

Isabella's mom's note

I loved Isabella’s artwork right away the first moment I saw it. I felt compelled to do something to express how much I admired her work and that I hope she continues to enjoy drawing and making things. I thought I could do it justice as a crocheted stuffed animal that she might like, so I gave it a try. It was a happy and moving experience for both of us.


(Back to me, June, again!)

I love everything about this story – it’s such a fun project, and isn’t the story behind it fantastic?! Both Maureen and Isabella are wonderfully creative, and I’m so happy my armadillo pattern contributed to their collaboration.

Part of the joy I find in having a clean and simple design style is seeing how people choose to adapt, embellish and modify my PlanetJune patterns – and I’m sure you’ll agree that Maureen’s armadillo is a prime example of that creativity.

Thank you so much, Maureen, for sharing your story with us today ๐Ÿ™‚
Please leave Maureen a comment if you’ve enjoyed this post!


Do you have a PlanetJune Story you’d like to share? I’d love to hear it! Please email your story to june@planetjune.com, together with one or more high quality photos showing what you’ve made from PlanetJune patterns. If I choose your story to feature here on the blog, I’ll send you your choice of pattern from my shop to say thank you!

Comments (8)

Barn Owl crochet pattern

I’m so happy to present another new design that was many years in the making: the Barn Owl!

barn owl crochet expansion pack pattern by planetjune

Barn Owls are my favourite owl, and adding a Barn Owl option to my Owl Collection was always part of my plan. Out of interest, I thought I’d look back at my digital notes to see how long it’s taken to bring it to life…

I first came up with the seeds of this idea in March 2014. It took until 2017 (and a whole year of prototyping) to figure out the unique shaping for the smooth lines and minimal sewing of the main Owl Collection design, but I couldn’t quite get the barn owl right… At that time, I said:

Fun Fact: Owls are divided into two families: Strigidae (typical owls) and Tytonidae (barn owls). With this pattern, you can choose appropriate colours to make any of the typical (true) owls.

Note: I’d love to design a barn owl too, but to make it look right it’d need lots of colour changes and special shaping to make the distinctive heart-shaped face, so that’s a challenge I’ll have to save for some future point in time!

I’m so glad I decided to publish the single-colour owls in June 2017 instead of waiting for the inspiration to finish the barn owl as well, because it took another 5 years to figure out how to add the barn owl’s distinctive facial features and get the colour changes that run all the way down the body just right!

owl collection crochet pattern with barn owl expansion pack by planetjune 
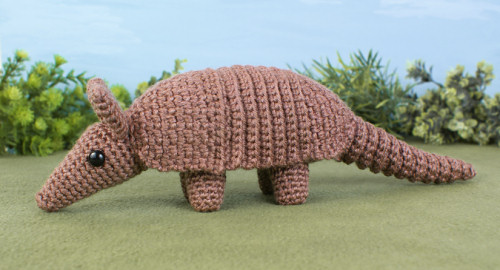
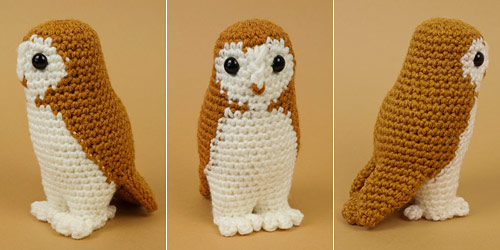
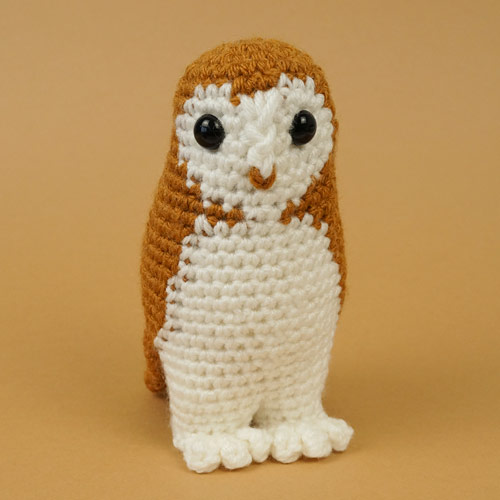
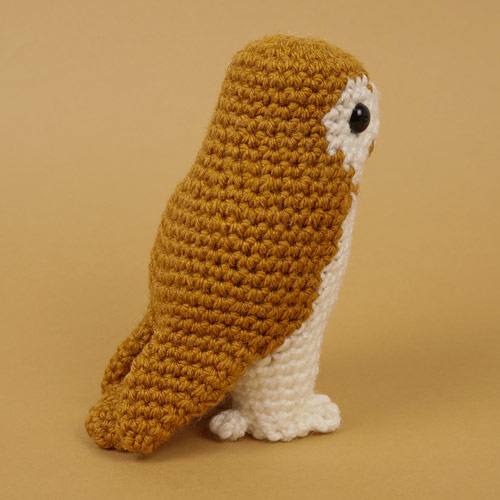
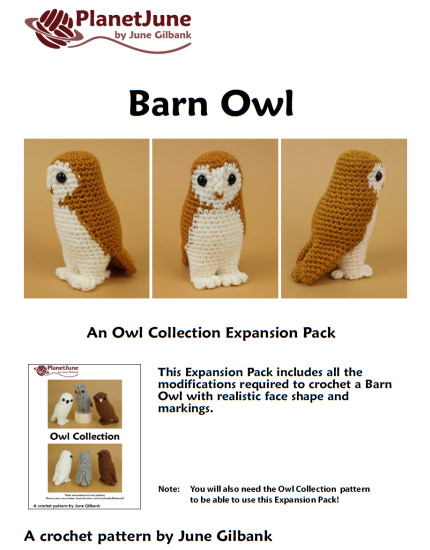
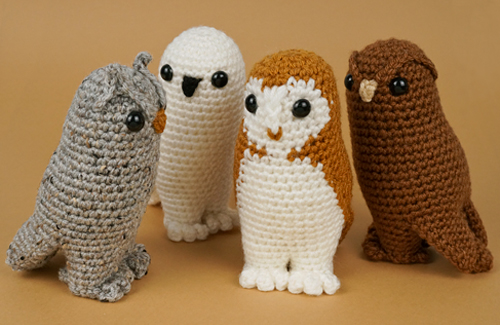
Whoooo’s this then?! My owls are delighted that their beautiful cousin, the Barn Owl, has joined them to complete the owl family.

Barn Owl Fun Facts

  • There are species of barn owl living almost all over the world.
  • It’s easy to recognise a barn owl by its heart-shaped facial disc and dark eyes.
  • The facial disc isn’t just an attractive feature! It helps barn owls to locate their prey by funneling sounds to their ears when they are hunting.
  • Unlike typical owls, barn owls don’t hoot: they have a loud shrieking cry.
  • Barn owls hunt at night, and they are often mistaken for ghosts when people see a white face with staring black eyes floating above the ground!

About the Pattern

Barn Owl is an Expansion Pack for my Owl Collection pattern, and includes all the modifications required to crochet a Barn Owl with realistic face shape and markings.

barn owl crochet expansion pack pattern by planetjune

Although it’s only an Expansion Pack, there’s a lot to this pattern – the special stitches that make the raised part of the face are all crocheted while you make the head, so I’ve included right- and left-handed appendices that walk you through exactly where and how to make those stitches so your barn owl will be perfect!

barn owl crochet expansion pack pattern by planetjune

Aside from the colouring and facial features, the Barn Owl has all the same features as the Owl Collection – the smooth, seamless head, body, wings and legs, giving you the perfect elegant owl posture with minimal assembly.

barn owl crochet expansion pack pattern by planetjune

(And btw, I’ve also updated the Owl Collection pattern in my new publishing software so both patterns will match, so you may as well re-download it too if you’ve already bought it! The new layout doesn’t look very different, but it’s higher quality, and all the round numbers are bolded to make for easier reading.)

barn owl crochet expansion pack pattern by planetjune

What is an Expansion Pack?

Expansion Packs by PlanetJune

  • An Expansion Pack is an add-on to an existing PlanetJune pattern.
  • The Expansion Pack lets you modify or add to the original pattern to create something else.
  • You cannot use the Expansion Pack alone – you must also purchase the original pattern in order to be able to complete the pictured items in the Expansion Pack pattern.

Links to Buy

You can buy the Barn Owlย Expansion Pack for only $3.50 individually from the shop, or, if you haven’t yet bought the Owl Collectionย pattern, you can buy the multipack of both owl patterns, and save 50c on the pair.

Not ready to make it yet? Add Barn Owl to your queue on Ravelry:


Although it’s ridiculous how long some of my designs take to be birthed, I’m so happy I waited until I could do justice to the gorgeous Barn Owl – this design is exactly what I pictured in my head, eight years ago…

barn owl crochet expansion pack pattern by planetjune

I hope you’ll love it too!

Comments

Two-Tone Heart crochet pattern for Ukraine

I had a request earlier this week in the PlanetJune Discord group to modify my Love Hearts pattern to look like the Ukrainian flag, and that was a request I just couldn’t refuse.

I thought it would be simple, but I made prototypes to figure out the straightest line…

prototypes for two-tone heart crochet pattern by planetjune

It’s *not* what you’d think – crochet stitches aren’t straight, so the straightest line is not formed from a symmetrical pattern…

And then more prototypes to figure out whether hook size affects the straightness of the colour change line (it does – smaller is better) and the best way to manage the yarns with all the colour changes…

prototypes for two-tone heart crochet pattern by planetjune

Cut-and-tie gives the cleanest result on the front, but a messy back with lots of yarn ends to deal with.ย Tapestry crochet (working over the unused colour with every stitch) gives a neat front and back, with only two yarn ends from each colour to weave in, but the unworked yarn colour is slightly visible between the stitches (especially in the yellow half).

prototypes for two-tone heart crochet pattern by planetjune

After several rounds of prototyping, the final pattern is ready for you, in flat and puffy versions, with colour change recommendations for how to get the best balance of appearance, speed, and simplicity.

love hearts crochet pattern by planetjune - two-tone hearts variants

Please use this pattern however you wish, and especially to make hearts in the colour of the Ukrainian flag to show your support during this crisis. You can also sell hearts to fundraise (look for an accredited humanitarian aid charity in your country).

Go to the Two-Tone Heart crochet pattern >>

Comments (6)

Join the PlanetJune community on Discord

I’ve just set up a PlanetJune Discord server, so now we have a private place for our community to chat and share pics about anything at any time.

After a soft launch with members of the PJ Ravelry group, we’ve got used to how Discord works, so now I’m ready to welcome you to the group! Keep reading to find out how to join…

Ready to Join?

If you already have a Discord account, you can join the PJ server now with this invite link:

If not, read on for more info…

What is Discord?

It’s an app that gives us a private invite-only home for the PlanetJune community – a place where we can talk, hang out, and have fun. (See the Discord Beginner’s Guide for an overview.)

PlanetJune Discord server using the desktop app
Here’s how the PlanetJune Discord looks on a computer (and you can switch to light mode if you don’t like the black background)

Why join the PJ Discord?

  • For friendship: Chat about crochet or anything else in a friendly, private community.
  • For crochet help: Get immediate crochet help from anyone in the community who’s online (or type @planetjune in your message to make sure I’ll see it and get to it asap).
  • To hang out with me: We have a monthly scheduled Chat Hour where we all try to show up at the same time and chat (I hope you’ll join us for the next one, on Wed 2nd March!)ย 
  • For PJ insider knowledge: Be a part of the PJ Think Tank by sharing your opinion on my secret plans and ideas. You’ll help contribute to the future of PlanetJune!

How do I join?

To join the PlanetJune group:

  1. If you aren’t already on Discord, sign up for a free Discord account.
  2. Click the verification link in the email you’ll receive from Discord.
  3. Visit the PlanetJune group here.
  4. Accept our group rules, then our friendly bot, MEE6, will grant you access and send you a welcome message!
  5. Recommended: download the Discord app for your phone and/or computer.

PlanetJune Discord server using the phone app
Here are a couple of screen grabs of the PJ Discord on my phone (with happy Maggie saying hello!)

FAQs

What is Discord?
Discord lets us create an invite-only home for our community – a place where we can talk, hang out, and have fun. See the Discord Beginner’s Guide for an overview.

How do I use Discord?
You can download the Discord app for your phone or computer, or use it through a browser. (I find the app much easier, but it’s up to you.)

Sign in and you’ll see the PlanetJune server (once you’ve joined through the invite link above), and any other servers you’ve joined. You can check in as often as you want, read past messages, reply to anything you want to, and chat in real-time with anyone else who’s online.

You can upload pictures directly into the chat (this is much easier than Ravelry, as you don’t need to add the photo to a project first). You can share pics of anything related to what you’re chatting about.

How do I get help with Discord?
Ask your questions in the #discord-help channel and we’ll help you. There are no stupid questions – unless you’re a gamer, Discord is probably brand new to you (it was to me too!) Our helpful mods probably know the answers, but, if not, we’ll figure it out together. ๐Ÿ™‚

Is Discord replacing the Ravelry group?
No! Ravelry is great, of course, and the PlanetJune Ravelry group isn’t going anywhere – the Discord server is an additional space where we can catch up, chat, and socialise. Ravelry is definitely the best place for long-term stuff like keeping a record of your projects, but our Discord is perfect for real-time chat about anything, sharing a quick pic of your work in progress, or getting instant feedback, support or giggles. (It’s like social media without all the negative parts!)

How do text and voice chat work?
We have two options for chatting: we mostly use text chat (like our rav chat room, but open all the time), and live voice chat (optional, but sometimes it’s nice to actually speak to people and hear their voices in return). You can read over the text chats you’ve missed and reply later, but voice chat isn’t recorded – it’s just live, and you can pop in or leave whenever you want.

How private are our messages?
Unlike Ravelry, where anyone with a Ravelry account can read all our chat threads, the PlanetJune Discord server is private. You need to request access to join (all are welcome!) and our moderators will make sure any trolls or disrespectful people who sneak in are banned, so it’ll always be a safe and welcoming space for everyone.

You can also DM (direct message) another PJ member and have a completely private conversation between the two of you that nobody else can access.

What are channels?
Text chats appear as channels with different topics, so choose a crafting channel (e.g. #crochet) if you want to talk about that subject, and/or post in the general #chat channel to talk about anything and everything!

Our mods will add new channels if there are other specific things we want to talk about, so please let us know and we can split that topic into a separate channel.

What can we talk about?
Crochet, of course, but the PlanetJune community has more than just crochet in common! Whatever else you’re interested in – whether it’s knitting, sci fi, baking, practicing your English, fitness, or anything else – you’ll probably find some of us are also interested and would love hear from you!

For example, in the past we’ve had threads in the Ravelry group for things like reading recommendations, weight loss, photography resources, pets and wildlife, and other non-crafty things. We can add new channels for any or all of those topics, and more…

Can we add new channels?
We can add new channels for anything you’re interested in – I bet other PJers will want to talk about them too! Just suggest a new channel topic in the main chat thread and one of our mods will add it as a new channel.


See you there?

I’d love to say hello to you in the chat room and get to know you better, so please do come and join our PlanetJune community on Discord (jump back to the instructions here). It’s a positive, friendly space, and we’d love to welcome you to the party!

Comments (2)

How to Print a ‘Large Print’ Version of any PDF File

If you need to print a PDF pattern so the text is larger, you can do it by printing each page of the PDF so itโ€™s split onto two sheets of paper.

sample result for splitting one page of a PDF file onto two pages

I’ve worked out which settings to use in Adobe Reader to tell it to print in this way:

  • The text size will be increased (the exact amount depends on your printer, but it’ll be around 125-130%).
  • No instructional text will be cut off. Note: If you see a partial line of text at the top (or bottom) of one page, don’t worry: I’ve added enough overlap that the complete line will be repeated on the previous (or next) page.
  • Unfortunately, any images that are located in the middle of the page may be cut in half (so the top half of the image is printed at the bottom of one page, and the bottom half of the image is at the top of the next page).

While this isn’t a perfect solution, if you need to work from a printed copy of a pattern (instead of a digital copy where you can zoom in as much as you like) and you need large print text, this is something you can try!

Here’s how to do it:

The dialog box may look slightly different depending on your version of Adobe Reader โ€“ here are the settings in mine:

Print dialog box for splitting one page of a PDF file onto two pages

Step by step instructions:

  1. Open your PDF file in Adobe Reader.
  2. Go to File > Print
  3. In the print dialog settings that comes up, make the following changes:
    • Printer: make sure your printer is selected at the top (where it says Printer: Adobe PDF in the picture above)
    • Orientation: Landscape
    • Page sizing (or scaling): Poster (or may be called ‘Tile All Pages’)
    • Tile Scale: somewhere around 125-130% (see below for details)
    • Overlap: 0.2 in
  4. Click ‘Print’ to send your file to your printer.

Setting the Maximum Scale

Your printer’s settings will control the maximum size you can print – it depends how close it can print to the edge of the page. To set the maximum zoom, you’re looking to type the largest number you can in the Tile Scale box without the page breaking onto four sheets of paper instead of two.

Here’s an example with my printer. At 125% Tile Scale, you can see in the preview box that my page has one horizontal dotted line through the middle. That’s what you want to see – it means the page will be split onto 2 sheets of paper:

Print dialog box for splitting one page of a PDF file onto two pages

At 126% Tile Scale, my page preview now has a horizontal and a vertical dotted line, indicating that it’ll be split over 4 sheets of paper:

Print dialog box for splitting one page of a PDF file onto two pages
You definitely don’t want this! The pattern would be unusable, as each line of text would be split in half vertically, plus it would waste lots of paper.

So, in my case, the largest number I can use is 125%. Play around with the number – yours may be a little higher or lower, depending on your printer’s margins.

Before and After

Before (below, left): Each page of the PDF prints in portrait format.

After (below, right): Each page of the PDF prints in landscape format, split in half so one page of the original PDF prints onto two sheets of paper.

sample result for splitting one page of a PDF file onto two pages

If you compare the size of the pattern page shown in the image above, you can see that the printed text is much larger – perfect if you need to print a PDF but find the text is just too small to comfortably read.

Of course, if you don’t need a printout, you can simply zoom the PDF to any size you need so you can read it on your screen.

Although I’ve only ever had one request for large print patterns to date, I’m sure this technique could be useful for people with visual impairment, or anyone who needs to print a larger version of a PDF without losing any content off the edges of the printed pages – you can use this method to print any PDF file at a larger size if you need to, not just PlanetJune patterns!

Comments (4)

a portrait of Maui

Thank you all so much for your messages of sympathy on my memorial post for Maui – it’s meant so much to me. It hasn’t been easy adjusting to the Maui-shaped hole in our lives, but our sweet pup Maggie is doing her best to keep us happily occupied! I don’t know how I’d have coped without her.

I’ve sold or donated most of Maui’s things, just keeping a couple of his favourite toys, but I wanted to have something special to remember him by. And, while I was preparing my memorial post by looking though 16 years of Maui photos (almost 2000 pics!), I spotted one random photo from 2013 that looked like it had the potential to become something more than a quick snap.

Maui was sitting in front of the TV (with the screen off):

source photo for portrait of Maui - setting the scene

As I got closer and continued to snap photos, he gazed up and out of the window, probably watching a bird outside:

source photo for portrait of Maui, pre-editing

The sunlight highlighted his beautiful eyes and whiskers, and the dark TV screen made for a dramatic background. I thought that, with a little cropping and editing, I could make this into a stunning portrait – a fitting tribute to my most elegant boy.

At first, I thought all I’d need to do would be to crop the photo around his head and then remove the bottom right of the picture, where the wall and clutter shows below the bottom of the TV screen. But, of course, the more I tweaked and adjusted, the more things I noticed that needed to be perfected.

I used my graphics tablet to create a complex system of layers and masks to remove all the background in a way that looked natural. It definitely wasn’t the way a pro would do something like this, but this is the first time I’ve tried to edit a portrait beyond removing the occasional blemish or stray hair, so I did a lot of experimenting and refining.

I ended up having to draw in and blend the edges around every single whisker by hand after I brightened and recoloured the photo, and then added another mask to tweak the colours further. It became more of an artistic process then I’d expected!

As I’d only started with a crop of a quick snap, my starting image wasn’t the highest quality, so that added some challenges, but finally I ended up with a portrait that I think captures Maui’s beauty in a truly eye-catching way. Here it is:

photographic portrait of my Maui cat, by June Gilbank

What do you think? Wasn’t he the most stunningly beautiful cat?

I sent my picture off to be printed on canvas, and waited…

And here’s the result!

canvas portrait of Maui on the wall

A little bit closer…

canvas portrait of Maui

I love it! Although it makes me feel a bit tearful to look at it right now, I know I’m going to appreciate my portrait of Maui for years to come.

I’m so pleased I happened to notice the potential in that original photo, and spent half a day turning it into this magical tribute to my handsome boy.

Comments (9)

Next entries » · « Previous entries
  • Quick Links: Crochet

    navigation: arrow

    buy crochet patterns and accessories from my online store

    'Everyday Crochet' and 'The Essential Guide to Amigurumi' crochet books by June Gilbank

    Crochet video tutorials and step-by-step photo tutorials

    Free PlanetJune crochet patterns

    Frequently Asked Questions

    Quick Links: Crafts

    navigation: arrow

    Punchneedle Embroidery information, ebook & patterns

    Papercraft ebook & tutorials

    Free PlanetJune craft projects & tutorials

  • Blog Post Categories

  • Blog Archives

  • Welcome to PlanetJune!

    June Gilbank

    Hi, I'm June. Welcome to my world of nature-inspired crochet and crafting. I hope you enjoy your visit!

    If you'd like to get in touch, you can contact me here.
    crocheted Canadian flag by PlanetJune
  • A fanned-out pile of the books Everyday Crochet and The Essential Guide to Amigurumi, with text 'The answers to all your crochet questions at your fingertips - find out more'
  • Support PlanetJune!

    Want to say thanks? You can send me money in seconds at paypal.me/planetjune (over $20) or paypal.me/planetjune2 (under $20) or send me a donation through my shop.

    Or simply click through from my links before you shop at Amazon, Etsy, KnitPicks, LoveCrafts or Crochet.com, and I'll make a small commission on your purchase, at no cost to you! Start here:

    ♥ Support PlanetJune ♥

    Tip: This link is also in the footer of every page!

    Thank you so much for your support!