how to make a magic ring in crochet [video]
My magic ring tutorial seems to have become pretty much the definitive photo guide that people link to in their crochet patterns, but it’s not enough for everyone. It’s taken a while, but the much-requested magic ring video tutorial is finally ready.
Now, I know that 99% of my regular readers probably already know how to make a magic ring, but it may be worth your time to watch my video anyway – I have a special little tip that makes the technique much easier!
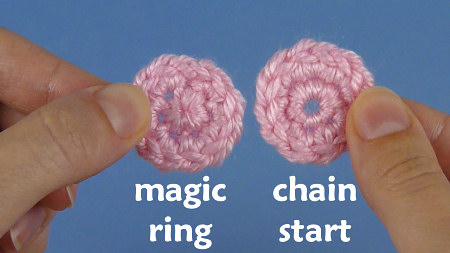
If you’re new to crochet, let me explain that the magic ring (also known as an adjustable ring) is an essential technique for crocheting in the round when you want to avoid the hole in the middle that you see when you start with a slip knot and chain and work into the chain. If you make, or want to make, amigurumi, you need this technique!
And now to the video tutorial (in right- and left-handed versions, of course):
Magic Ring for Crochet (right-handed)
Magic Ring for Crochet (left-handed)
Note: The videos may look a little small embedded in the blog: if so, you can fullscreen them or click through to YouTube (links: right-handed; left-handed) to watch them full-sized 🙂
Magic Ring Tips
- You can use magic ring in any amigurumi pattern – if it starts with a chain, just replace the starting ‘Ch 2, X sc in 2nd chain from hook’ with ‘Make a magic ring, ch 1, X sc in magic ring’.
- To work in joined rounds instead of the spiral I demonstrate, simply sl st into the first st at the end of Rnd 1, then ch 1 to begin the next round.
- Magic ring is also pretty handy for other crochet patterns worked in the round, too. For taller stitches, instead of the ch 1, you would ch 2 (for hdc), 3 (for dc), or more for even taller stitches, then work Rnd 1 of your stitches into the magic ring. Note that, with taller stitches, the turning (or non-turning, if you’re working without turning) chain typically does count as a stitch, so where I say to ignore the ch 1 in the video, you’d instead count that chain as the first stitch of Rnd 1, and sl st into the top of the chain before beginning Rnd 2.
If you enjoy my crochet tutorial videos, please help to spread the word about them, and/or subscribe to the PlanetJune YouTube channel.
Do you find my tutorials helpful? If so, please consider making a contribution towards my time so I can continue to create clear and concise tutorials for you:
Thank you so much for your support! Now click below for loads more crochet video and photo tutorials (and do let me know what else you’d like me to cover in future tutorials…)


Elin Duke said
I am so left-handed. Like another poster said, I can usually “translate” to left-handed from right-handed. But this magic ring thingy has eluded me for years. Even today with step-by-step pics and detailed instructions, my brain was going Nope Just Ain’t Getting this. Noper-oonies. Then I watched the video. and had this AHA moment so amazing that I was talking to my walls, asking them if they saw it too. There’s a finger switch-up move that no one ever mentions but is super important to the completion of the ringy thingy. Thank you, June!!! Blessings!!!
Debbie said
Thank you helps much. I finished two projects already but still did not know
How to make the proper manic ring. Your video for left handers was perfect. I think I will finally have it down.
Kristina said
Thank you for putting both left and right-handed instructions. Though I am left-handed, I find myself working upside-down like I am using right-handed instructions with my left hand. I can’t seem to get fully left or fully right down but because you have both, I feel hopeful that I can find a way that can work for me.
Angelica Dominguez said
Hello first let me start with a big thank u!! I’m not longed confused lol…..except for one thing and I can’t find the answer anywhere..do u make a knot after u pull the magic circle closed? I’m afraid it’ll come loose if I dont….help..thanks very much ahead of time
June said
You shouldn’t need to (I don’t!), but if you have a particularly slippery yarn and/or feel worried, you can either tie a knot or weave the tail through the backs of some of your stitches to secure it further.
Melinda Burns said
Hi June,
Thanks for the tutorial. It was very easy to understand. However, what do you do with the tag end that you pulled tight. Can you just cut it off?
Melinda
June said
Please don’t just cut the starting tail off, Melinda – your work will all unravel! If you’re making an amigurumi, you can leave the yarn tail dangling inside the piece. For any other crochet (garments, accessories, home decor, etc) you’d just weave in the yarn tail on the back of the work to secure it, as you do with all your other yarn ends.
Chitra Sampath said
Your instructions and video are so clear and personal I feel I am conversing with you, June.Thanks. Keep it up.
Sazgar said
Dear June said,
I like crochet very much, and I’d like to start learning it.Can you please advice me how to start it.
Thank you very much
June said
That’s great, Sazgar! Please see my beginner’s advice at www.planetjune.com/beginner 🙂
Patricia Wethmar said
Please send me instructions to make htr thank you Pat
WendyJ said
Aah.. Now I get it! I have tried to do this so many ways. Although I have succeeded, I’ve always been surprise that it worked. I wasn’t sure which end went where when the yarn was wrapped around my fingers. You’ve made it clear in this video. Thank you!
Yvette said
Thank you for the left-handed directions!
Rosie said
Thanks for this video, it is the best ! I have tried many and got yours right away. Rosie
Jenny said
I’m a beginner and would have given up if it weren’t for your fantastic videos, your instructions are very clear and easy to folow, well done and many thanks.
I have a basic question though: because i struggle to keep count of rows (despite using markers and/or yarn) I’m attracted to your instructions to work in rounds and therefore avoid a spiral. I’ve made several animals using the traditional spiral method but would like to know if I change to the round method, will the animals look much the same or will they look very different. Is there any reason not to use the round method all the time?
Thankyou,
Jenny
June said
Jenny, please read my post “the cleanest stripes in amigurumi: a comparison“, as it explains why working in spirals is usually preferable and the downsides of joining your rounds (this applies whether or not you’re making stripes!) The post also links onwards to the Perfect Stripes methods I developed for minimising the visibility of the seam – if you do decide to join all your rounds, using one of those methods will give you the best result.
And, to answer your other question, you can convert a basic amigurumi pattern designed to be worked in a continuous spiral into joined rounds, but only if it consists of simple, symmetrical pieces, so you can rotate each piece to have the seam at the back before assembly. This won’t work for most of my patterns as they usually have shaping and/or colour changes that means each piece has a ‘right way up’, so your seams may end up showing from the front and ruining the look of the amigurumi. I recommend you learn to work with continuous spirals if you can, as they do give the smoothest result. Make the stitch marker your friend 😉 And, if you still have problems with the spirals, come and ask for tips in the PlanetJune ravelry group and the PJ community will help you!
Joanna said
Hi June
thanks so much for explain the magic ring in your tutorial. This is so easy for me, now :). Greatins from Poland 🙂
Victoria said
I just wanted to say that this tutorial has saved me twice now! I first learned the magic ring from this very video when I was first learning amigurumi. I took a long break and forgot completely how to make a magic ring, and recently just looked up at least ten tutorials, and none of them were as clear and helpful as yours. Finally I can continue my amigurumi projects!
Ella said
Hey! Ur patterns are really good but i cant get to youtube so couldnt watch the video 🙁 i need help because my magic circle isnt flat and it starts turning in the shape of a basket! Please tell me what to do!
June said
If you can’t view videos, you can follow my magic ring step-by-step photo tutorial instead – you’ll find all my tutorials at www.planetjune.com/help 🙂
Sheila Rishworth said
Thank you so much for this tutorial in left handed. Brilliant!
Rosemary Foley said
Hello… thank you so much for the video, I have always hated the hole in the crochet project I am working on, so I am going to try this. I watched the video, and will watch it again, as I am hearing impaired and tried using the captioning, but it really wasn’t matching what you were saying.. so when I have a minute, I will practice.. this is such a great idea and from other comments it will be easy to learn. thank you again, I am hoping to learn to make some coasters or perhaps hot hats for my children’s homes !!! and mine of course.. thank you again very much..
Rosemary.. are you on facebook ???
June said
Rosemary, as an additional guide, you could also try following my step-by-step Magic Ring photo tutorial (linked at the top of this page) for my written explanation. And, yes! www.facebook.com/planetjune 🙂
Judith Stover said
This is the most amazing technique I’ve found in a long time! I’ve been crocheting for over 21 years and wish I had known this years ago. I make stuffed animals and characters for my kids and now grand kids. Many of the patterns start in a round and I often have to sew together the tell tale hole so stuffing won’t get pulled out by curious little fingers. I will begin using this immediately! Thank you!!!
Ariadne said
Hi June, I love your website and thanks particularly for the video tutorials, which are incredibly clear and very useful – especially love the one on invisible decreasing! Excuse my crochet ignorance, but can you tell me if I am correct in thinking that a pattern that starts like this:
Round 1: ch 4, sl st in the 1st ch to form ring.
Round 2: ch 1, dc 8 in the ring, sl st in the 1st dc st of row (8 sts).
can be substituted with this below to avoid a hole?:
Round 1: make magic circle, dc 4 in the circle, pull yarn to tighten circle and sl st in the 1st dc.
Round 2: 2 dc in each stitch (8 sts).
??? Does this give the same effect, but without the hole??
Thank you!
June said
Ariadne, not quite: Round 1 in the original pattern is just forming a circle to crochet into – the equivalent of making a magic ring. So you’d jump straight to Round 2 and crochet 8 dc directly into your magic ring.
Ariadne said
D’oh, I see, thanks! I was making it far too complicated for myself! Thanks for clarifying that. It’s surprising how many amigurumi patterns don’t instruct you to use the magic ring.
Thank you for taking the trouble to answer me, I appreciate that : )
Ari xx
Shawn George said
Thank you June for making such a clear video that even I could understand it and sucessfuly make a majic ring!
Suzanne said
Great video! I can finally do the magic ring thanks to you! I really appreciate all of your tutorials and videos. They are great aids for beginner crocheters!
natasha said
Thanks for this tutorial. I have made hundreds of hats but they always had a little hole in the top. I can’t wait to try the “magic circle” it seems so simple but at the same time a great idea! Thanks again 🙂
Lee Ann said
YAY! I finally get it!! I’ve looked everywhere to find how to make a magic ring, and I’ve never figured it out. Even with your photo tutorial, I just couldn’t quite get it. One time watching the video, and I’ve got it! I had to see every little step since I was missing some in the photos. Thank you! Not sure this lefty would have been able to figure it out watching the righty video. Thank you!!!!!!
Joan said
Thank you so much June for these lovely video tutorials. I’ve often wondered how to make a magic ring, and now I know, thanks to you. Brilliant!
Love Joan xx
BB said
Hello, I purchased a few of your patterns and I am really having a hard time with the legs. I am working on the Stegosaurus leg to be exact. . Same thing with attaching the head to the body, just not working out for me. Please let me know if you have any tips or tricks.
Thanks you!
June said
BB, I tried to email you about this, but you gave me a fake email address…
Assuming you’re just having difficulty attaching the pieces neatly, I recommend my Seamless Join tutorial.
(I show it on a much larger piece, but the principle is the same for any sized piece). You can also look at my older tutorial, Joining Amigurumi, which also works well and is demonstrated on similarly-sized parts to the steg legs and head.
If you need more help, please give me a real email address so I can get in touch with you!
Wendy Hampton said
Oh my! This is such an amazingly simple to understand procedure and totally solves my problem with that annoying hole. I got here through Pinterest and am thankful I found you. Wonderful video!
pam said
Thank you 1,000 times! I did finally figure it our using the written tutorial but if i don’t make a magic ring for a month or so most likely i will need the refresher and this will be wonderful to have.
I totally love your magic ring – can’t remember if it was Alice or Diane that pointed me in your direction, but however i got here, I am so glad I did!
Lisa said
Thank you so much for this tutorial and video. It has changed the way I crochet…I love to make hats etc and always despaired of getting the ring small enough. Thank you again!
Jana said
So glad to have a good video of this! I do one thing slightly different that has really worked well for me. I pull the first chain one really tight so it is kind of a knot. This helps two ways. 1 it tightens the ring up so it’s easier to put down if I need to as it keeps the ring in place, and 2 and most important, I never mistake it for a stitch and the “bump” is not at all noticible. 🙂
June said
You can see in the video that my ch 1 is quite small too – you’d have to battle to try to work into it! (It just happens naturally when you have your yarn under tension – that’s why you have to chain loosely if you plan to work back into those chains, e.g making a starting chain when you’re working in rows.)
I find that if you pull the ch 1 closed into a knot, it makes it much more difficult to insert your hook into the first stitch of Rnd 1 (when you begin Rnd 2), so it actually works better if you leave a little give in the chain stitch – but of course, whatever works for you is the method you should use 🙂
Monica said
Thank so much for making it a video!!! Your pictures and instructions in your patterns are amazing but this video is greatly appreciated! It’s nice to know that when you do it the same way as the designer your projects will hold up 😀 Thanks!!!
Sarah-Jane Corrado said
GENIUS! I feel like my whole crochet world has changed now. That annoying hole is gone from my projects! Thank you so much for your help! You rock!!!
concretemoomin said
Great video. I’d already learnt how to do this by using books on crochet but this video is very clear and easy to follow. I also didn’t realise that it’s better to tighten the closed centre hole after completing the second round of stitches, or that there’s a risk of it loosening again unless you pull really tight. Thanks for this, it’s really helpful :).
June said
Thanks, concretemoomin. That part is my own innovation – I realised it works better that way after many years of practice!